Making games with C# and Unity – Beginner’s Tutorial


Guest post by Sondre Agledahl: Games programmer, CS student and Microsoft Student Partner at UCL
Microsoft Student Partners ran an introductory workshop to game development with C# and Unity at UCL. The workshop was a great success and we covered a lot of important topics, but due to time constraints we weren’t able to finish the game we were planning to make at the event. For the benefit of attendees who wanted to complete the game in full (as well as for the many who wanted to attend but weren’t able), we’ve decided to post this web tutorial covering how to make the game from start to finish.

The game we want to make is an updated 2.5D version of the 1977 game Combat for the Atari 2600 (pictured below). Similarly to that classic, our game is a two-player top-down shooter game, where your objective is to shoot and eventually destroy your opponent’s tank.

Section 1 – Setting up our game scene
We begin by creating an empty Unity project, giving it a descriptive name (“SuperTanks” seems appropriate). Once Unity has finished loading an empty scene, import our special MSP Unity StarterPack (which you can freely download from https://bit.ly/UCLMSP18). You can import custom asset packs by clicking on Assets -> Import Package -> Custom Package… in Unity’s menu bar at the top of the screen.
From here, open the newly imported “Prefabs” folder and drag the Tank prefab into your scene hierarchy.

Remember to save your Unity scene with an appropriate name (“Level1”) either through File -> Save Scenes or by pressing CTRL+S (it’s a good habit to get into pressing these at frequent intervals to make sure you don’t lose any progress).
From here, we want to create the primary floor of our level mesh. Insert a plane into your scene by clicking on GameObject -> 3D Object -> Plane. Ensure your newly created plane is centred at position (0, 0, 0), which should be directly below the tank, as pictured below.

Navigate to the Materials folder and find the “GroundMat” material. Drag and drop it onto your newly created Plane object to apply a simple brown dirt texture to it.
  |
|||
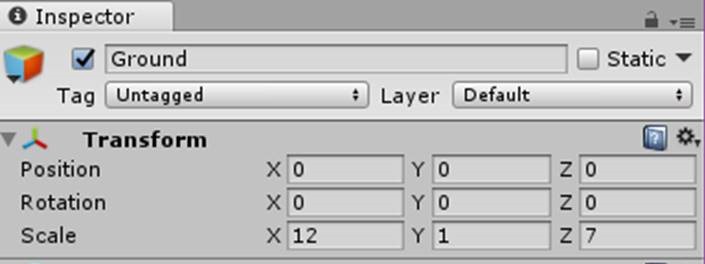
Next, we want to resize our plane to create a play space of a similar size to that of Atari Combat. Select your Plane object in the Hierarchy and change its scale values to (12, 1, 7). For organisational purposes, let’s also rename our plane object to “Ground”.
With our new Ground object set up, we’ll position our camera so that it captures this entire play space.
Select your Main Camera object in the Hierarchy and move it so that it is above the Ground and Tank objects, facing downwards. If you’re adjusting values manually, you can set the Main Camera’s position to (0, 63, -25), and its rotation to (70, 0, 0). Your scene should look similar to that pictured below:

Next, let’s start to think about how we want our Tank to behave. Since our Tank is going to be a solid, physical object in our game, we are going to want to add both a Rigidbody and a Box Collider to it. Simply select your Tank object and click on the Add Component button at the bottom right of the screen in the Inspector view, find the Rigidbody and Box Collider components and add them.

As a simple introduction to movement and input, we’ve included a PlayerMovement script as a part of the MSP Unity starter package. Navigate to the Scripts folder and drag the PlayerMovement file onto your Tank object. Provided you’ve set up the Tank’s other components correctly, you should now find that by building and running your game (pressing the Play icon at the top middle of Unity), you can move your tank around the play space with the W-A-S-D keys.

Once you’ve had a play with moving your Tank around your scene, remember to apply your changes to the Tank prefab, so that every other Tank copy we make in the future will have the same components that we just added applied to it. (With your Tank object selected, find the Prefab options in the top of the Inspector view on the right side of the screen, and click on Apply.

With your changes applied to the Tank prefab, you can now experiment around with inserting another tank and setting the value of Player Number (on the PlayerMovement component) to 2. The script will now respond to input from the UP-DOWN-LEFT-RIGHT arrow keys on your keyboard instead, allowing for two-player movement. (We will have a more detailed look at multiplayer integration later, so you can delete your second Tank object once you’re done testing out this basic movement.)
Section 2 – Firing missiles
One core piece of functionality we want in our game is for our Tank to be able to fire missiles – so let’s write a script that does just that. With your Tank object selected, click on Add Component in the lower right of the Inspector view, and select New Script. Name your new script appropriately (I will call mine MissileGun) and press Create and Add. Double-click on your newly created script and it should open up in Visual Studio (or your IDE of choice).
 |
 |
||
The empty script will contain two empty functions – Start (which is called once when our object first enters the scene), and Update (which is called every single frame of the game). Since we want to fire our missiles in response to user input (which can happen at any point), we want to add our functionality into the Update function.
Before we implement our missile firing, however, let’s declare a few important variables that we’re going to need. At the top of your script, declare a public int variable called “playerNumber” (with a default value of 1), and a public GameObject variable called missilePrefab. 
If you now switch back into Unity, you should find that these two variables now have become editable fields inside our MissileGun component that we can access our change from inside our Unity editor.

Now that we have a way to influence our scripts from inside Unity, go back inside the Prefabs folder and drag the Missile prefab into the empty Missile Prefab field on our Tank’s MissileGun component.
We now have access to our Missile object inside of our script, so let’s begin thinking about the conditions for shooting them. We want to spawn our missiles in response to input from the player, so let’s take a look at which buttons we have available to read from inside Unity.
Inside your Unity window, click on Edit -> Project Settings -> Input to open up Unity’s Input Manager (it should appear on the right-hand side of the screen). Here you can see a list of all the buttons that are defined in Unity by default. Notice the “Fire1” and “Fire2” buttons; we will configure these to be the button for firing missiles for our Player 1 and Player 2 respectively.

The Positive Button field for each input button denotes which keyboard key Unity checks for to determine whether the button in question was pressed. In order to make the game easiest to play for two players on a single keyboard, let’s change Positive Button for the “Fire2” button to “right ctrl”.
With this simple change applied, go back into Visual Studio (or your IDE of choice). We want to spawn our missile in response to the player pressing either the “Fire1” or “Fire2” buttons, so we will make the following changes to our Update function:

Here we’re making use of Unity’s handy Instantiate function, which takes in a GameObject reference, a position and a rotation value as parameters, and inserts that GameObject into our scene. Since we want to spawn our missile prefab, we pass in our missilePrefab variable as the first argument. The transform.position and transform.rotation variables refer to the current position and rotation of our Tank object, so we pass those in as well.
The Input.GetButtonDown function takes in the name of a Unity button and returns true if the user pressed that button during the current frame. By concatenating the string “Fire” with our playerNumber variable, we make Unity check for either “Fire1” (the left CTRL key) or “Fire2” (the right CTRL key) depending on what whether we’ve set playerNumber to 1 or 2.
Go back into Unity and press the Play button to play around with the current state of our game.

You should find that you can now spawn a trail of missiles in your Tank’s path with repeated presses of the CTRL key. Not exactly the behaviour we were going for, but we’re getting closer.
Let’s start moving closer to what we want by editing our Missile prefab. Drag the prefab from inside the Prefabs folder into your scene to create a new Missile instance. Just like our Tank, we want our missiles to be affected by Unity’s physics engine, so let’s add a Rigidbody component to our Missile instance.
We also want our missiles to collide with other objects in our scene, so let’s add a Capsule Collider component to it as well. You may find that Unity’s default size and position for this Capsule Collider don’t exactly match the shape of the missile, so edit the properties of this component until they do. (My settings are Center: (0, 0, 0), Radius: 0.3, Height: 2.5 and Direction: Z-axis).

Remember to Apply your changes to the Missile prefab when you’re done editing its components!
With these changes applied, you can do some more playtesting. You may notice that after making our missiles into physical, collidable objects, they cause our Tank to twirl around and bounce up and down around the scene. We’ll want to make a few adjustments to make sure this doesn’t happen.
 |
Select your Tank object and find its Rigidbody component. Under the Constraints option, tick the boxes for Freeze Rotation in X and Z. This will ensure that our Tank only rotates around the Y-axis (which is what we want it do in response to user input).
Next, let’s make a few adjustments so that our missiles spawn from a position just in front of the tank’s cannon instead of in the middle of it.
Right click on your Tank object in the Hierarchy view and select Create Empty. This will insert an empty GameObject into your scene that is “childed” to the Tank – which means that its position and rotation will always be relative to that of the Tank (so that when the Tank moves around the scene, this child object will move alongside it).
 |
|||||
Rename this empty GameObject with an appropriate name (such as “Fire Transform”), and move it to a location in front of the Tank where you want missiles to spawn from (I’ve set mine to position (0, 2, 5)).
From here, let’s get hold of a reference to our new Fire Transform object from inside our MissileGun script. Open your script again and declare a new public variable of type Transform called “fireTransform”.

Just as before, if you now go back into Unity, you will find that a new empty field (Fire Transform) should appear in your Tank’s MissileGun component. Take our newly created Fire Transform object and drag it into this empty field.

Back inside our MissileGun script, let’s change our call to Instantiate so that our missiles are spawned at the position of our Fire Transform object rather than our tank’s position:

Again, remember to apply your changes to the Tank prefab! If you now have a play with the game, you will see that our missiles behave much closer to how we want them to.
The astute reader will still notice that our missiles aren’t flying off into the air the way we would expect them to. Let’s change that by applying a force to them right after they’ve been spawned.
Let’s start by declaring another public float variable that defines the magnitude of the force we’ll be applying at the top of our script (I’ve set mine to a default value of 2000):

Now we can apply this force to our missiles in the following way:

Here we’re temporarily storing a reference to our newly spawned missile object inside the missile variable, then using the GetComponent function to retrieve its Rigidbody component. Finally, we call Unity’s AddForce function on the missile’s Rigidbody.
Because a force has both magnitude and direction, we have to pass in a vector object into this function. The handy transform.forward variable always contains a unit vector that points in our Tank’s “forward” direction, which is the direction we want our missiles to move in. We scale this vector with our fireForce variable in order to fire them off with the appropriate magnitude.
Test your game to confirm that your missiles are now finally blasting off into the air in a semi-realistic fashion.

As a final touch to our missile-firing functionality, let’s add a sound effect to play when our missiles spawn. Find your Missile prefab again and add an Audio Source component to it. Navigate to the Sounds folder, and drag the Fire.mp3 file into the empty AudioClip field on the Audio Source component.

Section 3 – Explosion Physics
We now have some satisfying missile-firing mechanics going, but our missiles are still just colliding against the floor and grinding to a halt like any other object when they fall. We would much prefer to have them explode instead.
If you’ve had a peek in the Prefabs folder, you will see that you’ve already been provided with an Explosion prefab. This prefab contains a collection of flashy-looking particle effects that we’ll want to spawn when our missiles collide with something.
On your Missile prefab, create and add a new script with an appropriate name for what we’re about to do (such as “MissileExplosion”), and open it up in your IDE. Just as we’ve done before, let’s declare a public GameObject variable at the top of our script to hold a reference to our Explosion prefab.

Drag the Explosion prefab into the field that corresponds to this new variable.

Now let’s Instantiate a copy of this Explosion prefab every time our Missile collides with something. We’re going to accomplish this using the Unity function OnCollisionEnter, which will be automatically called on any object with a Collider component the moment it collides against another object.
Inside your MissileExplosion script, simply start typing OnCollisionEnter, and Visual Studio should automatically give you the appropriate auto-complete option for the function we’re looking for (just hit TAB or RETURN on your keyboard to confirm your choice). If for whatever reason your IDE doesn’t provide you with this auto-complete help, just copy the function definition below into your MissileExplosion script:

Now, inside the OnCollisionEnter function, we want to spawn our Explosion prefab, and then remove our missile from our scene. We’ll accomplish this by adding the following lines to the function:

Like earlier, we’re Instantiating our explosionPrefab at our current position. The variable Quaternion.identity, though cryptic-looking, simply means that our explosion will spawn with no rotation applied to it. (We prefer not to pass in our Missile’s rotation here, as that would spawn our explosion effect rotated at weird angles depending on the orientation of our Missile.)
Once our explosion has spawned, we remove our missile from the scene by calling the aptly named Destroy function, passing in the gameObject variable, which holds a reference to the object this script is attached to (our Missile, in this case).
You can give your game another test-run now to confirm that our explosion effects are spawning as expected.

From here let’s back up our newly added explosion effects with some actual physics. After we’ve spawned our explosion prefab, we want to apply an appropriate explosion force to all objects that happen to be close by.
We can accomplish this with another convenient built-in function called Physics.OverlapSphere. This function will create a virtual sphere around any point in space and return a list of all the Collider components that fall inside its radius.
To implement this, let’s start by declaring one float variable to define the radius of our explosion (I’ve set mine to a default value of 5), and another to define the magnitude of the explosion force we want to apply to all surrounding objects (which I’ve set to a default value of 1000).

Next, we’ll insert a call to Physics.OverlapSphere right after we’ve spawned our explosion effects, passing in the current position of our missile and the radius we want our explosion to have:

From here, let’s go through each of the Collider components that were inside the virtual sphere (using a foreach loop) and apply an explosion force to them using the Unity function AddExplosionForce. Recall that in order to add a force to an object, we need to first get its Rigidbody component, so let’s do the following:

Here we temporarily store each object’s Rigidbody component inside the targetBody variable. We also have to make sure the object we’re trying to push actually has a Rigidbody component attached – this is why we insert the check for targetBody == null and continue to the next iteration of the loop if no Rigidbody was found.
The AddExplosionForce function takes in a value for the magnitude of our explosion force, as well as the position and desired radius of our explosion. From there, Unity will automatically calculate the appropriate force to apply to the object depending on how far away from the centre of the explosion it is.
If you’ve made it this far, congratulate yourself by giving your game another test-run. You can now insert another Tank prefab into your scene (remember to set the value of Player Number on the PlayerMovement and the MissileGun components to 2 for this second Tank!) and test that the explosion physics are working as they should. In its current state, you already have a rather enjoyable game of king-of-the-hill, as you can push your fellow Player off of the play space with a well-placed missile.

As a final touch to our explosion mechanics, let’s add another sound effect to play when our missiles explode. Find your Explosion prefab and add an Audio Source componentto it. Inside the Sounds folder, find the Explosion.mp3 file and drag it into the empty AudioClip field.
Section 4 – Setting up a win condition
Our current physics simulation is good fun, but doesn’t exactly resemble Atari Combat in its mechanics. Let’s set up a health system for keeping track of how many times each Tank has been hit, and for ending the game when one Tank has taken too many hits in a row.
Select either your Tank prefab or one of your Tank objects in the scene (if you’re editing a Tank instance, remember to apply your changes to the prefab when you’re done!), and create a new script. (I’ll call mine simply “Health”). Open your new script in your IDE.
To start with, declare a public int variable to determine how much health a Tank has at the beginning of the game (I’ve set mine to a default value of 5). From here, we’ll declare another private int to keep track of how much health our tank currently has at any given point in the game.

Inside the Start function (which you’ll recall is called by Unity on every script when that object first enters the scene), we’ll set currentHealth to the value of startHealth, so that our Tanks start out with a maximum health value when the game begins.

From there we’ll want to set up a way for other components to interact with our Health script to make our tanks lose health. We can accomplish this by creating a new public function that decrements the value of currentHealth every time it’s called:

We can now call this new TakeDamage function from anywhere in order to decrease the health of one of our Tanks.
Of course, we’ll want to have a mechanism in place to end the game once one of our Tanks’ health drops to zero. Let’s create another simple Die function that we call whenever this happens. Inside Die, we can simply destroy our Tank’s GameObject for the time being to indicate that the game is over.

We now have features in place to make our Tanks take damage, but we’re not actually using them anywhere. We want our Tanks to take damage whenever they are hit by a Missile’s explosion, so let’s return to our MissileExplosion script and add this extra functionality.
Inside of MissileExplosion’s OnCollisionEnter function, we’re already going through every object that is within range of our explosion, so let’s insert another few lines here to apply damage to any object in range that also has a Health component:

Notice that we can use Unity’s GetComponent function to access even our own user-defined components, such as Health. Just as we did before applying forces to nearby Rigidbodies, we also have to make sure to check whether or not the object we’re looking at actually has a Health component before we call the TakeDamage function.
We now have a suitable win condition in place! You may find it a bit difficult to kill your fellow player without knocking them off the playing field first, however. Let’s sort that out by adding some walls around our play space.
You can add walls by simply inserting a few cubes into your scene (GameObject -> 3D Object -> Cube from the menu at the top of Unity), resizing, rotating and moving them to the edge of the play space accordingly. If you navigate to the Materials folder, you can find the WallMat, which you can drag and drop onto your Cubes to give them a rusty metal look.
I set up my level’s walls in the following way: After inserting a Cube and applying the WallMat to it, I scaled it to (5, 5, 75) and moved it to the left edge of the play space. I then duplicated the cube (right click on it in the Hierarchy and select Duplicate) and moved the copy to the right edge. I then made another duplicate, set its scale to (5, 5, 125) rotated it 90 degrees in Y and moved it to the top edge. Finally, I duplicated this wall one last time and moved it to the bottom edge.

Now that we have all of the components we want on our Tanks in place, let’s also apply a different Material to our second Tank so they are clearly differentiated. With your second tank selected in the Hierarchy, find its Mesh Renderer component and expand the Materials array option. Inside the Materials folder, find Player2Mat and drag it into the first element of the second Tank’s Materials array.


Section 5 – User Interface
The only thing that remains for us to do to recreate Atari Combat in modern form is to display each player’s current score on some sort of on-screen HUD. We’ll accomplish this using a UI Text element.
Insert a UI Text object by clicking on GameObject -> UI -> Text. You’ll notice that doing this inserted not only a new object called Text into your scene, but also a Canvas and an EventSystem. If you double-click on the Canvas object in the Hierarchy to zoom in on it, you may be startled to find that it is actually a giant rectangle that sits somewhere far removed from the rest of our level. As it turns out, there is a natural explanation for this.

The Canvas object, which is the parent object of all UI objects in Unity, actually exists in a different “space” from all of our other objects. Our Tanks, walls, Ground and Missiles exist in what’s known as “World Space” – the virtual 3D coordinate system of our game. The Canvas and all the objects childed to it, meanwhile, exist in 2D “Screen Space”. Screen Space coordinates are determined by the size of the player’s screen, and objects that use it will by default always render on top of all other objects.
To start with, select your newly created Text object and edit its Text component. Select the Color property and set it to white.

You can now confirm that the Text object does in fact appear on top of everything else by switching to Game View (or by pressing the Play button and running the game).

Let’s make some more changes to our Text object. Select Unity’s UI Editing tool in the top left-hand side of Unity (or by pressing the T key on your keyboard).

Using this tool, move the Text object to the top left of the Canvas. Rename this object to “Player 1 Score”. From here, find its Text component again and set its Font Style to Bold, and its Font Size to 26. Fill in the Text field with placeholder numbers to represent Player 1’s score (I’ll just use “999999999”).
Duplicate this Player 1 Score object and rename it “Player 2 Score”. Move Player 2 Score to the top right corner of the Canvas, and edit its Alignment property to be right-aligned. You should end up with a Canvas that looks like the following:

With that, we have an on-screen HUD in place for displaying our players’ scores. Of course, our text elements are still completely static and will not change during play. Let’s do something about that.
Select your Canvas object in the Hierarchy and add a new script to it with a descriptive name (I’ll call mine “ScoreManager”). Open it up in your IDE.
As we saw when editing our Text objects, the component responsible for what text to display on the screen was the aptly named Text component, so these are the components we want to be editing inside our script. Unfortunately, Unity doesn’t grant us access to these components by default, so we’ll have to include the following line at the very top of our ScoreManager script:

This using line will import all of the components associated with UI. Having addressed that, let’s start our script by declaring two public variables of type Text (I will call mine “player1ScoreText” and “player2ScoreText”).

Similar to what we’ve done before, populate these new public variables by dragging the Player 1 Score and Player 2 Score objects into the corresponding empty fields on the Canvas in Unity.

We can now edit what text to display inside our Text objects anywhere we want inside our script. Let’s start by setting both of them to display “0” when inside our ScoreManager’s Start function:

Notice that in order to change the text that displays on each Text component, we have to assign a different string to its text property. (The term “text” has been heavily overloaded here, so if you’re confused, just take care to copy the above two lines carefully until you get the desired effect.)
If we now Play our game, we’ll see that our Text objects indeed start off by displaying “0” when the game runs.

All that remains now is for us to change what these elements display in response to a Tank getting hit by a missile. In order to accomplish that, we’ll have to declare another two private int variables to keep track of each player’s score. We’ll set both of these to a default value of 0 to represent each of our players’ score at the start of the game.

From here, let’s think about how we would want outside components to interact with our ScoreManager to increase a player’s score. A player’s score should go up if they managed to hit their fellow player with a well-placed missile. The easiest way for us to detect when this has happened would be inside our Health script whenever the TakeDamage function is called.
With this in mind, let’s create a public function inside our ScoreManager script that takes in the number of the player that just took damage and increments the value of the other player’s score. (I’m going to call this function “OnPlayerDamaged”.)

Finally, we want to make sure we’re updating our Text elements to display each player’s new score as soon as it changes:

Note that the text property expects to be assigned a string value, which is why we have to apply the ToString function to the player1Score and player2Score variables before we assign them to the Text elements.
All we have to do now is insert a call to this new function inside our Health script. Before we do that, however, we need to declare another public int variable inside of Health so we can keep track of which player took damage.

We’re also going to need a way to access our ScoreManager script from inside of Health. We can do this in the same way that we did before, by declaring a public ScoreManager variable and simply dragging it into the empty field.
This time, however, because we know that there will only be one ScoreManager in our scene at any time, we can make use of another handy Unity function instead – FindObjectOfType:

The FindObjectOfType function will search through our current scene and return the first object it finds of a certain type, which is why it’s enough for us to declare a private ScoreManager variable to hold the reference we need.
Finally, let’s insert the appropriate call to OnPlayerDamaged inside of our Health script’s TakeDamage function:

And with that – congratulations! You now have a fully working version of Atari Combat, updated for the modern era. Make sure to playtest your game to make sure everything is working as it should. (Remember to set the correct Player Number value for each Tank’s PlayerMovement, MissileGun and Health component respectively.)
It’s now up to you how you want to design your level. Personally, I will do my best to recreate the classic design of the Combat level pictured at the beginning of this tutorial by moving and shaping a set of cubes:

Conclusion
Thank you for sticking through with this tutorial until the end and for persevering through with making a complete game! Whether or not you made it out to our workshop in person or not, I hope you’ve picked up on a number of key concepts about making games in Unity and C#.
Feel free to take a look at the source code for the completed game at https://github.com/colonelsalt/SuperTanks if you want to compare your implementation to mine.
If you’re looking to improve or expand upon the game from here, there are certainly many directions you could take it. Let me offer a few suggestions off the top of my head:
· You’ll notice we have a couple of unused sound effects inside our Sounds folder. Can you think of a suitable place to insert these in the game? What actions should trigger them to start or stop playing?
· Is it really fair that a player can damage him- or herself with their own missile and give their opponent points? What changes could you implement to make sure that only an opponent’s missile can damage a given Tank?
· Typically games will have some functionality in place to prevent a player from taking damage too quickly in a row by making them invincible for a second or two after they take damage – how could you go about implementing this?
· What if we want to play another round immediately without closing down our game and re-opening it? What mechanisms would have to be in place, and which variables would have to be reset in order for a “Play Again” button to work as expected?
Project asset credits:
· Low-Poly Tank Assets by PixelMannen: https://opengameart.org/content/low-poly-tank-assets
· Small Explosives Pack by mrpoly: https://opengameart.org/content/small-explosives-pack
· Short Explosion 1 by ProjectsU012: https://freesound.org/people/ProjectsU012/sounds/334266/
· Gun, pistol, single shot silenced, Walther pp7 by John J: https://www.zapsplat.com/music/gun-pistol-single-shot-silenced-walther-pp7/
· Tada Fanfare A by plasterbrain: https://freesound.org/people/plasterbrain/sounds/397355/
· Combat Plan by PlayOnLoop.com: https://www.playonloop.com/2018-music-loops/combat-plan/
· Seamless Ground Textures by TutorialsForBlender: https://www.tutorialsforblender3d.com/Ground/Page2
· Metal Rusty and Patterned by maxTextures: https://www.mb3d.co.uk/mb3d/Metal_Rusty_and_Patterned_Seamless_and_Tileable_High_Res_Textures.html