Creating Generic USD Toolbar Button
Have you ever questioned whether we can create a generic USD Toolbar with Toolbar Button that you can apply to all needed Hosted Controls? Sound’s to be a familiar requirement, right? Is that Possible?
Yes, it is. To avoid having to create a separate toolbar for each hosted control, USD provides the flexibility to create generic toolbar with toolbar buttons that can be applied to all or the needed hosted controls. You can club the commonly used toolbar buttons and its functionality into a generic toolbar item and assign it across the needed hosted controls. You can create special generic actions that apply to controls for the toolbar it came from.
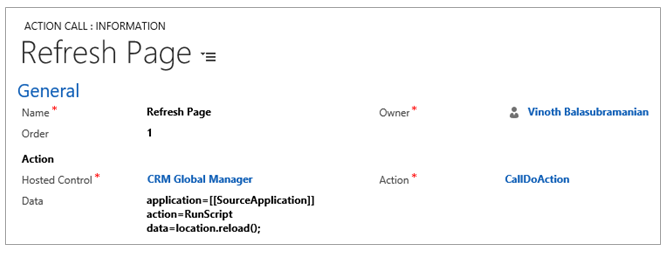
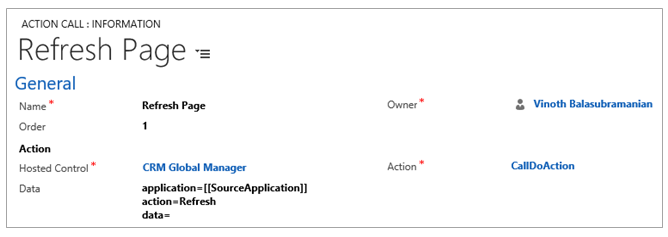
CRM Global Manager will allow you to perform this operation. Use CallDoAction on CRM Global Manager with application,action and data parameter’s to perform this request.
application=[[SourceApplication]]
action=<The action you want to call>
data=<The data you want to pass>
[[SourceApplication]] will contain the name of the application whose toolbar the call originated from. It will then call do action on the hosted control that the toolbar is attached to.
Below generic action call is sample(s) of how to invoke the Refresh action on using CallDoAction.
Example:
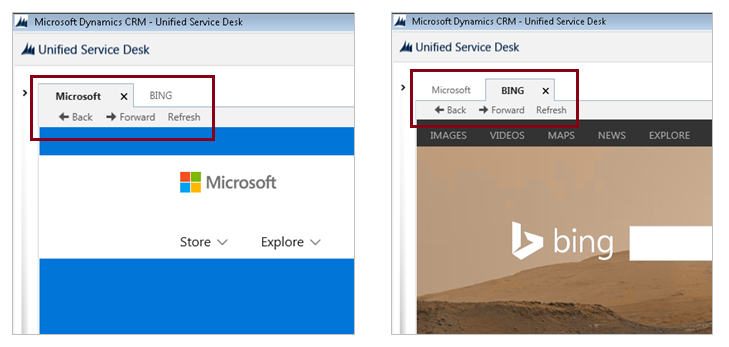
To illustrate it better, In the below example we will create a new generic toolbar with 3 toolbar buttons (Back button, Forward button, Refresh button) and assign it to 2 new Hosted Control’s.
Creating new Hosted Controls: In the below steps we will be creating 2 new Hosted Controls in USD for loading web pages. For more details on USD Hosted Control refer here.
- Login to CRM. Navigate to Settings --> Unified Service Desk --> Hosted Control.
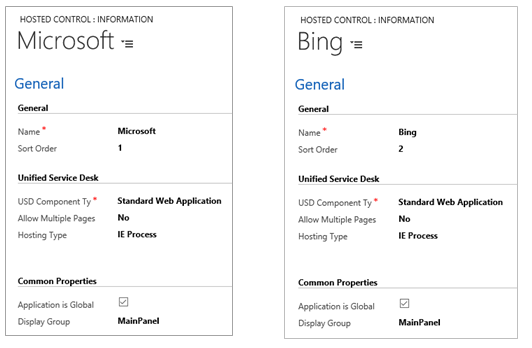
- Click NEW to create a new hosted control record and enter the below mentioned details.
- Name: Microsoft
- Sort Order: 1
- Display Name: MICROSOFT
- USD Component Type: Standard Web Application
- Allow Multiple Pages: No
- Hosting Type: IE Process
- Application is Global: Checked (Yes)
- Display Group: MainPanel
- Click ‘Save and Close’ to save and close the record.
- Click NEW to create a new hosted control record and enter the below mentioned details.
- Name: Bing
- Sort Order: 2
- Display Name: Bing
- USD Component Type: Standard Web Application
- Allow Multiple Pages: No
- Hosting Type: IE Process
- Application is Global: Checked (Yes)
- Display Group: MainPanel
- Click ‘Save and Close’ to save and close the record.
Creating Action Calls and associating to Events: In the below steps we will be creating Action Calls and hooking it to events to load web pages into the newly created Hosted Controls. For more details on Action Calls refer here.
- Navigate to Settings --> Unified Service Desk --> Events.
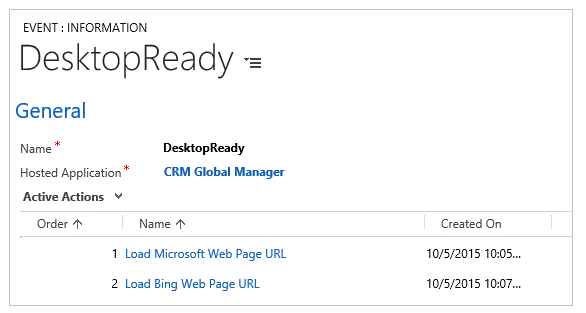
- Search and Open ‘DesktopReady’ event record.
- Add a New Action Call to the DesktopReady event record using the below mentioned details.
- Name: Load Microsoft Web Page URL
- Order: 1
- Hosted Control: Microsoft
- Action: Navigate
- Data: url=https://microsoft.com
- Click ‘Save and Close’ to save and close the record.
- Add another New Action Call to the DesktopReady event record using the below mentioned details.
- Name: Load Bing Web Page URL
- Order: 2
- Hosted Control: Bing
- Action: Navigate
- Data: url=https://bing.com
- Click ‘Save and Close’ to save and close the record.
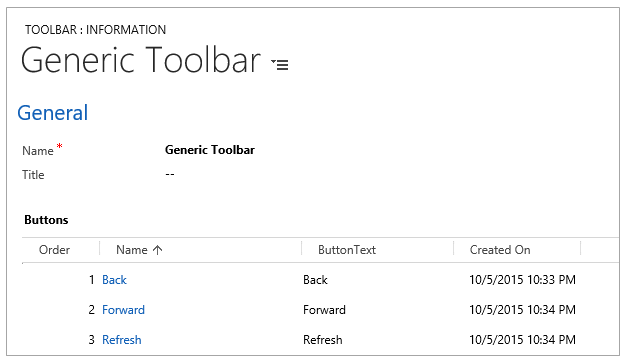
Creating Generic Toolbar & Toolbar Buttons: In the below steps we will be creating a new Toolbar with 3 new Toolbar buttons (Back button, Forward button and Refresh Button). For more details on Toolbar refer here.
- Navigate to Settings --> Unified Service Desk --> Toolbar.
- Click NEW to create a new toolbar using the below details.
- Name: Generic Toolbar
- Title:
- Order: 1
- Click ‘Save’ to save the record.
- Select ‘Hosted Control’ in the toolbar related record and add the below mentioned hosted controls using the ‘ADD EXISTING HOSTED CONTROL’ option.
- Microsoft
- Bing
- Create NEW toolbar buttons (Back Button) for the newly created toolbar using below details.
- Name: Back
- Image: msdyusd_Back
- Button Text: Back
- Order: 1
- Create another NEW toolbar buttons (Forward Button) for the newly created toolbar sing below details.
- Name: Forward
- Image: msdyusd_Forward
- Button Text: Forward
- Order: 2
- Create nother NEW toolbar buttons (Refresh Button) for the newly created toolbar sing below details.
- Name: Refresh
- Image:
- Button Text: Refresh
- Order: 3
Creating Generic Action Call’s for Toolbar Buttons: In the below steps we will be creating a generic action calls for each of the toolbar buttons created in previous step. For more details on Action Calls refer here.
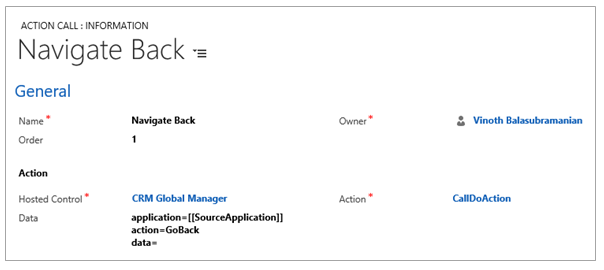
1. Add a NEW Action Call to ‘BACK’ toolbar button as mentioned in below screenshot.
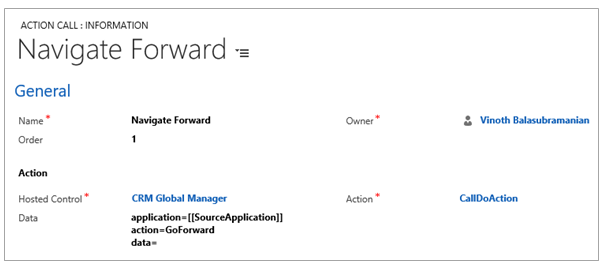
2. Add a NEW Action Call to ‘FORWARD’ toolbar button as mentioned in below screenshot.
3. Add a NEW Action Call to ‘REFRESH’ toolbar button as mentioned in below screenshot.

As you can see all the above 3 action calls are not tagged against a specific Hosted Control, they are tagged in a generic way such that they can interact with any of the calling hosted control using [[SourceApplication]] parameter.
Once all the above mentioned configurations are performed, you can go ahead and launch USD. You will see that all 3 toolbar buttons will be displayed and working in both the newly configured hosted controls as shown the below screenshot.