Tutorial 2-- Creating Your First VSPackage
Here's a preview of the new Tutorial 2. It's been updated for Visual Studio 2008 and Windows Vista.
The menu event handler section has been rewritten to use the .vsct format.
Submitted by Martin Tracy. This posting is provided "AS IS" with no warranties, and confers no rights.
Tutorial 2: Creating Your First VSPackage
A VSPackage is the unit of extensibility you build when extending to Visual Studio.
At the core, a VSPackage is a co-creatable COM object that implements the IVsPackage interface.
However, by using the Managed Package Framework (MPF) introduced in Visual Studio 2005,
you no longer need to implement the IVsPackage interface yourself because it provides a base class
implementation that you can inherit from. The interface is completely abstracted and you will not even see it.
We will use the MPF throughout this and other tutorials.
The VSPackage wizard creates a VSPackage project in Visual Studio that consists of everything you need
to create your extension. The VSPackage project includes several source and configuration files,
including a file that includes a class that you name when you set up the project.
This class is derived from a class called Package (supplied by MPF) and includes attributes that
define how your VSPackage should operate with Visual Studio. Additionally, this class contains
initialization code and other code such as menu item handlers.
This class is the foundation of your VSPackage.
In this tutorial, you will create a new VSPackage and customize the VsPkg.cs file in various ways.
You will learn how to:
· Create a VSPackage with the project wizard.
· Implement the menu item handler.
· Add a default keyboard shortcut.
· Add custom information to Splash screen and Help/About dialog box.
· Obtain and use a Package Load Key.
Create a VSPackage with the project wizard
1. Open Visual Studio 2008.
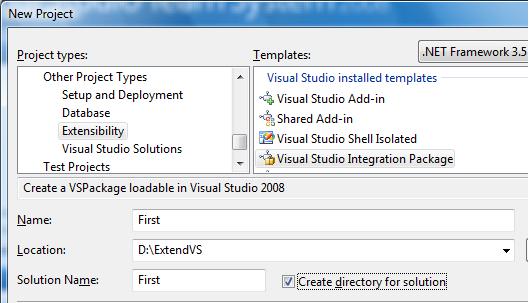
2. On the File menu, point to New, and then click Project. In the New Project dialog box,
expand Other Project Types in the left tree view and click Extensibility.
Under Visual Studio installed templates on the right, click Visual Studio Integration Package.
Check Create Directory for Solution, then type in First in the Name field.
Type in a good Location for the solution, such as D:\ExtendVS. Click OK.
3. On the wizard welcome page, click Next. The Select a Programming Language dialog box appears.
4. Click Visual C# (or Visual Basic), then click Generate a new key file to sign the assembly.
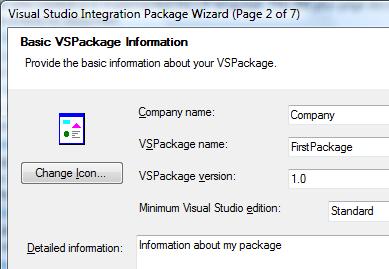
5. Click Next. The Basic VSPackage Information dialog box appears.
6. Type FirstPackage in the VSPackage name field, and accept the remaining defaults.
This information is used in a later step to generate the Package Load Key (PLK).
For more information on these fields, and on obtaining and installing PLK’s , see VSPackage Load Keys.
7. Click Next. The Select VSPackage Options dialog box appears.
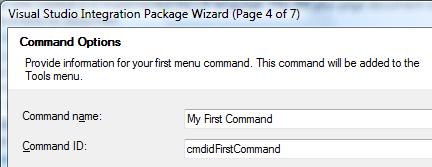
8. Select Menu Command and click Next. The Command Options dialog box appears.
9. In the Command name field, type First Command (this is the text that will appear on the menu).
Next to Command ID, type cmdidFirstCommand (this is the identifier that will be used
throughout your code to identify the command).
10. Click Next. The Select Test Options dialog appears.
11. Click Finish. After a few moments, the wizard will create a new Visual Studio project for you.
Initially, you'll have a basic project with minimal functionality. You can try it out by clicking Debug
and then clicking Start without debugging.
The first time the project builds, it could take a few minutes, and you could get a warning message
that appears over the Windows tray saying that Visual Studio is busy. After a few more moments,
the experimental build of Visual Studio will open and your extension will be loaded.
12. In the experimental build, open the Tools menu, where you'll see a First Command menu item,
the same name you typed in the wizard.
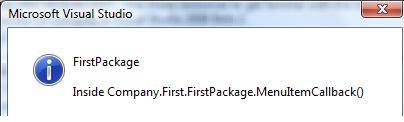
13. Click First Command. The message box like the following will appear:
Examine the menu item handler
The message box you've just seen comes from code in the handler for the menu item.
This handler is in the FirstPackage.cs file.
1. From the Solution Explorer, open the file FirstPackage.cs.
2. Find the FirstPackage class. The FirstPackage class is defined this way:
public sealed class FirstPackage : Package
You can see that the class is derived from the MPF Package class.
3. Find the code for the menu handler, which is implemented by the MenuItemCallback method.
The menu handler function is a standard event handler method like any other event handler
in a .NET Windows Forms program.
private void MenuItemCallback(object sender, EventArgs e)
{
IVsUIShell uiShell = (IVsUIShell)GetService(typeof(SVsUIShell));
Guid clsid = Guid.Empty;
int result;
Microsoft.VisualStudio.ErrorHandler.ThrowOnFailure(
uiShell.ShowMessageBox(
0, ref clsid,
"FirstPackage",
string.Format(CultureInfo.CurrentCulture,
"Inside {0}.MenuItemCallback()", this.ToString()),
string.Empty, 0,
OLEMSGBUTTON.OLEMSGBUTTON_OK,
OLEMSGDEFBUTTON.OLEMSGDEFBUTTON_FIRST,
OLEMSGICON.OLEMSGICON_INFO,
0, out result));
}
Add a default keyboard shortcut
By default, the menu item that was created does not have a keyboard shortcut. Let's add one.
1. Open the file First.vsct for editing. Visual Studio opens this file with the XML editor.
2. Locate the end of the Commands element, indicated by a </Commands> tag.
3. Add these lines between the </Commands> tag and the following <Symbols> tag:
<KeyBindings>
<KeyBinding guid="guidFirstCmdSet" id="cmdidFirstCommand"
editor="guidVSStd97" key1="M" mod1="control shift"/>
</KeyBindings>
This KeyBinding element has several attributes. The guid and id attributes determine the command
that will receive the key binding. The guid is the GUID of the VSPackage, and id is the command identifier
you typed in when you ran the wizard. Both symbols are defined in the Symbols section:
<Symbols>
<GuidSymbol name="guidFirstCmdSet"
value="{600efde8-1f5e-4df5-bc22-06074a411975}">
<IDSymbol name="cmdidFirstCommand" value="0x0100" />
</GuidSymbol>
The editor attribute is a GUID representing the context where this keyboard shortcut will be available.
Different parts of Visual Studio can have different keyboard handlers. For example,
when you are inside a text editor, the keyboard shortcut CTRL+I runs the Incremental Search command.
But when the Solution Explorer is active, CTRL+I has no key binding. Thus, CTRL+I is only available to the text editor.
We want our keyboard shortcut to be available everywhere in Visual Studio; thus, it will be global.
For global keyboard shortcuts, we use the GUID defined by guidVSStd97.
The key1 and mod1 attributes indicate the keyboard shortcut. The key1 attribute selects the key.
All keyboard keys are available in symbolic form, such as “M” for the letter M and “VK_F5” for the function key F5.
The mod1 attribute specifies some combination of “Alt”, “Control”, or “Shift”, separated by spaces.
In this example, key1 is “M” and mod1 is “Control Shift”. The keyboard shortcut is therefore CTRL+SHIFT+M.
4. Run the build with Debug/Start without debugging.
This time, when the experimental build starts and you open the Tools menu, you will see
a keyboard shortcut of CTRL+SHIFT+M on the right side of the menu.

5. Press CTRL+SHIFT+M, and you'll see the same message box that appeared earlier.
For more information on the .vsct file, see the VSCT XML Schema Reference.
Add custom information to the Splash screen and Help/About dialog box
In order to add a touch of professionalism to your extension, you can include an icon and information
in the Help/About dialog box. You will need to make these changes to the solution:
· Modify the InstalledProductRegistration attribute arguments for the VSPackage class.
· Implement the IVsInstalledProduct interface for the VSPackage class.
· Add a bitmap and icon to the Resources folder.
· Reference the bitmap and icon in the Resources.resx file.
Your main VSPackage class (in this example, FirstPackage, found in FirstPackage.cs) uses the
InstalledProductRegistration attribute to specify where to find information for the About dialog box.
The new project wizard generates this InstalledProductRegistration attribute:
[InstalledProductRegistration(
false, "#110", "#112", "1.0", IconResourceID = 400)]
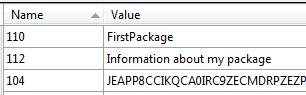
The resource IDs “#110” and “112” refer to these string resources declared in the VSPackage.resx file:
· 110 – FirstPackage
· 112 – Information about my VSPackage
The IconResourceID 400 refers to the Package.ico file in the Resources folder, as declared in the text of
the VSPackage.resx file:
<data name="400" type="System.Resources.ResXFileRef, System.Windows.Forms">
<value>Resources\Package.ico;System.Drawing.Icon, System.Drawing,
Version=2.0.0.0, Culture=neutral,
PublicKeyToken=b03f5f7f11d50a3a</value>
To customize the About dialog box, you change the first argument of the InstalledProductRegistration attribute to true,
which means your VSPackage will provide About dialog box resources through the IVsInstalledProduct interface.
1. Open the file FirstPackage.cs, find the InstalledProductRegistration attribute, and change its arguments as follows:
[InstalledProductRegistration(true, null, null, null)]
2. Derive the FirstPackage class from both Package and IVsInstalledProduct:
public sealed class FirstPackage : Package, IVsInstalledProduct
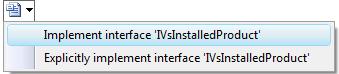
3. Implicitly implement the IVsInstalledProduct interface by hovering the mouse over the word IVsInstalledProduct.
When the SmartTag menu appears, click the first menu item:
This adds the following stub methods to the FirstPackage class. You will fill these methods in shortly:
public int IdBmpSplash(out uint pIdBmp)
{
throw new NotImplementedException();
}
public int IdIcoLogoForAboutbox(out uint pIdIco)
{
throw new NotImplementedException();
}
public int OfficialName(out string pbstrName)
{
throw new NotImplementedException();
}
public int ProductDetails(out string pbstrProductDetails)
{
throw new NotImplementedException();
}
public int ProductID(out string pbstrPID)
{
throw new NotImplementedException();
}
4. Copy the files GenericPackage.bmp and GenericPackage.ico from
<Visual Studio SDK Install Path>\VisualStudioIntegration\Samples\IDE\CSharp\Reference.Package to
your Resources directory.
5. In the Solution Explorer, right-click the Resources directory, and in the pop-up menu click Add and then
click Existing Item. Set your file type filter to "All Files (*.*)" and add the GenericPackage.bmp file.
Then repeat the procedure and add the GenericPackage.ico file.
6. Right-click the file C:\ExtendVS\FirstPackage\FirstPackage\VSPackage.resx, then click Open With.
Select the XML Editor in the dialog box to open the file in the XML Editor.
7. Add the following lines immediately before the final </root> tag:
<data name="500" type="System.Resources.ResXFileRef, System.Windows.Forms">
<value>Resources\GenericPackage.bmp;
System.Drawing.Bitmap, System.Drawing, Version=2.0.0.0,
Culture=neutral, PublicKeyToken=b03f5f7f11d50a3a
</value>
</data>
<data name="600" type="System.Resources.ResXFileRef, System.Windows.Forms">
<value>Resources\GenericPackage.ico;
System.Drawing.Icon, System.Drawing, Version=2.0.0.0,
Culture=neutral, PublicKeyToken=b03f5f7f11d50a3a
</value>
</data>
This declares the GenericPackage.bmp as resource ID 500, and GenericPackage.iso as resource ID 600.
8. Replace the implementation of the IVsInstalledProduct interface with the following code.
public int IdBmpSplash(out uint pIdBmp)
{
pIdBmp = 500;
return Microsoft.VisualStudio.VSConstants.S_OK;
}
public int IdIcoLogoForAboutbox(out uint pIdIco)
{
pIdIco = 600;
return Microsoft.VisualStudio.VSConstants.S_OK;
}
public int OfficialName(out string pbstrName)
{
pbstrName = "My Package";
return Microsoft.VisualStudio.VSConstants.S_OK;
}
public int ProductDetails(out string pbstrProductDetails)
{
pbstrProductDetails = "This is my package";
return Microsoft.VisualStudio.VSConstants.S_OK;
}
public int ProductID(out string pbstrPID)
{
pbstrPID = "My Package ID";
return Microsoft.VisualStudio.VSConstants.S_OK;
}
The first two methods return the resource IDs to use for the bitmap and icon, respectively.
The remaining three functions return the name, product details, and product ID, respectively,
which appear in the About dialog box.
To test your changes, first add the /splash switch to the Debug launch command line arguments.
9. In the Solution Explorer, right-click the First project node, then click Properties.
The application designer appears.
10. Click the Debug tab. The Debug options pane appears.
11. Add /splash to the Command line arguments:

12. Press F5 to launch Visual Studio in the experimental mode. The splash screen appears,
displaying your VSPackage information. Click OK to continue.

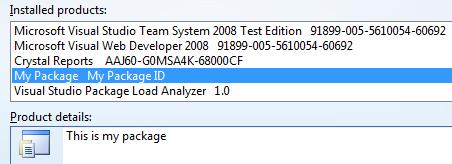
13. Click the Help menu, then click About Microsoft Visual Studio. The About dialog box appears,
displaying the icon and text for your VSPackage.
Obtain and use a Package Load Key
When you ship your VSPackage, it must contain a special key resource called the Package Load Key (PLK).
Visual Studio will only load VSPackages that contain a valid PLK.
The reason you don't need a PLK when you run under the experimental build is because the Visual Studio SDK
provides a special key called the Developer Load Key (DLK) which allows all VSPackages to load.
By the agreement you made with Microsoft when you installed the SDK, you are not allowed to ship this DLK.
You obtain a PLK for your VSPackage from Microsoft. To do so, visit the VSIP members web site.
You will need your Microsoft Passport ID to log into the site. When you have logged in, follow the instructions to obtain a PLK.
For the purposes of this tutorial, we will provide a PLK that matches the information you typed in to the
Basic VSPackage Information dialog box. The PLK value depends on the VSPackage GUID.
To use the PLK we supply, you must change your VSPackage GUID to match the one we used to generate the PLK:
1. Open the file First.vsct and alter the GuidSymbol tag value with the name attribute guidFirstPackage:
<GuidSymbol name="guidFirstPkg" value=
"{3fdab115-3cc1-457d-bd2a-78d72c7025be}" />
2. Open the file Guid.cs and alter the guidFirstPackageString value:
public const string guidFirstPkgString =
"3fdab115-3cc1-457d-bd2a-78d72c7025be";
Follow these steps to add the PLK to your VSPackage.
1. In the Solution Explorer, double-click VSPackage.resx to open it in the resource designer.
A grid control appears.
Add a string resource with the Name 104 (or some other unique number) and a Value equal to your PLK.
Here is the PLK for this tutorial. Enter it as one long line. If you obtained a PLK from the VSIP member web site,
use that value instead:
JEAPP8CCIKQCA0IRC9ZECMDRPZEZP2E3HPA9MRETM0CKJKK3JEKDAIDMKQR2EHK2CJKCQJK
HAMQTAKDKIZPHM8KDCMC0AIEME0KAKAACCMM1QHH2ECEKH1JIQQIEZIPR
2. Open the file VsPkg.cs, then locate the ProvideLoadKey attribute. Replace the last argument with the
resource name (104) of the PLK:
[ProvideLoadKey("Standard", "1.0", "FirstPackage", "Company", 104)]
To test the PLK, first add the /noVSIP switch to the Debug launch command line arguments. This disables the DLK.
1. In the Solution Explorer, right-click the First project node, then click Properties. The application designer appears.
2. Click the Debug tab. The Debug options pane appears.
3. Add /noVSIP to the Command line arguments:

4. Press F5 to launch Visual Studio in the experimental mode.
5. Click the Help menu, then click About Microsoft Visual Studio. The About dialog box appears as before,
displaying the icon and text for your VSPackage.
6. Close Visual Studio in the experimental mode.
7. Change any letter in the PLK string resource.
8. Press F5 to launch Visual Studio in the experimental mode.
9. Click the Help menu, then click About Microsoft Visual Studio. This time you should see an alert box
warning you of a PLK load failure.
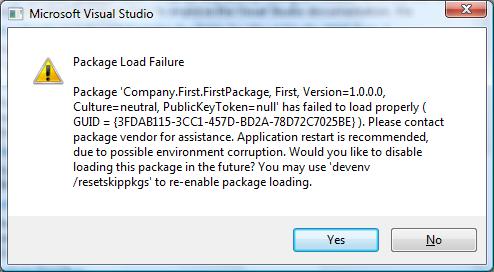
10. Click No.
11. Click the Help menu, then click About Microsoft Visual Studio. The About dialog box appears,
but no longer displays the icon and text for your VSPackage.
12. Close Visual Studio in the experimental mode.
13. Restore the letter that you altered in the PLK string resource.
Your VSPackage now has a valid PLK. If you continue to experience load failures, check out
Dr. Ex’s WebLog-- Debugging Package Load Failures.
See Also
· C# Reference.Package sample
· VisualBasic Reference.Package sample
· Tutorial 3: Creating Your First Tool Window
What's Next?
In the next tutorial, you will create your own tool window inside the Visual Studio IDE. Tool windows are the
basic windows throughout Visual Studio, such as the Solution Explorer and the Task List.
Your tool window will have all the same docking behavior as the other tool windows, and will allow you to
play music files right inside of Visual Studio!