Create an item details page when using the custom XML indexing connector for SharePoint 2013
Introduction
In this example we are using a custom XML indexing connector to feed XML data directly in to the index. The blog post Create a custom XML indexing connector for SharePoint 2013 describes how to implementing a custom XML indexing connector to feed XML content into the index.
A publishing site is used to display the content. A managed navigation structure is set up on the publishing site, and the navigation nodes, or terms, are configured to use the same rollup page for every node. The blog post Display XML content in a publishing site when using the custom XML indexing connector for SharePoint 2013 describes how to display XML content in a Content Search Web Part(CSWP) on a publishing site. The publishing site uses managed navigation. A single category page, with one CSWP, is assigned to all terms within the managed navigation term set. The query in the CSWP is set to use the terms from the managed navigation term set.
Short recap of previous steps:
At this point we have fed XML data to the search engine, and crawled the content. The publishing site is up and running, using managed navigation. For some terms or nodes in the navigation structure there are listed items. This depends on how many items you have included in your XML file. If you have used our very simple example with only 2 items, you will find these items in the “Cameras” node.
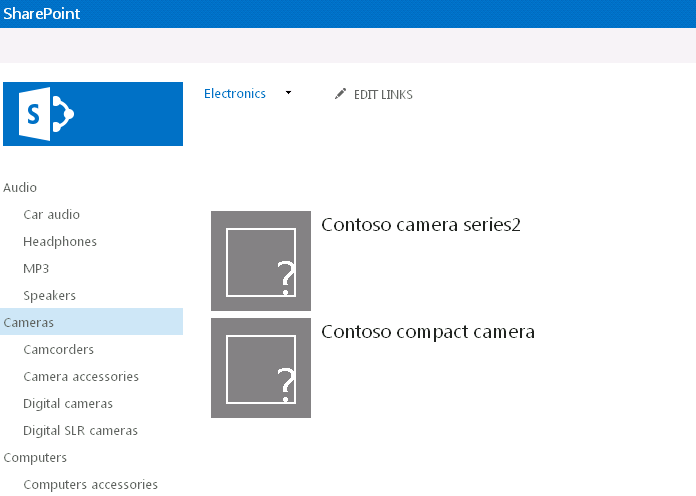
The title of each item consists of a link, but currently this doesn’t display a details page for any of the items.
This blog post
In this blog post I will show you how to create an item details page in your publishing site. When clicking on the title of one of the items displayed on a category page, an item details page will be displayed, rendering data for only that particular item. The steps I will cover are:
- How to create an item details page
- How to make the item details page show XML content from the right item by:
-
- Modifying the XML file
- Creating managed properties
- Modifying the category page
- Modifying the item details page
..ok, let’s start.
Note: Going forward you will see links like:
https://sphvm-20942/sites/pub1/Pages/DetailsPage.aspx?id=C234
Be sure to rename the parts of these links so they fit your setup.
Sphvm-20942 : Name of my test server. Replace it with the name of your server.
Pub1 : Name of my publishing site collection. Replace it with the name of your publishing site.
DetailsPage.aspx :Name of my item details page. Replace it with the name of your item details page.
C234: ID-number of an individual item. Will change from item to item.
How to create an item details page
- On your publishing site, click the Setting menu, then Site contents, and then the Pages icon.
- Click on the Files tab, and in the ribbon choose New Document and Catalog-Item reuse.
- Give the page a name (e.g. DetailsPage), and select Blank Catalog Item as page layout.
- Click Create.
Verify that you have created a page by clicking on the name.
The URL should now be something like: https://sphvm-20942/sites/pub1/Pages/DetailsPage.aspx
We will come back to this DetailsPage later.
How to make the Item Details Page show XML content from the right item.
Modifying the XML file
The XML file contains a field called “Url”. This has to be modified so it points to the page you created in the previous step. In addition, you will have to add the ID as a parameter, so the Content Search Web Part can show the right data.
Let’s go back to the XML file that we have indexed.
<?xml version="1.0" encoding="utf-8" ?>
<Products>
<Product>
<ID>C234</ID>
<Title>Contoso camera series2</Title>
<ItemCategoryText>Cameras</ItemCategoryText>
<Url>https://sphvm-20942/sites/pub1/Pages/DetailsPage.aspx?id=C234</Url>
<Category>Cameras/SLR</Category>
<Price>799</Price>
<Description>This camera is making great pictures. Easy to use to an affordable price. </Description>
</Product>
<Product>
<ID>C235</ID>
<Url>https://sphvm-20942/sites/pub1/Pages/DetailsPage.aspx?id=C235</Url>
<Title>Contoso compact camera</Title>
<ItemCategoryText>Cameras</ItemCategoryText>
<Category>Cameras/compact</Category>
<Price>350</Price>
<Description>This camera is making great pictures. Easy to use to an affordable price. </Description>
</Product>
</Products>
The field “ID” contains a unique number for each item.
For the field “Url”, insert the URL of the item details page you created in the previous step, and add “?id=<ID if the item>” to the end of the URL. For example, for the item C234, the URL= https://sphvm-20942/sites/pub1/Pages/DetailsPage.aspx?id=C234 has been added.
You will have to do this for every item in the XML file.
- Initiate a full crawl.
Creating managed properties
We will now create two managed properties, and map them to the crawled properties “Url” and “ID”. This will enable you to edit the Content Search Web Part so that the correct URL to the item details page is used. I will show you how this is done later in this blog.
The manage property DetailsUrl shall map to the crawled property Url.
The managed property ItemId shall map to the crawled property ID.
- In Central Admin => Manage service applications => Search service application => Search Schema, click on the tab Managed properties.
- Click on “New managed property”
- Set Name=DetailsUrl
- Set Type=Text
- Select:
- Searchable
- Queryable
- Retrievable
- Allow multiple values
- Safe for anonymous
- Under Mapping to crawled properties, select Add a mapping.
- Filter on “Custom XML connector” and choose “Url”
- Click OK
- Click OK to save your new managed property.
- Then, do the same steps to create the next managed property.
- Set Name=ItemId
- Map it to the crawled property “ID”.
- In Central Admin => Manage service applications => search service application => Search Schema, click on the tab named Crawled properties.
- Under “Category” choose “Custom XML connector” to display all crawled properties for our XML file fed by this connector.
- Verify that the crawled properties “ID” and “Url” are mapped to the managed properties “ItemId” and “DetailsUrl” respectively.
- Initiate a full crawl to index these managed properties.
Modifying the category page
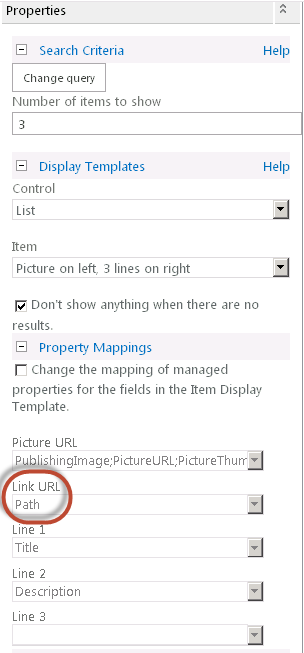
If you have set up your publishing site as described in the blog post Display XML content in a publishing site when using the custom XML indexing connector for SharePoint, your category page contains a Content Search Web part, which uses the display template “Picture on left, 3 lines”. This display template contains placeholders for managed properties, and we will now change the "Link URL" placeholder from Path to DetailsUrl, so that the managed property that contains the correct link will be shown in the Web Part.
On the publishing site, go to Site contents => Pages, and select the Rollup page 1 that you created in earlier (Creating a publishing site when using the custom XML indexing connector for SharePoint 2013) .
- Click on Edit page, and edit page template.
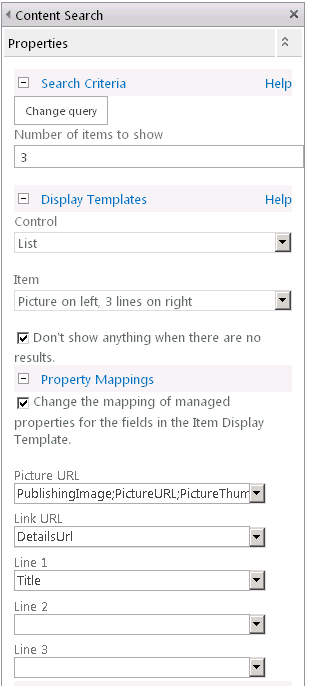
- On the Content Search Web Part, activate the menu on the upper right corner and select Edit web part.
- Under Property mapping, check the box for “Change the mapping for managed properties…”, and under LinkUrl, select the managed property DetailsUrl.
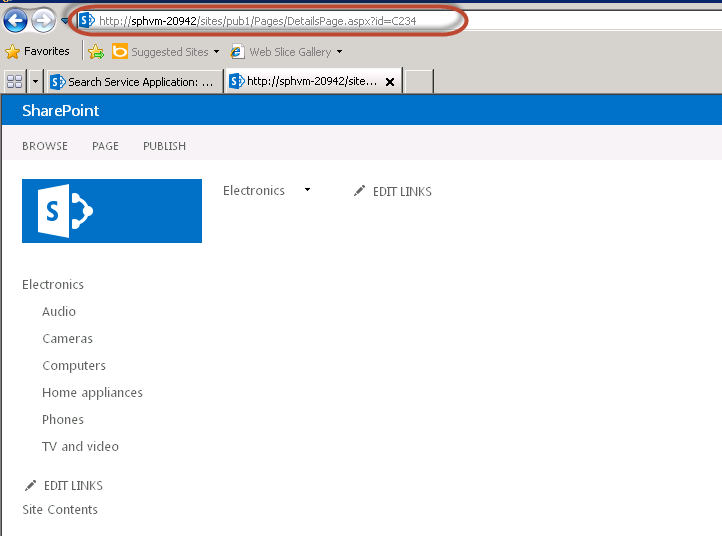
By doing this the “Link URL”= https://sphvm-20942/sites/pub1/Pages/DetailsPage.aspx?id=C234 is used when you click on the title for the product.
This happens because we have mapped the placeholder “Linked URL” in the display template to the managed property “DetailsUrl, which contains the right value from the Url-field in the XML file.
- Click OK, and then Save the page.
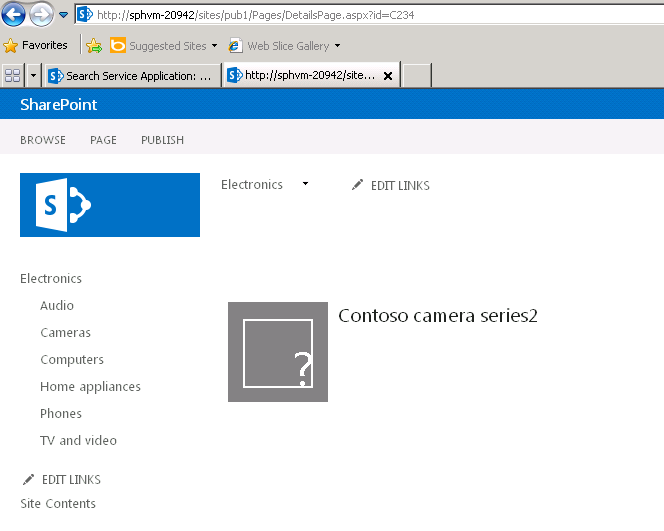
On your publishing site, in the navigation menu, click on Cameras. Click on the item with the title “Contoso camera series2”. An empty details page is displayed. However the URL to the page is correct, and should be: https://sphvm-20942/sites/pub1/Pages/DetailsPage.aspx?id=C234
Modifying the item details page
We now have an item details page that is shown when you click on the title of the item. We will now insert a Content Search Web Part into the details page, and modify the query string so that the correct XML data is displayed through search
- Navigate to the items details page by navigating to Site Contents => Pages => DetailsPage
- Click the Settings menu, and Edit Page.
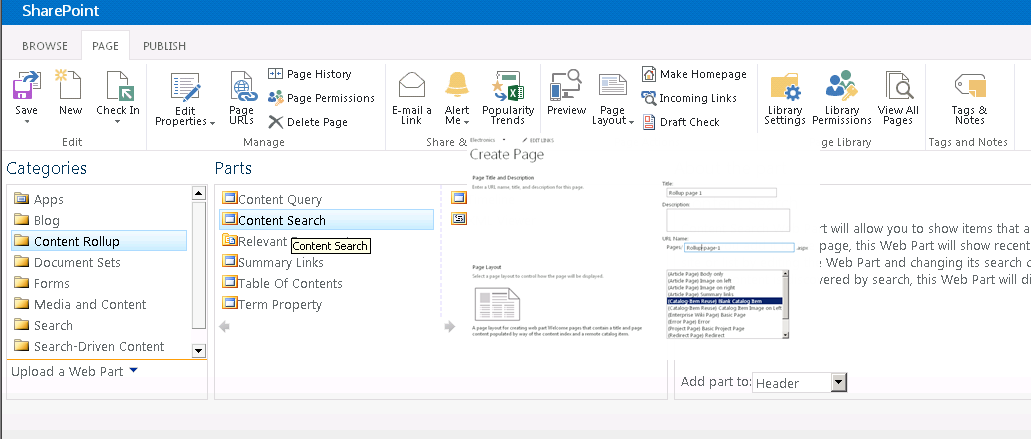
- In the Web Part Zone, click Add a Web Part.
- In the Categories section, click Content Rollup. In the Parts section, click Content Search, and then click Add.
- Click Edit Web Part.
- In the Web Part tool pane, in the Properties section, click Change query.
- In the Web Part query builder, click Switch to advanced mode.
- In the Query text section, type ItemId={QueryString.id}
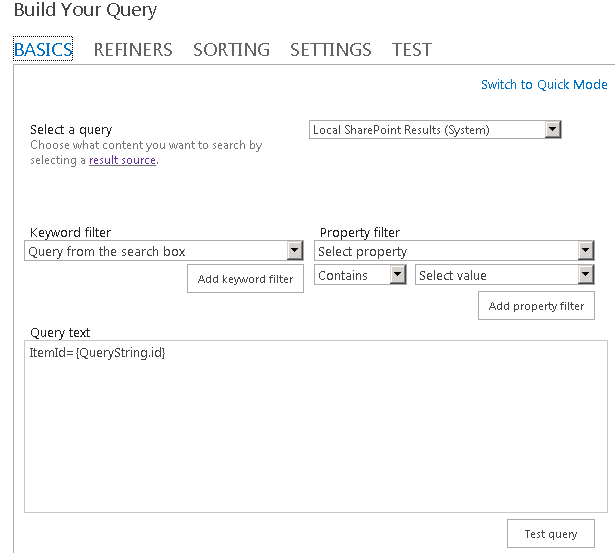
- Click OK for the “Build your query” GUI and web part editor, and SAVE your page.
On your main page, navigate to Cameras, and click on link for the item "Contoso camera series2".
The category items page will now look like this:
This is how it works:
The query you specified in the CSWP uses a query variable. A query variable is a placeholder for a value. When a query is run, this placeholder is replaced with a value of the current page. In our example, we are using the query variable {QueryString,<parameter name>} ,that allows you to query for a value in the URL of the current page. <parameter name> is in our case id. When the URL of a page is https://sphvm-20942/sites/pub1/Pages/DetailsPage.aspx?id=C234, the query variable will be replaced by C234.
The query also uses the managed property ItemId, which we created in an earlier step.
So, when the query is run, the query in the CSWP will resolve to ItemId=C234, and will display the item where the value of the managed property ItemId is C234.
Spicing up the item details page:
If you think that our item details page is boring at this moment, you may be right. It is only showing the title. There is not much data to play with for each item in our XML file, but let’s see what we can do. We also have values for the fields “Price” and “Description”. Let’s make managed properties for these, so we can display this data in the web part.
- In Central Admin => Manage service applications => Search service application => Search Schema, click on the tab Managed properties.
- Click on “New managed property”
- Set Name=ItemPrice
- Set Type=Text
- Select:
- Searchable
- Queryable
- Retrievable
- Allow multiple values
- Safe for anonymous
- Under Mapping to crawled properties, select Add a mapping.
- Filter on “Custom XML connector” and choose “Price”
- Click OK
- Click OK to save your new managed property
- Then, do the same steps to create the next managed property.
- Set Name=ItemDescription
- Map it to the crawled property “Description”.
Then, let us map these managed properties in the Content Search web part.
- Navigate to the items details page by navigating to Site Contents => Pages => DetailsPage
- Click the Settings menu, and Edit Page.
- On the Content Search Web Part, activate the menu on the upper right corner and select Edit web part.
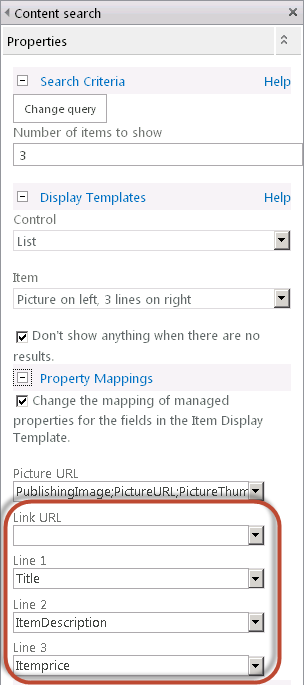
- Under Property mappings, check the box for “Change the mapping for managed properties…”.
- For “Link URL”, leave this blank, as we do not want to link to any pages from the item details page.
- For “Line2” select the managed property “ItemDescription”.
- For “Line3” select the managed property “ItemPrice”.
- Click OK, and SAVE your page.
Navigate back to your main page and the term Cameras, select the item Contoso camera series2.
The item details page will now look like this:

This shows how you can play around with managed properties to display content from the XML file. We are still missing an image, but I will talk about that in an upcoming blog.