Testing
Get Your Customers Involved in the Testing Process with Functional Tests in Excel
Will Stott
This article discusses:
|
This article uses the following technologies: Visual Studio, C#, Testing, Excel |
Code download available at:ExcelUnitTests.exe(800 KB)
Contents
Customer Tests
What is FIT and How Does it Work?
Using FIT to Perform Functional Testing
Writing Tests in Excel
WinFITRunnerLite
A Sample Development Episode
Conclusion
Many specification documents don't provide the full story about the products that they define. Often no one notices this until a significant amount of development time has gone into the project. For specifications to be truly valuable, they need to give an accurate picture of all the requirements of a project.
In this article I'll demonstrate how the communication value of specification documents can be improved by permitting users to test the code under construction using the Framework for Integrated Test (FIT), an open-source tool. I'll explain how you can build a Windows® Forms application in C# (WinFITRunnerLite) that converts functional tests, as written by your customers using Excel, into a form that allows you to run them with FIT against the code you're developing. I'll also present a practical development example to explain how you can set up and perform this sort of customer testing using FIT and WinFITRunnerLite.
Customer Tests
My previous article for MSDN®Magazine (Improve the Design and Flexibility of Your Project with Extreme Programming Techniques) explained how to perform automated unit testing using NUnit. This sort of structural (glass-box) testing is for developers. It validates the operation of code at the level of classes and their methods. However, structural testing alone is not sufficient to ensure that you can release software into production confident that it will deliver good value to the business.
Consider a method that calculates percentages that are accurate to two decimal places. A programmer test proves its behavior, so you send the software to your client certain that it will correctly calculate the sales tax for his invoices. However, the next day he's on the telephone complaining because the total sales tax on his invoices doesn't agree with the sum of sales taxes for each individual item. This is a situation where you could have run a simple functional test to prove that the tax was calculated correctly. Let's now look at how you might perform such a function test in two different types of projects.
In an Extreme Programming (XP) project, you sit down with the customer to discuss what the software must do; in this case, calculating the sales tax on an invoice. Together you work out the details of the customer's needs, his "story." The customer frames his requirements for each story in terms of functional tests, known in XP as acceptance or customer tests. Developers start work implementing stories with an understanding of the tests that are significant to the customer. The story itself is only deemed to be complete when it passes both its unit and customer tests. In agile development projects that use techniques such as XP, these customer tests are valued throughout the development cycle for their importance in helping customers communicate their requirements to developers for setting acceptance criteria for the finished software.
Functional tests are called black-box tests because they are written without any knowledge of how the software works. They simply define what the software must do in terms of measurable responses to certain external input in a given environment. This approach to testing is the basis of the customer test, as well as the foundation of many other types of tests performed on a software product during its development.
While it is your job as a developer to decide how the software will work, it is the customer's responsibility to know what the software must do, so he must have some influence on the writing of functional tests. In traditional projects, the involvement is indirect, proceeding as it does through the business analyst and tester. However, I believe that the agile approach of involving customers directly in the writing of functional tests leads to the development of more useful software that does what it's supposed to do.
What is FIT and How Does it Work?
The Framework for Integrated Test allows customers to write their tests in the form of HTML tables that can then be executed directly against the code under test. For example, a customer can use Microsoft® Word to create a specification document containing various tests (entered into tables), as well as input values and expected results, as shown in Figure 1.
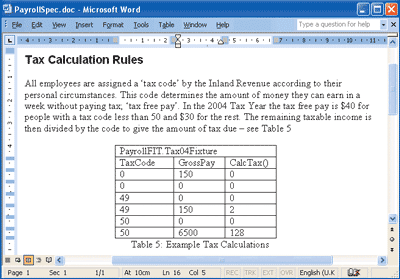
Figure 1** FIT Input - FIT Test Table in Word **
This HTML document can then be used as an input file for FIT, which parses the HTML and matches each table to a corresponding test method in the software test code, as discovered by reflection. FIT invokes the test method, passing parameters read from the HTML table and runs the test. The results are captured into a HTML output document of the same form as the input file, but with any errors added into the cells of each table. The customer can see the results of the various tests by opening the output file in their browser. Figure 2 shows that such a test failed because the customer incorrectly calculated the test result. I'll explain the FIT testing process and how it relates to Excel later in the article, but for now I want to concentrate on the form of the tests, both in the HTML document and in the software test fixture.
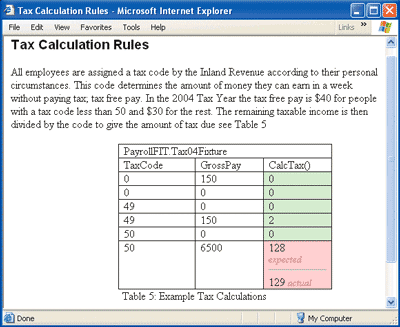
Figure 2** FIT Output - HTML File Displayed in Browser **
A test fixture is a bit of code that supports a test. Such code is usually held in test libraries (DLLs) separate from your domain code libraries, so they don't get released into the production environment. You keep everything that makes up the software under test in the domain code libraries. In your test environment, FIT is told where it can find these test libraries and discovers their classes and methods using reflection. It then runs a particular test by instantiating the appropriate test object and invoking the necessary method to execute the test fixture, passing and receiving the parameters as specified in the HTML test specification document. In turn, the code forming the test fixture creates the objects from the domain code libraries and invokes their methods, passing and receiving data, and therefore exercising the software under test.
To write a functional test, the customer creates a table using whatever tool is appropriate (Word or an HTML editor). The customer enters the name of the test fixture and a specification of the test, specifying the responses expected given certain inputs. Although the format of the test fixture name must conform to a particular convention, the name itself along with those used in the rest of the specification is expressed in language that the customer understands (see Figure 1). Similarly, the format of the table is not difficult for the customer to comprehend as there are only a few possible variations, which are related to the three main base types of the FIT fixture used in such tables: ColumnFixture, RowFixture, and ActionFixture.
A feature of customer tests is that they require considerably fewer different test fixtures than you might discover in the same project for structural testing (such as with NUnit) as the same test fixture also tends to be reused by several functional tests. This means that once developers have supplied some initial FIT test fixtures, the customer is able to write functional tests without having to wait for a specific fixture to be developed for each table.
Writing a test fixture for FIT is much like writing a test fixture to support NUnit testing. A fixture class is created in the test library derived from a Fixture base class appropriate for the type of tables in which it will be used. Methods for this class are then created to correspond to the requirements of the table's functional tests and implemented using the domain code libraries. You can, of course, create additional base fixture types beyond those supplied by FIT because all the source code is included in the download. This gives your customers the flexibility to create different types of tables for their functional tests. However, the supplied base fixture types are often all that is required to provide adequate functional testing capability for a project.
Using FIT to Perform Functional Testing
To use FIT, you first need to download it (from fit.c2.com) and install it in your test environment. Ask your customer to write the functional tests using Excel and then write the necessary test fixtures using an appropriate development environment (such as Visual Studio®) and language (such as C#). Lastly, build WinFITRunnerLite and then run the tests that are written in Excel directly from your desktop.
I used the version of FIT called fit-b030825cs.zip for this article. In FIT's source\fit directory, you'll find the base classes corresponding to the three main types of tables: ColumnFixture.cs, RowFixture.cs, and ActionFixture.cs. These three base classes are the only part of the FIT source code that you really need to know about; they are necessary for creating the test fixtures that are required to support your customer's tests.
Each of the three table types is useful for testing one of the three layers of architecture commonly found in today's software: the business layer, data layer, and user interface layer. This might appear to break the concept of black-box testing, but in practice the customer's view of the system doesn't have to correspond with the actual implementation. Using these three types of tables, the system can be modeled in terms of the parts that customers can see (the user interface layer), the business rules that they defined (the business layer), and the important data they expect to exist in the system (the data layer). Creating such a model of the software's structure can really help the customer understand the tests they are performing. Let's take a closer look at the tables.
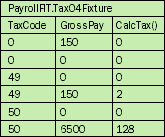
Figure 3** Column Fixture Table **
Column Fixture Tables This table type is intended to test the program's business logic. For example, if you had derived your FIT fixture from ColumnFixture and called it TaxCalcFixture, then the table in Figure 3 might emulate performing tax calculations for various employees with different tax codes and earnings in order to test the program's tax calculation logic.
There is no requirement for the names of the test fixture methods and their parameters to correspond to those found in your domain code libraries. You should express names in the language of the problem domain so that the customer can understand the test without needing to know the underlying software structure.
In the table, the first row contains a reference to the FIT fixture developed for your project to support the tests in this table. The second row contains headers for the subsequent rows which map each column to the name of a particular method or input field. The remaining rows contain data for each iteration of the test, listed in the order of processing. For tables that have more than one method in the header row, methods are invoked in sequence from left to right. The input data is given in the field name columns, such as TaxCode, and the expected output data is given in the method name columns, such as CalcTax.
Row Fixture Tables This type of table is used to validate collections of data held by the program. For example, if you derived your FIT fixture from RowFixture and called it StaffDataFixture, Figure 4 might represent the collection of staff data known to the program (as set by a previous test).
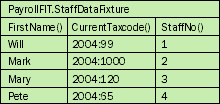
Figure 4** Row Fixture Table **
Row-type tables look similar to column-type tables except that if any rows in the table are not found in the program's DataSet, then a "missing" error is reported. Likewise, a "surplus" error is reported should the program's DataSet contain more records than are listed in the table. The header row (row two) contains the names of methods that reveal the various properties of each data item found in the collection, while any fields in the header are used for sorting the collection (left-most columns have primacy).
Action Fixture Tables This table is designed to allow emulation of the user interface so you can test how the program responds to certain external inputs. For example, if you had derived your FIT fixture from ActionFixture and called it NewStaffDlgFixture, then Figure 5 might emulate a particular user interaction with one of your program's dialog boxes, the one called NewStaffDlg.
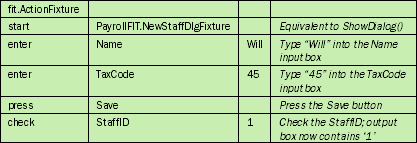
Figure 5** Action Fixture Table **
The general layout of Action tables is shown in Figure 6. The first column defines a command (start, enter, check, or press) and the contents of the remaining columns depend upon its type.
Figure 6 Action Table Commands
| Command | Arguments | Description | |
|---|---|---|---|
| start | myClass | myClass defines the fixture in use | |
| enter | inputA | value1 | myClass.inputA (value1) |
| press | doB | myClass.doB() | |
| check | methodC | result2 | assert (myClass.methodC() == result2) |
There is no reason why your domain code library should contain a class called NewStaffDlgFixture that implements this dialog box. It's enough that the customers and developers can agree that this FIT fixture emulates the behavior of whatever dialog box in the program is known to the customer as NewStaffDlg.
Writing Tests in Excel
Excel provides extensive functionality for manipulating data. Customers can quickly generate values for tests with features like "fill series" and "import external data," so it is sensible to use Excel for writing functional tests. It is particularly appropriate to employ Excel when customers are testing complex business logic as the calculations can be modeled in the worksheet and then used to provide the expected results of a test.
Although you can save your Excel file in HTML format, the resulting file is not suitable for use as an input file for FIT, so some form of conversion is going to be required. Fortunately, WinFITRunnerLite will perform this conversion if you create your tables just like the one shown in Figure 7.
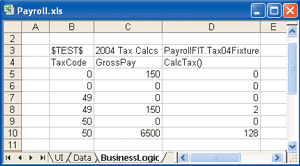
Figure 7** ColumnFixture Table in Excel **
WinFITRunnerLite reads all the worksheets in the workbook file and scans each one for tables with the following features:
- $TEST$ in the table's top-left cell (B3) identifies it as being for a FIT test. This allows you to put other types of information in your worksheet besides tests.
- The first blank cell in column one (B11) defines the number of rows in the table, whereas the first blank cell in row two (E4) defines the number of columns.
- The remaining cells in the top row identify the name of the test and the name of test fixture that's needed to run it. The name of the test ("2004 Tax Calcs" in this example) is used for identification purposes only.
- The second (header) row associates the columns with the fields and methods of the test fixture.
- All subsequent rows contain input and return values for each iteration of the test according to the various test fixture methods as specified by the header (second) row.
Worksheets are read from left to right and from top to bottom in search of appropriate tables that correspond to functional tests using the ColumnFixtures, RowFixtures, or ActionFixtures types. These tests are executed in the order in which they are found. Further examples of tests in an Excel worksheet are given in the sample development episode section at the end of this article.
WinFITRunnerLite
WinFITRunnerLite provides for customer tests what NUnitGUI does for programmer (unit) tests. It collects all the customer tests for a particular project from one or more Excel workbooks and allows the customer to run them with a single click. The customer can easily see which tests passed or failed, as well as the actual results of each test. Because the tool is designed for use by customers, it looks like any other Windows-based application and is operated entirely from the desktop.
I was developing the program using test-driven development (see my previously mentioned article) and therefore created a Visual Studio solution containing three projects: WinFITRunnerLite, FITRunLite, and FITRunLiteNUnit. WinFITRunnerLite is a C# Windows-based application containing the program's main entry point, its Main form, the About dialog box, and not much else. FITRunLite is a C# class library containing the domain code that does all the work. FITRunLiteNUnit is a C# class library, a test-code library containing all the fixtures and other code needed to unit test the domain library (FITRunLite).
WinFITRunnerLite contains two key files: WinFITRunnerLite.cs and MainForm.cs. The program's controller class is implemented in WinFITRunnerLite.cs and contains the app's entry point, Main, and holds a single instance of its document class. Because there can be only one instance of the program, it was developed using the Singleton pattern, such that all classes accessing it must go through the static Instance property which does much the same job as the MFC AfxGetApp function. Among the other methods that you'll find in the WinFITRunnerLite class are ErrorMsg, for displaying errors to the user, GetDocument, for accessing the document object, and methods to save and load the document from a file. WinFITRunnerLite derives from the Program class in the FITRunLite domain library.
MainForm.cs implements the application's main window and contains its menu as well as its TreeView and TabControl Page, as shown in Figure 8. This was developed using the Visual Studio graphical editor in a way that will be familiar to anyone with experience building Window Forms applications. The only component that you might not find in your graphical editor's toolbox is the DHTML edit control used to display HTML files in the TabControl Page. You can add this component by right-clicking your toolbox, selecting the Add/Remove Items menu, and then locating the "DHTML Edit control for IE5" in the COM components.
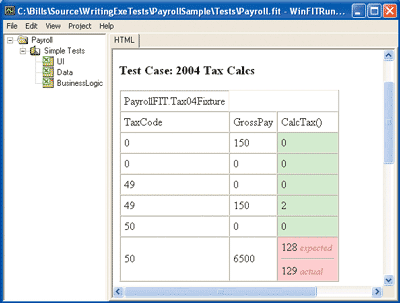
Figure 8** WinFITRunnerLite - Main Window After Running a Test **
The TreeView and TabControl Page present two views of the data held in the program's document. These two views are managed by the variables m_leftView and m_rightView, which are initialized in MainForm's constructor, with the form's TreeView and DHTML edit control being passed to the constructors of the LeftView and RightView classes, respectively. These classes are implemented in the domain library.
The application's views are updated in the MainForm_Update method whenever the document changes. This method invokes the Update method of the LeftView and RightView objects as well as driving an update of the form's menus and title bar. Depending on the state of the document object (and item selected in the LeftView), menus will be enabled or disabled. The title bar will also indicate the name of the file and whether it has been altered since last saved. The remaining methods in MainForm are concerned with handling menu activation events as well as handling a couple of events generated by the views, such as the TreeView selection. Most of these various events are deferred to objects in the domain library for processing.
WinFITRunnerLite contains code that will not be unit-tested automatically with NUnit, so this GUI layer is made as thin as possible. The design of MainForm was not driven by tests because most of the work involved declarative programming using the graphical editor. I've found it is more productive to let customers influence such parts of the design than to drive it with worries about creating a set of cohesive and loosely coupled objects. Test-driven development purists may resist this approach, but I've found it to be more pragmatic.
FITRunLite is the domain library and contains the classes shown in Figure 9.
Figure 9 FITRunLite Classes
| Class | Description |
|---|---|
| Document and its associated classes (Project, TestDoc, TestSuite, TestCase, TestCol, TestRow, and TestCell) | Represents the application's data, which is persisted as XML in its "fit" file. |
| LeftView and RightView | Concerned with the behavior of the application's views of its data. They are updated whenever it changes. |
| DlgProject and DlgTestDoc | Simple data entry type forms, each initialized by passing an appropriate data object to their constructor. This object is updated with information supplied by the user when their Update method is called. |
| DlgTestRun | Implements the Windows Form that is opened whenever the tests are run. It is responsible for creating the TestRun object and periodically invoking its DoTimerEvent method to drive the execution of tests. |
| TestRun | Responsible for iterating through the collection of test suites held in the application's document, preparing each one for execution by FIT, and then starting the process for runFile.exe that will run the test cases (tables) it contains. |
| SpreadsheetApp | An interface for the Excel11Adapter class, which uses the adapter pattern to make Excel object library v11.0 fit the Spreadsheet class. |
| Spreadsheet | Modeled after the Facade pattern. This is how the program reads the data in an Excel worksheet into a collection of Table objects (one for each test table found). Table objects are then used to update the application's document. |
| Program | An abstract class that forms the base class for WinFITRunnerLite. It holds the program's instance variable and makes it available to classes in the domain library using the static m_instance. |
The application's document has one project containing a collection of test documents (Excel files). Each test document has a collection of test suites (Excel worksheets), which in turn has a collection of test cases (one for each table found in the worksheet). A test case has a collection of columns (table headers) and a collection of rows each containing the data associated with an iteration of the test. A test row has a collection of test cells containing input and output data for the test instance.
The classes corresponding to these data objects are self-evident from their names and use the .NET XML serialization classes to save and load themselves from a file, which I defined as being of the type .fit. You can easily serialize your documents to an XML file using the .NET Framework by adding some attributes to each class contained in the document, as shown here:
[XmlRoot("TestCell")] public class TestCell { private string m_Expected; [XmlElement("Expected")] public string Expected { get { return m_Expected; } set { m_Expected = value; } } }
You then implement the document's save and load methods (see the code in Figure 10).
Figure 10 Document.cs
public bool SaveAs(string filename) { bool rc = false; FileStream fs = null; try { XmlSerializer serializer = new XmlSerializer(typeof(Document)); fs = new FileStream(filename, FileMode.Create); serializer.Serialize(fs, this); m_Dirty = false; SetFileName(filename); rc = true; } catch(Exception e) { Program.m_instance.ErrorMsg("Document.SaveAs()", e.Message); } finally { if ( fs != null) fs.Close(); } return rc; }
Any changes to the document's data causes a refresh of the application's views by invoking the NotifyDoc method of its base class, DocumentItem. However, not all the document data needs this notification mechanism, because data read from an Excel workbook file will not change unless the file itself changes. It is therefore sufficient to provide notification for Project and TestDoc objects and refresh all data items below TestDoc in the data hierarchy whenever the associated file is changed.
TestDoc uses the Program.GetHashForFile static method to calculate a hash value for the Excel file it references. When this hash value changes indicating that the file has changed, the Excel file is read and the tables it contains are converted into TestCase objects. The Spreadsheet class provides the GetTestSuiteNames method to obtain a list of the worksheets found in the file, and the GetTables method creates an array of Table objects from the test cases found in a given worksheet. All the complex classes in the Excel object library are hidden behind this simple facade. A Table object contains the address of the test case in the worksheet and an array of TableRows, each holding an array of strings corresponding to the contents of the cells found in a particular row of the test case. When you have a collection of Table objects, using them to reconstitute the document's TestDoc object is quite simple.
The Spreadsheet class does not itself access the Excel object library, but uses four small classes implementing interfaces defined in the abstract classes SpreadsheetApp, SpreadsheetFile, SpreadsheetPage, and SpreadsheetArea. Each of these interfaces contains three or four methods so supporting a different object library involves changing only a small, isolated part of the codebase. I decided to use Excel object library version 11.0 when building WinFITRunnerLite, but you might have a different version of the object library on your machine and therefore may need to create different types of adapter classes.
To create Excel11Adapter, I added a reference to the Excel object library as found in the COM tab page of the Add Reference dialog. To select FITRunLite references for your Visual Studio project, right-click Add Reference in the Solution View. I created a class derived from SpreadsheetApp and added "using Excel;" to the top of its file. Then I implemented the constructor so that it would create a single instance of the Excel application object. Finally, I wrote the methods and property defined by the interface: IsInstalled, OpenFile, and Name. Figure 11 shows a simplified version of my OpenFile implementation that just adapts the given Excel class for use with the Spreadsheet class. If you need to create your own adapters, you'll be glad to discover that the unit tests needed to validate them are supplied in the code download.
Figure 11 Excel11Adapter.cs
public override SpreadsheetFile OpenFile (string Filename) { Excel.Workbook openbook = null; object OpenMode = true; openbook = m_excel.Workbooks.Open(Filename, Type.Missing, OpenMode, Type.Missing, Type.Missing, Type.Missing, Type.Missing, Type.Missing, Type.Missing, Type.Missing, Type.Missing, Type.Missing, Type.Missing, Type.Missing, Type.Missing); return new Excel11Workbook(openbook); }
All the test cases contained in the application's document are executed whenever a user opens the DlgTestRun dialog box. This creates an instance of TestRun and initiates a timer to invoke the dialog's TimerEventProcessor method every 500 ms. The timer event invokes the TestRun.DoTimerEvent method which determines whether a test suite is executing; if no suite is currently running, it finds the next test suite, prepares it for execution, and then starts the process for FIT's runFile.exe to run the test. Preparing the test suite for execution involves writing its data to a temporary file and then using the project's XSLT file to translate this XML file into an HTML file suitable for FIT.
When TestRun.DoTimerEvent can find no more test suites to run, it changes the Project's LastTestRun data. This generates an update of a result file displayed on the right corresponding to any test suite selected on the left. DoTimerEvent completes by returning null, which causes the dialog box to close.
The domain library is small and contains simple code. To understand it, look at the unit tests in FITRunLiteNUnit and experiment a little by adding your own tests or altering the domain library.
A Sample Development Episode
Now that you've installed FIT and built WinFITRunnerLite, let's see how these tools might be used by a customer to create functional tests with Excel that can be executed directly against a program that is under development. This sample development episode will also describe how the developer can support such testing.
The program under test is a payroll application for calculating the pay-packets for a team of workers paid weekly. You join the project at the start of its development, so the codebase is simple and quite small. Your Visual Studio solution already has three projects: PayApp (the Window Forms application), Payroll (the domain code library), and PayrollNUnit (unit tests for the library code). All these project files, as well as their source code, are available for download and follow the general approach for test-driven development explained in my previous article.
The episode starts with the customer, Bob, writing tests for parts of a story he's already discussed at great length with you. When implemented, the plan will save the business $150 a week by automating part of the company's payroll system. In the first part of the story, Staff Info, the program needs to hold personal details about team members, such as staff number, name, and tax codes. The second part, Tax Calc, is concerned with the program calculating the tax deductible for a given member of the staff, which is determined by their gross weekly pay.
Bob had previously explained the rules for calculating tax and he now wants to check that they are correctly implemented in the program. He starts Excel and writes out a test, as shown in Figure 7. It's not a particularly comprehensive test, but it's enough to reassure him that you've done some work on the project. At this stage, Bob doesn't know the name of the test fixture, PayrollFIT.Tax04Fixture, so he leaves the cell blank. He saves the workbook as "Payroll.xls" in a shared folder called PayrollFIT on the team's test PC. Bob then goes to this test PC, starts WinFITRunnerLite, and goes to File | New to open a dialog box, allowing him to define a new project called Payroll. He enters the details that you gave him about the program, shown in Figure 12, into this dialog box and then presses OK.
Figure 12 WinFITRunnerLite Project Details
| Field | Contents | Comment |
|---|---|---|
| Name | Payroll | Appears as the root item in the TreeView |
| Test Tool exe | c:\PayrollFIT\Bin\runFile.exe | Standard FIT application |
| FIT test fixtures dir | c:\PayrollFIT\Bin | Location of test fixtures you've developed |
| XML to HTML | C:\WinFITRunnerLite\FITLite.xsl | WinFITRunnerLite installation directory |
Next, Bob clicks the WinFITRunnerLite menu bar and selects Project | Add File to open the Test Doc dialog box, so that he can add a reference to Payroll.xls, the Excel file containing his tests. He specifies the directories to be used for the FIT input and output files generated when the tests are run as being the subdirectory Temp of his PayrollTests folder. When he closes the dialog box the tree view is updated to show the Excel file and the worksheets it contains. Bob then saves this information in the WinFITRunnerLite file Payroll.fit and runs the tests (Project | Run Tests). Not surprisingly, his test fails because the test fixture hasn't been written yet.
You compare Bob's test in Payroll.xls to those in Figure 3 through Figure 5 and decide that it most closely resembles a test of business logic and needs a test fixture derived from the ColumnFixture class (as supplied by FIT). However, as you are supporting the project's initial customer test, you must first create a library (.dll) for this and subsequent FIT fixtures. Go to the Visual Studio menu and select File | New | Project to open a dialog box that allows you to select Class Library from a Visual C#® projects folder. You then enter PayrollFIT in its name field, and click Add to Solution, before finally closing the dialog box in order to create the project as well as its preliminary class, Class1.
In order to derive your class from ColumnFixture, you need to add a reference to the library, FIT.dll, as supplied with FIT. You can do this from the Visual Studio solution view by selecting the References folder for your PayrollFIT project, opening the Add Reference dialog box, and then using its Browse button to locate the correct file. You may also need to follow the same procedure for NUnitCore.dll, located in FIT's tools\nunit folder. Once you've added "using fit;" to the top of the file containing Class1, your code will have access to ColumnFixture and the rest of the classes that are contained in the FIT libraries.
You rename Class1 to Tax04Fixture and enter the code shown in Figure 13 in order to implement the method and fields defined by Bob in his customer test: CalcTax, TaxCode, and GrossPay. Assuming you've already built the TaxDetails04 class in your domain code library and unit-tested it to ensure it implements the tax calculation logic according to your understanding of Bob's instructions, all that remains for you to do is add to the project a reference to payroll.dll and build it (Build | PayrollFIT).
Figure 13 Tax04Fixture.cs
using System; using fit; using Payroll; namespace PayrollFIT { public class Tax04Fixture : ColumnFixture { public int TaxCode; public int GrossPay; public int CalcTax() { int rc = 0; TaxDetails04 tax = new TaxDetails04(TaxCode); rc = tax.WklyIncomeTax(GrossPay); return rc; } } }
Deploying your FIT fixture simply requires you to copy the contents of the directory PayrollFIT\bin\debug from your development PC to the shared c:\PayrollFIT\Bin directory on the team's test PC. Make sure you include all the libraries referenced by PayrollFIT.dll as well as the runFile.exe file supplied with FIT. Once this has been done, Bob can add the test fixture reference to his test, (see Figure 7) and rerun the tests. This time they pass, so he's satisfied that the development team is making progress.
Next Bob is concerned with verifying that the system is able to hold details about his staff—the StaffInfo. After talking to Peter, the team's testing specialist, he decides to write two tests that will be run consecutively. The first test will enter staff information into the program and the second test will confirm that the program holds only these records. This first test simulates the NewStaffDlg dialog box that the team's user interaction specialist showed him earlier that morning, so he creates a new worksheet in Payroll.xls called Data Tests and creates a test, using an Action Fixture Table as his template. His second test is based on the Row Fixture Table described by Peter and contains a set of rows, one for each row in the first test that contains "Press OK"—a signal that a new staff record should be created using the data in the preceding two rows.
Bob sends you the Payroll.xls and asks you to build the necessary test fixtures. You open your PayrollFIT project in Visual Studio and add a new class called NewStaffDlgFixure just as you did for his previous test, except this time you derive it from FIT's ActionFixture class. You flesh out the class with the code shown in Figure 14 in order to implement the fixture. The methods for Forename and Taxband save their input parameters in private data members, so the OK method can create a new Staff object using this information and then store it in the collection of Staff objects held by the program.
Figure 14 NewStaffDlgFixture.cs
using System; using fit; using Payroll; namespace PayrollFIT { public class StaffListFixture : ActionFixture { private string m_Name; private int m_TaxCode; private Staff m_Staff; public void Forename(string name) { m_Name = name; } public void Taxband(int taxcode) { m_TaxCode = taxcode; } public void OK() { m_Staff = new Staff(m_Name, new TaxDetails04(m_TaxCode)); if (m_Staff != null) App.Instance.team.Add(m_Staff); } } }
The second of Bob's tests needs a class called StaffDataFixture, which you create as before, but this time derive it from FIT's RowFixture class. This second test is a bit more complex to write because you need to implement the getTargetClass and query methods, defined as abstract in the base class. The first of these methods allows FIT to discover what class it should use to adapt the data as it is known to the system into the data as it is known to the test. The second method, query, is invoked by FIT to obtain an array of these adapter objects for use in the test. It is your job to create this array from the collection of Staff objects held by the program, but first you must create the adapter class which you call StaffAdapter:
public class StaffAdapter { private Staff m_Staff; public StaffAdapter(Staff staff) {m_Staff = staff; } public string FirstName() { return m_Staff.Name; } public int StaffNo() { return m_Staff.StaffID; } public string CurrentTaxcode(){return m_Staff.TaxInfo.ToString();} }
Once you've implemented StaffAdapter, you can code the getTargetClass as well as the query (StaffDataFixture.cs). When you're finished testing these new fixtures on your development PC, PayrollFIT is deployed to the test environment, and Bob can now run his tests.
There's a lot more testing to do before Bob can consider the story complete, but at least he can see that writing tests is really helping him get the product his department needs.
Conclusion
Customers have much to gain by writing and running their own functional tests for the software they want created. It helps them communicate their specs more clearly to developers, which is particularly important for a project where requirements are changing or were not well understood at the outset. Testing also gives customers a sense of control. Instead of asking the developers about progress, the customer can simply run the tests and see exactly what functionality is present and what is not working as it should. Tools like Excel, WinFITRunnerLite, and FIT put this sort of power into a customer's hands.
Will Stott is a freelance consultant living in Zurich, Switzerland. He is also an associate of Exoftware, a European company specializing in helping organizations become more agile in their software development practices. Reach him at wstott@exoftware.com.