ASP.NET 2.0
Personalize Your Portal with User Controls and Custom Web Parts
Ted Pattison and Fritz Onion
This article is based on a prerelease version of ASP.NET 2.0. All information contained herein is subject to change.
This article discusses:
|
This article uses the following technologies: ASP.NET 2.0 |
Code download available at:WebParts.exe(619 KB)
Contents
Web Part Primer
Display Modes and Page Scope
Properties and Personalization
Web Part Catalogs
ASP.NET 2.0 Portal Development
User Controls as Web Parts
Web Parts and Personalization Providers
Changing the Personalization Data Store
Creating Your Own Personalization Provider
Taking it a Step Further
Portal applications are very popular today and the better ones share some common traits. Useful portals serve up generous portions of content through a user interface that is modular, consistent, and easy to navigate. More sophisticated portals go even further and allow site members to contribute content, upload documents, and personalize portal pages.
Microsoft added a scalable portal framework to the Windows Server™ 2003 platform with the release of Windows® SharePoint® Services, which provides the basic elements required by a portal framework, including support for site membership, content and document management, and the modular presentation of data through the use of Web Parts.
Web Parts provide the foundation for both customization and personalization. Depending on the site configuration, users can easily personalize or customize pages in a Windows SharePoint Services site by adding, reconfiguring, and removing Web Parts. Developing custom Web Parts provides an easy and powerful way to extend sites based on Windows SharePoint Services. When you create a custom Web Part that supports customization and personalization, you simply add properties to your Web Part class and apply a few special attributes. The Web Part infrastructure of Windows SharePoint Services does all the heavy lifting of serializing, storing, and retrieving the data associated with site customization and member personalization.
ASP.NET 2.0 introduces a Web Part control set that is similar to Windows SharePoint Services in the sense that it was designed to deal with the serialization, storage, and retrieval of customization and personalization data behind the scenes. It's different and more flexible in that it's not tightly coupled to either SQL Server™ or Active Directory®. That's great news for companies that want to build portal applications using forms-based authentication or don't want to be tied to a particular database solution.
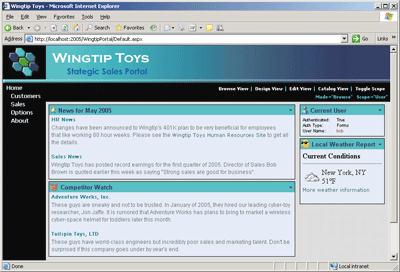
Figure 1** Sample Portal Showing a Modular Web Part Design **
This article walks you through a sample portal application written using Web Parts in ASP.NET 2.0. The primary goal is to teach you about the important design issues you will face when developing Web Parts for a portal application. We'll start by highlighting the fundamental concepts and control types involved with using the new Web Part control set in ASP.NET 2.0. For an example, see Figure 1.
Web Part Primer
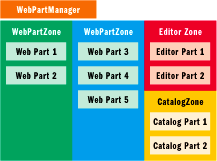
Figure 2** Typical Layout for a Web Part Page **
A page that is designed to host Web Parts is known as a Web Part Page. A Web Part Page requires exactly one instance of the WebPartManager control and one or more WebPartZone controls, as shown in Figure 2. A Web Part Page may optionally include an EditorZone or CatalogZone control. Note that the tag for the WebPartManager control must be placed in an .aspx file before the tags for any of the other controls associated with the Web Part infrastructure, such as WebPartZone, EditorZone, and CatalogZone. For better control over the layout and appearance of the Web Part Page, you can also lay out the different zones within the .aspx file by using HTML tables.
Let's start with a simple example of a Web Part Page that contains WebPartManager and WebPartZone controls:
<asp:WebPartManager ID=" WebPartManager1" runat="server" /> <asp:WebPartZone ID="WebPartZone1" runat="server" HeaderText="Zone 1"> <ZoneTemplate> <!-- time to add a Web Part --> </ZoneTemplate> </asp:WebPartZone>
Once you have a WebPartZone, you can use a Web Part definition to create a Web Part instance. There are two different approaches for creating a Web Part definition. First, you can create a custom class that inherits from the WebPart class. Second, you can create a user control. We'll take a more detailed look at the trade-offs between these two approaches later in this article. For now, let's begin by writing a simple class derived from WebPart (see Figure 3).
Figure 3 Class Derived from WebPart
using System.Web.UI; using System.Web.UI.WebControls.WebParts; namespace WingtipWebParts { public class HelloWorld : WebPart { public HelloWorld() { this.Title = "Hello World"; this.TitleIconImageUrl = @"img\WhaleBoy.gif"; } protected override void RenderContents(HtmlTextWriter writer) { writer.Write("Can I have your attention please"); } } }
Each Web Part instance exists on a specific page within a specific WebPartZone at a specific index. A WebPartZone can contain multiple Web Parts. For example, Figure 4 shows two Web Parts within the zone called WebPartZone1.
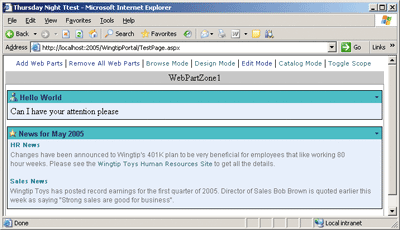
Figure 4** Web Parts in a Specific Zone **
You can add a Web Part to a zone either programmatically or declaratively. A bit later you will also see a technique for adding Web Parts to a catalog of parts. Once you have created a CatalogPart, your users will be able to add new Web Parts into WebPartZones at run time.
The way to add Web Parts to WebPartZones with code varies depending on the type of Web Part you are dealing with. If you have a class that inherits from WebPart, you can create an instance of the class programmatically and call the AddWebPart method of the WebPartManager class. When you call AddWebPart, you must pass parameters to specify the Web Part instance, the target WebPartZone, and the index at which the Web Part will appear within the target zone:
// create Web Part instance from WebPart-derived class WebPart wp1 = new WingtipWebParts.HelloWorld(); WebPartManager1.AddWebPart(wp1, WebPartZone1, 0);
That's the programmatic way of adding a Web Part to a WebPartZone. The declarative approach uses control tags within the .aspx file of the Web Part Page. If you want a Web Part to appear in a specific WebPartZone when the page is first retrieved by a user, you can add a ZoneTemplate within a WebPartZone:
<%@ Register Assembly="WingtipWebParts" Namespace="WingtipWebParts" TagPrefix="Wingtip" %> <asp:WebPartManager ID=" WebPartManager1" runat="server" /> <asp:WebPartZone ID="WebPartZone1" runat="server" HeaderText="Zone 1"> <ZoneTemplate> <Wingtip:HelloWorld runat="server" id="HelloWorld" /> </ZoneTemplate> </asp:WebPartZone>
Keep in mind that your Web Parts are going to look pretty boring on a Web Part Page if you don't dress them up a bit. A common feature request for intranet portal applications is the ability to "skin" the site, changing the appearance based on user preferences. In the past this meant that you had to build your own infrastructure to support changing control rendering, and this involved a fair amount of work to get right. ASP.NET 2.0 introduces the concept of themes, which are collections of styles and control attributes that can be applied individually to controls, across an entire page, or even globally at the application level.
To make your portal application look polished and professional, customize the appearance of all WebPartZone, EditorZone, and CatalogZone controls. This exercise can be tedious the first time you go through it because it involves skinning and branding the visual appearance of the body, title bars, and dynamic menus for Web Parts, Editor Parts, and Catalog Parts. Fortunately, the new themes feature of ASP.NET 2.0 makes it possible to factor all this visual work out of your .aspx files and into reusable .skin files and .css files. The sample portal application for this article customizes Web Part appearance by using skins and themes, and is available on the MSDN®Magazine Web site.
Display Modes and Page Scope
A single instance of the WebPartManager control runs on each Web Part Page and is responsible for managing Web Part instances and how they relate to WebPartZone controls. The WebPartManager control also provides a programmatic interface, making it possible to switch the Web Part Page between browse, design, and edit display modes. For example, to programmatically switch the current page into design mode, you can simply add a link control with an event handler that sets the DisplayMode property to DesignDisplayMode:
WebPartManager1.DisplayMode = WebPartManager.DesignDisplayMode;
It's important to understand the differences between each of the display modes of a Web Part Page. By default, a Web Part Page operates in browse mode, which doesn't let the user make changes to any Web Parts. When the Web Part Page is switched to design mode, the user is able to move Web Parts within a WebPartZone or between zones. Figure 5 lists the available display modes.
Figure 5 Web Part Page Display Modes
| Display Mode | Description |
|---|---|
| BrowseDisplayMode | Standard view mode. No personalization or editing. |
| DesignDisplayMode | Enables drag and drop layout personalization or customization. |
| EditDisplayMode | Enables personalization or customization of Web Part properties to change appearance and behavior. Also permits the user to delete Web Parts that have been added to the page dynamically. |
| ConnectDisplayMode | Enables user to connect Web Parts at run time. |
| CatalogDisplayMode | Enables user to add Web Parts into a WebPartZone at run time. |
The ASP.NET 2.0 Web Part controls produce all the required DHTML and JavaScript behind the scenes to enable drag and drop within the browser. On browsers that don't support the necessary DHTML and JavaScript features, all of the functionality other than drag and drop editing remains. This means that you don't have to worry about mandating that all clients use Microsoft® Internet Explorer 5.0 or higher. The ASP.NET 2.0 Web Part controls also take care of managing the storage and retrieval of personalization data to remember where users have placed Web Parts during previous sessions.
In addition to allowing your code to switch between display modes, WebPartManager also provides the means for changing a Web Part Page between user scope and shared scope. The scope of the page dictates whether a change to a Web Part is a customization or a personalization. Remember that customization changes are seen by all users, while personalization changes are seen only by the user who made them. Changing a Web Part Page is accomplished by calling the ToggleScope method of the WebPartManager control, as shown here:
WebPartManager1.Personalization.ToggleScope();
The default scope is user scope, in which changes made to Web Parts are recorded as personalizations that are only seen by the current user. A successful call to the ToggleScope method will place a Web Part Page in shared scope, in which changes are recorded as customizations. The purpose of shared scope is to allow an administrator or site designer to make sweeping customization changes to the Web Parts on a Web Part Page that are seen by all users. Any personalization changes made by users always take precedence over global customizations if there is any overlap.
It is not always possible for the current user to enter shared scope. By default, no user has the required permissions to enter shared scope. A user must be granted permission to do so in the Web.config file. Here's an example of granting permission for all users in the admin or site_designer roles to enter shared scope and modify global customizations:
<webParts> <personalization> <authorization> <allow roles="admin, site_designer" verbs="enterSharedScope" /> </authorization> </personalization> </webParts>
Properties and Personalization
Each Web Part object has a standard set of properties that can be customized or personalized. For example, each Web Part has a Title property that can be customized after it has been added to a WebPartZone. The EditorZone control and various Editor Parts allow users to make changes to Web Part properties.
When the user sets a Web Part Page to EditDisplayMode, the Web Part menu provides an Edit command. Invoking the Edit command on a particular Web Part brings up the EditorZone along with whatever Editor Parts you have placed into the zone in question. ASP.NET 2.0 ships with several built-in Editor Parts for modifying the standard Web Part appearance, behavior, and layout.
The Web Part personalization scheme is simple to extend by adding custom properties that can be personalized. You just add properties to a Web Part class definition and apply attributes such as Personalizable, WebBrowsable, and WebDisplayName. Once you have done this, the Web Part controls take care of storing and retrieving property values that have been customized or personalized.
When you create a personalization property, it usually makes sense to define a private field along with it, like so:
private bool _HR = true; [Personalizable(PersonalizationScope.User), WebBrowsable, WebDisplayName("Show HR News"), WebDescription("Use this property to show/hide HR news")] public bool HR { get { return _HR; } set { _HR = value; } }
If you want to allow your users to personalize a property like this, you only need to add a PropertyGridEditorPart into an EditorZone for the current page. Figure 6 shows the experience your users will have when you do this.
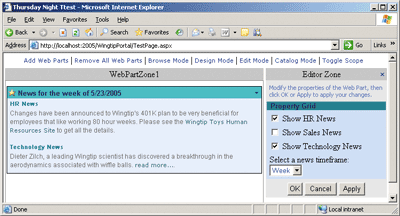
Figure 6** Editor Parts Allow Users to Personalize Web Parts **
If you define a Web Part property based on a string or numeric type, the PropertyGridEditorPart will provide a textbox for the user to change the value. If you define a Web Part property based on a Boolean value, the PropertyGridEditorPart will provide a checkbox, as shown in Figure 6.
Figure 7 shows a nifty programming trick that carries over from Web Part development with Windows SharePoint Services: you can define a personalization property whose type is based on an enumeration type.
Figure 7 Custom Personalization Property
public enum Timeframe { Today, Week, Month } ... protected Timeframe _Timeframe = Timeframe.Month; [Personalizable(PersonalizationScope.Shared), WebBrowsable, WebDisplayName("Select a news timeframe"), WebDescription("Use this property to set timeframe")] public Timeframe Timeframe { get { return _Timeframe; } set { _Timeframe = value; } }
The real value of creating a WebBrowsable, personalization property based on an enumeration is that the PropertyGridEditorPart generates a dropdown list of available property settings for the user, as shown for the Timeframe property in Figure 7. This is a nice convenience for the user and it also helps to ensure that the user picks a valid property value.
There's one more thing to note about the Timeframe property definition. It has been defined with a Personalizable attribute that has a setting of PersonalizationScope.Shared. When a property is defined in this manner as a shared property it can be customized, but not personalized. Since a shared property is not available for personalization, it does not show up in the PropertyGridEditorPart when the current Web Part Page is in user scope. It will only appear when the page is in shared scope.
Web Part Catalogs
You've seen Web Part Pages that prepopulate Web Parts into WebPartZones. You can complement this technique with another approach in which you allow users to add new Web Parts at run time. This is made possible through the use of a CatalogZone and CatalogParts such as PageCatalogPart and DeclarativeCatalogPart (see Figure 8).
Figure 8 Adding New Web Parts To Page
<asp:CatalogZone ID="CatalogZone1" runat="server" > <ZoneTemplate> <!-- allows users to re-add Web Parts to page after being closed --> <asp:PageCatalogPart ID="PageCatalogPart1" runat="server" Title="Local Page Catalog" /> <!-- allows users to add new Web Parts to page --> <asp:DeclarativeCatalogPart ID="DeclarativeCatalogPart1" runat="server" Title="Wingtip Web Parts"> <WebPartsTemplate> <cc1:WeatherWebPart ID="WeatherWebPart1" runat="server" ZipCode="04090" /> </WebPartsTemplate> </asp:DeclarativeCatalogPart> </ZoneTemplate> </asp:CatalogZone>
Once you have added a CatalogZone and CatalogPart in this manner, users will be able to dynamically add Web Parts at run time through a user interface like the one shown in Figure 9.
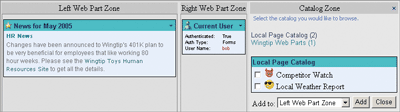
Figure 9** CatalogZones Allow Users to Dynamically Add Web Parts **
First, you need to understand the purpose of the PageCatalogPart. When in design display mode or edit display mode, the user has the ability to invoke the Close command on a Web Part. When a user closes a Web Part, the Web Part and its personalization or customization settings are retained so the user can add that WebPart again at a later time. Therefore, the PageCatalogPart shows a list of all the Web Parts that have been closed and then can be added to the page.
The Close command is different from the Delete command. The Delete command is only available when in edit display mode. When a user deletes a Web Part, all information about the existence of the Web Part, including its customization and personalization data, is deleted from storage.
A DeclarativeCatalogPart can be declaratively populated with Web Parts. The code in Figure 8 shows how to populate this catalog with a custom-named WeatherWebPart. Using this approach, you have the ability to make all kinds of Web Parts available to your users.
To complement this article and to give you more detail on the nuts and bolts of building Web Part Pages, we recommend reading the article "Introducing the ASP.NET 2.0 Web Parts Framework," by Stephen Walther. It provides more detail and working examples of building out Web Part Pages using EditorZones and CatalogZones. Stephen also delves into some more advanced topics, including Verbs, Connections, and importing and exporting Web Parts.
ASP.NET 2.0 Portal Development
In addition to the WebPart infrastructure itself, there are several new features that make the development of intranet Portal sites appealing in ASP.NET 2.0. As we mentioned earlier in this article, the introduction of themes and skins makes it very straightforward to isolate style properties in your portal pages and to make sweeping style changes without touching individual pages. Perhaps even more compelling, however, is the introduction of Master Pages. With Master Pages it is possible to isolate all of your WebPartZones and the overall WebPartManager control into a single template page from which individual pages inherit their base appearance and functionality. An interesting technique that we use in the sample portal is to add ContentPlaceholder controls within the ZoneTemplate of each WebPartZone in the Master Page. This way, content pages that use this Master Page can add their own Web Parts using Content controls that map onto the respective ContentPlaceHolder control.
One of the things you need to decide in designing your Master Page for a portal site is how to make the customization features available to the user. As you have seen, depending on what zone types have been added to a page, there are several different customization modes that a user can choose from to alter the page.
One approach to displaying customization options to the user is to wrap both the WebPartManager control and a collection of buttons (typically LinkButtons) into a user control that is then dropped into the Master Page to provide customization options for all pages in the site. Encapsulating these controls into a User Control (let's call it the WebPartManagerPanel) is also useful if you end up having more than one Master Page for your Web site, providing alternative layouts for some subset of your pages. The menu bar in the portal application that you saw earlier in Figure 1 shows a sample user control that displays the current mode and scope of the WebPartManager, and it also provides LinkButtons that change the mode of the page to one of the editing modes supported by the WebPartManager (this is the control that the sample portal application uses).
The other useful feature to provide in your WebPartManagerPanel is to dynamically show and hide the display modes that are available based on the current user and the current page. You can query the supported display modes by looking in the WebPartManager's SupportedDisplayModes collection and using that information to turn on or off the menu item that exposes that mode. For example, to find out whether the current page supports CatalogDisplayMode, you would do the following:
if (WebPartManager1.SupportedDisplayModes.Contains( WebPartManager.CatalogDisplayMode)) { //enable catalog display mode LinkButton here... }
You should also note that a call to ToggleScope will fail when executing within the context of a user without the proper permissions. It's a good idea to supply code that queries the CanEnterSharedScope property exposed by the WebPartManager controls Personalization property to determine whether to hide or show the user interface element that makes it possible for the user to enter shared scope:
if (WebPartManager1.Personalization.CanEnterSharedScope) { // display UI element that allows user to enter shared scope }
The WebPartManagerPanel user control in the sample accompanying this article contains a complete implementation of a panel that dynamically adjusts its display based on the current user and page capabilities.
User Controls as Web Parts
One of the frustrating things about building Web Parts in Windows SharePoint Services is that you have to programmatically create the entire user interface of your control with no help from the designer. Because a lot of Web Parts are collections of server-side controls that interoperate, it is unfortunate that you don't have the Visual Studio® designer at your disposal when creating Web Parts. The obvious solution to this problem is to allow developers to create ASP.NET user controls and use them as Web Parts. (A third-party tool called SmartPart provides support for employing user controls as Web Parts in Windows SharePoint Services.)
ASP.NET 2.0 Web Parts address this issue by allowing any control to be used directly as a Web Part, with no modifications or wrapping needed. This is not only useful for incorporating user controls into your Web Part collection, but is also an easy way to integrate any custom controls that you may have built for your current ASP.NET pages.
The way this works internally is if a standard control (non-Web Part) is added to a WebPartZone, an implicit call to WebPartManager.CreateWebPart is made, which allocates an instance of the GenericWebPart class and initializes it with the control that was added. The GenericWebPart class derives from the WebPart base class, providing implementations of the core Web Part properties. When GenericWebPart is constructed, it adds the control it was initialized with as a child control. During the rendering process, GenericWebPart renders nothing to the response buffer itself, and simply delegates rendering to its child control, as do most composite controls. The end result is that you can add any control you would like to a WebPartZone on a page and it works. For example, the following page defines a WebPartZone with a user control and a standard Calendar control, both of which will be implicitly wrapped by the GenericWebPart class at the time of creation:
<%@ Register Src="webparts/CustomerList.ascx" TagName="CustomerList" TagPrefix="Wingtip" %> <asp:WebPartManager ID=" WebPartManager1" runat="server" /> <asp:WebPartZone ID="WebPartZone1" runat="server" HeaderText="Zone 1"> <ZoneTemplate> <Wingtip:CustomerList runat="server" id="CustomerList" /> <asp:Calendar runat="server" id="CustomerCalendar" /> </ZoneTemplate> </asp:WebPartZone>
As with standard Web Parts, it is possible to dynamically create controls wrapped by GenericWebPart. If it is a user control, you must dynamically load and create the user control instance with a call to Page.LoadControl. Second, you must explicitly assign a unique ID to the control. Third, you must call the CreateWebPart method of the WebPartManager object to create an instance of the GenericWebPart class, which then acts as a wrapper around the user control instance. Finally, you need to take the GenericWebPart reference returned from the call to CreateWebPart and pass it into a call to AddWebPart, specifying the WebPartZone into which it should be added:
// create Web Part instance from User Control file Control uc = this.LoadControl(@"webparts\CompanyNews.ascx"); uc.ID = "wp2"; GenericWebPart wp2 = WebPartManager1.CreateWebPart(uc); WebPartManager1.AddWebPart(wp2, WebPartZone1, 1);
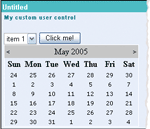
Figure 10** GenericWebPart **
The only disadvantage to this technique is that you lose the opportunity to control the Web Part-specific features of the control because the GenericWebPart class is the one that inherits from WebPart, not your control. This will become obvious as soon as you run a page with controls wrapped by GenericWebPart, as they default to Untitled for their titles and have no icons or descriptions associated with them as most Web Parts do. Figure 10 shows a sample user control wrapped by GenericWebParts with the default title (Untitled) and icons.
One way that you can work around this problem is to add a handler for the Init event of your user control. If your control is wrapped by GenericWebPart (which you can determine by querying the type of your Parent property), then you should set the attributes of the GenericWebPart class like this:
void Page_Init(object src, EventArgs e) { GenericWebPart gwp = Parent as GenericWebPart; if (gwp != null) { gwp.Title = "My custom user control"; gwp.TitleIconImageUrl = @"~\img\ALLUSR.GIF"; gwp.CatalogIconImageUrl = @"~\img\ALLUSR.GIF"; } }
When you run the page again, as long as the user control is being wrapped by GenericWebPart, the changes you made to the properties of the GenericWebPart parent will be reflected in the rendering of the Web Part containing your control. The newly attributed user control is shown in Figure 11. Note the title and icon.
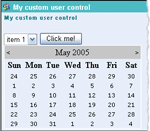
Figure 11** Title and Icon **
Another compelling solution is to implement the IWebPart interface directly on your user control class. This doesn't seem like it would help, since the user control is never queried directly for Web Part properties as those details are handled by the GenericWebPart class. Fortunately, the designers of the GenericWebPart class anticipated this need and implemented the properties in the GenericWebPart class to automatically delegate to the wrapped control if that control implements the IWebPart interface.
So customizing the Web Part features of a user control is just a matter of implementing the IWebPart interface and filling out the seven properties that it defines. The code in Figure 12 shows an example of the codebehind class for a user control that achieves the same results as we did before by dynamically altering the GenericWebPart properties.
Figure 12 User Control with Dynamic Properties
public partial class HelloWorld2 : UserControl, IWebPart { protected string _title = "My custom user control"; public string Title { get { return _title; } set { _title = value; } } private string _titleIconImageUrl = "~/img/ALLUSR.GIF"; public string TitleIconImageUrl { get { return _titleIconImageUrl; } set { _titleIconImageUrl = value; } } private string _catalogIconImageUrl = "~/img/ALLUSR.GIF"; public string CatalogIconImageUrl { get { return _catalogIconImageUrl; } set { _catalogIconImageUrl = value; } } // Remaining properties not shown... }
You might even consider creating an alternative base class for your user controls. This class would derive from UserControl and implement IWebPart, and can then be inherited by all of the user controls in your portal. This is what we do in the sample portal solution accompanying this article. With this solution your user controls can initialize the properties they care about in their constructors, and the rest takes care of itself. Figure 13 shows an alternative base class for user controls that implements IWebPart, and a corresponding codebehind class for a user control that makes use of the class to set its title and icon properties.
Figure 13 IWebPart
public class WebPartBase : UserControl, IWebPart { protected string _title = "[Generic Title]"; public string Title { get { return _title; } set { _title = value; } } private string _titleIconImageUrl = "~/img/star.GIF"; public string TitleIconImageUrl { get { return _titleIconImageUrl; } set { _titleIconImageUrl = value; } } private string _catalogIconImageUrl = "~/img/star.GIF"; public string CatalogIconImageUrl { get { return _catalogIconImageUrl; } set { _catalogIconImageUrl = value; } } // Remaining properties not shown... } // Code behind class for CustomerList.ascx User Control public partial class CustomerList : WebPartBase { public CustomerList() { this.Title = "Wingtip Customer List"; this.TitleIconImageUrl = @"~\img\ALLUSR.GIF"; this.CatalogIconImageUrl = @"~\img\ALLUSR.GIF"; } }
Now that you have so much flexibility with user controls, you may very well ask why would you ever want to create a custom control when you can have designer support with user controls and still customize the WebPart features? There are several reasons, actually, starting with the fact that you cannot add custom verbs to a user control. For that you must resort to deriving directly from WebPart and overriding the Verbs property. Alternatively, you can consider implementing IWebEditable in your control.
The other reason is that user controls are intrinsically scoped to the application directory—it is not possible to share a user control implementation across multiple Web applications without physically copying the .ascx file from one project to another. Custom Web Parts that derive from the WebPart class, on the other hand, can be compiled into a reusable DLL and deployed globally in the Global Assembly Cache (GAC). Also, with a custom Web Part, you have the option of writing a custom designer for your control to change its default appearance within Visual Studio, and you can create an icon to associate with the Web Part when it is dropped onto the toolbox. Figure 14 provides a comparison of features for deciding between custom Web Parts and user controls.
Figure 14 Custom Web Part or User Control?
| Feature | WebPart-Inherited Class | User Control |
|---|---|---|
| Can be built in separate DLL and installed in the GAC to reuse across applications | Yes | No |
| Can be added to Visual Studio toolbox with a fancy icon | Yes | No |
| Can contained extended verbs | Yes | No |
| Designer support available | No | Yes |
Web Parts and Personalization Providers
Providers are a new feature of ASP.NET 2.0 that are one of the main reasons you see so many fully functional controls available in this release that require little or no coding to get up and running. The basic idea behind a provider is to define a common set of data-related tasks for a particular feature, and aggregate those tasks into an abstract class declaration that inherits from a common ProviderBase class. In the personalization features we are exploring in this article, the obvious data-related tasks that must be available include:
- Saving the Web Part properties and layout for a particular page and user.
- Loading the Web Part properties and layout for a particular page and user.
- Saving the general Web Part properties and layout (for general customization) for a particular page.
- Loading the general Web Part properties and layout (for general customization) for a particular page.
- Resetting the Web Part properties and layout to their defaults for a particular page and user.
- Resetting the Web Part properties and layout to their defaults (for general customization) for a particular page.
There are some other ancillary features that are part of the personalization infrastructure that need persistence capabilities too, but it basically boils down to these six capabilities. If we assume that there is a class capable of performing these six actions and successfully saving and restoring the data, then the WebPartManager on each page can use that class to save and restore all personalization and customization data as the site runs. The abstract class that defines these methods is called PersonalizationProvider, and the one concrete derivative of this class that is used by default is the SqlPersonalizationProvider. The three methods that represent the six pieces of functionality we identified are shown in Figure 15. Note that each method is capable of working with either user personalization or shared customization based on whether the incoming userName parameter is null or not.
Figure 15 PersonalizationProvider
public abstract class PersonalizationProvider : ProviderBase { protected abstract void LoadPersonalizationBlobs( WebPartManager webPartManager, string path, string userName, ref byte[] sharedDataBlob, ref byte[] userDataBlob); protected abstract void ResetPersonalizationBlob( WebPartManager webPartManager, string path, string userName); protected abstract void SavePersonalizationBlob( WebPartManager webPartManager, string path, string userName, byte[] dataBlob); ... // remaining methods not shown }
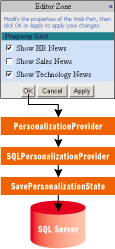
Figure 16** Interaction **
Note that all of the personalization data is stored as straight binary data (byte[]), which in the default SqlPersonalizationProvider is written to an image field in the database. Since ASP.NET 2.0 knows that there is a class that provides these methods, it can build much more logic into its base set of controls than was possible before. In our case, the WebPartManager in each page that uses Web Parts is responsible for making the right calls to the current PersonalizationProvider class to serialize and restore the personalization settings for each page. The diagram in Figure 16 shows the interaction between the EditorZone control and the default SqlPersonalizationProvider.
The more you work with ASP.NET 2.0, the more you will see examples of this provider architecture. There are providers for membership, role management, site map data, and health monitoring, among others, all of which define similar core sets of methods for controls to interact with.
Changing the Personalization Data Store
As with most of the providers in ASP.NET 2.0, the default provider for personalization is implemented to target a SQL Server back end. If you make no changes to the configuration files, the default SqlPersonalizationProvider uses a connection string for SQL Server 2005 Express Edition, which supports a local file-based database. The connection string looks like this:
data source=.\SQLEXPRESS; Integrated Security=SSPI; AttachDBFilename=|DataDirectory|aspnetdb.mdf; User Instance=true
The advantage to using a SQL Server 2005 Express Edition file-based database is that it can be created on the fly without any additional setup by the user. This means you can create a brand new site, start using the personalization features without setting up a database, and it just works! When you first interact with the site, it will generate a new aspnetdb.mdf file in your site's App_Data directory, and initialize it with the tables and stored procedures necessary to support all of the default providers.
This is great for small sites that don't need to scale or support many concurrent users, but for enterprise systems, it will be necessary to store the data in a fully administered dedicated database server. Fortunately, changing the database used by the SqlPersonalizationProvider is straightforward. The SqlPersonalizationProvider configuration initializes the connection string to LocalSqlServer, which means that it looks for an entry in the <connectionStrings> section of the configuration file with the name LocalSqlServer, and uses the associated connection string to open a connection to the database. By default, this string is the connection string you saw a few paragraphs ago, meaning it will write to a local SQL Server 2005 Express Edition .mdf file. To change this, you must first clear the LocalSqlServer connection string collection and then reassign a new connection string value in your Web.config file (or alternatively, you could change this in your machine-wide Machine.config file to affect all sites on that machine). Here's an example Web.config file that will change the provider database to point to a local SQL Server 2000 instance:
<configuration xmlns="https://schemas.microsoft.com/.NetConfiguration/ V.2.0"> <connectionStrings> <clear /> <add name="LocalSqlServer" connectionString= "server=.;integrated security=sspi;database=aspnetdb"/> </connectionStrings> ... </configuration>
Before this change will work, there must be a database named aspnetdb on the local server with the necessary tables and stored procedures required by the SqlPersonalizationProvider. To create this database, there is a utility that ships with ASP.NET 2.0 called aspnet_regsql.exe. When run with the default settings, it will create a database locally called aspnetdb with the necessary tables for all of the providers. Alternatively, you can choose to install the tables and stored procedures into an existing database. The table and stored procedure names are all prefixed with "aspnet" so it is unlikely they will clash with any existing tables.
As with all providers in ASP.NET 2.0, this level of indirection creates a very flexible architecture where the back-end data store can be completely changed without any modification to the pages or Web parts contained within.
Creating Your Own Personalization Provider
The ability to change the connection string for the personalization provider gives you a certain amount of flexibility, but under the hood the SqlPersonalizationProvider uses the System.Data.Sql.Client namespace to perform its data retrieval. This means that it is limited to a SqlServer database. If you need to store your personalization in a different database, or perhaps in a completely different data store altogether, you'll have to take the next step and build your own custom personalization provider. Fortunately, most of the hard work is already done for you and is easily leveraged. As an example of writing personalization data to a different data store, the sample portal site accompanying this article has a complete implementation of a custom personalization provider called FileBasedPersonalizationProvider that persists all personalization and customization data to local binary files in the application's App_Data directory. The binary file names are generated uniquely for each user and path, and there is also one file per unique path for general user settings.
To build a custom personalization provider you must first create a new class that inherits from the PersonalizationProvider base class, and override all of the abstract methods inherited from the base class. The class declaration that is shown in Figure 17 demonstrates how to do this.
Figure 17 Custom Personalization Provider Class
namespace Wingtip.Providers { public class FileBasedPersonalizationProvider : PersonalizationProvider { public override string ApplicationName { get { ... } set { ... } } public override void Initialize( string name, NameValueCollection configSettings) { ... } public override int GetCountOfState(PersonalizationScope scope, PersonalizationStateQuery query) { ... } public override int ResetUserState(string path, DateTime userInactiveSinceDate) { ... } protected override void LoadPersonalizationBlobs( WebPartManager webPartManager, string path, string userName, ref byte[] sharedDataBlob, ref byte[] userDataBlob) { ... } protected override void ResetPersonalizationBlob( WebPartManager webPartManager, string path, string userName) { ... } public override int ResetState(PersonalizationScope scope, string[] paths, string[] usernames) { ... } protected override void SavePersonalizationBlob( WebPartManager webPartManager, string path, string userName, byte[] dataBlob) { ... } public override PersonalizationStateInfoCollection FindState( PersonalizationScope scope, PersonalizationStateQuery query, int pageIndex, int pageSize, out int totalRecords) { ... } } }
There are really only two significant methods that must be implemented for your personalization provider to begin working: LoadPersonalizationBlobs and SavePersonalizationBlob. These two methods represent the binary serialization of personalization data and are called by the personalization infrastructure to retrieve data when a page is loading, and to write the data back out (typically on behalf of a particular user) when data is changed in edit, catalog, or design view on a page with Web Parts.
Figure 18 LoadPersonalizationBlobs and SavePersonalizationBlob
protected override void LoadPersonalizationBlobs( WebPartManager webPartManager, string path, string userName, ref byte[] sharedDataBlob, ref byte[] userDataBlob) { string allUsersFileName = HttpContext.Current.Server.MapPath( ConstructAllUsersDataFileName(path)); string userFileName = HttpContext.Current.Server.MapPath( ConstructUserDataFileName(userName, path)); allUsersFileName = string.Intern(allUsersFileName); userFileName = string.Intern(userFileName); try { // Read in shared user data first. // Lock on the file name in case two clients try accessing // the same file concurrently - note we lock on the Interned // file name string, which will always return the same object // for identical strings if (Monitor.TryEnter(allUsersFileName, 5000) && File.Exists(allUsersFileName)) sharedDataBlob = File.ReadAllBytes(allUsersFileName); else throw new ApplicationException("Monitor timed out"); // Next read in user specific data (if there is any) if (Monitor.TryEnter(userFileName, 5000) && File.Exists(userFileName)) userDataBlob = File.ReadAllBytes(userFileName); else throw new ApplicationException("Monitor timed out"); } finally { Monitor.Exit(allUsersFileName); Monitor.Exit(userFileName); } } protected override void SavePersonalizationBlob( WebPartManager webPartManager, string path, string userName, byte[] dataBlob) { string fileName = HttpContext.Current.Server.MapPath( string.IsNullOrEmpty(userName) ? ConstructAllUsersDataFileName(path) : ConstructUserDataFileName(userName, path)); fileName = string.Intern(fileName); try { // lock on the file name in case two clients try accessing // the same file concurrently if (Monitor.TryEnter(fileName, 5000)) { File.WriteAllBytes(HttpContext.Current.Server.MapPath( fileName), dataBlob); } else throw new ApplicationException("Monitor timed out"); } finally { Monitor.Exit(fileName); } } // Helper function for creating a unique file name for all users // based on a path private string ConstructAllUsersDataFileName(string path) { string fileName = path.Replace('/', '_').Replace('~', '_').Replace('.', '_'); return "~/App_Data/allusers" + fileName + ".bin"; } // Helper function for creating a unique file name for a particular // user based on a path private string ConstructUserDataFileName(string user, string path) { string fileName = path.Replace('/', '_').Replace('~', '_').Replace('.', '_'); return "~/App_Data/" + user + fileName + ".bin"; }
Once the provider is fully implemented, you use the providers section of the personalization configuration section to add it as a registered personalization provider. To actually begin using it, you must specify it as the default provider for personalization in your Web.config file. Here is an example of wiring up our custom file-based provider to be the default provider in our application:
<webParts> <personalization defaultProvider="FileBasedPersonalizationProvider"> <providers> <add name="FileBasedPersonalizationProvider" type="Wingtip.Providers.FileBasedPersonalizationProvider" /> </providers> </personalization> </webParts>
If we run our site again, all personalization data will now be stored in local binary files. Obviously not the most scalable solution, but the sample should give you an idea of how to implement your own personalization provider on whatever back end you like. Figure 19 shows our new provider plugged into the whole Web Part infrastructure.
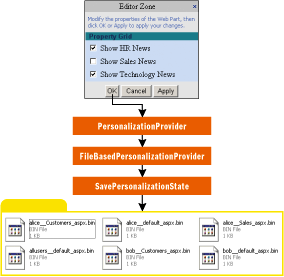
Figure 19** Using FileBasedPersonalizationProvider **
Taking it a Step Further
Now you've seen how ASP.NET 2.0 and its new Web Part control set make it relatively painless to create rich portal applications that support customization and personalization. Probably the most significant features of this infrastructure is its plug-ability. Instead of being tied to a particular serialization implementation and data store, the provider architecture makes it relatively easy to write the personalization data to any back-end data store that makes sense for your site. So, go ahead and start creating customizable sites today with ASP.NET 2.0 Web Parts.
If you have enjoyed this article, there is plenty more to learn when it comes to building on Web Parts in an ASP.NET 2.0 portal application. Be sure to download the accompanying sample from the MSDN Magazine Web site. We also recommend checking out Fredrik Normén's blog, which has several interesting examples of working with Web Parts in ASP.NET 2.0.
Ted Pattison is an author and trainer who delivers hands-on training classes through Pluralsight, provides consulting through Ted Pattison Group, and is the author of several books.
Fritz Onion is a co-founder of Pluralsight, an education and content-creation company, where he focuses on Web development with ASP.NET. Fritz is the author of Essential ASP.NET (Addison Wesley 2003). Read his blog at www.pluralsight.com/fritz.