Cutting Edge
A Tour of Windows Workflow Activities
Dino Esposito
Code download available at:CuttingEdge2006_11.exe(170 KB)
Contents
Out-of-the-Box Activities
Controlling Flow through Conditions
Loops and Repeated Activities
Synchronization Blocks
Exception Handling
Transactions
Calling Out Other Code
Summary
Most enterprise applications contain business processes that developers and architects find natural to express through workflows. Ultimately, a workflow is a program that captures the interactions among real-world entities. The workflow waits for stimulus from the external world, and the arrival of that stimulus could take arbitrarily long periods of time.
A pillar of the upcoming Microsoft® .NET Framework 3.0, Windows® Workflow Foundation provides the programming model and runtime engine for building workflow-enabled applications on a Windows platform equipped with the .NET Framework 2.0 or higher, running at least Windows XP Service Pack 2 (SP2) or Windows Server® 2003.
Don Box and Dharma Shukla wrote a Windows Workflow Foundation primer in the January 2006 issue of MSDN®Magazine. In recent Cutting Edge columns (March 2006 and April 2006), I addressed a very common type of workflow application where the execution of the workflow is conditioned by human intervention (see June 2003 Cutting Edge column and June 2004 Cutting Edge column). From a software perspective, the need for a human operator mostly means asynchronous event handling, state persistence, and the availability of a shared server. Windows Workflow Foundation supports virtually any scenario where human operators are involved.
Each workflow is a declarative program wherein each program statement is represented in terms of a component called an activity. One of the biggest myths about Windows Workflow Foundation is that all the constituent activities are linked either sequentially or by state-machine transition. In fact, Windows Workflow Foundation virtualizes the execution model in terms of an activity automata. This enables you to write composite activities which can capture any type of control flow pattern, ranging from fancy joins and merges to state machines to graphs to sequences to interleavings to non-local exits, and so on. In short, it allows you to model the control flow patterns that exist in the real world, through high-fidelity composite activities. However, Windows Workflow Foundation ships with built-in activities for only two patterns: sequential and state-machine workflows.
A sequential workflow has clear starting and ending points and execution proceeds from start to finish, one step after the next, following one possible route. State-machine workflows are expressed as a set of states, each of which may contain activities and is triggered by an event. You define an initial and a completed state and execution proceeds from state to state following all defined transitions until the completed state is reached.
As I mentioned, the building block of the workflow is the activity. Building such a workflow means combining activities to create the desired model for the problem to face. Windows Workflow Foundation comes with a large set of built-in activities, but it is also completely extensible through custom activities. Understanding goals and capabilities of the out-of-the-box activities is key to making full sense of the true potential of the platform. This column will provide a tour of the standard workflow activities you get when you install the Windows Workflow Foundation runtime and the Visual Studio® 2005 designer.
Out-of-the-Box Activities
Windows Workflow Foundation is part of the .NET Framework 3.0 (formerly code-named WinFX®). Even though it's still a beta, I found the latest Community Technology Preview (CTP) to be very stable; a number of companies are extensively using it to develop applications. As a result, a number of tools and custom activities are already available and a useful support community is growing on newsgroups and forums. If you have, or will soon have, some interest in workflow applications, be aware that it's never too early to get properly acquainted.
To find the latest download, go to Windows Workflow Foundation. Once it's installed, start Visual Studio 2005, open a Visual Basic® or C# workflow project, and take a look at the contents of the toolbox. Depending on the type of project you select, it should look like one of the toolboxes in Figure 1.
The contents of the toolbox are context-sensitive and change based on the type of workflow you select. In particular, the left-hand toolbox in Figure 1 also includes the state activities required when you create a state-machine workflow. The toolbox window on the right only includes activities for a sequential workflow. The set of predefined activities can be split into a few categories based on the goals and expected behavior. Figure 2 shows a possible categorization: control flow, execution, events, Web services, and state machines.
Figure 2 Categories of Workflow Activities
| Flow | Execution | Events | Web Services | State |
|---|---|---|---|---|
| IfElse | TransactionScope | EventDriven | WebServiceInput | SetState |
| While | Sequence | Listen | WebServiceOutput | State |
| CAG | Compensate | HandleExternalEvent | WebServiceFault | StateInitialization |
| Policy | SynchronizationScope | EventHandlingScope | InvokeWebService | StateFinalization |
| Replicator | Code | Delay | ||
| Throw | Parallel | |||
| Suspend | InvokeWorkflow | |||
| Terminate | CallExternalMethod | |||
| FaultHandler | CompensatableSequence | |||
| CompensatableTransactionScope |
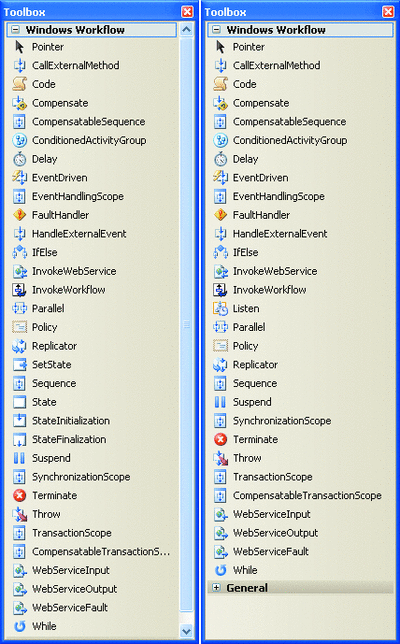
Figure 1** Workflow Activities in Toolbox **(Click the image for a larger view)
Control flow activities govern the sequence in which the graph activities execute. The list includes conditional blocks as well as constructs for implementing loops. Execution activities include constructs to terminate or suspend a workflow, throw an exception, execute internal or external code, or spawn another workflow. Most workflows need synchronization with the host environment—typically a Windows Forms or ASP.NET application. The activities in the events group let the workflow stop waiting for external events, handle received events, or just wait before proceeding with the next step. Finally, the Web services and state groups target two special features of a workflow—exposing the internal engine as a Web service and as a state machine. Let's examine the key activities in the framework, proceeding by groups.
Controlling Flow through Conditions
When conditions are specified in a workflow, the runtime engine evaluates them and then acts based on the result. Two of the core condition-based activities are IfElse and Policy. The IfElse activity works like a classic If statement in a high-level programming language. It may contain any number of condition-based branches and also a default branch to fall into if no other condition is met. The Policy activity, instead, represents a collection of rules. In Windows Workflow Foundation, a rule consists of a condition and one or more resulting actions. Think of a rule as an If-Then-Else statement, where the condition corresponds to the Boolean guard of the If block, and the actions define the behavior of the Then and Else clauses. Let's get to know more about each of these activities and then compare them.
When added to a workflow, the IfElse activity looks like Figure 3. By default, it has two branches, and new branches can be added by right-clicking and selecting Add Branch from the context menu. When the runtime engine reaches an IfElse activity it begins evaluating the condition of the various branches proceeding from the left to right. The condition of each branch is determined and the first branch that evaluates to true is run. You can alter the evaluation order of the branches by moving branches around through the commands in the activity's context menu. To enable a branch, you need to specify a valid condition. You specify a condition in either of two ways—through an expression or through a piece of code.

Figure 3** IfElse Activity in Action **(Click the image for a larger view)
If you opt for an expression, set the branch in the designer and give a public home to the Condition entry in the Visual Studio 2005 Properties box. Next, expand the expression editor and enter an expression that touches on workflow members and evaluates to a Boolean value. For example, if the workflow class features a public property named MinimumLength you can set the condition as follows:
this.MinimumLength >= 8
The editor shown in Figure 4 fully supports IntelliSense® and provides access to private and public members of the workflow. This means that you call out a Boolean function as well. Suppose you have a property declared like this:
Public Property MinimumLength() As Integer Get Return _minLength End Get Set(ByVal value As Integer) _minLength = value End Set End Property
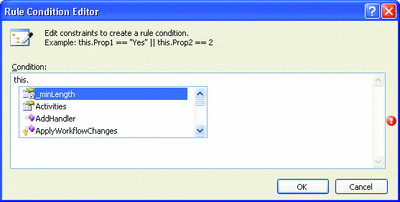
Figure 4** Condition Editor for IfElse Activities **(Click the image for a larger view)
When you try to read the value of MinimumLength, the runtime ends up invoking the get accessor of the property, which returns the value of the private member _minLength. The final branch in an IfElse activity can lack a condition. In this case, it will work as the Else branch of the IF workflow statement.
The second way to specify a condition is through ad hoc code. In this case, you add a method to the workflow class, as follows:
Sub EvalCondition(ByVal sender As Object, _ ByVal e As ConditionalEventArgs) e.Result = ... ' Boolean value End Sub
The function must match the signature that accepts an object and a ConditionalEventArgs class and returns void. The Result member of the ConditionalEventArgs class will be set to the Boolean value that represents the evaluation of the condition.
IfElse activities can be nested to express complex logic, but the design of the logic remains hardcoded in the workflow. This is good and bad at the same time. It's a good thing because it allows you to design the workflow exactly as you want and integrate it with the rest of the activities. It's a bad thing when you need to create a set of rules to initialize portions of the workflow's state. Having a bunch of IfElse activities only to assign values to internal members of the workflow is clearly overkill.
You should use a combination of IfElse activities when you really need to control the flow of the workflow and orchestrate various blocks of the work. If what you need is just a sequence of programmatic If statements with simple code attached to branches, then you're better off using a Policy activity. A Policy activity is a collection of rules. The code associated with each rule, though, is limited to setting a property on a workflow or calling a workflow method or a static method on types in referenced assemblies.
The activity is associated with a sorted collection of rules that you define through the editor. Each rule has a priority and an Active property. The combination of the two properties determines whether the rule should be evaluated and with which priority. In addition, a rule must specify a reevaluation behavior—Always (default) or Never. If set to Always, the rule is reevaluated as needed, otherwise it is evaluated only the first time and never changes whatever happens to the workflow's state.
Instead, the rule set as a whole is subject to forward chaining. Simply put, forward chaining refers to the ability of the actions of one rule to cause other dependent rules to be reevaluated. For example, an action that updates the value of a field that another rule tests requires a reevaluation of the involved rules (unless reevaluation is disabled on the rule). There are three types of forward chaining.
Implicit chaining indicates that the runtime engine will figure out which fields are modified by some actions and automatically reevaluate them. This mechanism succeeds as long as actions work on properties explicitly. What if you have an action like the following:
IF this.MinimumLength <= 8 THEN RefreshInternalState()
Who knows what the RefreshInternalState method is going to do? The method might touch on workflow properties that are involved with other rules in the policy activity. By using attributes on the method declaration, you can explicitly indicate the behavior of the method:
<RuleWrite("PasswordLevel")> _ Public Sub RefreshInternalState() Me.PasswordLevel = 1 End Sub
The RuleWrite attribute indicates that the method is going to modify the specified property; likewise, the RuleRead attribute indicates that the method reads from the specified properties. In this way, unequivocal information is provided to the runtime engine to keep the rule set in sync.
Finally, you can write actions that explicitly call out updates on involved properties. Here's an example:
IF this.MinimumLength <= 8 THEN RefreshInternalState() Update("PasswordLevel")
The Update method in the rule action orders the reevaluation of all rules that include the specified property.
Loops and Repeated Activities
The native set of activities provides classic While activity as well as a Replicator activity that has some points in common with a classic For loop. The While activity accepts a condition and evaluates it at the beginning of each iteration. If the condition is true, the activity runs the specified child activity and repeats until the condition becomes false. Note that a single activity is permitted in the body of the While. For this reason, you might want to use a composite activity such as Sequence or Parallel to execute multiple activities in the loop. (The term "interleaved" is probably more appropriate than "parallel" here. There is no true concurrency going on with the Parallel activity, only interleavings within the same thread.)
Similar to a Foreach statement, the Replicator activity creates and executes a given number of instances of the specified child activity. You can specify only one child activity, but using composite or custom activities is allowed. You can't control the number of iterations through a declarative property. Instead, you write a handler for the Initialized event and populate the CurrentChildData collection with initialization data for each of the desired instances:
Sub replicator1_Initialized(ByVal sender As Object, _ ByVal e As EventArgs) Console.WriteLine("Initializing ...") replicator1.CurrentChildData.Add("You are #1") replicator1.CurrentChildData.Add("You are #2") replicator1.CurrentChildData.Add("You are #3") End Sub
The preceding code snippet orders three instances of the child activity of the Replicator, each initialized with a given string. Note that if you leave the CurrentChildData collection empty, the Replicator won't run any child activity and is limited to firing top-level events such as Initialized and Completed. You can initialize child activities using an object (not necessarily a string), including instances of custom classes. The Replicator also includes events to signal initialization and completion of each child activity. By default, child instances run in sequence; by setting the ExecutionType property, though, you can opt for a parallel execution. When a parallel execution is requested, all child activity instances get created before the replicator starts and executes on parallel threads. When working in sequential mode, the next activity is instantiated only when the previous has finished.
If no global condition is set through the UntilCondition property, the Replicator ends when all replicates have completed; otherwise, the activity terminates when the UntilCondition is true. Note, though, that the activity will hang if all the child activities have completed and the UntilCondition property evaluates to false; the Replicator never loops through the child activities like in a While loop. The UntilCondition is evaluated after the global initialization of the activity, after each child activity has completed, and after all included activities have completed. If, at any time, the condition evaluates to true, the Replicator will exit immediately.
You can mix together conditional execution and loops in the ConditionedActivityGroup (CAG) activity. The CAG contains a number of child activities (possibly composite activities) and runs them until a global condition is met. Basically, a CAG combines the behavior of While and IfElse activities. Its internal logic is expressed by the following pseudocode:
While condition If child1.WhenCondition Then child1.Execute If child2.WhenCondition Then child2.Execute : If childN.WhenCondition Then childN.Execute End While
Each child activity has a WhenCondition property. Based on the evaluation of the specified condition, the activity is run or skipped in the current iteration. Note, though, that if the child activity has no WhenCondition set, it is executed only the first time and skipped for all subsequent iterations. All conditions are evaluated whenever required based state change dependencies.
The CAG activity terminates after the UntilCondition returns true and immediately cancels any currently executing activities. If no condition is specified, CAG completes when no child activities are running either because they have no condition set or the condition evaluates to false.
Synchronization Blocks
A sequential workflow that has no interleaved activities doesn't bother about serializing access to shared members. However, operation is different when a Parallel activity is used with two or more sequences running in an interleaved manner. Take a look at Figure 5. The While activity contains a Sequence block which, in turn, chains Parallel and Code activities. Internally, the Parallel activity has four different blocks, each performing a mathematical operation on a number defined as a member of the workflow class. The four branches in the Parallel activity execute in an interleaved manner. (There is only one thread in a workflow instance at any one time. That thread switches back and forth between the branches of the Parallel activity.) What about cross-task synchronization? By default, each piece of code running inside any of the child activities will perform a direct access to the shared member.
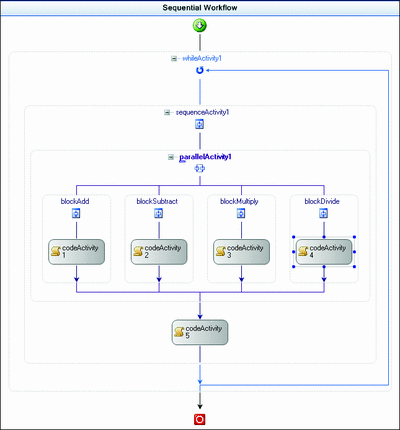
Figure 5** Parallel Tasks **(Click the image for a larger view)
With the simple schema of Figure 5, it may happen that each parallel branch runs as an atomic operation. This would be purely coincidental, though, and strictly based on the complexity and the duration of each operation. What if each branch is made of multiple activities? SynchronizationScope provides a declarative and explicit way of modeling synchronized access of shared state within a given workflow instance across a set of activities.
The section of the workflow running inside a SynchronizationScope activity is a sort of atomic operation that can't be interrupted. There's no transactional semantics here and the operation wrapped up in the SynchronizationScope activity cannot be rolled back. The SynchronizationScope activity plays a key role in all solutions based on activities that have parallel execution paths, such as Parallel, Replicator, and CAG.
To quickly figure out the role of a SynchronizationScope activity, take a look at Figure 6, which represents a modified version of the workflow in Figure 5. The blockMultiply activity counts two code blocks interspersed with a delay. The blockDivide activity contains one code block with no synchronization. If you place the contents of the blockMultiply outside of a synchronization scope, the blockDivide will likely execute during the delay phase of blockMultiply. Depending on what kind of updates you're making, this might be a serious issue. The SynchronizationScope activity safeguards the continuity of a section of the workflow.
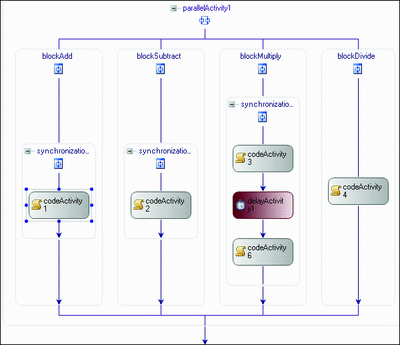
Figure 6** Parallel Tasks and Synchonization Scopes **(Click the image for a larger view)
Exception Handling
Just as any other .NET-based application, a workflow can throw and catch exceptions. In particular, you use the Throw activity to throw a particular exception. The Throw activity requires a couple of settings—the type of the exception to throw and a workflow class member to store an instance of the exception object for further customization. You can use custom exception types as long as the type is referenced in the workflow project.
To catch exceptions thrown by workflow activities, you add a FaultHandler activity. The workflow designers provide a container for all fault handlers you add. Each handler is bound to a workflow section that executes as soon as the exception is caught. After adding the FaultHandler activity, you define the type of the exception to catch. You can access the exception object through the Fault property. Note that to visualize fault handlers you have to switch the view in the Visual Studio 2005 designer and select the View Faults tab by clicking on the tab list at the bottom of the designer's view.
Transactions
The .NET Framework 2.0 includes an object to handle transactions easily and effectively—no matter the number and type of participant objects and the scope, local or distributed, of the transaction. The object is named TransactionScope and you typically use it according to this pattern:
Using ts As New TransactionScope ... ts.Complete End Using
The TransactionScope object guarantees that the transaction is either committed or rolled back in case of failure and, more importantly, it determines whether you need a local or distributed transaction and enlists any necessary resources. As the code reaches a point where it won't be running locally, TransactionScope escalates to the Distributed Transaction Coordinator (DTC) as appropriate. Any objects that implement the ITransaction interface can be enlisted with a transaction. The list includes all standard ADO.NET 2.0 data providers, while Microsoft Message Queue works in compatibility mode.
It is worth noting that there are a number of differences between TransactionScope and Enterprise Services as far as distributed transactions are concerned. TransactionScope belongs to a transaction framework designed specifically to fit .NET-based applications—System.Transactions. Internally, though, the classes of the System.Transactions namespace sometimes end up delegating some work to DTC and COM+. Why is TransactionScope important here? The TransactionScope Windows Workflow Foundation activity is just a workflow wrapper for an instance of the TransactionScope .NET class.
When you add a TransactionScope activity to a workflow, you can set the timeout for the transaction to complete and the desired level of isolation. All activities composed in the scope of the transaction form a unit of work that fulfills the classic ACID schema. When all child activities have successfully completed, the transaction commits and the workflow proceeds with the next step. The TransactionScope activity automatically rolls back if an exception is thrown from within the scope. Writing transactional workflows doesn't require you to explicitly deal with commit and rollback semantics—you just let things go if you want to commit and throw an exception to abort. The activity will comfortably manage everything else.
Note that you can't nest two or more TransactionScope activities. Likewise, you can't suspend the workflow from within a transaction using the Suspend activity. Instead, you can incorporate event handlers in the transaction through either the Listen or the EventHandlingScope activities. In this case, though, the workflow host should include a persistence service, otherwise an exception would be thrown if the workflow attempts to save its state on idle.
A related activity, CompensatableTransactionScope, also supports compensation. Compensation is the process of logically undoing the completed transactions in case of any subsequent business exceptions. Compensation differs from rollback in that it is a way to cancel the effects of a successfully completed and committed transaction when a rule is violated later in the workflow. The typical example of a rollback is when you have a transaction that transfers money across two accounts. The first call withdraws money from one account and the second call adds the same amount to another account. As long as the database supports the two-phase commit model, the rollback restores a consistent state in case of exceptions thrown within the transaction.
Imagine an order processing workflow where a transaction is used to process payment through, say, a credit card service. As the first step, money is withdrawn from the credit card to pay for some goods. Next, after the transaction completed successfully, it turns out that the goods are no longer available for sale. Such a business rule violation requires that the results of the transaction are compensated with proper code—typically crediting money to the charge card.
By right-clicking on the CompensatableTransactionScope activity, you can switch to the compensation view of the transaction and add all the activities that would compensate the effects of the transaction. In Figure 7, the OrderScope transaction is associated with a compensation activity code that will refund any money withdrawn in case of a business exception. As I mentioned earlier, exceptions in the workflow are caught by an exception handler. For a given exception (say, ProductDiscontinued) you invoke a Compensate activity bound to the transaction activity whose effects are canceled. In general, the Compensate activity triggers the compensation mechanism for any activity that is compensatable—that is, for any activity that implements the ICompensatableActivity interface. Along with CompensatableTransactionScope, CompensatableSequence also implements this interface and can be used for nontransaction-based compensation scenarios. However, you can write custom activities that support compensation as well.
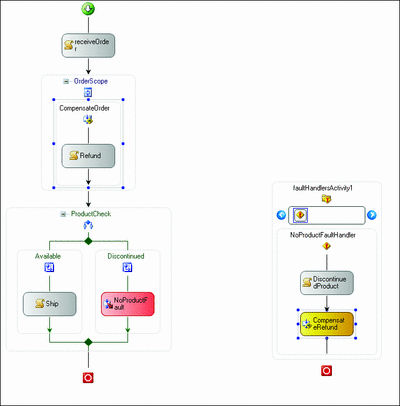
Figure 7** Transaction and Compensation Activities **(Click the image for a larger view)
Calling Out Other Code
There are a few other activities to invoke and execute code. They are Code, InvokeWorkflow, InvokeWebService, and CallExternalMethod. The Code activity is the most flexible and represents a block of custom code you insert at some point in the workflow. The Code activity fires the ExecuteCode event that you handle within the workflow and makes it run the code you want. The code, though, is incorporated in the workflow and compiled with it. The Code activity can call into an external assembly as long as you put into the ExecuteCode event handler any necessary code that loads the assembly and selects the method.
The InvokeWorkflow activity takes a reference to a workflow and invokes it asynchronously. You can pass input parameters but be aware that the InvokeWorkflow activity completes before the launched workflow starts its execution. In no way can you synchronize the current execution with that of an external workflow or process the output parameters in the current workflow.
The InvokeWebService activity synchronously invokes a Web service method through a proxy class. The behavior of the activity can be simulated using a Code activity and calling a Web service from there.
Finally, the CallExternalMethod activity is used to call a method on a local service. A local service is any class available to the workflow that implements an interface decorated with the ExternalDataExchange attribute. In addition, the class that represents the local service must be added to the workflow runtime as an external data exchange service:
Dim service As New ExternalDataExchangeService runtime.AddService(service) Dim localService As New YourService() service.AddService(localService)
You configure a CallExternalMethod activity to call into any of the methods of the interface implemented by the local service. Why is CallExternalMethod limited to calling into the methods of a well-known interface? The reason lies in the fact that the activity is not a mere code executor but is designed to work in conjunction with the HandleExternalEvent activity to implement a two-way communication with a local service. With the CallExternalMethod activity you invoke a method on the service; you handle any event raised by the service by placing a HandleExternalEvent activity in the workflow.
Summary
Activities are the building blocks of workflows. You create workflow solutions by composing activities in the Visual Studio 2005 designer. Like server controls in ASP.NET and controls in Windows Forms, workflow activities are the essence of the solution and form the primary tool chest for developers. The Windows Workflow Foundation provides a number of in-box activities to cover the most common needs. Here I reviewed the native activities that cover transactions, parallel and conditional execution, loops, and exception handling.
Send your questions and comments for Dino to cutting@microsoft.com.
Dino Esposito is a mentor at Solid Quality Learning and the author of Programming Microsoft ASP.NET 2.0 (Microsoft Press, 2005). Based in Italy, Dino is a frequent speaker at industry events worldwide. Get in touch with Dino at cutting@microsoft.com or join the blog at weblogs.asp.net/despos.