Wicked Code
Silverlight 2 Transforms And Clipping Regions
Jeff Prosise
This column is based on a prerelease version of Silverlight 2. All information is subject to change.
Code download available at:MSDN Code Gallery(51,861 KB)
Contents
Under the Magnifying Glass
Round and Round She Goes (in 3D)
Live Video Overlays the Easy Way
Silverlight is the revolutionary platform from Microsoft for creating highly functional, immersive, interactive browser-based applications. Silverlight 2, which was in beta at the time of this writing but will be nearing release by the time you read this, supports multithreading, networking, browser integration, isolated storage, strong typing, reflection, and much more. But Silverlight is best known for stunning graphics.
Silverlight 2 combines a vector-based XAML rendering engine with browser-based versions of the CLR and the Microsoft .NET Framework Base Class Library. Armed with a working knowledge of XAML, developers and designers can make amazing things happen. Key to many of the eye-popping visual effects featured in Silverlight applications are transforms and clipping regions. The page-turn framework presented in the May 2008 installment of Wicked Code, ( "Silverlight Page Turning Made Simple" ), for example, relies heavily on transforms and clipping regions to create the illusion of pages turning in a browser the same way they turn in a book or magazine.
There are more cool tricks you can pull off with a little help from your friends Mr. Transform and Ms. Clipping, which you'll see in a minute. But first, be aware that the samples I'll present were built and tested with Silverlight 2 Beta 2 and thus may require modification to work with Silverlight 2 RC and RTM releases.
Under the Magnifying Glass
Windows Presentation Foundation (WPF) programmers sometimes use VisualBrushes to create virtual magnifying glasses like the one pictured in Figure 1 . Silverlight doesn't support VisualBrush, which has led some developers to believe—even to pronounce—that it's impossible to create similar effects in a Silverlight application.

Figure 1 Silverlight Magnifier in Action (Click the image for a larger view)
Fortunately, you can simulate magnifying glasses in Silverlight; doing so just requires a bit of ingenuity with transforms and clipping regions. The Magnifier application presented here demonstrates how. Figure 2 shows an abridged version of Magnifier's Page.xaml file. It declares two almost identical Canvases, each containing a copy of the content pictured in Figure 1 . The first Canvas—MainCanvas—is the one that the user normally sees. The second Canvas—ZoomCanvas—contains the same content as the first but also includes a ScaleTransform that magnifies everything by a factor of 4.
Figure 2 Page.xaml
<UserControl x:Class="Magnifier.Page"
  xmlns="https://schemas.microsoft.com/winfx/2006/xaml/presentation"
  xmlns:x="https://schemas.microsoft.com/winfx/2006/xaml">
  <Grid x:Name="LayoutRoot" Background="Black"
    MouseLeftButtonDown="OnMouseLeftButtonDown" MouseMove="OnMouseMove"
    MouseLeftButtonUp="OnMouseLeftButtonUp">
    <Canvas x:Name="RootCanvas" Width="800" Height="800">

      <!-- Main canvas -->
      <Canvas x:Name="MainCanvas" Canvas.Left="0" Canvas.Top="0"
        Width="800" Height="900" Background="Black">
        <Canvas Canvas.Left="90" Canvas.Top="30" Width="620" Height="470">
          <Rectangle Canvas.Left="0" Canvas.Top="0" Width="620"
            Height="470" Fill="White" />
          <Image Canvas.Left="10" Canvas.Top="10" Width="600" Height="450"
            Source="Images/BobCat.jpg" />
        </Canvas>
        <Canvas Canvas.Left="90" Canvas.Top="540">
          <Line Canvas.Left="0" Canvas.Top="0" X1="0" Y1="0" X2="620"
            Y2="0" Stroke="#808080" StrokeThickness="3"
            StrokeDashArray="1,1" />
          <TextBlock Canvas.Left="0" Canvas.Top="10" Foreground="White"
            FontSize="36" Text="BVM BobCat" />
          <TextBlock Canvas.Left="0" Canvas.Top="70" Foreground="White"
            FontSize="12" TextWrapping="Wrap" Width="620" Text="..." />
          <Line Canvas.Left="0" Canvas.Top="180" X1="0" Y1="0" X2="620"
            Y2="0" Stroke="#808080" StrokeThickness="3"
            StrokeDashArray="1,1" />
        </Canvas>
      </Canvas>

      <!-- Zoom canvas -->
      <Canvas x:Name="ZoomCanvas" Canvas.Left="0" Canvas.Top="0"
        Width="800" Height="900" Background="Black" Visibility="Collapsed">
        <Canvas.RenderTransform>
          <ScaleTransform CenterX="0" CenterY="0" ScaleX="4" ScaleY="4"/>
        </Canvas.RenderTransform>
        <Canvas.Clip>
          <EllipseGeometry x:Name="Lens" Center="0,0"
            RadiusX="40" RadiusY="40" />
        </Canvas.Clip>
          ...
        <Path Canvas.Left="0" Canvas.Top="0" Stroke="#808080"
          StrokeThickness="1">
          <Path.Data>
            <EllipseGeometry x:Name="LensBorder" Center="0,0"
              RadiusX="40" RadiusY="40" />
          </Path.Data>
        </Path>
      </Canvas>
    </Canvas>
  </Grid>
</UserControl>
ZoomCanvas is normally hidden from the user, but when the left mouse button goes down, OnMouseLeftButtonDown (see Figure 3 ) makes ZoomCanvas visible by toggling its Visibility property. ZoomCanvas is never seen in its entirety. However, its Clip property is initialized with an EllipseGeometry that exposes content in a perfect circle that appears, for all intents and purposes, to be a magnifying glass. You can change the size of the magnifying glass—actually the clipping region—by modifying the EllipseGeometry's RadiusX and RadiusY properties. If you do, you'll also want to modify the same properties of the EllipseGeometry named LensBorder to match (that EllipseGeometry draws the border around the magnifying glass).
Figure 3 Page.xaml.cs
using System;
using System.Windows;
using System.Windows.Controls;
using System.Windows.Input;

namespace Magnifier
{
    public partial class Page : UserControl
    {
        private bool _dragging = false;
        private const double _scale = 4.0;

        public Page()
        {
            InitializeComponent();
        }

        private void OnMouseLeftButtonDown(object sender,
            MouseButtonEventArgs e)
        {
            double x = e.GetPosition(RootCanvas).X;
            double y = e.GetPosition(RootCanvas).Y;
            PositionLens(x, y);

            ZoomCanvas.Visibility = Visibility.Visible;
            ((FrameworkElement)sender).CaptureMouse();
            _dragging = true;
        }

        private void OnMouseMove(object sender, MouseEventArgs e)
        {
            if (_dragging)
            {
                double x = e.GetPosition(MainCanvas).X;
                double y = e.GetPosition(MainCanvas).Y;
                PositionLens(x, y);
            }
        }

        private void OnMouseLeftButtonUp(object sender,
            MouseButtonEventArgs e)
        {
            if (_dragging)
            {
                ZoomCanvas.Visibility = Visibility.Collapsed;
                ((FrameworkElement)sender).ReleaseMouseCapture();
                _dragging = false;            }
        }

        private void PositionLens(double x, double y)
        {
            Lens.Center = LensBorder.Center = new Point(x, y);
            ZoomCanvas.SetValue(Canvas.LeftProperty, (1 - _scale) * x);
            ZoomCanvas.SetValue(Canvas.TopProperty, (1 - _scale) * y);
        }
    }
}
You can see the magnifying glass in action by running the application and clicking and holding the left mouse button anywhere in the scene (even over the text at the bottom of the page). Also observe that moving the mouse with the button held down moves the magnifying glass, too. This is accomplished by modifying the Center properties of the two EllipseGeometries to reposition the lens and by adjusting the Canvas.Left and Canvas.Top properties of ZoomCanvas so that the content exposed through the clipping region coincides with the content under the cursor in MainCanvas. See the OnMouseMove and PositionLens methods to see exactly how this is done.
As you play with the application, note that the magnifying glass doesn't blow up pixels when it's positioned over the image; it reveals greater image detail. That's because the image's native resolution is 2,400x1,800 pixels. The image is declared in MainCanvas and ZoomCanvas with a width and height of 600 and 450, respectively, or exactly one-fourth its native resolution. But when ZoomCanvas expands the image four times using a ScaleTransform, the image reverts to its native size. Therefore, the image the user normally sees is compressed to one-fourth its actual width and height, but the image seen through the magnifying glass is displayed at its native resolution. If the image's native size were 600x450, the magnified view would be pixelated.
Round and Round She Goes (in 3D)
Another difference between Silverlight and WPF is the latter's support for 3D graphics. But that hasn't stopped Silverlight developers from employing 3D effects in their apps. The lack of 3D support simply means that Silverlight programmers have to work a little harder to create 3D effects. One such effect is demonstrated in the next example.
When it first appears, the SpinAndZoom application displays a photo of my youngest daughter leaping off a lava rock into a crystal clear ocean. But drag the mouse over the picture with the left button held down and the photo spins around a vertical axis to reveal a picture of my other daughter on the sea floor at the base of the same lava formation ( Figure 4 ). Keeping your daughters underwater, by the way, is a great way to hide them away from boys.
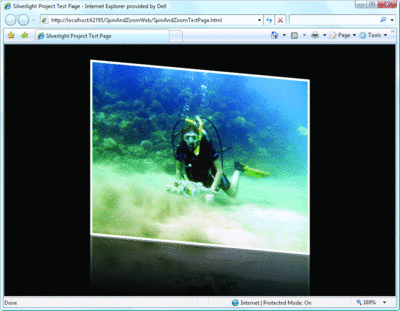
Figure 4 Spinning a Photo around a Vertical Axis—in 3D (Click the image for a larger view)
Figure 5 shows the XAML underlying the 3D spins. It declares four separate images: two for the front photo and its reflection, and two more for the back photo and its reflection. The reflections are generated by using a ScaleTransform to flip the image upside down and by combining an OpacityMask with a LinearGradientBrush to fade the reflected image as a function of distance. Spinning is accomplished by programmatically manipulating a ScaleTransform (SpinScaleTransform) and a SkewTransform (SpinSkewTransform). As the angle of rotation increases, the SkewTransform increases the angle of the top and bottom edges, while the ScaleTransform squeezes the image horizontally. Choreographed properly, the result is a convincing imitation of a 3D rotation.
Figure 5 Page.xaml
<UserControl x:Class="SpinAndZoom.Page"
  xmlns="https://schemas.microsoft.com/winfx/2006/xaml/presentation"
  xmlns:x="https://schemas.microsoft.com/winfx/2006/xaml">
  <Grid x:Name="LayoutRoot" Background="Black"
    MouseLeftButtonDown="OnMouseLeftButtonDown" MouseMove="OnMouseMove"
    MouseLeftButtonUp="OnMouseLeftButtonUp">
    <Canvas x:Name="SpinCanvas" Width="400" Height="300">
      <Canvas.RenderTransform>
        <TransformGroup>
          <ScaleTransform x:Name="SpinScaleTransform" CenterX="200" />
          <SkewTransform x:Name="SpinSkewTransform" CenterX="200" />
          <ScaleTransform x:Name="ZoomScaleTransform" CenterX="200"
            CenterY="150" />
        </TransformGroup>
      </Canvas.RenderTransform>

      <!-- Front -->
      <Image x:Name="Front" Source="Images/Abby.jpg" Canvas.Left="0"
        Canvas.Top="0" Width="400" Height="300" Visibility="Visible"
        Stretch="Fill" />

      <!-- Front reflection -->
      <Image x:Name="FrontReflection" Source="Images/Abby.jpg"
        Canvas.Left="0" Canvas.Top="500" Width="400" Height="200"
        Visibility="Visible" Stretch="Fill">
        <Image.RenderTransform>
          <ScaleTransform ScaleY="-1" />
        </Image.RenderTransform>
        <Image.OpacityMask>
          <LinearGradientBrush StartPoint="0,0" EndPoint="0,1">
            <GradientStop Offset="0.5" Color="#00000000" />
            <GradientStop Offset="1" Color="#80000000" />
          </LinearGradientBrush>
        </Image.OpacityMask>
      </Image>

      <!-- Back -->
      <Image x:Name="Back" Source="Images/Amy.jpg" Canvas.Left="0"
        Canvas.Top="0" Width="400" Height="300" Visibility="Collapsed"
        Stretch="Fill" />

      <!-- Back reflection -->
      <Image x:Name="BackReflection" Source="Images/Amy.jpg" Canvas.Left="0"
        Canvas.Top="500" Width="400" Height="200" Visibility="Collapsed"
        Stretch="Fill">
        <Image.RenderTransform>
          <ScaleTransform ScaleY="-1" />
        </Image.RenderTransform>
        <Image.OpacityMask>
          <LinearGradientBrush StartPoint="0,0" EndPoint="0,1">
            <GradientStop Offset="0.5" Color="#00000000" />
            <GradientStop Offset="1" Color="#80000000" />
          </LinearGradientBrush>
        </Image.OpacityMask>
      </Image>
    </Canvas>
  </Grid>
</UserControl>
The code responsible appears in the download and is excerpted in Figure 6 . RotateTo, the key method, is called by the MouseMove handler to increase or decrease the angle of rotation as the mouse cursor traverses the scene. RotateTo employs a bit of trig to compute SkewTransform and ScaleTransform parameters based on the geometry in Figure 7 . For a given angle of rotation, RotateTo computes the width and inner angle (the angle nearest the center) of the triangle highlighted in purple. The width tells RotateTo what value to set the ScaleTransform's ScaleX property to, and the angle tells it what to set the SkewTransform's AngleY property to.
Figure 6 RotateTo from Page.xaml.cs
private void RotateTo(double angle)
{
    double radians = (angle * Math.PI) / 180;
    double scaleX = Math.Abs(Math.Cos(radians));

    // Update the ScaleTransform
    // Avoid ScaleX == 0 to prevent images from disappearing!
    SpinScaleTransform.ScaleX = Math.Max(0.005, scaleX);

    // Update the SkewTransform
    if (angle != 90 && angle != 270) // Tangent undefined
    {
        double h = Math.Sin(radians) * _aspect;
        double r = Math.Atan(h / scaleX);
        if (angle > 90 && angle < 270)
            r = -r;
        SpinSkewTransform.AngleY = (r * 180) / Math.PI;
    }
}
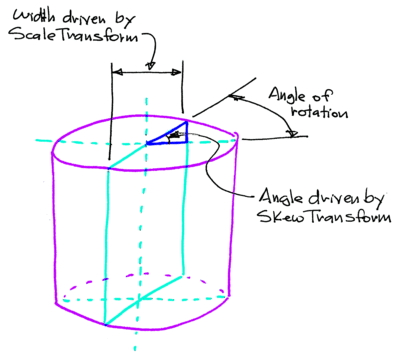
Figure 7 The Geometry of 3D Spins (Click the image for a larger view)
The key to the effectiveness of the illusion is that the vertices of the rotating image follow the track defined by an imaginary cylinder. The degree to which that cylinder is tilted toward the user is controlled by the private field named _aspect. You can increase the severity of the cylinder by increasing the value of _aspect.
SpinAndZoom also demonstrates how to implement another common visual effect found in Silverlight applications: interactive zooms. An event handler named OnMouseWheelTurned shown in Figure 8 responds to mouse-wheel movements by manipulating the ScaleTransform named ZoomScaleTransform. That transform scales every XAML object in the scene up or down. (Try it; position the mouse cursor anywhere in the scene and roll the mouse wheel back and forth.)
Figure 8 OnMouseWheelTurned from Page.xaml.cs
private void OnMouseWheelTurned(Object sender, HtmlEventArgs args)
{
    double delta = 0;
    ScriptObject e = args.EventObject;

    if (e.GetProperty("wheelDelta") != null) // IE and Opera
    {
        delta = ((double)e.GetProperty("wheelDelta"));
        if (HtmlPage.Window.GetProperty("opera") != null)
            delta = -delta;
    }
    else if (e.GetProperty("detail") != null) // Mozilla and Safari
    {
        delta = -((double)e.GetProperty("detail"));
    }

    if (delta > 0)
    {
        if (ZoomScaleTransform.ScaleX < _max)
        {
            // Zoom in
            ZoomScaleTransform.ScaleX += 0.1;
            ZoomScaleTransform.ScaleY += 0.1;
        }
    }

    else if (delta < 0)
    {
        if (ZoomScaleTransform.ScaleX > _min)
        {
            // Zoom out
            ZoomScaleTransform.ScaleX -= 0.1;
            ZoomScaleTransform.ScaleY -= 0.1;
        }
    }

    if (delta != 0)
    {
        args.PreventDefault();
        e.SetProperty("returnValue", false);
    }
}
Because Silverlight doesn't fire mouse-wheel events, SpinAndZoom responds to the browser's mouse-wheel events, taking advantage of the fact that in Silverlight 2, you can register managed event handlers for unmanaged browser DOM events. Registration takes place in the Page constructor, and the same handler is registered three times to accommodate differences between browsers. Browsers are maddeningly inconsistent in how they report mouse-wheel events, so OnMouseWheelTurned includes some smarts of its own to detect the direction of mouse-wheel movement.
Live Video Overlays the Easy Way
The final example isn't as glitzy as the others, but it demonstrates a simple and inexpensive solution to a problem that could otherwise require extraordinary measures.
I recently met with a Microsoft customer who uses Windows Media Player to stream live events. This customer was interested in using the cross-platform capabilities of Silverlight to expand his customer base to non-Windows users. Almost as an aside, he asked if Windows Media Server would allow him to embed live overlays in the video feed—he wanted something along the lines of the tickers that scroll across the bottom of the screen on television news channels.
I explained to him that with Silverlight, you don't need expensive hardware or software on the server to do video overlays. Instead, you can use Silverlight's networking stack to grab a feed out of band with the video stream, and then use XAML to display the feed on top of a Silverlight MediaElement. The application pictured in Figure 9 shows how.
.gif)
Figure 9 Scrolling Headlines Positioned over a MediaElement
This application uses a MediaElement to play a WMV (Windows Media Video) file downloaded from the server. Out of band to the video, it uses a WebClient object to fetch a news feed from FeedBurner.com (which has an XML policy file in place permitting cross-domain access) and a SyndicationFeed object to parse the feed and generate a string of news headlines. Then it displays the string in an overlay consisting of a TextBlock and a Rectangle, using an opacity of 0.5 to prevent the overlay from completely obscuring the video underneath. A simple animation scrolls the TextBlock horizontally, and a clipping region clips out all of the text outside the Rectangle (see Figure 10 ).
Figure 10 Page.xaml
<UserControl x:Class="VideoOverlay.Page"
  xmlns="https://schemas.microsoft.com/winfx/2006/xaml/presentation"
  xmlns:x="https://schemas.microsoft.com/winfx/2006/xaml">
  <Grid x:Name="LayoutRoot" Background="Black">
    <Canvas Width="720" Height="480">
      <MediaElement x:Name="Player" Source="Videos/CRCC Jet Fly.wmv"
        Width="720" Height="480" MediaEnded="MediaElement_MediaEnded" />
      <Canvas Canvas.Top="448" Width="720" Height="32" Opacity="0.5">
        <Canvas.Clip>
          <RectangleGeometry Rect="0,0,720,32" />
        </Canvas.Clip>
        <Rectangle x:Name="Marquee" Width="720" Height="32" Fill="Black" />
        <TextBlock x:Name="Headlines" Canvas.Left="800" Canvas.Top="8"
          Foreground="White" FontSize="14">
          <TextBlock.Resources>
            <Storyboard x:Name="TickerStoryBoard"
              Completed="TickerStoryBoard_Completed">
              <DoubleAnimation x:Name="TickerAnimation"
                Storyboard.TargetName="Headlines"
                Storyboard.TargetProperty="(Canvas.Left)" />
            ...
</UserControl>
Parts of the XAML codebehind appear in Figure 11 (the code download contains the full code). The Page constructor calls WebClient.OpenReadAsync to launch an asynchronous request for the news feed, and the completion event handler copies the headlines from the feed into a TextBlock. Then it calls Storyboard.Begin to begin scrolling the TextBlock and programs a DispatcherTimer to fire a Tick event every five minutes. The Tick event handler submits a fresh request for the news feed, which is ultimately stored in a private field.
Figure 11 Page.xaml.cs
using System;
namespace VideoOverlay
{
    public partial class Page : UserControl
    {
        private const double _offset = 20.0;
        private const double _secondsPerFrame = 10.0;
        private const string _separator = "   ?   ";
        private readonly Uri _uri =
            new Uri("https://feeds.feedburner.com/AbcNews_TopStories");
        private DispatcherTimer _timer = new DispatcherTimer();
        private string _text = null;

        public Page()
        {
            InitializeComponent();

            // Launch an async request for current news headlines
            WebClient wc = new WebClient();
            wc.OpenReadCompleted += new
                OpenReadCompletedEventHandler(OnInitialDownloadCompleted);
            wc.OpenReadAsync(_uri);
        }

        private void OnInitialDownloadCompleted(object sender,
            OpenReadCompletedEventArgs e)
        {
            if (e.Error == null)
            {
                // Convert the news content into a string
                Headlines.Text = GetHeadlinesFromSyndicationStream(e.Result);

                // Begin scrolling headlines
                StartTicker();

                // Start the refresh timer
                _timer.Tick += new EventHandler(OnTimerTick);
                _timer.Interval = new TimeSpan(0, 5, 0); // 5 minutes
                _timer.Start();
            }
        }

        private void OnTimerTick(object sender, EventArgs e)
        {
            // Launch an async request for current news headlines
            WebClient wc = new WebClient();
            wc.OpenReadCompleted += new
                OpenReadCompletedEventHandler(OnRefreshDownloadCompleted);
            wc.OpenReadAsync(_uri);
        }

        private void OnRefreshDownloadCompleted(object sender,
            OpenReadCompletedEventArgs e)
        {
            if (e.Error == null)
            {
                // Convert the news content into a string and store it away
                _text = GetHeadlinesFromSyndicationStream(e.Result);
            }
        }

...
    }
}
Each time the animation that scrolls the headlines ends, a Storyboard.Completed event handler checks that field for a fresh news feed and updates the contents of the TextBlock if new content is available. It then starts the animation running again. Consequently, headlines scroll across the screen in a continuous loop, and the headlines are refreshed every five minutes. Significantly, there is no need for thread synchronization logic or for marshaling calls back to the application's UI thread; this is because both the DispatcherTimer.Tick event handler and the Storyboard.Completed event handler execute on the UI thread.
The downside to this approach is that fetching and refreshing the news feed generates additional network traffic. But that traffic pales in comparison to the video stream itself, and it doesn't require expensive hardware or software on the server to modify live video streams. Moreover, a news feed rendered on the client can be enhanced with additional UX effects, such as mouseovers that display additional information about a headline or hyperlinks that link headlines to news pages. The possibilities are endless when content presented to the user is part of the XAML DOM rather than just bits in a video stream.
Transforms and clipping regions are among the most powerful tools that XAML places at your disposal. Without them, the graphics subsystem of Silverlight would be a lot less extraordinary. I'm receiving lots of queries these days about how to implement effects such as rotating carousels, Rolodex-style paging, and interactive charts. Look for more exciting graphical Silverlight goodies in future installments of Wicked Code.
Send your questions and comments for Jeff to wicked@microsoft.com .
Jeff Prosise is a contributing editor to MSDN Magazine and the author of several books, including Programming Microsoft .NET . He's also cofounder of Wintellect ( www.wintellect.com ), a software consulting and education firm that specializes in Microsoft .NET.