Events
Power BI DataViz World Championships
Feb 14, 4 PM - Mar 31, 4 PM
With 4 chances to enter, you could win a conference package and make it to the LIVE Grand Finale in Las Vegas
Learn moreThis browser is no longer supported.
Upgrade to Microsoft Edge to take advantage of the latest features, security updates, and technical support.
Note
This isn't the latest version of this article. For the current release, see the .NET 9 version of this article.
Warning
This version of ASP.NET Core is no longer supported. For more information, see the .NET and .NET Core Support Policy. For the current release, see the .NET 9 version of this article.
Important
This information relates to a pre-release product that may be substantially modified before it's commercially released. Microsoft makes no warranties, express or implied, with respect to the information provided here.
For the current release, see the .NET 9 version of this article.
This article explains how to get started with WebSockets in ASP.NET Core. WebSocket (RFC 6455) is a protocol that enables two-way persistent communication channels over TCP connections. It's used in apps that benefit from fast, real-time communication, such as chat, dashboard, and game apps.
View or download sample code (how to download, how to run).
Using WebSockets over HTTP/2 takes advantage of new features such as:
These supported features are available in Kestrel on all HTTP/2 enabled platforms. The version negotiation is automatic in browsers and Kestrel, so no new APIs are needed.
.NET 7 introduced WebSockets over HTTP/2 support for Kestrel, the SignalR JavaScript client, and SignalR with Blazor WebAssembly.
Note
HTTP/2 WebSockets use CONNECT requests rather than GET, so your own routes and controllers may need updating. For more information, see Add HTTP/2 WebSockets support for existing controllers in this article.
Chrome and Edge have HTTP/2 WebSockets enabled by default, and you can enable it in FireFox on the about:config page with the network.http.spdy.websockets flag.
WebSockets were originally designed for HTTP/1.1 but have since been adapted to work over HTTP/2. (RFC 8441)
ASP.NET Core SignalR is a library that simplifies adding real-time web functionality to apps. It uses WebSockets whenever possible.
For most applications, we recommend SignalR rather than raw WebSockets. SignalR:
WebSockets over HTTP/2 is supported for:
For some apps, gRPC on .NET provides an alternative to WebSockets.
Add the WebSockets middleware in Program.cs:
app.UseWebSockets();
The following settings can be configured:
var webSocketOptions = new WebSocketOptions
{
    KeepAliveInterval = TimeSpan.FromMinutes(2)
};

app.UseWebSockets(webSocketOptions);
Somewhere later in the request life cycle (later in Program.cs or in an action method, for example) check if it's a WebSocket request and accept the WebSocket request.
The following example is from later in Program.cs:
app.Use(async (context, next) =>
{
    if (context.Request.Path == "/ws")
    {
        if (context.WebSockets.IsWebSocketRequest)
        {
            using var webSocket = await context.WebSockets.AcceptWebSocketAsync();
            await Echo(webSocket);
        }
        else
        {
            context.Response.StatusCode = StatusCodes.Status400BadRequest;
        }
    }
    else
    {
        await next(context);
    }

});
A WebSocket request could come in on any URL, but this sample code only accepts requests for /ws.
A similar approach can be taken in a controller method:
public class WebSocketController : ControllerBase
{
    [Route("/ws")]
    public async Task Get()
    {
        if (HttpContext.WebSockets.IsWebSocketRequest)
        {
            using var webSocket = await HttpContext.WebSockets.AcceptWebSocketAsync();
            await Echo(webSocket);
        }
        else
        {
            HttpContext.Response.StatusCode = StatusCodes.Status400BadRequest;
        }
    }
When using a WebSocket, you must keep the middleware pipeline running for the duration of the connection. If you attempt to send or receive a WebSocket message after the middleware pipeline ends, you may get an exception like the following:
System.Net.WebSockets.WebSocketException (0x80004005): The remote party closed the WebSocket connection without completing the close handshake. ---> System.ObjectDisposedException: Cannot write to the response body, the response has completed.
Object name: 'HttpResponseStream'.
If you're using a background service to write data to a WebSocket, make sure you keep the middleware pipeline running. Do this by using a TaskCompletionSource<TResult>. Pass the TaskCompletionSource to your background service and have it call TrySetResult when you finish with the WebSocket. Then await the Task property during the request, as shown in the following example:
app.Run(async (context) =>
{
    using var webSocket = await context.WebSockets.AcceptWebSocketAsync();
    var socketFinishedTcs = new TaskCompletionSource<object>();

    BackgroundSocketProcessor.AddSocket(webSocket, socketFinishedTcs);

    await socketFinishedTcs.Task;
});
The WebSocket closed exception can also happen when returning too soon from an action method. When accepting a socket in an action method, wait for the code that uses the socket to complete before returning from the action method.
Never use Task.Wait, Task.Result, or similar blocking calls to wait for the socket to complete, as that can cause serious threading issues. Always use await.
.NET 7 introduced WebSockets over HTTP/2 support for Kestrel, the SignalR JavaScript client, and SignalR with Blazor WebAssembly. HTTP/2 WebSockets use CONNECT requests rather than GET. If you previously used [HttpGet("/path")] on your controller action method for Websocket requests, update it to use [Route("/path")] instead.
public class WebSocketController : ControllerBase
{
    [Route("/ws")]
    public async Task Get()
    {
        if (HttpContext.WebSockets.IsWebSocketRequest)
        {
            using var webSocket = await HttpContext.WebSockets.AcceptWebSocketAsync();
            await Echo(webSocket);
        }
        else
        {
            HttpContext.Response.StatusCode = StatusCodes.Status400BadRequest;
        }
    }
Warning
Enabling compression over encrypted connections can make an app subject to CRIME/BREACH attacks.
If sending sensitive information, avoid enabling compression or use WebSocketMessageFlags.DisableCompression when calling WebSocket.SendAsync.
This applies to both sides of the WebSocket. Note that the WebSockets API in the browser doesn't have configuration for disabling compression per send.
If compression of messages over WebSockets is desired, then the accept code must specify that it allows compression as follows:
using (var webSocket = await context.WebSockets.AcceptWebSocketAsync(
    new WebSocketAcceptContext { DangerousEnableCompression = true }))
{

}
WebSocketAcceptContext.ServerMaxWindowBits and WebSocketAcceptContext.DisableServerContextTakeover are advanced options that control how the compression works.
Compression is negotiated between the client and server when first establishing a connection. You can read more about the negotiation in the Compression Extensions for WebSocket RFC.
Note
If the compression negotiation isn't accepted by either the server or client, the connection is still established. However, the connection doesn't use compression when sending and receiving messages.
The AcceptWebSocketAsync method upgrades the TCP connection to a WebSocket connection and provides a WebSocket object. Use the WebSocket object to send and receive messages.
The code shown earlier that accepts the WebSocket request passes the WebSocket object to an Echo method. The code receives a message and immediately sends back the same message. Messages are sent and received in a loop until the client closes the connection:
private static async Task Echo(WebSocket webSocket)
{
    var buffer = new byte[1024 * 4];
    var receiveResult = await webSocket.ReceiveAsync(
        new ArraySegment<byte>(buffer), CancellationToken.None);

    while (!receiveResult.CloseStatus.HasValue)
    {
        await webSocket.SendAsync(
            new ArraySegment<byte>(buffer, 0, receiveResult.Count),
            receiveResult.MessageType,
            receiveResult.EndOfMessage,
            CancellationToken.None);

        receiveResult = await webSocket.ReceiveAsync(
            new ArraySegment<byte>(buffer), CancellationToken.None);
    }

    await webSocket.CloseAsync(
        receiveResult.CloseStatus.Value,
        receiveResult.CloseStatusDescription,
        CancellationToken.None);
}
When accepting the WebSocket connection before beginning the loop, the middleware pipeline ends. Upon closing the socket, the pipeline unwinds. That is, the request stops moving forward in the pipeline when the WebSocket is accepted. When the loop is finished and the socket is closed, the request proceeds back up the pipeline.
The server isn't automatically informed when the client disconnects due to loss of connectivity. The server receives a disconnect message only if the client sends it, which can't be done if the internet connection is lost. If you want to take some action when that happens, set a timeout after nothing is received from the client within a certain time window.
If the client isn't always sending messages and you don't want to time out just because the connection goes idle, have the client use a timer to send a ping message every X seconds. On the server, if a message hasn't arrived within 2*X seconds after the previous one, terminate the connection and report that the client disconnected. Wait for twice the expected time interval to leave extra time for network delays that might hold up the ping message.
The protections provided by CORS don't apply to WebSockets. Browsers do not:
Access-Control headers when making WebSocket requests.However, browsers do send the Origin header when issuing WebSocket requests. Applications should be configured to validate these headers to ensure that only WebSockets coming from the expected origins are allowed.
If you're hosting your server on "https://server.com" and hosting your client on "https://client.com", add "https://client.com" to the AllowedOrigins list for WebSockets to verify.
var webSocketOptions = new WebSocketOptions
{
    KeepAliveInterval = TimeSpan.FromMinutes(2)
};

webSocketOptions.AllowedOrigins.Add("https://client.com");
webSocketOptions.AllowedOrigins.Add("https://www.client.com");

app.UseWebSockets(webSocketOptions);
Note
The Origin header is controlled by the client and, like the Referer header, can be faked. Do not use these headers as an authentication mechanism.
Windows Server 2012 or later and Windows 8 or later with IIS/IIS Express 8 or later has support for the WebSocket protocol, but not for WebSockets over HTTP/2.
Note
WebSockets are always enabled when using IIS Express.
To enable support for the WebSocket protocol on Windows Server 2012 or later:
Note
These steps are not required when using IIS Express
To enable support for the WebSocket protocol on Windows 8 or later:
Note
These steps are not required when using IIS Express
If using the WebSocket support in socket.io on Node.js, disable the default IIS WebSocket module using the webSocket element in web.config or applicationHost.config. If this step isn't performed, the IIS WebSocket module attempts to handle the WebSocket communication rather than Node.js and the app.
<system.webServer>
  <webSocket enabled="false" />
</system.webServer>
The sample app that accompanies this article is an echo app. It has a webpage that makes WebSocket connections, and the server resends any messages it receives back to the client. The sample app supports WebSockets over HTTP/2 when using a targeted framework of .NET 7 or later.
Run the app:
dotnet run and navigate in a browser to http://localhost:<port>.The webpage shows the connection status:
Select Connect to send a WebSocket request to the URL shown. Enter a test message and select Send. When done, select Close Socket. The Communication Log section reports each open, send, and close action as it happens.
This article explains how to get started with WebSockets in ASP.NET Core. WebSocket (RFC 6455) is a protocol that enables two-way persistent communication channels over TCP connections. It's used in apps that benefit from fast, real-time communication, such as chat, dashboard, and game apps.
View or download sample code (how to download, how to run).
ASP.NET Core SignalR is a library that simplifies adding real-time web functionality to apps. It uses WebSockets whenever possible.
For most applications, we recommend SignalR over raw WebSockets. SignalR provides transport fallback for environments where WebSockets isn't available. It also provides a basic remote procedure call app model. And in most scenarios, SignalR has no significant performance disadvantage compared to using raw WebSockets.
For some apps, gRPC on .NET provides an alternative to WebSockets.
Add the WebSockets middleware in Program.cs:
app.UseWebSockets();
The following settings can be configured:
var webSocketOptions = new WebSocketOptions
{
    KeepAliveInterval = TimeSpan.FromMinutes(2)
};

app.UseWebSockets(webSocketOptions);
Somewhere later in the request life cycle (later in Program.cs or in an action method, for example) check if it's a WebSocket request and accept the WebSocket request.
The following example is from later in Program.cs:
app.Use(async (context, next) =>
{
    if (context.Request.Path == "/ws")
    {
        if (context.WebSockets.IsWebSocketRequest)
        {
            using var webSocket = await context.WebSockets.AcceptWebSocketAsync();
            await Echo(webSocket);
        }
        else
        {
            context.Response.StatusCode = StatusCodes.Status400BadRequest;
        }
    }
    else
    {
        await next(context);
    }

});
A WebSocket request could come in on any URL, but this sample code only accepts requests for /ws.
A similar approach can be taken in a controller method:
public class WebSocketController : ControllerBase
{
    [HttpGet("/ws")]
    public async Task Get()
    {
        if (HttpContext.WebSockets.IsWebSocketRequest)
        {
            using var webSocket = await HttpContext.WebSockets.AcceptWebSocketAsync();
            await Echo(webSocket);
        }
        else
        {
            HttpContext.Response.StatusCode = StatusCodes.Status400BadRequest;
        }
    }
When using a WebSocket, you must keep the middleware pipeline running for the duration of the connection. If you attempt to send or receive a WebSocket message after the middleware pipeline ends, you may get an exception like the following:
System.Net.WebSockets.WebSocketException (0x80004005): The remote party closed the WebSocket connection without completing the close handshake. ---> System.ObjectDisposedException: Cannot write to the response body, the response has completed.
Object name: 'HttpResponseStream'.
If you're using a background service to write data to a WebSocket, make sure you keep the middleware pipeline running. Do this by using a TaskCompletionSource<TResult>. Pass the TaskCompletionSource to your background service and have it call TrySetResult when you finish with the WebSocket. Then await the Task property during the request, as shown in the following example:
app.Run(async (context) =>
{
    using var webSocket = await context.WebSockets.AcceptWebSocketAsync();
    var socketFinishedTcs = new TaskCompletionSource<object>();

    BackgroundSocketProcessor.AddSocket(webSocket, socketFinishedTcs);

    await socketFinishedTcs.Task;
});
The WebSocket closed exception can also happen when returning too soon from an action method. When accepting a socket in an action method, wait for the code that uses the socket to complete before returning from the action method.
Never use Task.Wait, Task.Result, or similar blocking calls to wait for the socket to complete, as that can cause serious threading issues. Always use await.
Warning
Enabling compression over encrypted connections can make an app subject to CRIME/BREACH attacks.
If sending sensitive information, avoid enabling compression or use WebSocketMessageFlags.DisableCompression when calling WebSocket.SendAsync.
This applies to both sides of the WebSocket. Note that the WebSockets API in the browser doesn't have configuration for disabling compression per send.
If compression of messages over WebSockets is desired, then the accept code must specify that it allows compression as follows:
using (var webSocket = await context.WebSockets.AcceptWebSocketAsync(
    new WebSocketAcceptContext { DangerousEnableCompression = true }))
{

}
WebSocketAcceptContext.ServerMaxWindowBits and WebSocketAcceptContext.DisableServerContextTakeover are advanced options that control how the compression works.
Compression is negotiated between the client and server when first establishing a connection. You can read more about the negotiation in the Compression Extensions for WebSocket RFC.
Note
If the compression negotiation isn't accepted by either the server or client, the connection is still established. However, the connection doesn't use compression when sending and receiving messages.
The AcceptWebSocketAsync method upgrades the TCP connection to a WebSocket connection and provides a WebSocket object. Use the WebSocket object to send and receive messages.
The code shown earlier that accepts the WebSocket request passes the WebSocket object to an Echo method. The code receives a message and immediately sends back the same message. Messages are sent and received in a loop until the client closes the connection:
private static async Task Echo(WebSocket webSocket)
{
    var buffer = new byte[1024 * 4];
    var receiveResult = await webSocket.ReceiveAsync(
        new ArraySegment<byte>(buffer), CancellationToken.None);

    while (!receiveResult.CloseStatus.HasValue)
    {
        await webSocket.SendAsync(
            new ArraySegment<byte>(buffer, 0, receiveResult.Count),
            receiveResult.MessageType,
            receiveResult.EndOfMessage,
            CancellationToken.None);

        receiveResult = await webSocket.ReceiveAsync(
            new ArraySegment<byte>(buffer), CancellationToken.None);
    }

    await webSocket.CloseAsync(
        receiveResult.CloseStatus.Value,
        receiveResult.CloseStatusDescription,
        CancellationToken.None);
}
When accepting the WebSocket connection before beginning the loop, the middleware pipeline ends. Upon closing the socket, the pipeline unwinds. That is, the request stops moving forward in the pipeline when the WebSocket is accepted. When the loop is finished and the socket is closed, the request proceeds back up the pipeline.
The server isn't automatically informed when the client disconnects due to loss of connectivity. The server receives a disconnect message only if the client sends it, which can't be done if the internet connection is lost. If you want to take some action when that happens, set a timeout after nothing is received from the client within a certain time window.
If the client isn't always sending messages and you don't want to time out just because the connection goes idle, have the client use a timer to send a ping message every X seconds. On the server, if a message hasn't arrived within 2*X seconds after the previous one, terminate the connection and report that the client disconnected. Wait for twice the expected time interval to leave extra time for network delays that might hold up the ping message.
The protections provided by CORS don't apply to WebSockets. Browsers do not:
Access-Control headers when making WebSocket requests.However, browsers do send the Origin header when issuing WebSocket requests. Applications should be configured to validate these headers to ensure that only WebSockets coming from the expected origins are allowed.
If you're hosting your server on "https://server.com" and hosting your client on "https://client.com", add "https://client.com" to the AllowedOrigins list for WebSockets to verify.
var webSocketOptions = new WebSocketOptions
{
    KeepAliveInterval = TimeSpan.FromMinutes(2)
};

webSocketOptions.AllowedOrigins.Add("https://client.com");
webSocketOptions.AllowedOrigins.Add("https://www.client.com");

app.UseWebSockets(webSocketOptions);
Note
The Origin header is controlled by the client and, like the Referer header, can be faked. Do not use these headers as an authentication mechanism.
Windows Server 2012 or later and Windows 8 or later with IIS/IIS Express 8 or later has support for the WebSocket protocol.
Note
WebSockets are always enabled when using IIS Express.
To enable support for the WebSocket protocol on Windows Server 2012 or later:
Note
These steps are not required when using IIS Express
To enable support for the WebSocket protocol on Windows 8 or later:
Note
These steps are not required when using IIS Express
If using the WebSocket support in socket.io on Node.js, disable the default IIS WebSocket module using the webSocket element in web.config or applicationHost.config. If this step isn't performed, the IIS WebSocket module attempts to handle the WebSocket communication rather than Node.js and the app.
<system.webServer>
  <webSocket enabled="false" />
</system.webServer>
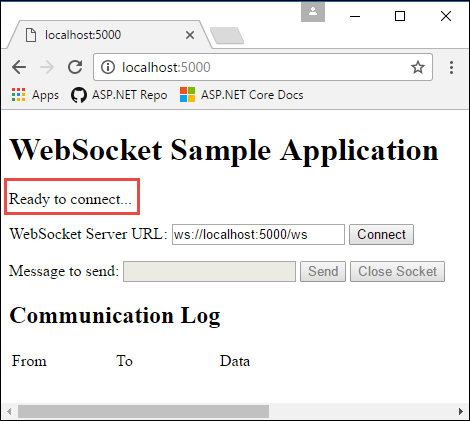
The sample app that accompanies this article is an echo app. It has a webpage that makes WebSocket connections, and the server resends any messages it receives back to the client. The sample app isn't configured to run from Visual Studio with IIS Express, so run the app in a command shell with dotnet run and navigate in a browser to http://localhost:<port>. The webpage shows the connection status:
Select Connect to send a WebSocket request to the URL shown. Enter a test message and select Send. When done, select Close Socket. The Communication Log section reports each open, send, and close action as it happens.
This article explains how to get started with WebSockets in ASP.NET Core. WebSocket (RFC 6455) is a protocol that enables two-way persistent communication channels over TCP connections. It's used in apps that benefit from fast, real-time communication, such as chat, dashboard, and game apps.
View or download sample code (how to download). How to run.
ASP.NET Core SignalR is a library that simplifies adding real-time web functionality to apps. It uses WebSockets whenever possible.
For most applications, we recommend SignalR over raw WebSockets. SignalR provides transport fallback for environments where WebSockets isn't available. It also provides a basic remote procedure call app model. And in most scenarios, SignalR has no significant performance disadvantage compared to using raw WebSockets.
For some apps, gRPC on .NET provides an alternative to WebSockets.
Add the WebSockets middleware in the Configure method of the Startup class:
app.UseWebSockets();
Note
If you would like to accept WebSocket requests in a controller, the call to app.UseWebSockets must occur before app.UseEndpoints.
The following settings can be configured:
var webSocketOptions = new WebSocketOptions()
{
    KeepAliveInterval = TimeSpan.FromSeconds(120),
};

app.UseWebSockets(webSocketOptions);
Somewhere later in the request life cycle (later in the Configure method or in an action method, for example) check if it's a WebSocket request and accept the WebSocket request.
The following example is from later in the Configure method:
app.Use(async (context, next) =>
{
    if (context.Request.Path == "/ws")
    {
        if (context.WebSockets.IsWebSocketRequest)
        {
            using (WebSocket webSocket = await context.WebSockets.AcceptWebSocketAsync())
            {
                await Echo(context, webSocket);
            }
        }
        else
        {
            context.Response.StatusCode = (int) HttpStatusCode.BadRequest;
        }
    }
    else
    {
        await next();
    }

});
A WebSocket request could come in on any URL, but this sample code only accepts requests for /ws.
A similar approach can be taken in a controller method:
public class WebSocketController : ControllerBase
{
    [HttpGet("/ws")]
    public async Task Get()
    {
        if (HttpContext.WebSockets.IsWebSocketRequest)
        {
            using var webSocket = await HttpContext.WebSockets.AcceptWebSocketAsync();
            await Echo(webSocket);
        }
        else
        {
            HttpContext.Response.StatusCode = StatusCodes.Status400BadRequest;
        }
    }
When using a WebSocket, you must keep the middleware pipeline running for the duration of the connection. If you attempt to send or receive a WebSocket message after the middleware pipeline ends, you may get an exception like the following:
System.Net.WebSockets.WebSocketException (0x80004005): The remote party closed the WebSocket connection without completing the close handshake. ---> System.ObjectDisposedException: Cannot write to the response body, the response has completed.
Object name: 'HttpResponseStream'.
If you're using a background service to write data to a WebSocket, make sure you keep the middleware pipeline running. Do this by using a TaskCompletionSource<TResult>. Pass the TaskCompletionSource to your background service and have it call TrySetResult when you finish with the WebSocket. Then await the Task property during the request, as shown in the following example:
app.Use(async (context, next) =>
{
    using (WebSocket webSocket = await context.WebSockets.AcceptWebSocketAsync())
    {
        var socketFinishedTcs = new TaskCompletionSource<object>();

        BackgroundSocketProcessor.AddSocket(webSocket, socketFinishedTcs);

        await socketFinishedTcs.Task;
    }
});
The WebSocket closed exception can also happen when returning too soon from an action method. When accepting a socket in an action method, wait for the code that uses the socket to complete before returning from the action method.
Never use Task.Wait, Task.Result, or similar blocking calls to wait for the socket to complete, as that can cause serious threading issues. Always use await.
The AcceptWebSocketAsync method upgrades the TCP connection to a WebSocket connection and provides a WebSocket object. Use the WebSocket object to send and receive messages.
The code shown earlier that accepts the WebSocket request passes the WebSocket object to an Echo method. The code receives a message and immediately sends back the same message. Messages are sent and received in a loop until the client closes the connection:
private async Task Echo(HttpContext context, WebSocket webSocket)
{
    var buffer = new byte[1024 * 4];
    WebSocketReceiveResult result = await webSocket.ReceiveAsync(new ArraySegment<byte>(buffer), CancellationToken.None);
    while (!result.CloseStatus.HasValue)
    {
        await webSocket.SendAsync(new ArraySegment<byte>(buffer, 0, result.Count), result.MessageType, result.EndOfMessage, CancellationToken.None);

        result = await webSocket.ReceiveAsync(new ArraySegment<byte>(buffer), CancellationToken.None);
    }
    await webSocket.CloseAsync(result.CloseStatus.Value, result.CloseStatusDescription, CancellationToken.None);
}
When accepting the WebSocket connection before beginning the loop, the middleware pipeline ends. Upon closing the socket, the pipeline unwinds. That is, the request stops moving forward in the pipeline when the WebSocket is accepted. When the loop is finished and the socket is closed, the request proceeds back up the pipeline.
The server isn't automatically informed when the client disconnects due to loss of connectivity. The server receives a disconnect message only if the client sends it, which can't be done if the internet connection is lost. If you want to take some action when that happens, set a timeout after nothing is received from the client within a certain time window.
If the client isn't always sending messages and you don't want to time out just because the connection goes idle, have the client use a timer to send a ping message every X seconds. On the server, if a message hasn't arrived within 2*X seconds after the previous one, terminate the connection and report that the client disconnected. Wait for twice the expected time interval to leave extra time for network delays that might hold up the ping message.
Note
The internal ManagedWebSocket handles the Ping/Pong frames implicitly to keep the connection alive if the KeepAliveInterval option is greater than zero, which defaults to 30 seconds (TimeSpan.FromSeconds(30)).
The protections provided by CORS don't apply to WebSockets. Browsers do not:
Access-Control headers when making WebSocket requests.However, browsers do send the Origin header when issuing WebSocket requests. Applications should be configured to validate these headers to ensure that only WebSockets coming from the expected origins are allowed.
If you're hosting your server on "https://server.com" and hosting your client on "https://client.com", add "https://client.com" to the AllowedOrigins list for WebSockets to verify.
var webSocketOptions = new WebSocketOptions()
{
    KeepAliveInterval = TimeSpan.FromSeconds(120),
};
webSocketOptions.AllowedOrigins.Add("https://client.com");
webSocketOptions.AllowedOrigins.Add("https://www.client.com");

app.UseWebSockets(webSocketOptions);
Note
The Origin header is controlled by the client and, like the Referer header, can be faked. Do not use these headers as an authentication mechanism.
Windows Server 2012 or later and Windows 8 or later with IIS/IIS Express 8 or later has support for the WebSocket protocol.
Note
WebSockets are always enabled when using IIS Express.
To enable support for the WebSocket protocol on Windows Server 2012 or later:
Note
These steps are not required when using IIS Express
To enable support for the WebSocket protocol on Windows 8 or later:
Note
These steps are not required when using IIS Express
If using the WebSocket support in socket.io on Node.js, disable the default IIS WebSocket module using the webSocket element in web.config or applicationHost.config. If this step isn't performed, the IIS WebSocket module attempts to handle the WebSocket communication rather than Node.js and the app.
<system.webServer>
  <webSocket enabled="false" />
</system.webServer>
The sample app that accompanies this article is an echo app. It has a webpage that makes WebSocket connections, and the server resends any messages it receives back to the client. The sample app isn't configured to run from Visual Studio with IIS Express, so run the app in a command shell with dotnet run and navigate in a browser to http://localhost:5000. The webpage shows the connection status:
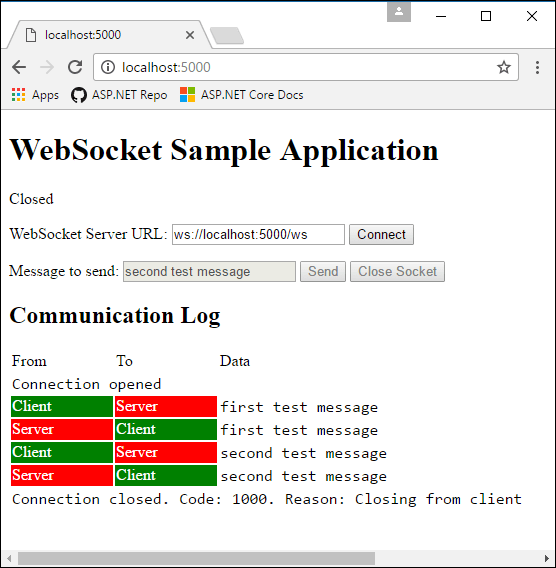
Select Connect to send a WebSocket request to the URL shown. Enter a test message and select Send. When done, select Close Socket. The Communication Log section reports each open, send, and close action as it happens.
ASP.NET Core feedback
ASP.NET Core is an open source project. Select a link to provide feedback:
Events
Power BI DataViz World Championships
Feb 14, 4 PM - Mar 31, 4 PM
With 4 chances to enter, you could win a conference package and make it to the LIVE Grand Finale in Las Vegas
Learn moreTraining
Module
Introduction to ASP.NET Core SignalR - Training
In this introductory module, you'll learn what ASP.NET Core SignalR is, how it works, and when to use it.