This information relates to a pre-release product that may be substantially modified before it's commercially released. Microsoft makes no warranties, express or implied, with respect to the information provided here.
In this tutorial, classes are added for managing movies in a database. The app's model classes use Entity Framework Core (EF Core) to work with the database. EF Core is an object-relational mapper (O/RM) that simplifies data access. You write the model classes first, and EF Core creates the database.
The model classes are known as POCO classes (from "Plain-Old CLR Objects") because they don't have a dependency on EF Core. They define the properties of the data that are stored in the database.
In Solution Explorer, right-click the RazorPagesMovie project > Add > New Folder. Name the folder Models.
Right-click the Models folder. Select Add > Class. Name the class Movie.
Add the following properties to the Movie class:
using System.ComponentModel.DataAnnotations;

namespace RazorPagesMovie.Models;

public class Movie
{
    public int Id { get; set; }
    public string? Title { get; set; }
    [DataType(DataType.Date)]
    public DateTime ReleaseDate { get; set; }
    public string? Genre { get; set; }
    public decimal Price { get; set; }
}
The Movie class contains:
The ID field is required by the database for the primary key.
A [DataType] attribute that specifies the type of data in the ReleaseDate property. With this attribute:
The user isn't required to enter time information in the date field.
Only the date is displayed, not time information.
The question mark after string indicates that the property is nullable. For more information, see Nullable reference types.
Build the project to verify there are no compilation errors.
Add a folder named Models.
Add a class to the Models folder named Movie.cs.
Add the following properties to the Movie class:
using System.ComponentModel.DataAnnotations;

namespace RazorPagesMovie.Models;

public class Movie
{
    public int Id { get; set; }
    public string? Title { get; set; }
    [DataType(DataType.Date)]
    public DateTime ReleaseDate { get; set; }
    public string? Genre { get; set; }
    public decimal Price { get; set; }
}
The Movie class contains:
An ID field to provide a primary key for the database.
A [DataType] attribute to specify the type of data in the ReleaseDate field. With this attribute:
The user is not required to enter time information in the date field.
Only the date is displayed, not time information.
The question mark after string indicates that the property is nullable. For more information, see Nullable reference types.
The EF Core SQLite provider, which installs the EF Core package as a dependency.
Packages needed for scaffolding: Microsoft.VisualStudio.Web.CodeGeneration.Design and Microsoft.EntityFrameworkCore.SqlServer.
For guidance on multiple environment configuration that permits an app to configure its database contexts by environment, see Use multiple environments in ASP.NET Core.
Note
By default the architecture of the .NET binaries to install represents the currently running OS architecture. To specify a different OS architecture, see dotnet tool install, --arch option.
For more information, see GitHub issue dotnet/AspNetCore.Docs #29262.
In Visual Studio Code, press Ctrl+F5 (Windows) or ⌘+F5 (macOS) to run the app without debugging.
In the Panel below the editor region, select the PROBLEMS tab, or from the View menu, select Problems if it is not currently in view. Verify there are no compilation errors.
In the Solution Tool Window, control-click the RazorPagesMovie project, and then select Add > New Folder.... Name the folder Models.
Control-click the Models folder, and then select Add > New Class....
In the New File dialog:
Select General in the left pane.
Select Empty Class in the center pane.
Name the class Movie and select Create.
Add the following properties to the Movie class:
using System.ComponentModel.DataAnnotations;

namespace RazorPagesMovie.Models;

public class Movie
{
    public int Id { get; set; }
    public string? Title { get; set; }
    [DataType(DataType.Date)]
    public DateTime ReleaseDate { get; set; }
    public string? Genre { get; set; }
    public decimal Price { get; set; }
}
The Movie class contains:
An ID field to provide a primary key for the database.
A [DataType] attribute to specify the type of data in the ReleaseDate field. With this attribute:
The user isn't required to enter time information in the date field.
Build the project to verify there are no compilation errors.
Scaffold the movie model
In this section, the movie model is scaffolded. That is, the scaffolding tool produces pages for Create, Read, Update, and Delete (CRUD) operations for the movie model.
Use SQLite for development, SQL Server for production
When SQLite is selected, the template generated code is ready for development. The following code shows how to select the SQLite connection string in development and SQL Server in production.
using Microsoft.EntityFrameworkCore;

var builder = WebApplication.CreateBuilder(args);

builder.Services.AddRazorPages();

if (builder.Environment.IsDevelopment())
{
    builder.Services.AddDbContext<RazorPagesMovieContext>(options =>
        options.UseSqlite(builder.Configuration.GetConnectionString("RazorPagesMovieContext")));
}
else
{
    builder.Services.AddDbContext<RazorPagesMovieContext>(options =>
        options.UseSqlServer(builder.Configuration.GetConnectionString("ProductionMovieContext")));
}

var app = builder.Build();

if (!app.Environment.IsDevelopment())
{
    app.UseExceptionHandler("/Error");
    app.UseHsts();
}

app.UseHttpsRedirection();
app.UseStaticFiles();

app.UseRouting();

app.UseAuthorization();

app.MapRazorPages();

app.Run();
The preceding code doesn't call UseDeveloperExceptionPage in development because WebApplication calls UseDeveloperExceptionPage in development mode.
Add the NuGet package Microsoft.EntityFrameworkCore.Sqlite, which is required for the scaffolding tool.
In the Solution Tool Window, control-click the RazorPagesMovie project, and then select Open in Terminal.
The Terminal window opens with the command prompt at the project directory, which contains the Program.cs and .csproj files.
Control-click on the Pages folder > Add > New Folder.
Name the folder Movies.
Control-click on the Pages/Movies folder > Add > New Scaffolding....
In the New Scaffolding dialog, select Razor Pages using Entity Framework (CRUD) > Next.
Complete the Add Razor Pages using Entity Framework (CRUD) dialog:
In the Model class to use: row, enter Movie.
In the DbContext Class to use: row, name the class RazorPagesMovie.Data.RazorPagesMovieContext.
Select Finish.
The scaffolding process may take some time to complete as required packages are automatically downloaded and added to the project.
The appsettings.json file is updated with the connection string used to connect to a local database.
Use SQLite for development, SQL Server for production
When SQLite is selected, the template generated code is ready for development. The following code shows how to select the SQLite connection string in development and SQL Server in production.
using Microsoft.EntityFrameworkCore;

var builder = WebApplication.CreateBuilder(args);

builder.Services.AddRazorPages();

if (builder.Environment.IsDevelopment())
{
    builder.Services.AddDbContext<RazorPagesMovieContext>(options =>
        options.UseSqlite(builder.Configuration.GetConnectionString("RazorPagesMovieContext")));
}
else
{
    builder.Services.AddDbContext<RazorPagesMovieContext>(options =>
        options.UseSqlServer(builder.Configuration.GetConnectionString("ProductionMovieContext")));
}

var app = builder.Build();

if (!app.Environment.IsDevelopment())
{
    app.UseExceptionHandler("/Error");
    app.UseHsts();
}

app.UseHttpsRedirection();
app.UseStaticFiles();

app.UseRouting();

app.UseAuthorization();

app.MapRazorPages();

app.Run();
The preceding code doesn't call UseDeveloperExceptionPage in development because WebApplication calls UseDeveloperExceptionPage in development mode.
Files created and updated
The scaffold process creates the following files:
Pages/Movies: Create, Delete, Details, Edit, and Index.
Data/RazorPagesMovieContext.cs
The created files are explained in the next tutorial.
The scaffold process adds the following highlighted code to the Program.cs file:
using Microsoft.EntityFrameworkCore;
using Microsoft.Extensions.DependencyInjection;
using RazorPagesMovie.Data;
var builder = WebApplication.CreateBuilder(args);

// Add services to the container.
builder.Services.AddRazorPages();
builder.Services.AddDbContext<RazorPagesMovieContext>(options =>
    options.UseSqlServer(builder.Configuration.GetConnectionString("RazorPagesMovieContext") ?? throw new InvalidOperationException("Connection string 'RazorPagesMovieContext' not found.")));

var app = builder.Build();

// Configure the HTTP request pipeline.
if (!app.Environment.IsDevelopment())
{
    app.UseExceptionHandler("/Error");
    // The default HSTS value is 30 days. You may want to change this for production scenarios, see https://aka.ms/aspnetcore-hsts.
    app.UseHsts();
}

app.UseHttpsRedirection();
app.UseStaticFiles();

app.UseRouting();

app.UseAuthorization();

app.MapRazorPages();

app.Run();
using Microsoft.EntityFrameworkCore;
using Microsoft.Extensions.DependencyInjection;
var builder = WebApplication.CreateBuilder(args);

// Add services to the container.
builder.Services.AddRazorPages();
builder.Services.AddDbContext<RazorPagesMovieContext>(options =>
    options.UseSqlite(builder.Configuration.GetConnectionString("RazorPagesMovieContext") ?? throw new InvalidOperationException("Connection string 'RazorPagesMovieContext' not found.")));

var app = builder.Build();

// Configure the HTTP request pipeline.
if (!app.Environment.IsDevelopment())
{
    app.UseExceptionHandler("/Error");
    // The default HSTS value is 30 days. You may want to change this for production scenarios, see https://aka.ms/aspnetcore-hsts.
    app.UseHsts();
}

app.UseHttpsRedirection();
app.UseStaticFiles();

app.UseRouting();

app.UseAuthorization();

app.MapRazorPages();

app.Run();
The Program.cs changes are explained later in this tutorial.
Create the initial database schema using EF's migration feature
The migrations feature in Entity Framework Core provides a way to:
Create the initial database schema.
Incrementally update the database schema to keep it in sync with the app's data model. Existing data in the database is preserved.
In this section, the Package Manager Console (PMC) window is used to:
Add an initial migration.
Update the database with the initial migration.
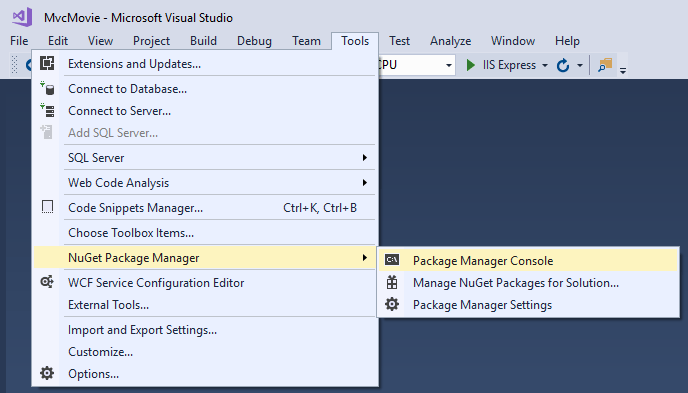
From the Tools menu, select NuGet Package Manager > Package Manager Console.
In the PMC, enter the following commands:
Add-Migration InitialCreate
Update-Database
The Add-Migration command generates code to create the initial database schema. The schema is based on the model specified in DbContext. The InitialCreate argument is used to name the migration. Any name can be used, but by convention a name is selected that describes the migration.
The Update-Database command runs the Up method in migrations that have not been applied. In this case, the command runs the Up method in the Migrations/<time-stamp>_InitialCreate.cs file, which creates the database.
Right-click the RazorPagesMovie.csproj project, and then select Open in Integrated Terminal.
The Terminal window opens with the command prompt at the project directory, which contains the Program.cs and .csproj files.
Run the following .NET CLI commands:
dotnet ef migrations add InitialCreate
dotnet ef database update
The migrations command generates code to create the initial database schema. The schema is based on the model specified in DbContext. The InitialCreate argument is used to name the migrations. Any name can be used, but by convention a name is selected that describes the migration.
The update command runs the Up method in migrations that have not been applied. In this case, update runs the Up method in the Migrations/<time-stamp>_InitialCreate.cs file, which creates the database.
Note
For SQLite, column type for the Price field is set to TEXT. This is resolved in a later step.
Control-click the RazorPagesMovie project, and then select Open in Terminal.
The Terminal window opens with the command prompt at the project directory, which contains the Program.cs and .csproj files.
Run the following .NET CLI commands:
dotnet tool uninstall --global dotnet-ef
dotnet tool install --global dotnet-ef
dotnet ef migrations add InitialCreate
dotnet ef database update
The tool commands install the latest Entity Framework Core tools after uninstalling any previous version, if one exists.
Note
By default the architecture of the .NET binaries to install represents the currently running OS architecture. To specify a different OS architecture, see dotnet tool install, --arch option.
For more information, see GitHub issue dotnet/AspNetCore.Docs #29262.
The migrations command generates code to create the initial database schema. The schema is based on the model specified in DbContext. The InitialCreate argument is used to name the migrations. Any name can be used, but by convention a name is selected that describes the migration.
The update command runs the Up method in migrations that have not been applied. In this case, update runs the Up method in the Migrations/<time-stamp>_InitialCreate.cs file, which creates the database.
Note
For SQLite, column type for the Price field is set to TEXT. This is resolved in a later step.
The following warning is displayed, which is addressed in a later step:
No type was specified for the decimal column 'Price' on entity type 'Movie'. This will cause values to be silently truncated if they do not fit in the default precision and scale. Explicitly specify the SQL server column type that can accommodate all the values using 'HasColumnType()'.
Specifies which entities are included in the data model.
Coordinates EF Core functionality, such as Create, Read, Update and Delete, for the Movie model.
using System;
using System.Collections.Generic;
using System.Linq;
using System.Threading.Tasks;
using Microsoft.EntityFrameworkCore;
using RazorPagesMovie.Models;

namespace RazorPagesMovie.Data
{
    public class RazorPagesMovieContext : DbContext
    {
        public RazorPagesMovieContext (DbContextOptions<RazorPagesMovieContext> options)
            : base(options)
        {
        }

        public DbSet<RazorPagesMovie.Models.Movie> Movie { get; set; } = default!;
    }
}
The preceding code creates a DbSet<Movie> property for the entity set. In Entity Framework terminology, an entity set typically corresponds to a database table. An entity corresponds to a row in the table.
The name of the connection string is passed in to the context by calling a method on a DbContextOptions object. For local development, the Configuration system reads the connection string from the appsettings.json file.
Test the app
Run the app and append /Movies to the URL in the browser (http://localhost:port/movies).
If you receive the following error:
SqlException: Cannot open database "RazorPagesMovieContext-GUID" requested by the login. The login failed.
Login failed for user 'User-name'.
You may not be able to enter decimal commas in the Price field. To support jQuery validation for non-English locales that use a comma (",") for a decimal point and for non US-English date formats, the app must be globalized. For globalization instructions, see this GitHub issue.
Test the Edit, Details, and Delete links.
The next tutorial explains the files created by scaffolding.
Examine the context registered with dependency injection
ASP.NET Core is built with dependency injection. Services, such as the EF Core database context, are registered with dependency injection during application startup. Components that require these services (such as Razor Pages) are provided via constructor parameters. The constructor code that gets a database context instance is shown later in the tutorial.
The scaffolding tool automatically created a database context and registered it with the dependency injection container. The following highlighted code is added to the Program.cs file by the scaffolder:
using Microsoft.EntityFrameworkCore;
using Microsoft.Extensions.DependencyInjection;
using RazorPagesMovie.Data;
var builder = WebApplication.CreateBuilder(args);

// Add services to the container.
builder.Services.AddRazorPages();
builder.Services.AddDbContext<RazorPagesMovieContext>(options =>
    options.UseSqlServer(builder.Configuration.GetConnectionString("RazorPagesMovieContext") ?? throw new InvalidOperationException("Connection string 'RazorPagesMovieContext' not found.")));

var app = builder.Build();

// Configure the HTTP request pipeline.
if (!app.Environment.IsDevelopment())
{
    app.UseExceptionHandler("/Error");
    // The default HSTS value is 30 days. You may want to change this for production scenarios, see https://aka.ms/aspnetcore-hsts.
    app.UseHsts();
}

app.UseHttpsRedirection();
app.UseStaticFiles();

app.UseRouting();

app.UseAuthorization();

app.MapRazorPages();

app.Run();
using Microsoft.EntityFrameworkCore;
using Microsoft.Extensions.DependencyInjection;
var builder = WebApplication.CreateBuilder(args);

// Add services to the container.
builder.Services.AddRazorPages();
builder.Services.AddDbContext<RazorPagesMovieContext>(options =>
    options.UseSqlite(builder.Configuration.GetConnectionString("RazorPagesMovieContext") ?? throw new InvalidOperationException("Connection string 'RazorPagesMovieContext' not found.")));

var app = builder.Build();

// Configure the HTTP request pipeline.
if (!app.Environment.IsDevelopment())
{
    app.UseExceptionHandler("/Error");
    // The default HSTS value is 30 days. You may want to change this for production scenarios, see https://aka.ms/aspnetcore-hsts.
    app.UseHsts();
}

app.UseHttpsRedirection();
app.UseStaticFiles();

app.UseRouting();

app.UseAuthorization();

app.MapRazorPages();

app.Run();
In this tutorial, classes are added for managing movies in a database. The app's model classes use Entity Framework Core (EF Core) to work with the database. EF Core is an object-relational mapper (O/RM) that simplifies data access. You write the model classes first, and EF Core creates the database.
The model classes are known as POCO classes (from "Plain-Old CLR Objects") because they don't have a dependency on EF Core. They define the properties of the data that are stored in the database.
In Solution Explorer, right-click the RazorPagesMovie project > Add > New Folder. Name the folder Models.
Right-click the Models folder. Select Add > Class. Name the class Movie.
Add the following properties to the Movie class:
using System.ComponentModel.DataAnnotations;

namespace RazorPagesMovie.Models;

public class Movie
{
    public int Id { get; set; }
    public string? Title { get; set; }
    [DataType(DataType.Date)]
    public DateTime ReleaseDate { get; set; }
    public string? Genre { get; set; }
    public decimal Price { get; set; }
}
The Movie class contains:
The ID field is required by the database for the primary key.
A [DataType] attribute that specifies the type of data in the ReleaseDate property. With this attribute:
The user isn't required to enter time information in the date field.
Only the date is displayed, not time information.
The question mark after string indicates that the property is nullable. For more information, see Nullable reference types.
Build the project to verify there are no compilation errors.
Add a folder named Models.
Add a class to the Models folder named Movie.cs.
Add the following properties to the Movie class:
using System.ComponentModel.DataAnnotations;

namespace RazorPagesMovie.Models;

public class Movie
{
    public int Id { get; set; }
    public string? Title { get; set; }
    [DataType(DataType.Date)]
    public DateTime ReleaseDate { get; set; }
    public string? Genre { get; set; }
    public decimal Price { get; set; }
}
The Movie class contains:
An ID field to provide a primary key for the database.
A [DataType] attribute to specify the type of data in the ReleaseDate field. With this attribute:
The user is not required to enter time information in the date field.
Only the date is displayed, not time information.
The question mark after string indicates that the property is nullable. For more information, see Nullable reference types.
The EF Core SQLite provider, which installs the EF Core package as a dependency.
Packages needed for scaffolding: Microsoft.VisualStudio.Web.CodeGeneration.Design and Microsoft.EntityFrameworkCore.SqlServer.
For guidance on multiple environment configuration that permits an app to configure its database contexts by environment, see Use multiple environments in ASP.NET Core.
Note
By default the architecture of the .NET binaries to install represents the currently running OS architecture. To specify a different OS architecture, see dotnet tool install, --arch option.
For more information, see GitHub issue dotnet/AspNetCore.Docs #29262.
In Visual Studio Code, press Ctrl+F5 (Windows) or ⌘+F5 (macOS) to run the app without debugging.
In the Panel below the editor region, select the PROBLEMS tab, or from the View menu, select Problems if it is not currently in view. Verify there are no compilation errors.
In the Solution Tool Window, control-click the RazorPagesMovie project, and then select Add > New Folder.... Name the folder Models.
Control-click the Models folder, and then select Add > New Class....
In the New File dialog:
Select General in the left pane.
Select Empty Class in the center pane.
Name the class Movie and select Create.
Add the following properties to the Movie class:
using System.ComponentModel.DataAnnotations;

namespace RazorPagesMovie.Models;

public class Movie
{
    public int Id { get; set; }
    public string? Title { get; set; }
    [DataType(DataType.Date)]
    public DateTime ReleaseDate { get; set; }
    public string? Genre { get; set; }
    public decimal Price { get; set; }
}
The Movie class contains:
An ID field to provide a primary key for the database.
A [DataType] attribute to specify the type of data in the ReleaseDate field. With this attribute:
The user isn't required to enter time information in the date field.
Build the project to verify there are no compilation errors.
Scaffold the movie model
In this section, the movie model is scaffolded. That is, the scaffolding tool produces pages for Create, Read, Update, and Delete (CRUD) operations for the movie model.
Use SQLite for development, SQL Server for production
When SQLite is selected, the template generated code is ready for development. The following code shows how to select the SQLite connection string in development and SQL Server in production.
using Microsoft.EntityFrameworkCore;

var builder = WebApplication.CreateBuilder(args);

builder.Services.AddRazorPages();

if (builder.Environment.IsDevelopment())
{
    builder.Services.AddDbContext<RazorPagesMovieContext>(options =>
        options.UseSqlite(builder.Configuration.GetConnectionString("RazorPagesMovieContext")));
}
else
{
    builder.Services.AddDbContext<RazorPagesMovieContext>(options =>
        options.UseSqlServer(builder.Configuration.GetConnectionString("ProductionMovieContext")));
}

var app = builder.Build();

if (!app.Environment.IsDevelopment())
{
    app.UseExceptionHandler("/Error");
    app.UseHsts();
}

app.UseHttpsRedirection();
app.UseStaticFiles();

app.UseRouting();

app.UseAuthorization();

app.MapRazorPages();

app.Run();
The preceding code doesn't call UseDeveloperExceptionPage in development because WebApplication calls UseDeveloperExceptionPage in development mode.
Add the NuGet package Microsoft.EntityFrameworkCore.Sqlite, which is required for the scaffolding tool.
In the Solution Tool Window, control-click the RazorPagesMovie project, and then select Open in Terminal.
The Terminal window opens with the command prompt at the project directory, which contains the Program.cs and .csproj files.
Control-click on the Pages folder > Add > New Folder.
Name the folder Movies.
Control-click on the Pages/Movies folder > Add > New Scaffolding....
In the New Scaffolding dialog, select Razor Pages using Entity Framework (CRUD) > Next.
Complete the Add Razor Pages using Entity Framework (CRUD) dialog:
In the Model class to use: row, enter Movie.
In the DbContext Class to use: row, name the class RazorPagesMovie.Data.RazorPagesMovieContext.
Select Finish.
The scaffolding process may take some time to complete as required packages are automatically downloaded and added to the project.
The appsettings.json file is updated with the connection string used to connect to a local database.
Use SQLite for development, SQL Server for production
When SQLite is selected, the template generated code is ready for development. The following code shows how to select the SQLite connection string in development and SQL Server in production.
using Microsoft.EntityFrameworkCore;

var builder = WebApplication.CreateBuilder(args);

builder.Services.AddRazorPages();

if (builder.Environment.IsDevelopment())
{
    builder.Services.AddDbContext<RazorPagesMovieContext>(options =>
        options.UseSqlite(builder.Configuration.GetConnectionString("RazorPagesMovieContext")));
}
else
{
    builder.Services.AddDbContext<RazorPagesMovieContext>(options =>
        options.UseSqlServer(builder.Configuration.GetConnectionString("ProductionMovieContext")));
}

var app = builder.Build();

if (!app.Environment.IsDevelopment())
{
    app.UseExceptionHandler("/Error");
    app.UseHsts();
}

app.UseHttpsRedirection();
app.UseStaticFiles();

app.UseRouting();

app.UseAuthorization();

app.MapRazorPages();

app.Run();
The preceding code doesn't call UseDeveloperExceptionPage in development because WebApplication calls UseDeveloperExceptionPage in development mode.
Files created and updated
The scaffold process creates the following files:
Pages/Movies: Create, Delete, Details, Edit, and Index.
Data/RazorPagesMovieContext.cs
The created files are explained in the next tutorial.
The scaffold process adds the following highlighted code to the Program.cs file:
using Microsoft.EntityFrameworkCore;
using Microsoft.Extensions.DependencyInjection;
using RazorPagesMovie.Data;
var builder = WebApplication.CreateBuilder(args);

// Add services to the container.
builder.Services.AddRazorPages();
builder.Services.AddDbContext<RazorPagesMovieContext>(options =>
    options.UseSqlServer(builder.Configuration.GetConnectionString("RazorPagesMovieContext") ?? throw new InvalidOperationException("Connection string 'RazorPagesMovieContext' not found.")));

var app = builder.Build();

// Configure the HTTP request pipeline.
if (!app.Environment.IsDevelopment())
{
    app.UseExceptionHandler("/Error");
    // The default HSTS value is 30 days. You may want to change this for production scenarios, see https://aka.ms/aspnetcore-hsts.
    app.UseHsts();
}

app.UseHttpsRedirection();
app.UseStaticFiles();

app.UseRouting();

app.UseAuthorization();

app.MapRazorPages();

app.Run();
using Microsoft.EntityFrameworkCore;
using Microsoft.Extensions.DependencyInjection;
var builder = WebApplication.CreateBuilder(args);

// Add services to the container.
builder.Services.AddRazorPages();
builder.Services.AddDbContext<RazorPagesMovieContext>(options =>
    options.UseSqlite(builder.Configuration.GetConnectionString("RazorPagesMovieContext") ?? throw new InvalidOperationException("Connection string 'RazorPagesMovieContext' not found.")));

var app = builder.Build();

// Configure the HTTP request pipeline.
if (!app.Environment.IsDevelopment())
{
    app.UseExceptionHandler("/Error");
    // The default HSTS value is 30 days. You may want to change this for production scenarios, see https://aka.ms/aspnetcore-hsts.
    app.UseHsts();
}

app.UseHttpsRedirection();
app.UseStaticFiles();

app.UseRouting();

app.UseAuthorization();

app.MapRazorPages();

app.Run();
The Program.cs changes are explained later in this tutorial.
Create the initial database schema using EF's migration feature
The migrations feature in Entity Framework Core provides a way to:
Create the initial database schema.
Incrementally update the database schema to keep it in sync with the app's data model. Existing data in the database is preserved.
In this section, the Package Manager Console (PMC) window is used to:
Add an initial migration.
Update the database with the initial migration.
From the Tools menu, select NuGet Package Manager > Package Manager Console.
In the PMC, enter the following commands:
Add-Migration InitialCreate
Update-Database
The Add-Migration command generates code to create the initial database schema. The schema is based on the model specified in DbContext. The InitialCreate argument is used to name the migration. Any name can be used, but by convention a name is selected that describes the migration.
The Update-Database command runs the Up method in migrations that have not been applied. In this case, the command runs the Up method in the Migrations/<time-stamp>_InitialCreate.cs file, which creates the database.
Right-click the RazorPagesMovie.csproj project, and then select Open in Integrated Terminal.
The Terminal window opens with the command prompt at the project directory, which contains the Program.cs and .csproj files.
Run the following .NET CLI commands:
dotnet ef migrations add InitialCreate
dotnet ef database update
The migrations command generates code to create the initial database schema. The schema is based on the model specified in DbContext. The InitialCreate argument is used to name the migrations. Any name can be used, but by convention a name is selected that describes the migration.
The update command runs the Up method in migrations that have not been applied. In this case, update runs the Up method in the Migrations/<time-stamp>_InitialCreate.cs file, which creates the database.
Note
For SQLite, column type for the Price field is set to TEXT. This is resolved in a later step.
Control-click the RazorPagesMovie project, and then select Open in Terminal.
The Terminal window opens with the command prompt at the project directory, which contains the Program.cs and .csproj files.
Run the following .NET CLI commands:
dotnet tool uninstall --global dotnet-ef
dotnet tool install --global dotnet-ef
dotnet ef migrations add InitialCreate
dotnet ef database update
The tool commands install the latest Entity Framework Core tools after uninstalling any previous version, if one exists.
Note
By default the architecture of the .NET binaries to install represents the currently running OS architecture. To specify a different OS architecture, see dotnet tool install, --arch option.
For more information, see GitHub issue dotnet/AspNetCore.Docs #29262.
The migrations command generates code to create the initial database schema. The schema is based on the model specified in DbContext. The InitialCreate argument is used to name the migrations. Any name can be used, but by convention a name is selected that describes the migration.
The update command runs the Up method in migrations that have not been applied. In this case, update runs the Up method in the Migrations/<time-stamp>_InitialCreate.cs file, which creates the database.
Note
For SQLite, column type for the Price field is set to TEXT. This is resolved in a later step.
The following warning is displayed, which is addressed in a later step:
No type was specified for the decimal column 'Price' on entity type 'Movie'. This will cause values to be silently truncated if they do not fit in the default precision and scale. Explicitly specify the SQL server column type that can accommodate all the values using 'HasColumnType()'.
Specifies which entities are included in the data model.
Coordinates EF Core functionality, such as Create, Read, Update and Delete, for the Movie model.
using System;
using System.Collections.Generic;
using System.Linq;
using System.Threading.Tasks;
using Microsoft.EntityFrameworkCore;
using RazorPagesMovie.Models;

namespace RazorPagesMovie.Data
{
    public class RazorPagesMovieContext : DbContext
    {
        public RazorPagesMovieContext (DbContextOptions<RazorPagesMovieContext> options)
            : base(options)
        {
        }

        public DbSet<RazorPagesMovie.Models.Movie> Movie { get; set; } = default!;
    }
}
The preceding code creates a DbSet<Movie> property for the entity set. In Entity Framework terminology, an entity set typically corresponds to a database table. An entity corresponds to a row in the table.
The name of the connection string is passed in to the context by calling a method on a DbContextOptions object. For local development, the Configuration system reads the connection string from the appsettings.json file.
Test the app
Run the app and append /Movies to the URL in the browser (http://localhost:port/movies).
If you receive the following error:
SqlException: Cannot open database "RazorPagesMovieContext-GUID" requested by the login. The login failed.
Login failed for user 'User-name'.
You may not be able to enter decimal commas in the Price field. To support jQuery validation for non-English locales that use a comma (",") for a decimal point and for non US-English date formats, the app must be globalized. For globalization instructions, see this GitHub issue.
Test the Edit, Details, and Delete links.
The next tutorial explains the files created by scaffolding.
Examine the context registered with dependency injection
ASP.NET Core is built with dependency injection. Services, such as the EF Core database context, are registered with dependency injection during application startup. Components that require these services (such as Razor Pages) are provided via constructor parameters. The constructor code that gets a database context instance is shown later in the tutorial.
The scaffolding tool automatically created a database context and registered it with the dependency injection container. The following highlighted code is added to the Program.cs file by the scaffolder:
using Microsoft.EntityFrameworkCore;
using Microsoft.Extensions.DependencyInjection;
using RazorPagesMovie.Data;
var builder = WebApplication.CreateBuilder(args);

// Add services to the container.
builder.Services.AddRazorPages();
builder.Services.AddDbContext<RazorPagesMovieContext>(options =>
    options.UseSqlServer(builder.Configuration.GetConnectionString("RazorPagesMovieContext") ?? throw new InvalidOperationException("Connection string 'RazorPagesMovieContext' not found.")));

var app = builder.Build();

// Configure the HTTP request pipeline.
if (!app.Environment.IsDevelopment())
{
    app.UseExceptionHandler("/Error");
    // The default HSTS value is 30 days. You may want to change this for production scenarios, see https://aka.ms/aspnetcore-hsts.
    app.UseHsts();
}

app.UseHttpsRedirection();
app.UseStaticFiles();

app.UseRouting();

app.UseAuthorization();

app.MapRazorPages();

app.Run();
using Microsoft.EntityFrameworkCore;
using Microsoft.Extensions.DependencyInjection;
var builder = WebApplication.CreateBuilder(args);

// Add services to the container.
builder.Services.AddRazorPages();
builder.Services.AddDbContext<RazorPagesMovieContext>(options =>
    options.UseSqlite(builder.Configuration.GetConnectionString("RazorPagesMovieContext") ?? throw new InvalidOperationException("Connection string 'RazorPagesMovieContext' not found.")));

var app = builder.Build();

// Configure the HTTP request pipeline.
if (!app.Environment.IsDevelopment())
{
    app.UseExceptionHandler("/Error");
    // The default HSTS value is 30 days. You may want to change this for production scenarios, see https://aka.ms/aspnetcore-hsts.
    app.UseHsts();
}

app.UseHttpsRedirection();
app.UseStaticFiles();

app.UseRouting();

app.UseAuthorization();

app.MapRazorPages();

app.Run();
In this tutorial, classes are added for managing movies in a database. The app's model classes use Entity Framework Core (EF Core) to work with the database. EF Core is an object-relational mapper (O/RM) that simplifies data access. You write the model classes first, and EF Core creates the database.
The model classes are known as POCO classes (from "Plain-Old CLR Objects") because they don't have a dependency on EF Core. They define the properties of the data that are stored in the database.
In Solution Explorer, right-click the RazorPagesMovie project > Add > New Folder. Name the folder Models.
Right-click the Models folder. Select Add > Class. Name the class Movie.
Add the following properties to the Movie class:
using System.ComponentModel.DataAnnotations;

namespace RazorPagesMovie.Models
{
    public class Movie
    {
        public int ID { get; set; }
        public string Title { get; set; } = string.Empty;

        [DataType(DataType.Date)]
        public DateTime ReleaseDate { get; set; }
        public string Genre { get; set; } = string.Empty;
        public decimal Price { get; set; }
    }
}
The Movie class contains:
The ID field is required by the database for the primary key.
A [DataType] attribute that specifies the type of data in the ReleaseDate property. With this attribute:
The user isn't required to enter time information in the date field.
Only the date is displayed, not time information.
Add a folder named Models.
Add a class to the Models folder named Movie.cs.
Add the following properties to the Movie class:
using System.ComponentModel.DataAnnotations;

namespace RazorPagesMovie.Models
{
    public class Movie
    {
        public int ID { get; set; }
        public string Title { get; set; } = string.Empty;

        [DataType(DataType.Date)]
        public DateTime ReleaseDate { get; set; }
        public string Genre { get; set; } = string.Empty;
        public decimal Price { get; set; }
    }
}
The Movie class contains:
An ID field to provide a primary key for the database.
A [DataType] attribute to specify the type of data in the ReleaseDate field. With this attribute:
The user is not required to enter time information in the date field.
The EF Core SQLite provider, which installs the EF Core package as a dependency.
Packages needed for scaffolding: Microsoft.VisualStudio.Web.CodeGeneration.Design and Microsoft.EntityFrameworkCore.SqlServer.
For guidance on multiple environment configuration that permits an app to configure its database contexts by environment, see Use multiple environments in ASP.NET Core.
Note
By default the architecture of the .NET binaries to install represents the currently running OS architecture. To specify a different OS architecture, see dotnet tool install, --arch option.
For more information, see GitHub issue dotnet/AspNetCore.Docs #29262.
In the Solution Tool Window, right-click the RazorPagesMovie project, and then select Add > New Folder.... Name the folder Models.
Right-click the Models folder, and then select Add > New File....
In the New File dialog:
Select General in the left pane.
Select Empty Class in the center pane.
Name the class Movie and select Create.
Add the following properties to the Movie class:
using System.ComponentModel.DataAnnotations;

namespace RazorPagesMovie.Models
{
    public class Movie
    {
        public int ID { get; set; }
        public string Title { get; set; } = string.Empty;

        [DataType(DataType.Date)]
        public DateTime ReleaseDate { get; set; }
        public string Genre { get; set; } = string.Empty;
        public decimal Price { get; set; }
    }
}
The Movie class contains:
An ID field to provide a primary key for the database.
A [DataType] attribute to specify the type of data in the ReleaseDate field. With this attribute:
The user isn't required to enter time information in the date field.
Build the project to verify there are no compilation errors.
Scaffold the movie model
In this section, the movie model is scaffolded. That is, the scaffolding tool produces pages for Create, Read, Update, and Delete (CRUD) operations for the movie model.
Add the NuGet package Microsoft.EntityFrameworkCore.Design, which is required for the scaffolding tool.
From the Tools menu, select NuGet Package Manager > Manage NuGet Packages for Solution
Select the Browse tab.
Enter Microsoft.EntityFrameworkCore.Design and select it from the list.
Check Project and then Select Install
Select I Accept in the License Acceptance dialog.
Create the Pages/Movies folder:
Right-click on the Pages folder > Add > New Folder.
Name the folder Movies.
Right-click on the Pages/Movies folder > Add > New Scaffolded Item.
In the Add New Scaffold dialog, select Razor Pages using Entity Framework (CRUD) > Add.
Complete the Add Razor Pages using Entity Framework (CRUD) dialog:
In the Model class drop down, select Movie (RazorPagesMovie.Models).
In the Data context class row, select the + (plus) sign.
In the Add Data Context dialog, the class name RazorPagesMovie.Data.RazorPagesMovieContext is generated.
Select Add.
If you get an error message that says you need to install the Microsoft.EntityFrameworkCore.SqlServer package, repeat the steps starting with Add > New Scaffolded Item.
The appsettings.json file is updated with the connection string used to connect to a local database.
Open a command shell to the project directory, which contains the Program.cs and .csproj files. Run the following command:
Use SQLite for development, SQL Server for production
When SQLite is selected, the template generated code is ready for development. The following code shows how to select the SQLite connection string in development and SQL Server in production.
using Microsoft.EntityFrameworkCore;

var builder = WebApplication.CreateBuilder(args);

builder.Services.AddRazorPages();

if (builder.Environment.IsDevelopment())
{
    builder.Services.AddDbContext<RazorPagesMovieContext>(options =>
        options.UseSqlite(builder.Configuration.GetConnectionString("RazorPagesMovieContext")));
}
else
{
    builder.Services.AddDbContext<RazorPagesMovieContext>(options =>
        options.UseSqlServer(builder.Configuration.GetConnectionString("ProductionMovieContext")));
}

var app = builder.Build();

if (!app.Environment.IsDevelopment())
{
    app.UseExceptionHandler("/Error");
    app.UseHsts();
}

app.UseHttpsRedirection();
app.UseStaticFiles();

app.UseRouting();

app.UseAuthorization();

app.MapRazorPages();

app.Run();
The preceding code doesn't call UseDeveloperExceptionPage in development because WebApplication calls UseDeveloperExceptionPage in development mode.
Create a Pages/Movies folder:
Right-click on the Pages folder > Add > New Folder.
Name the folder Movies.
Right-click on the Pages/Movies folder > Add > New Scaffolding....
In the New Scaffolding dialog, select Razor Pages using Entity Framework (CRUD) > Next.
Complete the Add Razor Pages using Entity Framework (CRUD) dialog:
In the Model class to use: row, enter Movie.
In the DbContext Class to use: row, name the class RazorPagesMovie.Data.RazorPagesMovieContext.
Select Finish.
The appsettings.json file is updated with the connection string used to connect to a local database.
Use SQLite for development, SQL Server for production
When SQLite is selected, the template generated code is ready for development. The following code shows how to select the SQLite connection string in development and SQL Server in production.
using Microsoft.EntityFrameworkCore;

var builder = WebApplication.CreateBuilder(args);

builder.Services.AddRazorPages();

if (builder.Environment.IsDevelopment())
{
    builder.Services.AddDbContext<RazorPagesMovieContext>(options =>
        options.UseSqlite(builder.Configuration.GetConnectionString("RazorPagesMovieContext")));
}
else
{
    builder.Services.AddDbContext<RazorPagesMovieContext>(options =>
        options.UseSqlServer(builder.Configuration.GetConnectionString("ProductionMovieContext")));
}

var app = builder.Build();

if (!app.Environment.IsDevelopment())
{
    app.UseExceptionHandler("/Error");
    app.UseHsts();
}

app.UseHttpsRedirection();
app.UseStaticFiles();

app.UseRouting();

app.UseAuthorization();

app.MapRazorPages();

app.Run();
The preceding code doesn't call UseDeveloperExceptionPage in development because WebApplication calls UseDeveloperExceptionPage in development mode.
Files created and updated
The scaffold process creates the following files:
Pages/Movies: Create, Delete, Details, Edit, and Index.
Data/RazorPagesMovieContext.cs
The created files are explained in the next tutorial.
The scaffold process adds the following highlighted code to the Program.cs file:
using Microsoft.EntityFrameworkCore;
using Microsoft.Extensions.DependencyInjection;
using RazorPagesMovie.Data;
var builder = WebApplication.CreateBuilder(args);

// Add services to the container.
builder.Services.AddRazorPages();
builder.Services.AddDbContext<RazorPagesMovieContext>(options =>
    options.UseSqlServer(builder.Configuration.GetConnectionString("RazorPagesMovieContext") ?? throw new InvalidOperationException("Connection string 'RazorPagesMovieContext' not found.")));

var app = builder.Build();

// Configure the HTTP request pipeline.
if (!app.Environment.IsDevelopment())
{
    app.UseExceptionHandler("/Error");
    // The default HSTS value is 30 days. You may want to change this for production scenarios, see https://aka.ms/aspnetcore-hsts.
    app.UseHsts();
}

app.UseHttpsRedirection();
app.UseStaticFiles();

app.UseRouting();

app.UseAuthorization();

app.MapRazorPages();

app.Run();
using Microsoft.EntityFrameworkCore;
using Microsoft.Extensions.DependencyInjection;
using RazorPagesMovie.Data;
var builder = WebApplication.CreateBuilder(args);

// Add services to the container.
builder.Services.AddRazorPages();
builder.Services.AddDbContext<RazorPagesMovieContext>(options =>
    options.UseSqlite(builder.Configuration.GetConnectionString("RazorPagesMovieContext") ?? throw new InvalidOperationException("Connection string 'RazorPagesMovieContext' not found.")));

var app = builder.Build();

// Configure the HTTP request pipeline.
if (!app.Environment.IsDevelopment())
{
    app.UseExceptionHandler("/Error");
    // The default HSTS value is 30 days. You may want to change this for production scenarios, see https://aka.ms/aspnetcore-hsts.
    app.UseHsts();
}

app.UseHttpsRedirection();
app.UseStaticFiles();

app.UseRouting();

app.UseAuthorization();

app.MapRazorPages();

app.Run();
The Program.cs changes are explained later in this tutorial.
Create the initial database schema using EF's migration feature
The migrations feature in Entity Framework Core provides a way to:
Create the initial database schema.
Incrementally update the database schema to keep it in sync with the app's data model. Existing data in the database is preserved.
In this section, the Package Manager Console (PMC) window is used to:
Add an initial migration.
Update the database with the initial migration.
From the Tools menu, select NuGet Package Manager > Package Manager Console.
In the PMC, enter the following commands:
Add-Migration InitialCreate
Update-Database
In the Solution Tool Window, right-click the RazorPagesMovie project, and then select Open in Terminal.
The Terminal window opens with the command prompt at the project directory, which contains the Program.cs and .csproj files.
Run the following .NET CLI commands:
dotnet tool install --global dotnet-ef
dotnet ef migrations add InitialCreate
dotnet ef database update
Note
By default the architecture of the .NET binaries to install represents the currently running OS architecture. To specify a different OS architecture, see dotnet tool install, --arch option.
For more information, see GitHub issue dotnet/AspNetCore.Docs #29262.
Note
For SQLite, column type for the Price field is set to TEXT. This is resolved in a later step.
The preceding commands install the Entity Framework Core tools and run the migrations command to generate code that creates the initial database schema.
The following warning is displayed, which is addressed in a later step:
No type was specified for the decimal column 'Price' on entity type 'Movie'. This will cause values to be silently truncated if they do not fit in the default precision and scale. Explicitly specify the SQL server column type that can accommodate all the values using 'HasColumnType()'.
The migrations command generates code to create the initial database schema. The schema is based on the model specified in DbContext. The InitialCreate argument is used to name the migrations. Any name can be used, but by convention a name is selected that describes the migration.
The update command runs the Up method in migrations that have not been applied. In this case, update runs the Up method in the Migrations/<time-stamp>_InitialCreate.cs file, which creates the database.
Examine the context registered with dependency injection
ASP.NET Core is built with dependency injection. Services, such as the EF Core database context, are registered with dependency injection during application startup. Components that require these services (such as Razor Pages) are provided via constructor parameters. The constructor code that gets a database context instance is shown later in the tutorial.
The scaffolding tool automatically created a database context and registered it with the dependency injection container. The following highlighted code is added to the Program.cs file by the scaffolder:
using Microsoft.EntityFrameworkCore;
using Microsoft.Extensions.DependencyInjection;
using RazorPagesMovie.Data;
var builder = WebApplication.CreateBuilder(args);

// Add services to the container.
builder.Services.AddRazorPages();
builder.Services.AddDbContext<RazorPagesMovieContext>(options =>
    options.UseSqlServer(builder.Configuration.GetConnectionString("RazorPagesMovieContext") ?? throw new InvalidOperationException("Connection string 'RazorPagesMovieContext' not found.")));

var app = builder.Build();

// Configure the HTTP request pipeline.
if (!app.Environment.IsDevelopment())
{
    app.UseExceptionHandler("/Error");
    // The default HSTS value is 30 days. You may want to change this for production scenarios, see https://aka.ms/aspnetcore-hsts.
    app.UseHsts();
}

app.UseHttpsRedirection();
app.UseStaticFiles();

app.UseRouting();

app.UseAuthorization();

app.MapRazorPages();

app.Run();
using Microsoft.EntityFrameworkCore;
using Microsoft.Extensions.DependencyInjection;
using RazorPagesMovie.Data;
var builder = WebApplication.CreateBuilder(args);

// Add services to the container.
builder.Services.AddRazorPages();
builder.Services.AddDbContext<RazorPagesMovieContext>(options =>
    options.UseSqlite(builder.Configuration.GetConnectionString("RazorPagesMovieContext") ?? throw new InvalidOperationException("Connection string 'RazorPagesMovieContext' not found.")));

var app = builder.Build();

// Configure the HTTP request pipeline.
if (!app.Environment.IsDevelopment())
{
    app.UseExceptionHandler("/Error");
    // The default HSTS value is 30 days. You may want to change this for production scenarios, see https://aka.ms/aspnetcore-hsts.
    app.UseHsts();
}

app.UseHttpsRedirection();
app.UseStaticFiles();

app.UseRouting();

app.UseAuthorization();

app.MapRazorPages();

app.Run();
Specifies which entities are included in the data model.
Coordinates EF Core functionality, such as Create, Read, Update and Delete, for the Movie model.
using System;
using System.Collections.Generic;
using System.Linq;
using System.Threading.Tasks;
using Microsoft.EntityFrameworkCore;
using RazorPagesMovie.Models;

namespace RazorPagesMovie.Data
{
    public class RazorPagesMovieContext : DbContext
    {
        public RazorPagesMovieContext (DbContextOptions<RazorPagesMovieContext> options)
            : base(options)
        {
        }

        public DbSet<RazorPagesMovie.Models.Movie>? Movie { get; set; }
    }
}
The preceding code creates a DbSet<Movie> property for the entity set. In Entity Framework terminology, an entity set typically corresponds to a database table. An entity corresponds to a row in the table.
The name of the connection string is passed in to the context by calling a method on a DbContextOptions object. For local development, the Configuration system reads the connection string from the appsettings.json file.
Test the app
Run the app and append /Movies to the URL in the browser (http://localhost:port/movies).
If you receive the following error:
SqlException: Cannot open database "RazorPagesMovieContext-GUID" requested by the login. The login failed.
Login failed for user 'User-name'.
You may not be able to enter decimal commas in the Price field. To support jQuery validation for non-English locales that use a comma (",") for a decimal point and for non US-English date formats, the app must be globalized. For globalization instructions, see this GitHub issue.
Test the Edit, Details, and Delete links.
The next tutorial explains the files created by scaffolding.
In this section, classes are added for managing movies in a database. The app's model classes use Entity Framework Core (EF Core) to work with the database. EF Core is an object-relational mapper (O/RM) that simplifies data access. You write the model classes first, and EF Core creates the database.
The model classes are known as POCO classes (from "Plain-Old CLR Objects") because they don't have a dependency on EF Core. They define the properties of the data that are stored in the database.
In Solution Explorer, right-click the RazorPagesMovie project > Add > New Folder. Name the folder Models.
Right-click the Models folder. Select Add > Class. Name the class Movie.
Add the following properties to the Movie class:
using System;
using System.ComponentModel.DataAnnotations;

namespace RazorPagesMovie.Models
{
    public class Movie
    {
        public int ID { get; set; }
        public string Title { get; set; }

        [DataType(DataType.Date)]
        public DateTime ReleaseDate { get; set; }
        public string Genre { get; set; }
        public decimal Price { get; set; }
    }
}
The Movie class contains:
The ID field is required by the database for the primary key.
[DataType(DataType.Date)]: The [DataType] attribute specifies the type of the data (Date). With this attribute:
The user isn't required to enter time information in the date field.
Only the date is displayed, not time information.
Add a folder named Models.
Add a class to the Models folder named Movie.cs.
Add the following properties to the Movie class:
using System;
using System.ComponentModel.DataAnnotations;

namespace RazorPagesMovie.Models
{
    public class Movie
    {
        public int ID { get; set; }
        public string Title { get; set; }

        [DataType(DataType.Date)]
        public DateTime ReleaseDate { get; set; }
        public string Genre { get; set; }
        public decimal Price { get; set; }
    }
}
The Movie class contains:
The ID field is required by the database for the primary key.
[DataType(DataType.Date)]: The [DataType] attribute specifies the type of the data (Date). With this attribute:
The user is not required to enter time information in the date field.
The EF Core SQLite provider, which installs the EF Core package as a dependency.
Packages needed for scaffolding: Microsoft.VisualStudio.Web.CodeGeneration.Design and Microsoft.EntityFrameworkCore.SqlServer.
For guidance on multiple environment configuration that permits an app to configure its database contexts by environment, see Use multiple environments in ASP.NET Core.
Note
By default the architecture of the .NET binaries to install represents the currently running OS architecture. To specify a different OS architecture, see dotnet tool install, --arch option.
For more information, see GitHub issue dotnet/AspNetCore.Docs #29262.
If you get a scaffolding error, verify the Target Framework Moniker (TFM) matches the NuGet package version in the project file. For example, the following project file uses version 5.0 for .NET and the listed NuGet packages:
In the Solution Tool Window, control-click the RazorPagesMovie project, and then select Add > New Folder.... Name the folder Models.
Control-click the Models folder, and then select Add > New File....
In the New File dialog:
Select General in the left pane.
Select Empty Class in the center pane.
Name the class Movie and select New.
Add the following properties to the Movie class:
using System;
using System.ComponentModel.DataAnnotations;

namespace RazorPagesMovie.Models
{
    public class Movie
    {
        public int ID { get; set; }
        public string Title { get; set; }

        [DataType(DataType.Date)]
        public DateTime ReleaseDate { get; set; }
        public string Genre { get; set; }
        public decimal Price { get; set; }
    }
}
The Movie class contains:
The ID field is required by the database for the primary key.
[DataType(DataType.Date)]: The [DataType] attribute specifies the type of the data (Date). With this attribute:
The user is not required to enter time information in the date field.
Build the project to verify there are no compilation errors.
Scaffold the movie model
In this section, the movie model is scaffolded. That is, the scaffolding tool produces pages for Create, Read, Update, and Delete (CRUD) operations for the movie model.
Use SQLite for development, SQL Server for production
When SQLite is selected, the template generated code is ready for development. The following code shows how to inject IWebHostEnvironment into Startup. IWebHostEnvironment is injected so ConfigureServices can use SQLite in development and SQL Server in production.
public class Startup
{
    public Startup(IConfiguration configuration, IWebHostEnvironment env)
    {
        Environment = env;
        Configuration = configuration;
    }

    public IConfiguration Configuration { get; }
    public IWebHostEnvironment Environment { get; }

    public void ConfigureServices(IServiceCollection services)
    {
        if (Environment.IsDevelopment())
        {
            services.AddDbContext<RazorPagesMovieContext>(options =>
            options.UseSqlite(
                Configuration.GetConnectionString("RazorPagesMovieContext")));
        }
        else
        {
            services.AddDbContext<RazorPagesMovieContext>(options =>
            options.UseSqlServer(
                Configuration.GetConnectionString("MovieContext")));
        }

        services.AddRazorPages();
    }

    public void Configure(IApplicationBuilder app)
    {
        if (Environment.IsDevelopment())
        {
            app.UseDeveloperExceptionPage();
        }
        else
        {
            app.UseExceptionHandler("/Error");
            app.UseHsts();
        }

        app.UseHttpsRedirection();
        app.UseStaticFiles();

        app.UseRouting();

        app.UseEndpoints(endpoints =>
        {
            endpoints.MapRazorPages();
        });
    }
}
Create a Pages/Movies folder:
Control-click on the Pages folder > Add > New Folder.
Name the folder Movies.
Control-click on the Pages/Movies folder > Add > New Scaffolding....
In the New Scaffolding dialog, select Razor Pages using Entity Framework (CRUD) > Next.
Complete the Add Razor Pages using Entity Framework (CRUD) dialog:
In the DbContext Class to use: row, name the class RazorPagesMovie.Data.RazorPagesMovieContext.
Select Finish.
The appsettings.json file is updated with the connection string used to connect to a local database.
Use SQLite for development, SQL Server for production
When SQLite is selected, the template generated code is ready for development. The following code shows how to inject IWebHostEnvironment into Startup. IWebHostEnvironment is injected so ConfigureServices can use SQLite in development and SQL Server in production.
public class Startup
{
    public Startup(IConfiguration configuration, IWebHostEnvironment env)
    {
        Environment = env;
        Configuration = configuration;
    }

    public IConfiguration Configuration { get; }
    public IWebHostEnvironment Environment { get; }

    public void ConfigureServices(IServiceCollection services)
    {
        if (Environment.IsDevelopment())
        {
            services.AddDbContext<RazorPagesMovieContext>(options =>
            options.UseSqlite(
                Configuration.GetConnectionString("RazorPagesMovieContext")));
        }
        else
        {
            services.AddDbContext<RazorPagesMovieContext>(options =>
            options.UseSqlServer(
                Configuration.GetConnectionString("MovieContext")));
        }

        services.AddRazorPages();
    }

    public void Configure(IApplicationBuilder app)
    {
        if (Environment.IsDevelopment())
        {
            app.UseDeveloperExceptionPage();
        }
        else
        {
            app.UseExceptionHandler("/Error");
            app.UseHsts();
        }

        app.UseHttpsRedirection();
        app.UseStaticFiles();

        app.UseRouting();

        app.UseEndpoints(endpoints =>
        {
            endpoints.MapRazorPages();
        });
    }
}
Files created and updated
The scaffold process creates the following files:
Pages/Movies: Create, Delete, Details, Edit, and Index.
Data/RazorPagesMovieContext.cs
Updated files
Startup.cs
The created and updated files are explained in the next section.
Create the initial database schema using EF's migration feature
The migrations feature in Entity Framework Core provides a way to:
Create the initial database schema.
Incrementally update the database schema to keep it in sync with the application's data model. Existing data in the database is preserved.
In this section, the Package Manager Console (PMC) window is used to:
Add an initial migration.
Update the database with the initial migration.
From the Tools menu, select NuGet Package Manager > Package Manager Console.
In the PMC, enter the following commands:
Add-Migration InitialCreate
Update-Database
Run the following .NET CLI commands:
dotnet ef migrations add InitialCreate
dotnet ef database update
Note
For SQLite, column type for the Price field is set to TEXT. This is resolved in a later step.
For SQL Server, the preceding commands generate the following warning: "No type was specified for the decimal column 'Price' on entity type 'Movie'. This will cause values to be silently truncated if they do not fit in the default precision and scale. Explicitly specify the SQL server column type that can accommodate all the values using 'HasColumnType()'."
Ignore the warning, as it will be addressed in a later step.
The migrations command generates code to create the initial database schema. The schema is based on the model specified in DbContext. The InitialCreate argument is used to name the migrations. Any name can be used, but by convention a name is selected that describes the migration.
The update command runs the Up method in migrations that have not been applied. In this case, update runs the Up method in the Migrations/<time-stamp>_InitialCreate.cs file, which creates the database.
Examine the context registered with dependency injection
ASP.NET Core is built with dependency injection. Services, such as the EF Core database context, are registered with dependency injection during application startup. Components that require these services (such as Razor Pages) are provided via constructor parameters. The constructor code that gets a database context instance is shown later in the tutorial.
The scaffolding tool automatically created a database context and registered it with the dependency injection container.
Examine the Startup.ConfigureServices method. The highlighted line was added by the scaffolder:
public void ConfigureServices(IServiceCollection services)
{
    services.AddRazorPages();

    services.AddDbContext<RazorPagesMovieContext>(options =>
      options.UseSqlServer(Configuration.GetConnectionString("RazorPagesMovieContext")));
}
The RazorPagesMovieContext coordinates EF Core functionality, such as Create, Read, Update and Delete, for the Movie model. The data context (RazorPagesMovieContext) is derived from Microsoft.EntityFrameworkCore.DbContext. The data context specifies which entities are included in the data model.
using Microsoft.EntityFrameworkCore;

namespace RazorPagesMovie.Data
{
    public class RazorPagesMovieContext : DbContext
    {
        public RazorPagesMovieContext (
            DbContextOptions<RazorPagesMovieContext> options)
            : base(options)
        {
        }

        public DbSet<RazorPagesMovie.Models.Movie> Movie { get; set; }
    }
}
The preceding code creates a DbSet<Movie> property for the entity set. In Entity Framework terminology, an entity set typically corresponds to a database table. An entity corresponds to a row in the table.
The name of the connection string is passed in to the context by calling a method on a DbContextOptions object. For local development, the Configuration system reads the connection string from the appsettings.json file.
Examine the Up method.
Test the app
Run the app and append /Movies to the URL in the browser (http://localhost:port/movies).
If you receive the following error:
SqlException: Cannot open database "RazorPagesMovieContext-GUID" requested by the login. The login failed.
Login failed for user 'User-name'.
You may not be able to enter decimal commas in the Price field. To support jQuery validation for non-English locales that use a comma (",") for a decimal point and for non US-English date formats, the app must be globalized. For globalization instructions, see this GitHub issue.
Test the Edit, Details, and Delete links.
SQL Logging of Entity Framework Core
Logging configuration is commonly provided by the Logging section of appsettings.{Environment}.json files. To log SQL statements, add "Microsoft.EntityFrameworkCore.Database.Command": "Information" to the appsettings.Development.json file:
In this section, classes are added for managing movies. The app's model classes use Entity Framework Core (EF Core) to work with the database. EF Core is an object-relational mapper (O/RM) that simplifies data access.
The model classes are known as POCO classes (from "plain-old CLR objects") because they don't have any dependency on EF Core. They define the properties of the data that are stored in the database.
Right-click the RazorPagesMovie project > Add > New Folder. Name the folder Models.
Right-click the Models folder. Select Add > Class. Name the class Movie.
Add the following properties to the Movie class:
using System;
using System.ComponentModel.DataAnnotations;

namespace RazorPagesMovie.Models
{
    public class Movie
    {
        public int ID { get; set; }
        public string Title { get; set; }

        [DataType(DataType.Date)]
        public DateTime ReleaseDate { get; set; }
        public string Genre { get; set; }
        public decimal Price { get; set; }
    }
}
The Movie class contains:
The ID field is required by the database for the primary key.
[DataType(DataType.Date)]: The DataType attribute specifies the type of the data (Date). With this attribute:
The user is not required to enter time information in the date field.
The Entity Framework Core Tools for the .NET Core CLI.
The EF Core SQLite provider, which installs the EF Core package as a dependency.
Packages needed for scaffolding: Microsoft.VisualStudio.Web.CodeGeneration.Design and Microsoft.EntityFrameworkCore.SqlServer.
For guidance on multiple environment configuration that permits an app to configure its database contexts by environment, see Use multiple environments in ASP.NET Core.
Note
By default the architecture of the .NET binaries to install represents the currently running OS architecture. To specify a different OS architecture, see dotnet tool install, --arch option.
For more information, see GitHub issue dotnet/AspNetCore.Docs #29262.
If you get a scaffolding error, verify the Target Framework Moniker (TFM) matches the NuGet package version in the project file. For example, the following project file contains the version 3.1 for .NET Core and the listed NuGet packages:
In the RazorPagesMovie project, create a new folder named Data.
Add the following RazorPagesMovieContext class to the Data folder:
using Microsoft.EntityFrameworkCore;

namespace RazorPagesMovie.Data
{
    public class RazorPagesMovieContext : DbContext
    {
        public RazorPagesMovieContext (
            DbContextOptions<RazorPagesMovieContext> options)
            : base(options)
        {
        }

        public DbSet<RazorPagesMovie.Models.Movie> Movie { get; set; }
    }
}
The preceding code creates a DbSet property for the entity set. In Entity Framework terminology, an entity set typically corresponds to a database table, and an entity corresponds to a row in the table. The code won't compile until dependencies are added in a later step.
Add a database connection string
Add a connection string to the appsettings.json file as shown in the following highlighted code:
Add the following using statements at the top of Startup.cs:
using RazorPagesMovie.Data;
using Microsoft.EntityFrameworkCore;
Register the database context with the dependency injection container in Startup.ConfigureServices.
public void ConfigureServices(IServiceCollection services)
{
    services.AddRazorPages();

    services.AddDbContext<RazorPagesMovieContext>(options =>
        options.UseSqlite(Configuration.GetConnectionString("RazorPagesMovieContext")));
}
In the Solution Tool Window, control-click the RazorPagesMovie project, and then select Add > New Folder.... Name the folder Models.
Right-click the Models folder, and then select Add > New File....
In the New File dialog:
Select General in the left pane.
Select Empty Class in the center pane.
Name the class Movie and select New.
Add the following properties to the Movie class:
using System;
using System.ComponentModel.DataAnnotations;

namespace RazorPagesMovie.Models
{
    public class Movie
    {
        public int ID { get; set; }
        public string Title { get; set; }

        [DataType(DataType.Date)]
        public DateTime ReleaseDate { get; set; }
        public string Genre { get; set; }
        public decimal Price { get; set; }
    }
}
The Movie class contains:
The ID field is required by the database for the primary key.
[DataType(DataType.Date)]: The DataType attribute specifies the type of the data (Date). With this attribute:
The user is not required to enter time information in the date field.
Build the project to verify there are no compilation errors.
Scaffold the movie model
In this section, the movie model is scaffolded. That is, the scaffolding tool produces pages for Create, Read, Update, and Delete (CRUD) operations for the movie model.
Right-click on the Pages folder > Add > New Folder.
Name the folder Movies.
Right-click on the Pages/Movies folder > Add > New Scaffolded Item.
In the Add Scaffold dialog, select Razor Pages using Entity Framework (CRUD) > Add.
Complete the Add Razor Pages using Entity Framework (CRUD) dialog:
In the Model class drop down, select Movie (RazorPagesMovie.Models).
In the Data context class row, select the + (plus) sign and change the generated name from RazorPagesMovie.Models.RazorPagesMovieContext to RazorPagesMovie.Data.RazorPagesMovieContext. This change is not required. It creates the database context class with the correct namespace.
Select Add.
The appsettings.json file is updated with the connection string used to connect to a local database.
Open a command window in the project directory, which contains the Program.cs, Startup.cs, and .csproj files.
Use SQLite for development, SQL Server for production
When SQLite is selected, the template generated code is ready for development. The following code shows how to inject IWebHostEnvironment into Startup. IWebHostEnvironment is injected so ConfigureServices can use SQLite in development and SQL Server in production.
public class Startup
{
    public Startup(IConfiguration configuration, IWebHostEnvironment env)
    {
        Environment = env;
        Configuration = configuration;
    }

    public IConfiguration Configuration { get; }
    public IWebHostEnvironment Environment { get; }

    public void ConfigureServices(IServiceCollection services)
    {
        if (Environment.IsDevelopment())
        {
            services.AddDbContext<RazorPagesMovieContext>(options =>
            options.UseSqlite(
                Configuration.GetConnectionString("RazorPagesMovieContext")));
        }
        else
        {
            services.AddDbContext<RazorPagesMovieContext>(options =>
            options.UseSqlServer(
                Configuration.GetConnectionString("MovieContext")));
        }

        services.AddRazorPages();
    }

    public void Configure(IApplicationBuilder app)
    {
        if (Environment.IsDevelopment())
        {
            app.UseDeveloperExceptionPage();
            app.UseDatabaseErrorPage();
        }
        else
        {
            app.UseExceptionHandler("/Error");
            app.UseHsts();
        }

        app.UseHttpsRedirection();
        app.UseStaticFiles();

        app.UseRouting();

        app.UseEndpoints(endpoints =>
        {
            endpoints.MapRazorPages();
        });
    }
}
Create a Pages/Movies folder:
Right-click on the Pages folder > Add > New Folder.
Name the folder Movies.
Right-click on the Pages/Movies folder > Add > New Scaffolding....
In the New Scaffolding dialog, select Razor Pages using Entity Framework (CRUD) > Next.
Complete the Add Razor Pages using Entity Framework (CRUD) dialog:
In the Model class drop down, select, or type, Movie (RazorPagesMovie.Models).
In the Data context class row, type the name for the new class, RazorPagesMovie.Data.RazorPagesMovieContext. This change is not required. It creates the database context class with the correct namespace.
Select Add.
The appsettings.json file is updated with the connection string used to connect to a local database.
By default the architecture of the .NET binaries to install represents the currently running OS architecture. To specify a different OS architecture, see dotnet tool install, --arch option.
For more information, see GitHub issue dotnet/AspNetCore.Docs #29262.
Use SQLite for development, SQL Server for production
When SQLite is selected, the template generated code is ready for development. The following code shows how to inject IWebHostEnvironment into Startup. IWebHostEnvironment is injected so ConfigureServices can use SQLite in development and SQL Server in production.
public class Startup
{
    public Startup(IConfiguration configuration, IWebHostEnvironment env)
    {
        Environment = env;
        Configuration = configuration;
    }

    public IConfiguration Configuration { get; }
    public IWebHostEnvironment Environment { get; }

    public void ConfigureServices(IServiceCollection services)
    {
        if (Environment.IsDevelopment())
        {
            services.AddDbContext<RazorPagesMovieContext>(options =>
            options.UseSqlite(
                Configuration.GetConnectionString("RazorPagesMovieContext")));
        }
        else
        {
            services.AddDbContext<RazorPagesMovieContext>(options =>
            options.UseSqlServer(
                Configuration.GetConnectionString("MovieContext")));
        }

        services.AddRazorPages();
    }

    public void Configure(IApplicationBuilder app)
    {
        if (Environment.IsDevelopment())
        {
            app.UseDeveloperExceptionPage();
            app.UseDatabaseErrorPage();
        }
        else
        {
            app.UseExceptionHandler("/Error");
            app.UseHsts();
        }

        app.UseHttpsRedirection();
        app.UseStaticFiles();

        app.UseRouting();

        app.UseEndpoints(endpoints =>
        {
            endpoints.MapRazorPages();
        });
    }
}
By default the architecture of the .NET binaries to install represents the currently running OS architecture. To specify a different OS architecture, see dotnet tool install, --arch option.
For more information, see GitHub issue dotnet/AspNetCore.Docs #29262.
Run the following .NET Core CLI commands:
dotnet ef migrations add InitialCreate
dotnet ef database update
The preceding commands generate the following warning: "No type was specified for the decimal column 'Price' on entity type 'Movie'. This will cause values to be silently truncated if they do not fit in the default precision and scale. Explicitly specify the SQL server column type that can accommodate all the values using 'HasColumnType()'."
Ignore the warning, as it will be addressed in a later step.
The migrations command generates code to create the initial database schema. The schema is based on the model specified in DbContext. The InitialCreate argument is used to name the migrations. Any name can be used, but by convention a name is selected that describes the migration.
The update command runs the Up method in migrations that have not been applied. In this case, update runs the Up method in Migrations/<time-stamp>_InitialCreate.cs file, which creates the database.
Examine the context registered with dependency injection
ASP.NET Core is built with dependency injection. Services, such as the EF Core database context, are registered with dependency injection during application startup. Components that require these services, such as Razor Pages, are provided via constructor parameters. The constructor code that gets a database context instance is shown later in the tutorial.
The scaffolding tool automatically created a database context and registered it with the dependency injection container.
Examine the Startup.ConfigureServices method. The highlighted line was added by the scaffolder:
public void ConfigureServices(IServiceCollection services)
{
    services.AddRazorPages();

    services.AddDbContext<RazorPagesMovieContext>(options =>
      options.UseSqlServer(Configuration.GetConnectionString("RazorPagesMovieContext")));
}
The RazorPagesMovieContext coordinates EF Core functionality, such as Create, Read, Update and Delete, for the Movie model. The data context (RazorPagesMovieContext) is derived from Microsoft.EntityFrameworkCore.DbContext. The data context specifies which entities are included in the data model.
using Microsoft.EntityFrameworkCore;

namespace RazorPagesMovie.Data
{
    public class RazorPagesMovieContext : DbContext
    {
        public RazorPagesMovieContext (
            DbContextOptions<RazorPagesMovieContext> options)
            : base(options)
        {
        }

        public DbSet<RazorPagesMovie.Models.Movie> Movie { get; set; }
    }
}
The preceding code creates a DbSet<Movie> property for the entity set. In Entity Framework terminology, an entity set typically corresponds to a database table. An entity corresponds to a row in the table.
The name of the connection string is passed in to the context by calling a method on a DbContextOptions object. For local development, the Configuration system reads the connection string from the appsettings.json file.
Examine the Up method.
Test the app
Run the app and append /Movies to the URL in the browser (http://localhost:port/movies).
If you get the error:
SqlException: Cannot open database "RazorPagesMovieContext-GUID" requested by the login. The login failed.
Login failed for user 'User-name'.
You may not be able to enter decimal commas in the Price field. To support jQuery validation for non-English locales that use a comma (",") for a decimal point and for non US-English date formats, the app must be globalized. For globalization instructions, see this GitHub issue.
Test the Edit, Details, and Delete links.
The next tutorial explains the files created by scaffolding.
The source for this content can be found on GitHub, where you can also create and review issues and pull requests. For more information, see our contributor guide.
Coming soon: Throughout 2024 we will be phasing out GitHub Issues as the feedback mechanism for content and replacing it with a new feedback system. For more information see: https://aka.ms/ContentUserFeedback.