Attaching a GPU to an Ubuntu Linux VM on Azure Stack HCI
Applies to: Azure Stack HCI, versions 23H2 and 22H2
Note
The recommended way to create and manage VMs on Azure Stack HCI 23H2 is using the Azure Arc control plane. Use the mechanism described below to manage your VMs only if you need functionality that is not available in Azure Arc VMs.
This topic provides step-by-step instructions on how to install and configure an NVIDIA graphics processing unit (GPU) with Azure Stack HCI using Discrete Device Assignment (DDA) technology for an Ubuntu virtual machine (VM). This document assumes you have the Azure Stack HCI cluster deployed and VMs installed.
Install the GPU and then dismount it in PowerShell
Install the NVIDIA GPU(s) physically into the appropriate server(s) following OEM instructions and BIOS recommendations.
Power on each server.
Sign in using an account with administrative privileges to the server(s) with the NVIDIA GPU installed.
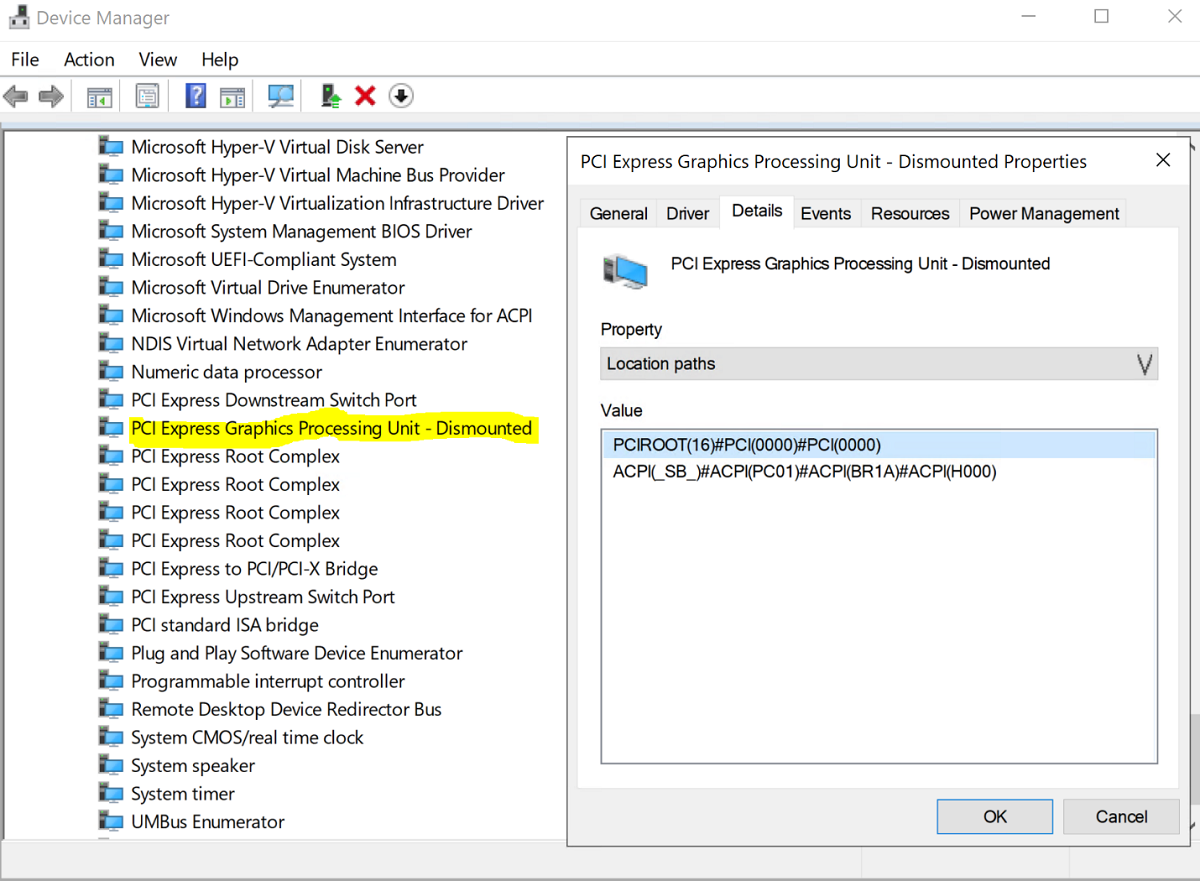
Open Device Manager and navigate to the other devices section. You should see a device listed as "3D Video Controller."
Right-click on "3D Video Controller" to bring up the Properties page. Click Details. From the dropdown under Property, select "Location paths."
Note the value with string PCIRoot as highlighted in the screen shot below. Right-click on Value and copy/save it.

Open Windows PowerShell with elevated privileges and execute the
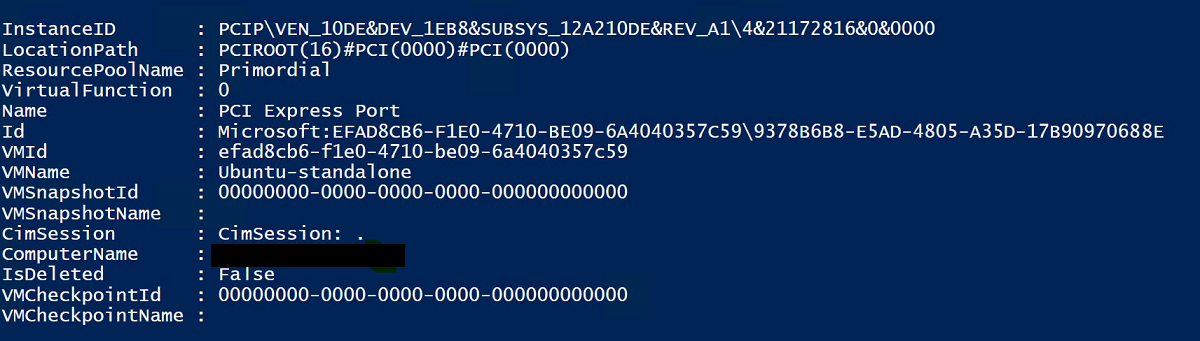
Dismount-VMHostAssignableDevicecmdlet to dismount the GPU device for DDA to VM. Replace the LocationPath value with the value for your device obtained in step 6.Dismount-VMHostAssignableDevice -LocationPath "PCIROOT(16)#PCI(0000)#PCI(0000)" -forceConfirm the device is listed under system devices in Device Manager as Dismounted.


Create and configure an Ubuntu virtual machine
Download Ubuntu desktop release 18.04.02 ISO.
Open Hyper-V Manager on the node of the system with the GPU installed.
Note
DDA doesn't support failover. This is a virtual machine limitation with DDA. Therefore, we recommend using Hyper-V Manager to deploy the VM on the node instead of Failover Cluster Manager. Use of Failover Cluster Manager with DDA will fail with an error message indicating that the VM has a device that doesn't support high availability.
Using the Ubuntu ISO downloaded in step 1, create a new virtual machine using the New Virtual Machine Wizard in Hyper-V Manager to create a Ubuntu Gen 1 VM with 2GB of memory and a network card attached to it.
In PowerShell, assign the Dismounted GPU device to the VM using the cmdlets below, replacing the LocationPath value with the value for your device.
# Confirm that there are no DDA devices assigned to the VM
Get-VMAssignableDevice -VMName Ubuntu

# Assign the GPU to the VM
Add-VMAssignableDevice -LocationPath "PCIROOT(16)#PCI(0000)#PCI(0000)" -VMName Ubuntu

# Confirm that the GPU is assigned to the VM
Get-VMAssignableDevice -VMName Ubuntu
Successful assignment of the GPU to the VM will show the output below:
Configure additional values following GPU documentation here:
 # Enable Write-Combining on the CPU
 Set-VM -GuestControlledCacheTypes $true -VMName VMName

 # Configure the 32 bit MMIO space
 Set-VM -LowMemoryMappedIoSpace 3Gb -VMName VMName

 # Configure greater than 32 bit MMIO space
 Set-VM -HighMemoryMappedIoSpace 33280Mb -VMName VMName
Note
The Value 33280Mb should suffice for most GPUs, but should be replaced with a value greater than your GPU memory.
Using Hyper-V Manager, connect to the VM and start the Ubuntu OS install. Choose the defaults to install the Ubuntu OS on the VM.
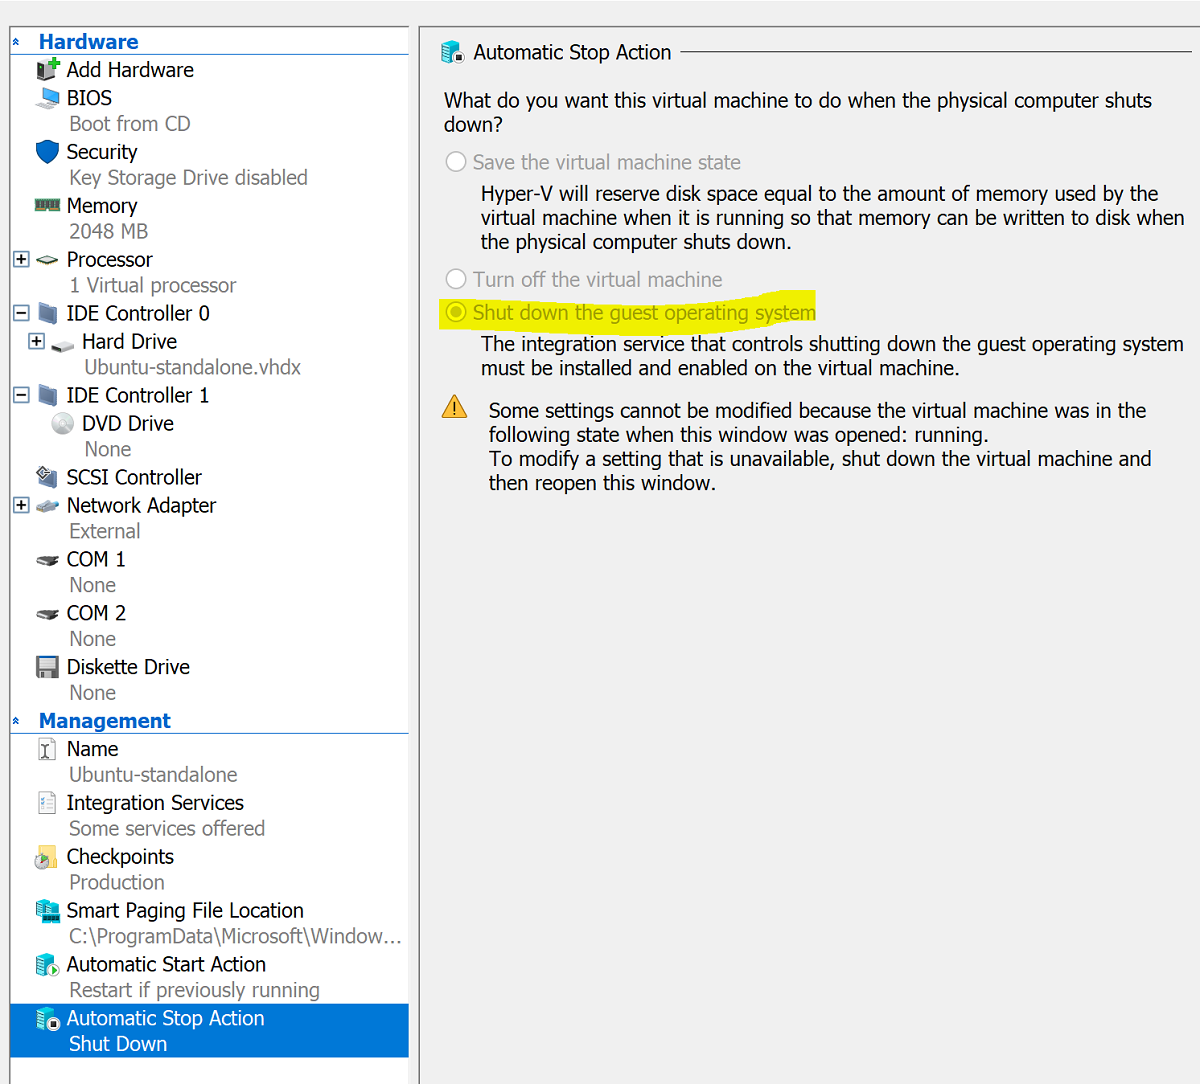
After the installation is complete, use Hyper-V Manager to shut down the VM and configure the Automatic Stop Action for the VM to shut down the guest operating system as in the screenshot below:
Log in to Ubuntu and open the terminal to install SSH:
$ sudo apt install openssh-serverFind The TCP/IP address for the Ubuntu installation using the ifconfig command and copy the IP address for the eth0 interface.
Use an SSH client such as OpenSSH (ssh.exe installed with Windows 10 by default) or Putty to connect to the Ubuntu VM for further configuration.
Upon login through the SSH client, issue the command lspci and validate that the NVIDIA GPU is listed as "3D controller."
Important
If The NVIDIA GPU is not seen as "3D controller," please do not proceed further. Please ensure that the steps above are followed before proceeding.
Within the VM, search for and open Software & Updates. Navigate to Additional Drivers, then choose the latest NVIDIA GPU drivers listed. Complete the driver install by clicking the Apply Changes button.

Restart the Ubuntu VM after the driver installation completes. Once the VM starts, connect through the SSH client and issue the command nvidia-smi to verify that the NVIDIA GPU driver installation completed successfully. The output should be similar to the screenshot below:

Using the SSH client, set up the repository and install the Docker CE Engine:
$ sudo apt-get update
$ sudo apt-get install \
apt-transport-https \
ca-certificates \
curl \
gnupg-agent \
software-properties-common
Add Docker's official GPG key:
$ curl -fsSL https://download.docker.com/linux/ubuntu/gpg | sudo apt-key add -Verify that you now have the key with the fingerprint 9DC8 5822 9FC7 DD38 854A E2D8 8D81 803C 0EBF CD88 by searching for the last eight characters of the fingerprint:
$ sudo apt-key fingerprint 0EBFCD88Your output should look similar to this:
pub   rsa4096 2017-02-22 [SCEA]
9DC8 5822 9FC7 DD38 854A  E2D8 8D81 803C 0EBF CD88
uid           [ unknown] Docker Release (CE deb) <docker@docker.com>
sub   rsa4096 2017-02-22 [S]
Set up the stable repository for Ubuntu AMD64 architecture:
$ sudo add-apt-repository \
"deb [arch=amd64] https://download.docker.com/linux/ubuntu \
$(lsb_release -cs) \
stable"
Update packages and install Docker CE:
$ sudo apt-get update
$ sudo apt-get install docker-ce docker-ce-cli containerd.io
Verify the Docker CE install:
$ sudo docker run hello-world


Configure Azure IoT Edge
To prepare for this configuration, please review the FAQ contained in the NVIDIA-Deepstream-Azure-IoT-Edge-on-a-NVIDIA-Jetson-Nano GitHub repo, which explains the need to install Docker instead of Moby. After reviewing, proceed to the steps below.
Install NVIDIA Docker
From the SSH client, add package repositories:
curl -s -L https://nvidia.github.io/nvidia-docker/gpgkey | \
sudo apt-key add -
distribution=$(. /etc/os-release;echo $ID$VERSION_ID)

curl -s -L https://nvidia.github.io/nvidia-docker/$distribution/nvidia-docker.list | \
sudo tee /etc/apt/sources.list.d/nvidia-docker.list

sudo apt-get update
Install nvidia-docker2 and reload the Docker daemon configuration:
sudo apt-get install -y nvidia-docker2
sudo pkill -SIGHUP dockerd
Reboot the VM:
sudo /sbin/shutdown -r nowUpon reboot, verify successful installation of NVIDIA Docker:
sudo docker run --runtime=nvidia --rm nvidia/cuda:9.0-base nvidia-smiSuccessful installation will look like the output in the screenshot below:

Following the instructions here, proceed to install Azure IoT Edge, skipping the runtime install:
curl https://packages.microsoft.com/config/ubuntu/18.04/multiarch/prod.list > ./microsoft-prod.list

sudo cp ./microsoft-prod.list /etc/apt/sources.list.d/

curl https://packages.microsoft.com/keys/microsoft.asc | gpg --dearmor > microsoft.gpg
sudo cp ./microsoft.gpg /etc/apt/trusted.gpg.d/
sudo apt-get update

sudo apt-get install iotedge
Note
After installing Azure IoT Edge, verify that the config.yaml is present on the Ubuntu VM at /etc/iotedge/config.yaml
Create an IoT Edge device identity in the Azure portal following guidance here. Next, copy the device connection string for the newly created IoT Edge.
Using the SSH client, update the device connection string in config.yaml on the Ubuntu VM:
sudo nano /etc/iotedge/config.yamlFind the provisioning configurations of the file and uncomment the "Manual provisioning configuration" section. Update the value of device_connection_string with the connection string from your IoT Edge device. Make sure any other provisioning sections are commented out. Make sure that the provisioning: line has no preceding whitespace and that nested items are indented by two spaces:

To paste clipboard contents into Nano, shift+right click or press shift+insert. Save and close the file (Ctrl + X, Y, Enter).
Using the SSH client, restart the IoT Edge daemon:
sudo systemctl restart iotedgeVerify the installation and check the status of the IoT Edge daemon:
systemctl status iotedge

journalctl -u iotedge --no-pager --no-full
Using the SSH client, create the following directory structure on the Ubuntu VM:
cd /var
sudo mkdir deepstream
mkdir ./deepstream/custom_configs
cd /var/deepstream
sudo mkdir custom_streams
sudo chmod -R 777 /var/deepstream
cd ./custom_streams
Ensure your working directory is /var/deepstream/custom_streams and download the demo videos file by executing the following command in the SSH client:
wget -O cars-streams.tar.gz --no-check-certificate https://onedrive.live.com/download?cid=0C0A4A69A0CDCB4C&resid=0C0A4A69A0CDCB4C%21588371&authkey=AAavgrxG95v9gu0Un-compress the video files:
tar -xzvf cars-streams.tar.gzThe contents of the directory /var/deepstream/custom_streams should be similar to the screenshot below:

Create a new file called test5_config_file_src_infer_azure_iotedge_edited.txt in the /var/deepstream/custom_configs directory. Using a text editor, open the file and paste in the following code, then save and close the file.
# Copyright (c) 2018 NVIDIA Corporation.  All rights reserved.
#
# NVIDIA Corporation and its licensors retain all intellectual property
# and proprietary rights in and to this software, related documentation
# and any modifications thereto.  Any use, reproduction, disclosure or
# distribution of this software and related documentation without an express
# license agreement from NVIDIA Corporation is strictly prohibited.

[application]
enable-perf-measurement=1
perf-measurement-interval-sec=5
#gie-kitti-output-dir=streamscl

[tiled-display]
enable=1
rows=2
columns=2
width=1280
height=720
gpu-id=0
#(0): nvbuf-mem-default - Default memory allocated, specific to particular platform
#(1): nvbuf-mem-cuda-pinned - Allocate Pinned/Host cuda memory, applicable for Tesla
#(2): nvbuf-mem-cuda-device - Allocate Device cuda memory, applicable for Tesla
#(3): nvbuf-mem-cuda-unified - Allocate Unified cuda memory, applicable for Tesla
#(4): nvbuf-mem-surface-array - Allocate Surface Array memory, applicable for Jetson
nvbuf-memory-type=0

[source0]
enable=1
#Type - 1=CameraV4L2 2=URI 3=MultiURI
type=3
uri=file://../../../../../samples/streams/sample_1080p_h264.mp4
num-sources=2
gpu-id=0
nvbuf-memory-type=0

[source1]
enable=1
#Type - 1=CameraV4L2 2=URI 3=MultiURI
type=3
uri=file://../../../../../samples/streams/sample_1080p_h264.mp4
num-sources=2
gpu-id=0
nvbuf-memory-type=0

[sink0]
enable=0

[sink3]
enable=1
#Type - 1=FakeSink 2=EglSink 3=File 4=RTSPStreaming
type=4
#1=h264 2=h265
codec=1
sync=0
bitrate=4000000
# set below properties in case of RTSPStreaming
rtsp-port=8554
udp-port=5400

[sink1]
enable=1
#Type - 1=FakeSink 2=EglSink 3=File 4=UDPSink 5=nvoverlaysink 6=MsgConvBroker
type=6
msg-conv-config=../configs/dstest5_msgconv_sample_config.txt
#(0): PAYLOAD_DEEPSTREAM - Deepstream schema payload
#(1): PAYLOAD_DEEPSTREAM_MINIMAL - Deepstream schema payload minimal
#(256): PAYLOAD_RESERVED - Reserved type
#(257): PAYLOAD_CUSTOM   - Custom schema payload
msg-conv-payload-type=1
msg-broker-proto-lib=/opt/nvidia/deepstream/deepstream-4.0/lib/libnvds_azure_edge_proto.so
topic=mytopic
#Optional:
#msg-broker-config=../../../../libs/azure_protocol_adaptor/module_client/cfg_azure.txt

[sink2]
enable=0
type=3
#1=mp4 2=mkv
container=1
#1=h264 2=h265 3=mpeg4
## only SW mpeg4 is supported right now.
codec=3
sync=1
bitrate=2000000
output-file=out.mp4
source-id=0

[osd]
enable=1
gpu-id=0
border-width=1
text-size=15
text-color=1;1;1;1;
text-bg-color=0.3;0.3;0.3;1
font=Arial
show-clock=0
clock-x-offset=800
clock-y-offset=820
clock-text-size=12
clock-color=1;0;0;0
nvbuf-memory-type=0

[streammux]
gpu-id=0
##Boolean property to inform muxer that sources are live
live-source=0
batch-size=4
##time out in usec, to wait after the first buffer is available
##to push the batch even if the complete batch is not formed
batched-push-timeout=40000
## Set muxer output width and height
width=1920
height=1080
##Enable to maintain aspect ratio wrt source, and allow black borders, works
##along with width, height properties
enable-padding=0
nvbuf-memory-type=0

[primary-gie]
enable=1
gpu-id=0
batch-size=4
## 0=FP32, 1=INT8, 2=FP16 mode
bbox-border-color0=1;0;0;1
bbox-border-color1=0;1;1;1
bbox-border-color2=0;1;1;1
bbox-border-color3=0;1;0;1
nvbuf-memory-type=0
interval=0
gie-unique-id=1
model-engine-file=../../../../../samples/models/Primary_Detector/resnet10.caffemodel_b4_int8.engine
labelfile-path=../../../../../samples/models/Primary_Detector/labels.txt
config-file=../../../../../samples/configs/deepstream-app/config_infer_primary.txt
#infer-raw-output-dir=../../../../../samples/primary_detector_raw_output/

[tracker]
enable=1
tracker-width=600
tracker-height=300
ll-lib-file=/opt/nvidia/deepstream/deepstream-4.0/lib/libnvds_mot_klt.so
#ll-config-file required for DCF/IOU only
#ll-config-file=tracker_config.yml
#ll-config-file=iou_config.txt
gpu-id=0
#enable-batch-process applicable to DCF only
enable-batch-process=0

[tests]
file-loop=1
Navigate to the Azure portal. Select IoT Hub Provisioned, click on Automatic Device Management, then click on IoT Edge:
In the right-hand pane, select the device identity whose device connection string was used above. Click on set modules:

Under IoT Edge Modules, click and choose IoT Edge Module:
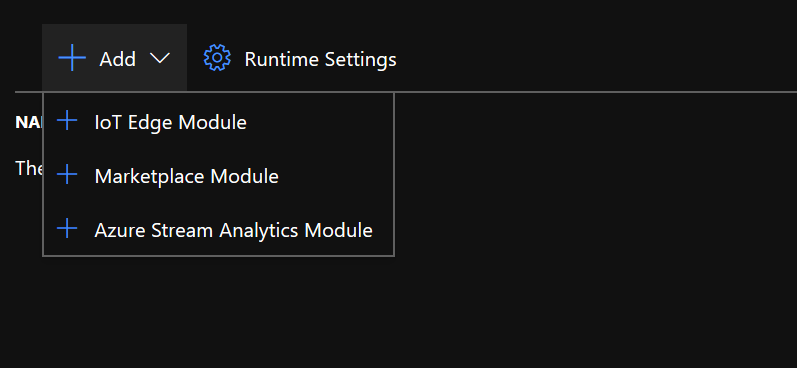
In the Add IoT Edge Module pane, select the Module Settings tab, and then enter or select the following values:
IoT Edge Module Name: NVIDIADeepStreamSDK
Image URI: marketplace.azurecr.io/nvidia/deepstream-iot2
Restart Policy: always
Desired Status: running
Image Pull Policy: blank
Select Add.

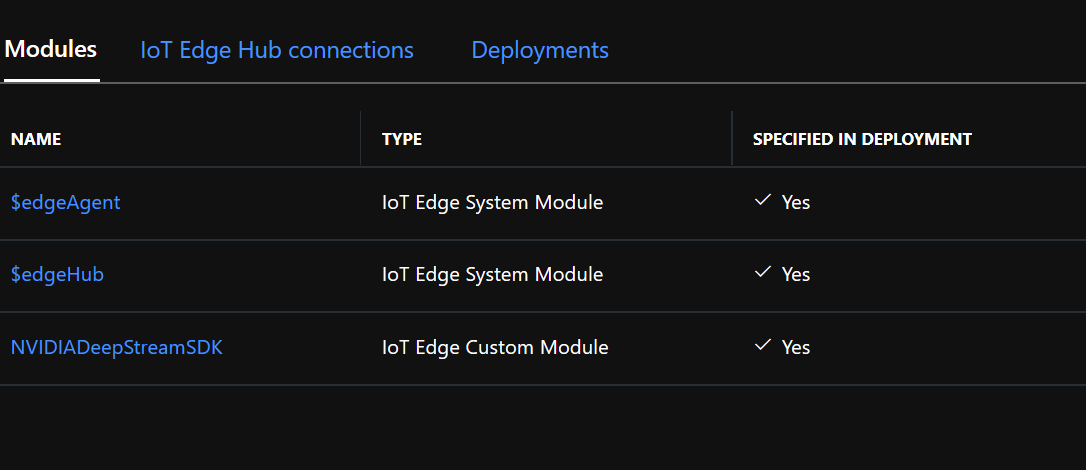
Ensure NvidiaDeepStreamSDK module is listed under IoT Edge Modules:

Click on The "NVIDIADeepStreamSDK" module and choose "Container Create Options." The default configuration is shown here:

Replace the configuration above with the configuration below:
{
  "ExposedPorts": {
    "8554/tcp": {}
  },
  "Entrypoint": [
    "/usr/bin/deepstream-test5-app",
    "-c",
    "test5_config_file_src_infer_azure_iotedge_edited.txt",
    "-p",
    "1",
    "-m",
    "1"
  ],
  "HostConfig": {
    "runtime": "nvidia",
    "Binds": [
      "/var/deepstream/custom_configs:/root/deepstream_sdk_v4.0.2_x86_64/sources/apps/sample_apps/deepstream-test5/custom_configs/",
      "/var/deepstream/custom_streams:/root/deepstream_sdk_v4.0.2_x86_64/sources/apps/sample_apps/deepstream-test5/custom_streams/"
    ],
    "PortBindings": {
      "8554/tcp": [
        {
          "HostPort": "8554"
        }
      ]
    }
  },
  "WorkingDir": "/root/deepstream_sdk_v4.0.2_x86_64/sources/apps/sample_apps/deepstream-test5/custom_configs/"
}
Click Review and Create, and on the next page click Create. You should now see the three modules listed below for your IoT Edge device in the Azure portal:
Connect to the Ubuntu VM using the SSH client and verify that the correct modules are running:
sudo iotedge list
nvidia-smi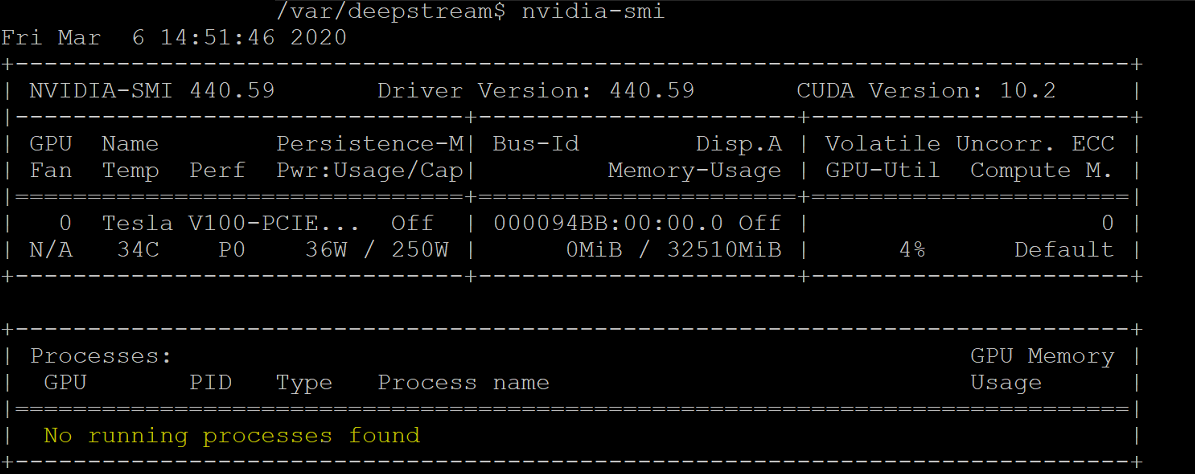
Note
It will take a few minutes for the NvidiaDeepstream Container to be downloaded. You can validate the download using the command "journalctl -u iotedge --no-pager --no-full" to look at the iotedge daemon logs.
Confirm that the NvdiaDeepStreem Container is operational. The command output in the screenshots below indicates success.
sudo iotedge list
sudo iotedge logs -f NVIDIADeepStreamSDK
nvidia-smi
Confirm the TCP/IP address for your Ubuntu VM using the ifconfig command and look for the TCP/IP address next to the eth0 interface.
Install the VLC Player on your workstation. Within the VLC Player, click Media -> open network stream, and type in the address using this format:
rtsp://ipaddress:8554/ds-test
where ipaddress is the TCP/IP address of your VM.


Next steps
For more on GPUs and DDA, see also:
Feedback
Coming soon: Throughout 2024 we will be phasing out GitHub Issues as the feedback mechanism for content and replacing it with a new feedback system. For more information see: https://aka.ms/ContentUserFeedback.
Submit and view feedback for