Secure APIs used for API connectors in Azure AD B2C
When integrating a REST API within an Azure AD B2C user flow, you must protect your REST API endpoint with authentication. The REST API authentication ensures that only services that have proper credentials, such as Azure AD B2C, can make calls to your endpoint. This article explores how to secure REST API.
Prerequisites
Complete the steps in the Add an API connector to a sign-up user flow guide.
You can protect your API endpoint by using either HTTP basic authentication or HTTPS client certificate authentication. In either case, you provide the credentials that Azure AD B2C uses when it calls your API endpoint. Your API endpoint then checks the credentials and performs authorization decisions.
HTTP basic authentication
HTTP basic authentication is defined in RFC 2617. Basic authentication works as follows:
Azure AD B2C sends an HTTP request with the client credentials (
usernameandpassword) in theAuthorizationheader.The credentials are formatted as the base64-encoded string
username:password.Your API then is responsible for checking these values to perform other authorization decisions.
To configure an API Connector with HTTP basic authentication, follow these steps:
- Sign in to the Azure portal.
- Under Azure services, select Azure AD B2C or search for and select Azure AD B2C.
- Select API connectors, and then select the API Connector you want to configure.
- For the Authentication type, select Basic.
- Provide the Username, and Password of your REST API endpoint.
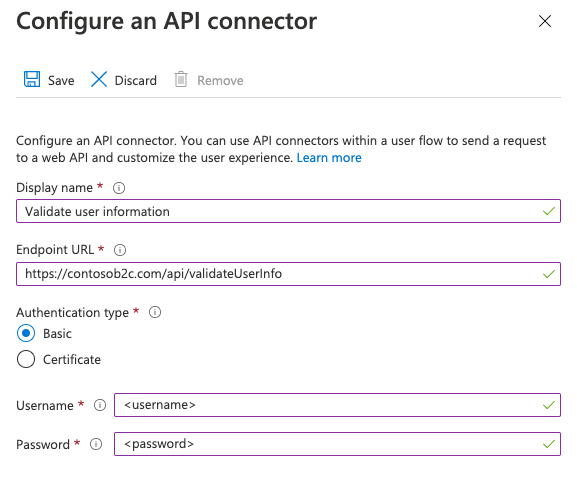
- Select Save.
Add REST API username and password policy keys
To configure a REST API technical profile with HTTP basic authentication, create the following cryptographic keys to store the username and password:
- Sign in to the Azure portal.
- If you have access to multiple tenants, select the Settings icon in the top menu to switch to your Azure AD B2C tenant from the Directories + subscriptions menu.
- Choose All services in the top-left corner of the Azure portal, and then search for and select Azure AD B2C.
- On the Overview page, select Identity Experience Framework.
- Select Policy Keys, and then select Add.
- For Options, select Manual.
- For Name, type RestApiUsername. The prefix B2C_1A_ might be added automatically.
- In the Secret box, enter the REST API username.
- For Key usage, select Encryption.
- Select Create.
- Select Policy Keys again.
- Select Add.
- For Options, select Manual.
- For Name, type RestApiPassword. The prefix B2C_1A_ might be added automatically.
- In the Secret box, enter the REST API password.
- For Key usage, select Encryption.
- Select Create.
Configure your REST API technical profile to use HTTP basic authentication
After creating the necessary keys, configure your REST API technical profile metadata to reference the credentials.
- In your working directory, open the extension policy file (TrustFrameworkExtensions.xml).
- Search for the REST API technical profile. For example
REST-ValidateProfile, orREST-GetProfile. - Locate the
<Metadata>element. - Change the AuthenticationType to
Basic. - Change the AllowInsecureAuthInProduction to
false. - Immediately after the closing
</Metadata>element, add the following XML snippet:<CryptographicKeys> <Key Id="BasicAuthenticationUsername" StorageReferenceId="B2C_1A_RestApiUsername" /> <Key Id="BasicAuthenticationPassword" StorageReferenceId="B2C_1A_RestApiPassword" /> </CryptographicKeys>
The following XML snippet is an example of a RESTful technical profile configured with HTTP basic authentication:
<ClaimsProvider>
<DisplayName>REST APIs</DisplayName>
<TechnicalProfiles>
<TechnicalProfile Id="REST-GetProfile">
<DisplayName>Get user extended profile Azure Function web hook</DisplayName>
<Protocol Name="Proprietary" Handler="Web.TPEngine.Providers.RestfulProvider, Web.TPEngine, Version=1.0.0.0, Culture=neutral, PublicKeyToken=null" />
<Metadata>
<Item Key="ServiceUrl">https://your-account.azurewebsites.net/api/GetProfile?code=your-code</Item>
<Item Key="SendClaimsIn">Body</Item>
<Item Key="AuthenticationType">Basic</Item>
<Item Key="AllowInsecureAuthInProduction">false</Item>
</Metadata>
<CryptographicKeys>
    <Key Id="BasicAuthenticationUsername" StorageReferenceId="B2C_1A_RestApiUsername" />
    <Key Id="BasicAuthenticationPassword" StorageReferenceId="B2C_1A_RestApiPassword" />
</CryptographicKeys>
...
</TechnicalProfile>
</TechnicalProfiles>
</ClaimsProvider>
HTTPS client certificate authentication
Client certificate authentication is a mutual certificate-based authentication, where the client, Azure AD B2C, provides its client certificate to the server to prove its identity. This happens as a part of the SSL handshake. Your API is responsible for validating the certificates belong to a valid client, such as Azure AD B2C, and performing authorization decisions. The client certificate is an X.509 digital certificate.
Important
In production environments, the certificate must be signed by a certificate authority.
Create a certificate
Option 1: Use Azure Key Vault (recommended)
To create a certificate, you can use Azure Key Vault, which has options for self-signed certificates and integrations with certificate issuer providers for signed certificates. Recommended settings include:
- Subject:
CN=<yourapiname>.<tenantname>.onmicrosoft.com - Content Type:
PKCS #12 - Lifetime Acton Type:
Email all contacts at a given percentage lifetimeorEmail all contacts a given number of days before expiry - Key Type:
RSA - Key Size:
2048 - Exportable Private Key:
Yes(in order to be able to export.pfxfile)
You can then export the certificate.
Option 2: prepare a self-signed certificate using PowerShell module
If you don't already have a certificate, you can use a self-signed certificate. A self-signed certificate is a security certificate that is not signed by a certificate authority (CA) and doesn't provide the security guarantees of a certificate signed by a CA.
On Windows, use the New-SelfSignedCertificate cmdlet in PowerShell to generate a certificate.
Run the following PowerShell command to generate a self-signed certificate. Modify the
-Subjectargument as appropriate for your application and Azure AD B2C tenant name such ascontosowebapp.contoso.onmicrosoft.com. You can also adjust the-NotAfterdate to specify a different expiration for the certificate.New-SelfSignedCertificate ` -KeyExportPolicy Exportable ` -Subject "CN=yourappname.yourtenant.onmicrosoft.com" ` -KeyAlgorithm RSA ` -KeyLength 2048 ` -KeyUsage DigitalSignature ` -NotAfter (Get-Date).AddMonths(12) ` -CertStoreLocation "Cert:\CurrentUser\My"On Windows computer, search for and select Manage user certificates
Under Certificates - Current User, select Personal > Certificates>yourappname.yourtenant.onmicrosoft.com.
Select the certificate, and then select Action > All Tasks > Export.
Select Next > Yes, export the private key > Next.
Accept the defaults for Export File Format, and then select Next.
Enable Password option, enter a password for the certificate, and then select Next.
To specify a location to save your certificate, select Browse and navigate to a directory of your choice.
On the Save As window, enter a File name, and then select Save.
Select Next>Finish.
For Azure AD B2C to accept the .pfx file password, the password must be encrypted with the TripleDES-SHA1 option in the Windows Certificate Store Export utility, as opposed to AES256-SHA256.
Configure your API Connector
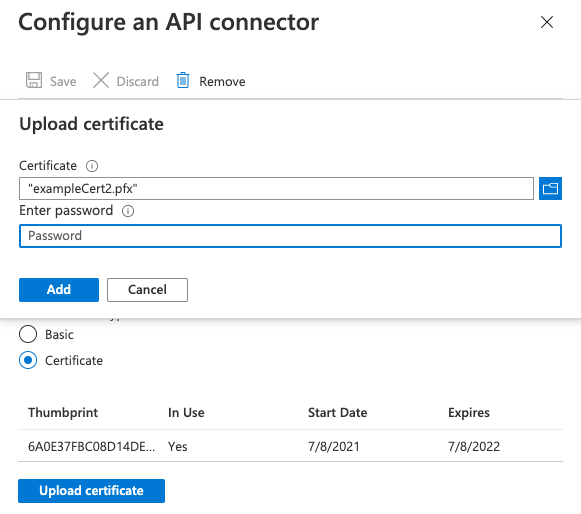
To configure an API Connector with client certificate authentication, follow these steps:
- Sign in to the Azure portal.
- Under Azure services, select Azure AD B2C.
- Select API connectors, and then select the API Connector you want to configure.
- For the Authentication type, select Certificate.
- In the Upload certificate box, select your certificate's .pfx file with a private key.
- In the Enter Password box, type the certificate's password.

- Select Save.
Perform authorization decisions
Your API must implement the authorization based on sent client certificates in order to protect the API endpoints. For Azure App Service and Azure Functions, see configure TLS mutual authentication to learn how to enable and validate the certificate from your API code. You can alternatively use Azure API Management as a layer in front of any API service to check client certificate properties against desired values.
Renewing certificates
It's recommended you set reminder alerts for when your certificate will expire. You need to generate a new certificate and repeat the steps above when used certificates are about to expire. To "roll" the use of a new certificate, your API service can continue to accept old and new certificates for a temporary amount of time while the new certificate is deployed.
To upload a new certificate to an existing API connector, select the API connector under API connectors and click on Upload new certificate. The most recently uploaded certificate, which is not expired and whose start date has passed will automatically be used by Azure AD B2C.
Add a client certificate policy key
- Sign in to the Azure portal.
- If you have access to multiple tenants, select the Settings icon in the top menu to switch to your Azure AD B2C tenant from the Directories + subscriptions menu.
- Choose All services in the top-left corner of the Azure portal, and then search for and select Azure AD B2C.
- On the Overview page, select Identity Experience Framework.
- Select Policy Keys, and then select Add.
- In the Options box, select Upload.
- In the Name box, type RestApiClientCertificate. The prefix B2C_1A_ is added automatically.
- In the File upload box, select your certificate's .pfx file with a private key.
- In the Password box, type the certificate's password.
- Select Create.
Configure your REST API technical profile to use client certificate authentication
After creating the necessary key, configure your REST API technical profile metadata to reference the client certificate.
- In your working directory, open the extension policy file (TrustFrameworkExtensions.xml).
- Search for the REST API technical profile. For example
REST-ValidateProfile, orREST-GetProfile. - Locate the
<Metadata>element. - Change the AuthenticationType to
ClientCertificate. - Change the AllowInsecureAuthInProduction to
false. - Immediately after the closing
</Metadata>element, add the following XML snippet:<CryptographicKeys> <Key Id="ClientCertificate" StorageReferenceId="B2C_1A_RestApiClientCertificate" /> </CryptographicKeys>
The following XML snippet is an example of a RESTful technical profile configured with an HTTP client certificate:
<ClaimsProvider>
<DisplayName>REST APIs</DisplayName>
<TechnicalProfiles>
<TechnicalProfile Id="REST-GetProfile">
<DisplayName>Get user extended profile Azure Function web hook</DisplayName>
<Protocol Name="Proprietary" Handler="Web.TPEngine.Providers.RestfulProvider, Web.TPEngine, Version=1.0.0.0, Culture=neutral, PublicKeyToken=null" />
<Metadata>
<Item Key="ServiceUrl">https://your-account.azurewebsites.net/api/GetProfile?code=your-code</Item>
<Item Key="SendClaimsIn">Body</Item>
<Item Key="AuthenticationType">ClientCertificate</Item>
<Item Key="AllowInsecureAuthInProduction">false</Item>
</Metadata>
<CryptographicKeys>
   <Key Id="ClientCertificate" StorageReferenceId="B2C_1A_RestApiClientCertificate" />
</CryptographicKeys>
...
</TechnicalProfile>
</TechnicalProfiles>
</ClaimsProvider>
OAuth2 bearer authentication
Bearer token authentication is defined in OAuth2.0 Authorization Framework: Bearer Token Usage (RFC 6750). In bearer token authentication, Azure AD B2C sends an HTTP request with a token in the authorization header.
Authorization: Bearer <token>
A bearer token is an opaque string. It can be a JWT access token or any string that the REST API expects Azure AD B2C to send in the authorization header. Azure AD B2C supports the following types:
- Bearer token. To be able to send the bearer token in the Restful technical profile, your policy needs to first acquire the bearer token and then use it in the RESTful technical profile.
- Static bearer token. Use this approach when your REST API issues a long-term access token. To use a static bearer token, create a policy key and make a reference from the RESTful technical profile to your policy key.
Using OAuth2 Bearer
The following steps demonstrate how to use client credentials to obtain a bearer token and pass it into the Authorization header of the REST API calls.
Define a claim to store the bearer token
A claim provides temporary storage of data during an Azure AD B2C policy execution. The claims schema is the place where you declare your claims. The access token must be stored in a claim to be used later.
- Open the extensions file of your policy. For example,
SocialAndLocalAccounts/TrustFrameworkExtensions.xml. - Search for the BuildingBlocks element. If the element doesn't exist, add it.
- Locate the ClaimsSchema element. If the element doesn't exist, add it.
- Add the following claims to the ClaimsSchema element.
<ClaimType Id="bearerToken">
  <DisplayName>Bearer token</DisplayName>
  <DataType>string</DataType>
</ClaimType>
<ClaimType Id="grant_type">
  <DisplayName>Grant type</DisplayName>
  <DataType>string</DataType>
</ClaimType>
<ClaimType Id="scope">
  <DisplayName>scope</DisplayName>
  <DataType>string</DataType>
</ClaimType>
Acquiring an access token
You can obtain an access token in one of several ways, for the from a federated identity provider, by calling a REST API that returns an access token, by using an ROPC flow, or by using the client credentials flow. The client credentials flow is commonly used for server-to-server interactions that must run in the background, without immediate interaction with a user.
Acquiring a Microsoft Entra access token
The following example uses a REST API technical profile to make a request to the Microsoft Entra token endpoint using the client credentials passed as HTTP basic authentication. For more information, see Microsoft identity platform and the OAuth 2.0 client credentials flow.
Before the technical profile can interact with Microsoft Entra ID to obtain an access token, you need to register an application. Azure AD B2C relies the Microsoft Entra platform. You can create the app in your Azure AD B2C tenant, or in any Microsoft Entra tenant you manage. To register an application:
- Sign in to the Azure portal.
- If you have access to multiple tenants, select the Settings icon in the top menu to switch to your Azure AD B2C tenant from the Directories + subscriptions menu.
- In the left menu, select Microsoft Entra ID. Or, select All services and search for and select Microsoft Entra ID.
- Select App registrations, and then select New registration.
- Enter a Name for the application. For example, Client_Credentials_Auth_app.
- Under Supported account types, select Accounts in this organizational directory only.
- Select Register.
- Record the Application (client) ID.
For a client credentials flow, you need to create an application secret. The client secret is also known as an application password. Your application uses the secret to acquire an access token.
- In the Microsoft Entra ID - App registrations page, select the application you created, for example Client_Credentials_Auth_app.
- In the left menu, under Manage, select Certificates & secrets.
- Select New client secret.
- Enter a description for the client secret in the Description box. For example, clientsecret1.
- Under Expires, select a duration for which the secret is valid, and then select Add.
- Record the secret's Value for use in your client application code. This secret value is never displayed again after you leave this page. You use this value as the application secret in your application's code.
Create Azure AD B2C policy keys
You need to store the client ID and the client secret value that you previously recorded in your Azure AD B2C tenant.
- Sign in to the Azure portal.
- If you have access to multiple tenants, select the Settings icon in the top menu to switch to your Azure AD B2C tenant from the Directories + subscriptions menu.
- Choose All services in the top-left corner of the Azure portal, and then search for and select Azure AD B2C.
- On the Overview page, select Identity Experience Framework.
- Select Policy Keys and then select Add.
- For Options, choose
Manual. - Enter a Name for the policy key,
SecureRESTClientId. The prefixB2C_1A_is added automatically to the name of your key. - In Secret, enter your client ID that you previously recorded.
- For Key usage, select
Signature. - Select Create.
- Create another policy key with the following settings:
- Name:
SecureRESTClientSecret. - Secret: enter your client secret that you previously recorded
- Name:
For the ServiceUrl, replace your-tenant-name with the name of your Microsoft Entra tenant. See the RESTful technical profile reference for all options available.
<TechnicalProfile Id="REST-AcquireAccessToken">
  <DisplayName></DisplayName>
  <Protocol Name="Proprietary" Handler="Web.TPEngine.Providers.RestfulProvider, Web.TPEngine, Version=1.0.0.0, Culture=neutral, PublicKeyToken=null" />
  <Metadata>
    <Item Key="ServiceUrl">https://login.microsoftonline.com/your-tenant-name.onmicrosoft.com/oauth2/v2.0/token</Item>
    <Item Key="AuthenticationType">Basic</Item>
     <Item Key="SendClaimsIn">Form</Item>
  </Metadata>
  <CryptographicKeys>
    <Key Id="BasicAuthenticationUsername" StorageReferenceId="B2C_1A_SecureRESTClientId" />
    <Key Id="BasicAuthenticationPassword" StorageReferenceId="B2C_1A_SecureRESTClientSecret" />
  </CryptographicKeys>
  <InputClaims>
    <InputClaim ClaimTypeReferenceId="grant_type" DefaultValue="client_credentials" AlwaysUseDefaultValue="true" />
    <InputClaim ClaimTypeReferenceId="scope" DefaultValue="https://graph.microsoft.com/.default" AlwaysUseDefaultValue="true" />
  </InputClaims>
  <OutputClaims>
    <OutputClaim ClaimTypeReferenceId="bearerToken" PartnerClaimType="access_token" />
  </OutputClaims>
  <UseTechnicalProfileForSessionManagement ReferenceId="SM-Noop" />
</TechnicalProfile>
Note
If you use the grant_type or scope claims in other technical profiles, we recommend that they also specify DefaultValue and use AlwaysUseDefaultValue="true" to avoid potential conflicts in binding against the incorrect value.
Change the REST technical profile to use bearer token authentication
To support bearer token authentication in your custom policy, modify the REST API technical profile by using the following steps:
In your working directory, open the TrustFrameworkExtensions.xml extension policy file.
Search for the
<TechnicalProfile>node that includesId="REST-API-SignUp".Locate the
<Metadata>element.Change the AuthenticationType to Bearer, as follows:
<Item Key="AuthenticationType">Bearer</Item>Change or add the UseClaimAsBearerToken to bearerToken, as follows. The bearerToken is the name of the claim that the bearer token is retrieved from (the output claim from
REST-AcquireAccessToken).<Item Key="UseClaimAsBearerToken">bearerToken</Item>Add the claim from the previous step as an input claim:
<InputClaim ClaimTypeReferenceId="bearerToken"/>
After you update your policy, your technical profile should look similar to the following XML code:
<ClaimsProvider>
  <DisplayName>REST APIs</DisplayName>
  <TechnicalProfiles>
    <TechnicalProfile Id="REST-GetProfile">
      <DisplayName>Get user extended profile Azure Function web hook</DisplayName>
      <Protocol Name="Proprietary" Handler="Web.TPEngine.Providers.RestfulProvider, Web.TPEngine, Version=1.0.0.0, Culture=neutral, PublicKeyToken=null" />
      <Metadata>
        <Item Key="ServiceUrl">https://your-account.azurewebsites.net/api/GetProfile?code=your-code</Item>
        <Item Key="SendClaimsIn">Body</Item>
        <Item Key="AuthenticationType">Bearer</Item>
        <Item Key="UseClaimAsBearerToken">bearerToken</Item>
        <Item Key="AllowInsecureAuthInProduction">false</Item>
      </Metadata>
      <InputClaims>
        <InputClaim ClaimTypeReferenceId="bearerToken"/>
      </InputClaims>
      ...
    </TechnicalProfile>
  </TechnicalProfiles>
</ClaimsProvider>
Call the REST technical profile
To call the REST-GetProfile technical profile, you first need to acquire a Microsoft Entra access token using the REST-AcquireAccessToken technical profile. The following example shows how to call the REST-GetProfile technical profile from a validation technical profile:
<ValidationTechnicalProfiles>
  <ValidationTechnicalProfile ReferenceId="REST-AcquireAccessToken" />
  <ValidationTechnicalProfile ReferenceId="REST-GetProfile" />
</ValidationTechnicalProfiles>
The following example shows how to call the REST-GetProfile technical profile from a user journey, or a sub journey:
<OrchestrationSteps>
  <OrchestrationStep Order="2" Type="ClaimsExchange">
    <ClaimsExchanges>
      <ClaimsExchange Id="REST-AcquireAccessTokens" TechnicalProfileReferenceId="REST-AcquireAccessToken" />
    </ClaimsExchanges>
  </OrchestrationStep>

  <OrchestrationStep Order="3" Type="ClaimsExchange">
    <ClaimsExchanges>
      <ClaimsExchange Id="REST-GetProfile" TechnicalProfileReferenceId="REST-GetProfile" />
    </ClaimsExchanges>
  </OrchestrationStep>
</OrchestrationSteps>
Using a static OAuth2 bearer
Add the OAuth2 bearer token policy key
To configure a REST API technical profile with an OAuth2 bearer token, obtain an access token from the REST API owner. Then create the following cryptographic key to store the bearer token.
- Sign in to the Azure portal.
- If you have access to multiple tenants, select the Settings icon in the top menu to switch to your Azure AD B2C tenant from the Directories + subscriptions menu.
- Choose All services in the top-left corner of the Azure portal, and then search for and select Azure AD B2C.
- On the Overview page, select Identity Experience Framework.
- Select Policy Keys, and then select Add.
- For Options, choose
Manual. - Enter a Name for the policy key. For example,
RestApiBearerToken. The prefixB2C_1A_is added automatically to the name of your key. - In Secret, enter your client secret that you previously recorded.
- For Key usage, select
Encryption. - Select Create.
Configure your REST API technical profile to use the bearer token policy key
After creating the necessary key, configure your REST API technical profile metadata to reference the bearer token.
- In your working directory, open the extension policy file (TrustFrameworkExtensions.xml).
- Search for the REST API technical profile. For example
REST-ValidateProfile, orREST-GetProfile. - Locate the
<Metadata>element. - Change the AuthenticationType to
Bearer. - Change the AllowInsecureAuthInProduction to
false. - Immediately after the closing
</Metadata>element, add the following XML snippet:<CryptographicKeys> <Key Id="BearerAuthenticationToken" StorageReferenceId="B2C_1A_RestApiBearerToken" /> </CryptographicKeys>
The following XML snippet is an example of a RESTful technical profile configured with bearer token authentication:
<ClaimsProvider>
<DisplayName>REST APIs</DisplayName>
<TechnicalProfiles>
<TechnicalProfile Id="REST-GetProfile">
<DisplayName>Get user extended profile Azure Function web hook</DisplayName>
<Protocol Name="Proprietary" Handler="Web.TPEngine.Providers.RestfulProvider, Web.TPEngine, Version=1.0.0.0, Culture=neutral, PublicKeyToken=null" />
<Metadata>
<Item Key="ServiceUrl">https://your-account.azurewebsites.net/api/GetProfile?code=your-code</Item>
<Item Key="SendClaimsIn">Body</Item>
<Item Key="AuthenticationType">Bearer</Item>
<Item Key="AllowInsecureAuthInProduction">false</Item>
</Metadata>
<CryptographicKeys>
   <Key Id="BearerAuthenticationToken" StorageReferenceId="B2C_1A_RestApiBearerToken" />
</CryptographicKeys>
...
</TechnicalProfile>
</TechnicalProfiles>
</ClaimsProvider>
Add the validation technical profile reference to the sign up technical profile, which calls the REST-AcquireAccessToken. This behavior means that Azure AD B2C moves on to create the account in the directory only after successful validation.
For example:
```XML
<ValidationTechnicalProfiles>
   ....
   <ValidationTechnicalProfile ReferenceId="REST-AcquireAccessToken" />
   ....
</ValidationTechnicalProfiles>
API key authentication
Some services use an "API key" mechanism to obfuscate access to your HTTP endpoints during development by requiring the caller to include a unique key as an HTTP header or HTTP query parameter. For Azure Functions, you can accomplish this by including the code as a query parameter in the Endpoint URL of your API connector. For example, https://contoso.azurewebsites.net/api/endpoint?code=0123456789).
This is not a mechanism that should be used alone in production. Therefore, configuration for basic or certificate authentication is always required. If you do not wish to implement any authentication method (not recommended) for development purposes, you can select 'basic' authentication in the API connector configuration and use temporary values for username and password that your API can disregard while you implement proper authorization.
API key is a unique identifier used to authenticate a user to access a REST API endpoint. The key is sent in a custom HTTP header. For example, the Azure Functions HTTP trigger uses the x-functions-key HTTP header to identify the requester.
Add API key policy keys
To configure a REST API technical profile with API key authentication, create the following cryptographic key to store the API key:
- Sign in to the Azure portal.
- If you have access to multiple tenants, select the Settings icon in the top menu to switch to your Azure AD B2C tenant from the Directories + subscriptions menu.
- Choose All services in the top-left corner of the Azure portal, and then search for and select Azure AD B2C.
- On the Overview page, select Identity Experience Framework.
- Select Policy Keys, and then select Add.
- For Options, select Manual.
- For Name, type RestApiKey. The prefix B2C_1A_ might be added automatically.
- In the Secret box, enter the REST API key.
- For Key usage, select Encryption.
- Select Create.
Configure your REST API technical profile to use API key authentication
After creating the necessary key, configure your REST API technical profile metadata to reference the credentials.
- In your working directory, open the extension policy file (TrustFrameworkExtensions.xml).
- Search for the REST API technical profile. For example
REST-ValidateProfile, orREST-GetProfile. - Locate the
<Metadata>element. - Change the AuthenticationType to
ApiKeyHeader. - Change the AllowInsecureAuthInProduction to
false. - Immediately after the closing
</Metadata>element, add the following XML snippet:<CryptographicKeys> <Key Id="x-functions-key" StorageReferenceId="B2C_1A_RestApiKey" /> </CryptographicKeys>
The Id of the cryptographic key defines the HTTP header. In this example, the API key is sent as x-functions-key.
The following XML snippet is an example of a RESTful technical profile configured to call an Azure Function with API key authentication:
<ClaimsProvider>
<DisplayName>REST APIs</DisplayName>
<TechnicalProfiles>
<TechnicalProfile Id="REST-GetProfile">
<DisplayName>Get user extended profile Azure Function web hook</DisplayName>
<Protocol Name="Proprietary" Handler="Web.TPEngine.Providers.RestfulProvider, Web.TPEngine, Version=1.0.0.0, Culture=neutral, PublicKeyToken=null" />
<Metadata>
<Item Key="ServiceUrl">https://your-account.azurewebsites.net/api/GetProfile?code=your-code</Item>
<Item Key="SendClaimsIn">Body</Item>
<Item Key="AuthenticationType">ApiKeyHeader</Item>
<Item Key="AllowInsecureAuthInProduction">false</Item>
</Metadata>
<CryptographicKeys>
    <Key Id="x-functions-key" StorageReferenceId="B2C_1A_RestApiKey" />
</CryptographicKeys>
...
</TechnicalProfile>
</TechnicalProfiles>
</ClaimsProvider>
Next steps
- Get started with our samples.
- Learn more about the Restful technical profile element in the custom policy reference.
Feedback
Coming soon: Throughout 2024 we will be phasing out GitHub Issues as the feedback mechanism for content and replacing it with a new feedback system. For more information see: https://aka.ms/ContentUserFeedback.
Submit and view feedback for