Secure a custom DNS name with a TLS/SSL binding in Azure App Service
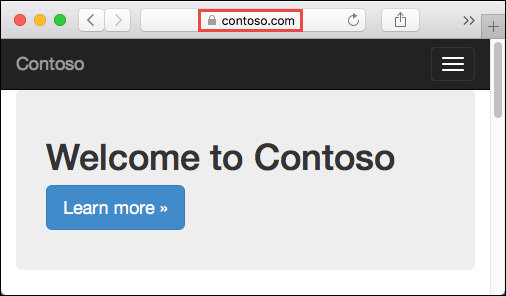
This article shows you how to secure the custom domain in your App Service app or function app by creating a certificate binding. When you're finished, you can access your App Service app at the https:// endpoint for your custom DNS name (for example, https://www.contoso.com).
Prerequisites
- Scale up your App Service app to one of the supported pricing tiers: Basic, Standard, Premium.
- Map a domain name to your app or buy and configure it in Azure.
1. Add the binding
In the Azure portal:
From the left menu, select App Services > <app-name>.
From the left navigation of your app, select Custom domains
Next to the custom domain, select Add binding
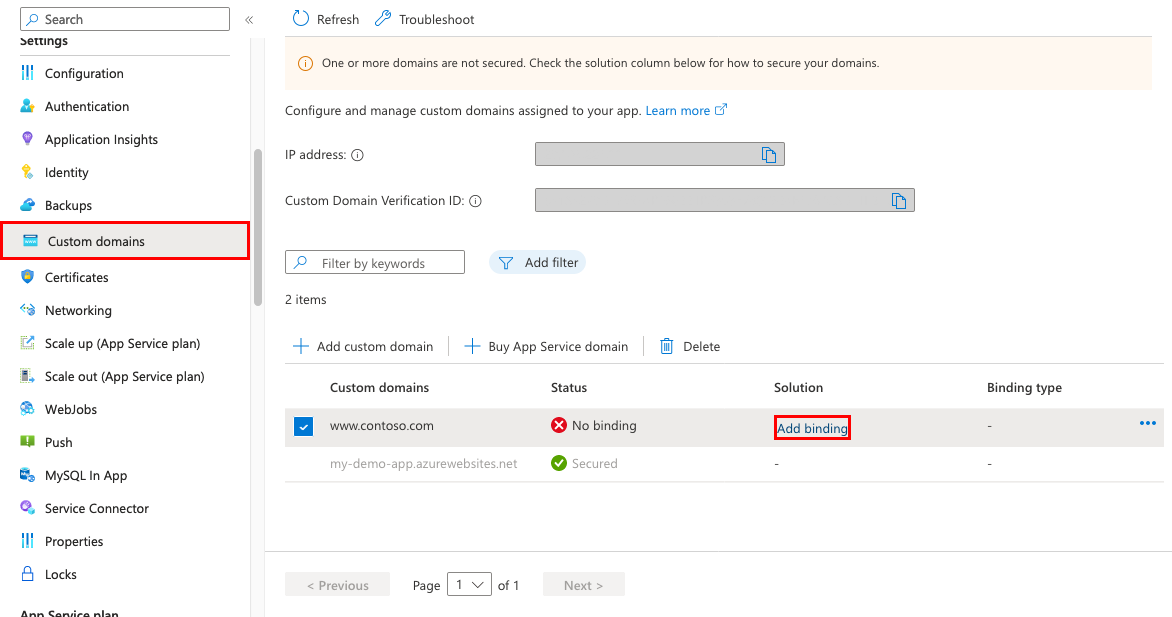
If your app already has a certificate for the selected custom domain, you can select it in Certificate. If not, you must add a certificate using one of the selections in Source.
- Create App Service Managed Certificate - Let App Service create a managed certificate for your selected domain. This option is the simplest. For more information, see Create a free managed certificate.
- Import App Service Certificate - In App Service Certificate, choose an App Service certificate you've purchased for your selected domain.
- Upload certificate (.pfx) - Follow the workflow at Upload a private certificate to upload a PFX certificate from your local machine and specify the certificate password.
- Import from Key Vault - Select Select key vault certificate and select the certificate in the dialog.
In TLS/SSL type, choose between SNI SSL and IP based SSL.
- SNI SSL: Multiple SNI SSL bindings may be added. This option allows multiple TLS/SSL certificates to secure multiple domains on the same IP address. Most modern browsers (including Internet Explorer, Chrome, Firefox, and Opera) support SNI (for more information, see Server Name Indication).
-
- IP based SSL: Only one IP SSL binding may be added. This option allows only one TLS/SSL certificate to secure a dedicated public IP address. After you configure the binding, follow the steps in 2. Remap records for IP based SSL.
IP SSL is supported only in Basic tier or higher.
- IP based SSL: Only one IP SSL binding may be added. This option allows only one TLS/SSL certificate to secure a dedicated public IP address. After you configure the binding, follow the steps in 2. Remap records for IP based SSL.
When adding a new certificate, validate the new certificate by selecting Validate.
Select Add.
Once the operation is complete, the custom domain's TLS/SSL state is changed to Secure.

Note
A Secure state in the Custom domains means that it is secured with a certificate, but App Service doesn't check if the certificate is self-signed or expired, for example, which can also cause browsers to show an error or warning.
2. Remap records for IP based SSL
This step is needed only for IP based SSL. For an SNI SSL binding, skip to Test HTTPS for your custom domain.
There are two changes you need to make, potentially:
By default, your app uses a shared public IP address. When you bind a certificate with IP SSL, App Service creates a new, dedicated IP address for your app. If you mapped an A record to your app, update your domain registry with this new, dedicated IP address.
Your app's Custom domain page is updated with the new, dedicated IP address. Copy this IP address, then remap the A record to this new IP address.
If you have an SNI SSL binding to
<app-name>.azurewebsites.net, remap any CNAME mapping to point tosni.<app-name>.azurewebsites.netinstead (add thesniprefix).
3. Test HTTPS
In various browsers, browse to https://<your.custom.domain> to verify that it serves up your app.
Your application code can inspect the protocol via the "x-appservice-proto" header. The header has a value of http or https.
Note
If your app gives you certificate validation errors, you're probably using a self-signed certificate.
If that's not the case, you may have left out intermediate certificates when you export your certificate to the PFX file.
Frequently asked questions
- How do I make sure that the app's IP address doesn't change when I make changes to the certificate binding?
- Can I disable the forced redirect from HTTP to HTTPS?
- How can I change the minimum TLS versions for the app?
- How do I handle TLS termination in App Service?
How do I make sure that the app's IP address doesn't change when I make changes to the certificate binding?
Your inbound IP address can change when you delete a binding, even if that binding is IP SSL. This is especially important when you renew a certificate that's already in an IP SSL binding. To avoid a change in your app's IP address, follow these steps in order:
- Upload the new certificate.
- Bind the new certificate to the custom domain you want without deleting the old one. This action replaces the binding instead of removing the old one.
- Delete the old certificate.
Can I disable the forced redirect from HTTP to HTTPS?
By default, App Service forces a redirect from HTTP requests to HTTPS. To disable this behavior, see Configure general settings.
How can I change the minimum TLS versions for the app?
Your app allows TLS 1.2 by default, which is the recommended TLS level by industry standards, such as PCI DSS. To enforce different TLS versions, see Configure general settings.
How do I handle TLS termination in App Service?
In App Service, TLS termination happens at the network load balancers, so all HTTPS requests reach your app as unencrypted HTTP requests. If your app logic needs to check if the user requests are encrypted or not, inspect the X-Forwarded-Proto header.
Language specific configuration guides, such as the Linux Node.js configuration guide, shows you how to detect an HTTPS session in your application code.
Automate with scripts
Azure CLI
Bind a custom TLS/SSL certificate to a web app
PowerShell
$fqdn="<Replace with your custom domain name>"
$pfxPath="<Replace with path to your .PFX file>"
$pfxPassword="<Replace with your .PFX password>"
$webappname="mywebapp$(Get-Random)"
$location="West Europe"

# Create a resource group.
New-AzResourceGroup -Name $webappname -Location $location

# Create an App Service plan in Free tier.
New-AzAppServicePlan -Name $webappname -Location $location `
-ResourceGroupName $webappname -Tier Free

# Create a web app.
$webapp = New-AzWebApp -Name $webappname -Location $location -AppServicePlan $webappname `
-ResourceGroupName $webappname

Write-Host "Sign in to your domain provider's website and configure the following records:"
Write-Host "A CNAME record that maps $fqdn to $webappname.azurewebsites.net"
Write-Host "A TXT record that maps asuid.$fqdn to the domain verification ID $($webapp.CustomDomainVerificationId)"
Read-Host "Press [Enter] key when ready ..."

# Before continuing, go to your DNS configuration UI for your custom domain and follow the
# instructions at https://aka.ms/appservicecustomdns to configure a CNAME record for the
# hostname "www" and point it your web app's default domain name.

# Upgrade App Service plan to Basic tier (minimum required by custom SSL certificates)
Set-AzAppServicePlan -Name $webappname -ResourceGroupName $webappname `
-Tier Basic

# Add a custom domain name to the web app.
Set-AzWebApp -Name $webappname -ResourceGroupName $webappname `
-HostNames @($fqdn,"$webappname.azurewebsites.net")

# Upload and bind the SSL certificate to the web app.
New-AzWebAppSSLBinding -WebAppName $webappname -ResourceGroupName $webappname -Name $fqdn `
-CertificateFilePath $pfxPath -CertificatePassword $pfxPassword -SslState SniEnabled
More resources
Feedback
Coming soon: Throughout 2024 we will be phasing out GitHub Issues as the feedback mechanism for content and replacing it with a new feedback system. For more information see: https://aka.ms/ContentUserFeedback.
Submit and view feedback for