Create an External App Service Environment
Important
This article is about App Service Environment v2 which is used with Isolated App Service plans. App Service Environment v2 will be retired on 31 August 2024. There's a new version of App Service Environment that is easier to use and runs on more powerful infrastructure. To learn more about the new version, start with the Introduction to the App Service Environment. If you're currently using App Service Environment v2, please follow the steps in this article to migrate to the new version.
As of 29 January 2024, you can no longer create new App Service Environment v2 resources using any of the available methods including ARM/Bicep templates, Azure Portal, Azure CLI, or REST API. You must migrate to App Service Environment v3 before 31 August 2024 to prevent resource deletion and data loss.
Azure App Service Environment is a deployment of Azure App Service into a subnet in an Azure virtual network (VNet). There are two ways to deploy an App Service Environment (ASE):
- With a VIP on an external public facing IP address, often called an External ASE.
- With the VIP on an internal IP address, often called an ILB ASE because the internal endpoint is an Internal Load Balancer (ILB).
This article shows you how to create an External ASE. For an overview of the ASE, see An introduction to the App Service Environment. For information on how to create an ILB ASE, see Create and use an ILB ASE.
Before you create your ASE
After you create your ASE, you can't change the following:
- Location
- Subscription
- Resource group
- VNet used
- Subnet used
- Subnet size
Note
When you choose a VNet and specify a subnet, make sure that it's large enough to accommodate future growth and scaling needs. We recommend a size of /24 with 256 addresses.
Three ways to create an ASE
There are three ways to create an ASE:
- While creating an App Service plan. This method creates the ASE and the App Service plan in one step.
- As a standalone action. This method creates a standalone ASE, which is an ASE with nothing in it. This method is a more advanced process to create an ASE. You use it to create an ASE with an ILB.
- From an Azure Resource Manager template. This method is for advanced users. For more information, see Create an ASE from a template.
An External ASE has a public VIP, which means that all HTTP/HTTPS traffic to the apps in the ASE hits an internet-accessible IP address. An ASE with an ILB has an IP address from the subnet used by the ASE. The apps hosted in an ILB ASE aren't exposed directly to the internet.
Create an ASE and an App Service plan together
The App Service plan is a container of apps. When you create an app in App Service, you choose or create an App Service plan. App Service Environments hold App Service plans, and App Service plans hold apps.
To create an ASE while you create an App Service plan:
In the Azure portal, select Create a resource > Web + Mobile > Web App.
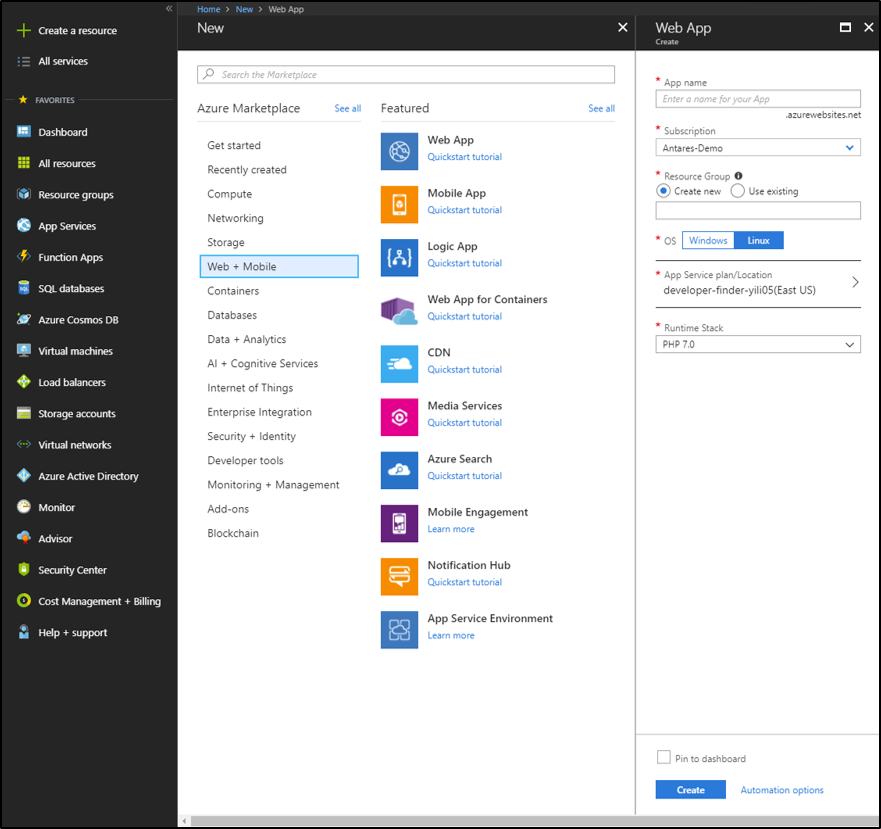
Select your subscription. The app and the ASE are created in the same subscriptions.
Select or create a resource group. With resource groups, you can manage related Azure resources as a unit. Resource groups also are useful when you establish Role-Based Access Control rules for your apps. For more information, see the Azure Resource Manager overview.
Select your OS (Windows, Linux, or Docker).
Select the App Service plan, and then select Create New. Linux web apps and Windows web apps cannot be in the same App Service Plan, but can be in the same App Service Environment.
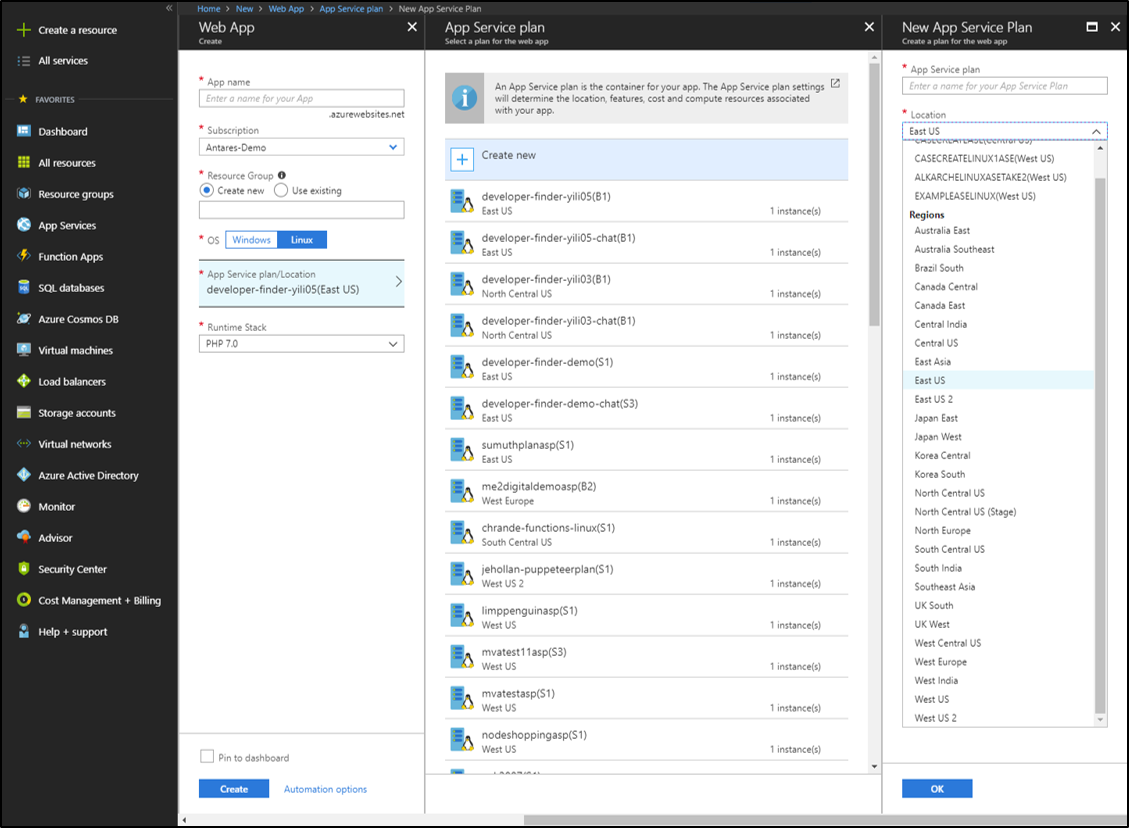
In the Location drop-down list, select the region where you want to create the ASE. If you select an existing ASE, a new ASE isn't created. The App Service plan is created in the ASE that you selected.
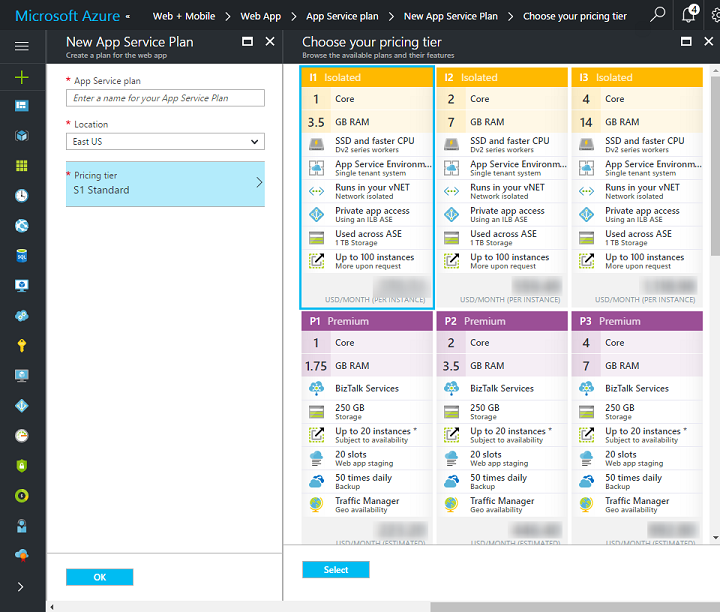
Select Pricing tier, and choose one of the Isolated pricing SKUs. If you choose an Isolated SKU card and a location that's not an ASE, a new ASE is created in that location. To start the process to create an ASE, select Select. The Isolated SKU is available only in conjunction with an ASE. You also can't use any other pricing SKU in an ASE other than Isolated.
Enter the name for your ASE. This name is used in the addressable name for your apps. If the name of the ASE is appsvcenvdemo, the domain name is .appsvcenvdemo.p.azurewebsites.net. If you create an app named mytestapp, it's addressable at mytestapp.appsvcenvdemo.p.azurewebsites.net. You can't use white space in the name. If you use uppercase characters, the domain name is the total lowercase version of that name.

Specify your Azure virtual networking details. Select either Create New or Select Existing. The option to select an existing VNet is available only if you have a VNet in the selected region. If you select Create New, enter a name for the VNet. A new Resource Manager VNet with that name is created. It uses the address space
192.168.250.0/23in the selected region. If you select Select Existing, you need to:a. Select the VNet address block, if you have more than one.
b. Enter a new subnet name.
c. Select the size of the subnet. Remember to select a size large enough to accommodate future growth of your ASE. We recommend
/24, which has 256 addresses and can handle a maximum-sized ASE. We don't recommend/28, for example, because only 16 addresses are available. Infrastructure uses at least seven addresses and Azure Networking uses another 5. In a/28subnet, you're left with a maximum scaling of 4 App Service plan instances for an External ASE and only 3 App Service plan instances for an ILB ASE.d. Select the subnet IP range.
Select Create to create the ASE. This process also creates the App Service plan and the app. The ASE, App Service plan, and app are all under the same subscription and also in the same resource group. If your ASE needs a separate resource group or if you need an ILB ASE, follow the steps to create an ASE by itself.
Create an ASE and a Linux web app using a custom Docker image together
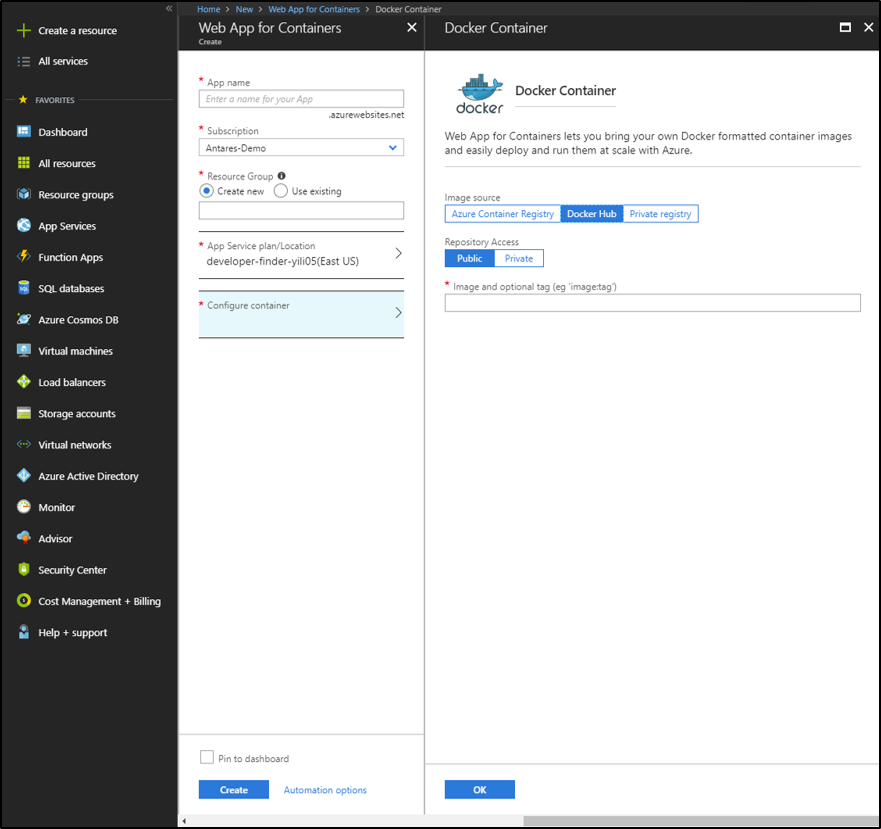
In the Azure portal, Create a Resource > Web + Mobile > Web App for Containers.
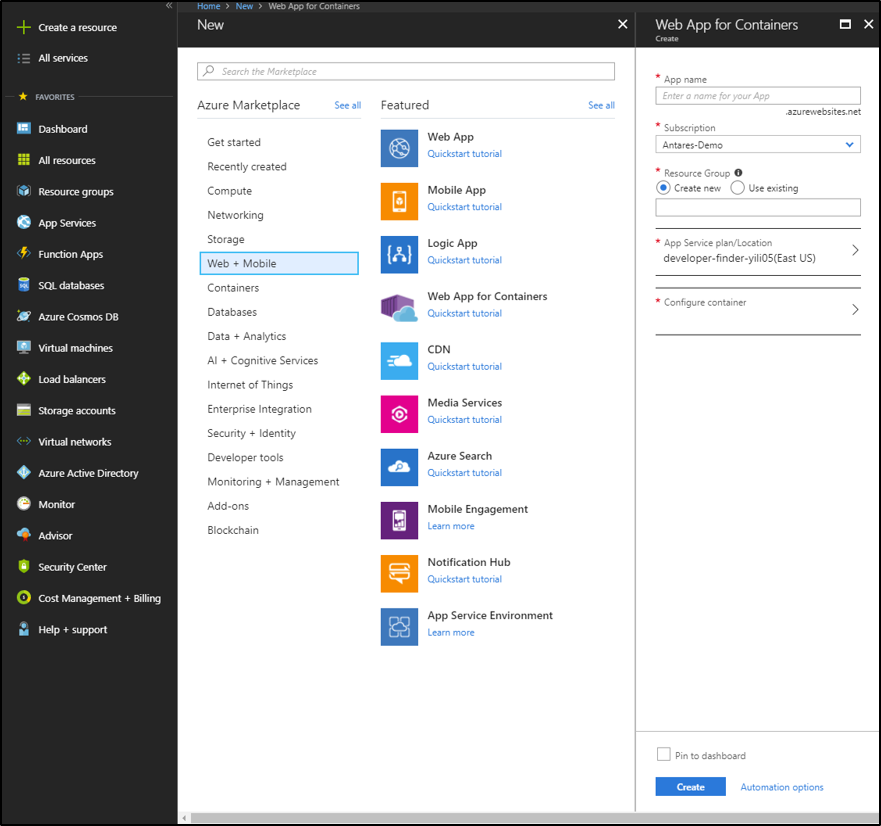
Select your subscription. The app and the ASE are created in the same subscriptions.
Select or create a resource group. With resource groups, you can manage related Azure resources as a unit. Resource groups also are useful when you establish Role-Based Access Control rules for your apps. For more information, see the Azure Resource Manager overview.
Select the App Service plan, and then select Create New. Linux web apps and Windows web apps cannot be in the same App Service Plan, but can be in the same App Service Environment.

In the Location drop-down list, select the region where you want to create the ASE. If you select an existing ASE, a new ASE isn't created. The App Service plan is created in the ASE that you selected.
Select Pricing tier, and choose one of the Isolated pricing SKUs. If you choose an Isolated SKU card and a location that's not an ASE, a new ASE is created in that location. To start the process to create an ASE, select Select. The Isolated SKU is available only in conjunction with an ASE. You also can't use any other pricing SKU in an ASE other than Isolated.
Enter the name for your ASE. This name is used in the addressable name for your apps. If the name of the ASE is appsvcenvdemo, the domain name is .appsvcenvdemo.p.azurewebsites.net. If you create an app named mytestapp, it's addressable at mytestapp.appsvcenvdemo.p.azurewebsites.net. You can't use white space in the name. If you use uppercase characters, the domain name is the total lowercase version of that name.
Specify your Azure virtual networking details. Select either Create New or Select Existing. The option to select an existing VNet is available only if you have a VNet in the selected region. If you select Create New, enter a name for the VNet. A new Resource Manager VNet with that name is created. It uses the address space
192.168.250.0/23in the selected region. If you select Select Existing, you need to:a. Select the VNet address block, if you have more than one.
b. Enter a new subnet name.
c. Select the size of the subnet. Remember to select a size large enough to accommodate future growth of your ASE. We recommend
/24, which has 128 addresses and can handle a maximum-sized ASE. We don't recommend/28, for example, because only 16 addresses are available. Infrastructure uses at least seven addresses and Azure Networking uses another 5. In a/28subnet, you're left with a maximum scaling of 4 App Service plan instances for an External ASE and only 3 App Service plan instances for an ILB ASE.d. Select the subnet IP range.
Select “Configure Container.”
- Enter your custom image name (you can use Azure Container Registry, Docker Hub, and your own private registry). If you don’t want to use your own custom container, you can just bring your code and use a built-in image with App Service on Linux, using the instructions above.
Select Create to create the ASE. This process also creates the App Service plan and the app. The ASE, App Service plan, and app are all under the same subscription and also in the same resource group. If your ASE needs a separate resource group or if you need an ILB ASE, follow the steps to create an ASE by itself.
Create an ASE by itself
If you create an ASE standalone, it has nothing in it. An empty ASE still incurs a monthly charge for the infrastructure. Follow these steps to create an ASE with an ILB or to create an ASE in its own resource group. After you create your ASE, you can create apps in it by using the normal process. Select your new ASE as the location.
Search the Azure Marketplace for App Service Environment, or select Create a resource > Web Mobile > App Service Environment.
Enter the name of your ASE. This name is used for the apps created in the ASE. If the name is mynewdemoase, the subdomain name is .mynewdemoase.p.azurewebsites.net. If you create an app named mytestapp, it's addressable at mytestapp.mynewdemoase.p.azurewebsites.net. You can't use white space in the name. If you use uppercase characters, the domain name is the total lowercase version of the name. If you use an ILB, your ASE name isn't used in your subdomain but is instead explicitly stated during ASE creation.

Select your subscription. This subscription is also the one that all apps in the ASE use. You can't put your ASE in a VNet that's in another subscription.
Select or specify a new resource group. The resource group used for your ASE must be the same one that's used for your VNet. If you select an existing VNet, the resource group selection for your ASE is updated to reflect that of your VNet. You can create an ASE with a resource group that is different from the VNet resource group if you use a Resource Manager template. To create an ASE from a template, see Create an App Service environment from a template.
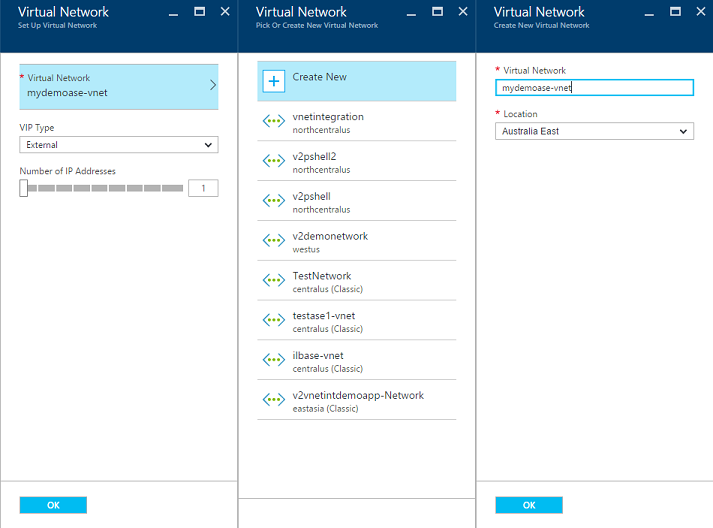
Select your VNet and location. You can create a new VNet or select an existing VNet:
If you select a new VNet, you can specify a name and location.
The new VNet has the address range 192.168.250.0/23 and a subnet named default. The subnet is defined as 192.168.250.0/24. You can only select a Resource Manager VNet. The VIP Type selection determines if your ASE can be directly accessed from the internet (External) or if it uses an ILB. To learn more about these options, see Create and use an internal load balancer with an App Service environment.
If you select External for the VIP Type, you can select how many external IP addresses the system is created with for IP-based SSL purposes.
If you select Internal for the VIP Type, you must specify the domain that your ASE uses. You can deploy an ASE into a VNet that uses public or private address ranges. To use a VNet with a public address range, you need to create the VNet ahead of time.
If you select an existing VNet, a new subnet is created when the ASE is created. You can't use a pre-created subnet in the portal. You can create an ASE with an existing subnet if you use a Resource Manager template. To create an ASE from a template, see Create an App Service Environment from a template.
App Service Environment v1
You can still create instances of the first version of App Service Environment (ASEv1). To start that process, search the Marketplace for App Service Environment v1. You create the ASE in the same way that you create the standalone ASE. When it's finished, your ASEv1 has two front ends and two workers. With ASEv1, you must manage the front ends and workers. They're not automatically added when you create your App Service plans. The front ends act as the HTTP/HTTPS endpoints and send traffic to the workers. The workers are the roles that host your apps. You can adjust the quantity of front ends and workers after you create your ASE.
To learn more about ASEv1, see Introduction to the App Service Environment v1. For more information on scaling, managing, and monitoring ASEv1, see How to configure an App Service Environment.
Feedback
Coming soon: Throughout 2024 we will be phasing out GitHub Issues as the feedback mechanism for content and replacing it with a new feedback system. For more information see: https://aka.ms/ContentUserFeedback.
Submit and view feedback for