Quickstart: Create a Python app in Azure App Service on Linux
In this quickstart, you deploy a Python web app to App Service on Linux, Azure's highly scalable, self-patching web hosting service. You use the Azure CLI locally from a Windows, Linux, or macOS environment to deploy a sample with either the Flask or Django frameworks. The web app you configure uses a free App Service tier, so you incur no costs in the course of this article.
Tip
If you prefer to deploy apps through an IDE, see Deploy Python apps to App Service from Visual Studio Code.
Set up your initial environment
- Have an Azure account with an active subscription. Create an account for free.
- Install Python.
- Install the Azure CLI 2.0.80 or higher, with which you run commands in any shell to provision and configure Azure resources.
Open a terminal window and check your Python version is 3.6 or higher:
python3 --version
Check that your Azure CLI version is 2.0.80 or higher:
az --version
Then sign in to Azure through the CLI:
az login
This command opens a browser to gather your credentials. When the command finishes, it shows JSON output containing information about your subscriptions.
Once signed in, you can run Azure commands with the Azure CLI to work with resources in your subscription.
Clone the sample
Clone the sample repository using the following command and navigate into the sample folder. (Install git if you don't have git already.)
git clone https://github.com/Azure-Samples/python-docs-hello-world
Then navigate into that folder:
cd python-docs-hello-world
git clone https://github.com/Azure-Samples/python-docs-hello-django
Then navigate into that folder:
cd python-docs-hello-django
The sample contains framework-specific code that Azure App Service recognizes when starting the app. For more information, see Container startup process.
Deploy the sample
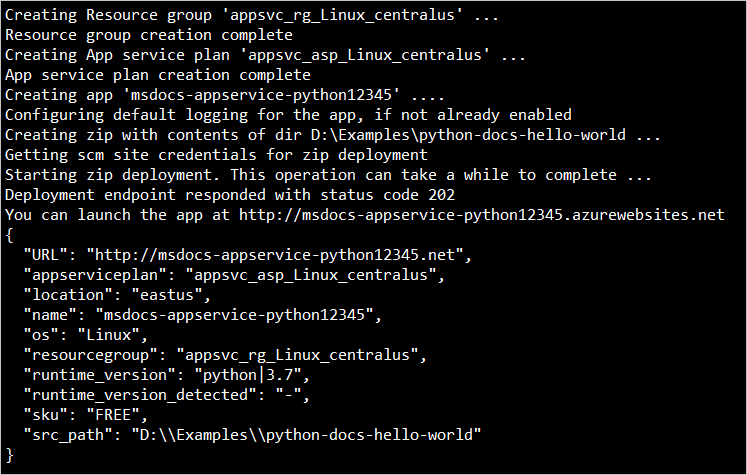
Deploy the code in your local folder (python-docs-hello-world) using the az webapp up command:
az webapp up --sku B1 --name <app-name>
- If the
azcommand isn't recognized, be sure you have the Azure CLI installed as described in Set up your initial environment. - If the
webappcommand isn't recognized, because that your Azure CLI version is 2.0.80 or higher. If not, install the latest version. - Replace
<app_name>with a name that's unique across all of Azure (valid characters area-z,0-9, and-). A good pattern is to use a combination of your company name and an app identifier. - The
--sku B1argument creates the web app on the Basic pricing tier, which incurs a small hourly cost. Omit this argument to use a faster premium tier. - You can optionally include the argument
--location <location-name>where<location_name>is an available Azure region. You can retrieve a list of allowable regions for your Azure account by running the az account list-locations command. - If you see the error, "Could not auto-detect the runtime stack of your app," make sure you're running the command in the python-docs-hello-world folder (Flask) or the python-docs-hello-django folder (Django) that contains the requirements.txt file. (See Troubleshooting auto-detect issues with az webapp up (GitHub).)
The command may take a few minutes to complete. While running, it provides messages about creating the resource group, the App Service plan and hosting app, configuring logging, then performing ZIP deployment. It then gives the message, "You can launch the app at http://<app-name>.azurewebsites.net", which is the app's URL on Azure.
Note
The az webapp up command does the following actions:
Create a default resource group.
Create a default App Service plan.
Create an app with the specified name.
Zip deploy all files from the current working directory, with build automation enabled.
Cache the parameters locally in the .azure/config file so that you don't need to specify them again when deploying later with
az webapp upor otheraz webappcommands from the project folder. The cached values are used automatically by default.
Browse to the app
Browse to the deployed application in your web browser at the URL http://<app-name>.azurewebsites.net. It takes a few moments to start the app initially.
The Python sample code is running a Linux container in App Service using a built-in image.
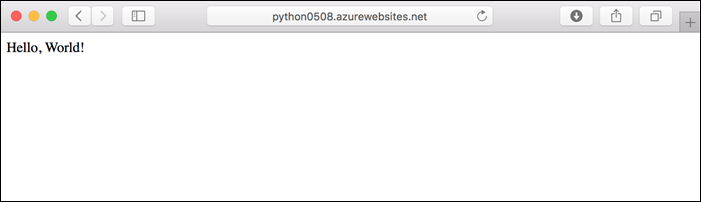
Congratulations! You've deployed your Python app to App Service.
Run the sample
Make sure you're in the python-docs-hello-world folder.
Create a virtual environment and install dependencies:
# Linux systems only
python3 -m venv .venv
source .venv/bin/activate
pip install -r requirements.txt

# Git Bash on Windows only
py -3 -m venv .venv
source .venv\\scripts\\activate
pip install -r requirements.txt
If you're on a Windows system and see the error "'source' is not recognized as an internal or external command," make sure you're either running in the Git Bash shell, or use the commands shown in the Cmd tab above.
If you encounter "[Errno 2] No such file or directory: 'requirements.txt'.", make sure you're in the python-docs-hello-world folder.
Run the development server.
flask runBy default, the server assumes that the app's entry module is in app.py, as used in the sample. (If you use a different module name, set the
FLASK_APPenvironment variable to that name.)Open a web browser and go to the sample app at
http://localhost:5000/. The app displays the message Hello, World!.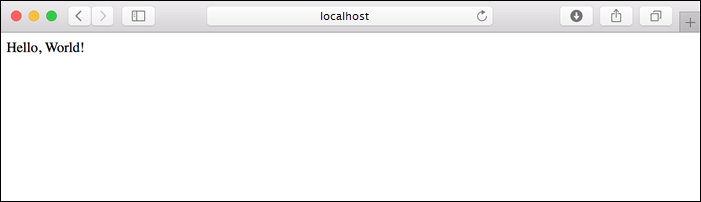
In your terminal window, press Ctrl+C to exit the development server.
Make sure you're in the python-docs-hello-django folder.
Create a virtual environment and install dependencies:
# Linux systems only
python3 -m venv .venv
source .venv/bin/activate
pip install -r requirements.txt

# Git Bash on Windows only
py -3 -m venv .venv
source .venv\\scripts\\activate
pip install -r requirements.txt
If you're on a Windows system and see the error "'source' is not recognized as an internal or external command," make sure you're either running in the Git Bash shell, or use the commands shown in the Cmd tab above.
If you encounter "[Errno 2] No such file or directory: 'requirements.txt'.", make sure you're in the python-docs-hello-django folder.
Run the development server.
python3 manage.py runserverOpen a web browser and go to the sample app at
http://localhost:8000/. The app displays the message Hello, World!.In your terminal window, press Ctrl+C to exit the development server.
Redeploy updates
In this section, you make a small code change and then redeploy the code to Azure. The code change includes a print statement to generate logging output that you work with in the next section.
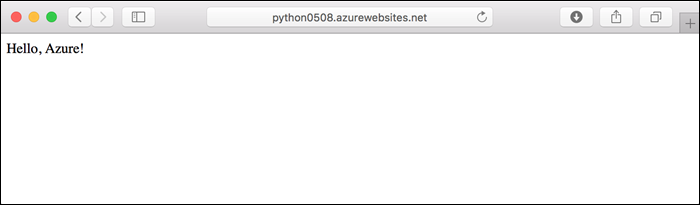
Open app.py in an editor and update the hello function to match the following code.
def hello():
    print("Handling request to home page.")
    return "Hello, Azure!"
Open hello/views.py in an editor and update the hello function to match the following code.
def hello(request):
    print("Handling request to home page.")
    return HttpResponse("Hello, Azure!")
Save your changes, then redeploy the app using the az webapp up command again:
az webapp up
This command uses values that are cached locally in the .azure/config file, including the app name, resource group, and App Service plan.
Once deployment is complete, switch back to the browser window open to http://<app-name>.azurewebsites.net. Refresh the page, which should display the modified message:
Tip
Visual Studio Code provides powerful extensions for Python and Azure App Service, which simplify the process of deploying Python web apps to App Service. For more information, see Deploy Python apps to App Service from Visual Studio Code.
Stream logs
You can access the console logs generated from inside the app and the container in which it runs. Logs include any output generated using print statements.
To stream logs, run the az webapp log tail command:
az webapp log tail
You can also include the --logs parameter with then az webapp up command to automatically open the log stream on deployment.
Refresh the app in the browser to generate console logs, which include messages describing HTTP requests to the app. If no output appears immediately, try again in 30 seconds.
You can also inspect the log files from the browser at https://<app-name>.scm.azurewebsites.net/api/logs/docker.
To stop log streaming at any time, press Ctrl+C in the terminal.
Manage the Azure app
Go to the Azure portal to manage the app you created. Search for and select App Services.
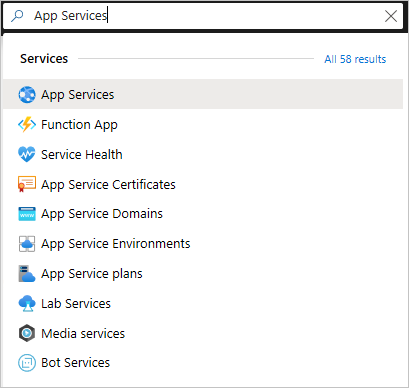
Select the name of your Azure app.

Selecting the app opens its Overview page, where you can perform basic management tasks like browse, stop, start, restart, and delete.
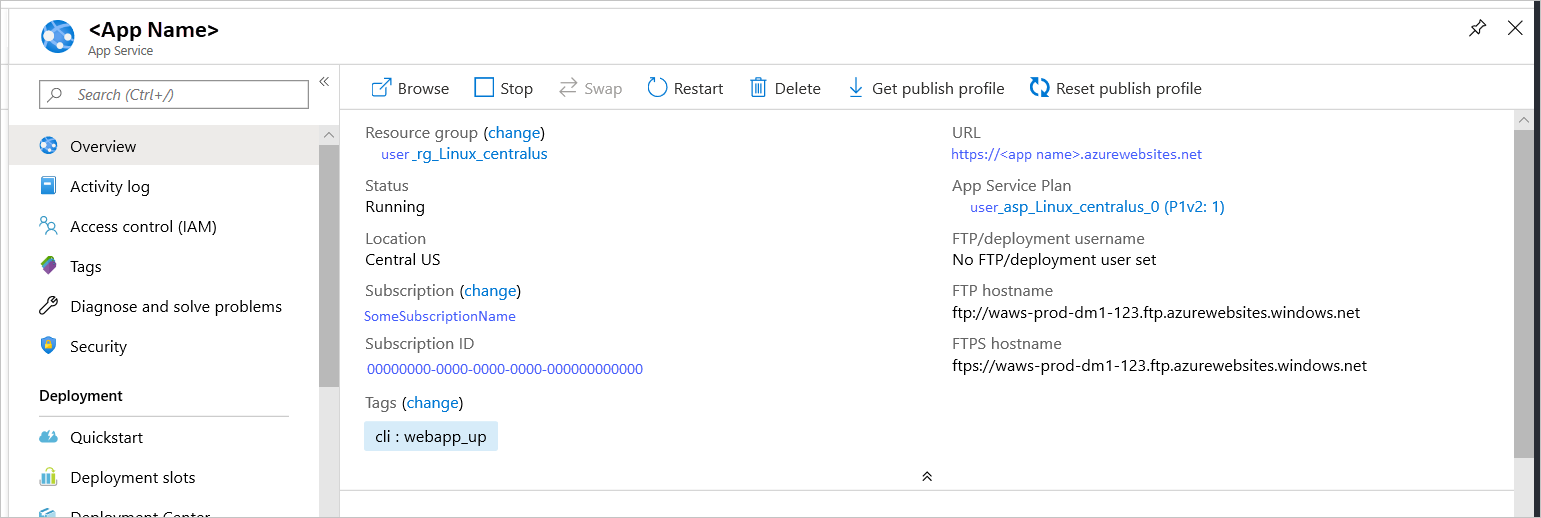
The App Service menu provides different pages for configuring your app.
Clean up resources
In the preceding steps, you created Azure resources in a resource group. The resource group has a name like "appsvc_rg_Linux_CentralUS" depending on your location. If you keep the web app running, you will incur some ongoing costs (see App Service pricing).
If you don't expect to need these resources in the future, delete the resource group by running the following command:
az group delete --no-wait
The command uses the resource group name cached in the .azure/config file.
The --no-wait argument allows the command to return before the operation is complete.
Next steps
Feedback
Coming soon: Throughout 2024 we will be phasing out GitHub Issues as the feedback mechanism for content and replacing it with a new feedback system. For more information see: https://aka.ms/ContentUserFeedback.
Submit and view feedback for