Tutorial: Use Azure Functions and Python to process stored documents
Document Intelligence can be used as part of an automated data processing pipeline built with Azure Functions. This guide will show you how to use Azure Functions to process documents that are uploaded to an Azure blob storage container. This workflow extracts table data from stored documents using the Document Intelligence layout model and saves the table data in a .csv file in Azure. You can then display the data using Microsoft Power BI (not covered here).

In this tutorial, you learn how to:
- Create an Azure Storage account.
- Create an Azure Functions project.
- Extract layout data from uploaded forms.
- Upload extracted layout data to Azure Storage.
Prerequisites
Azure subscription - Create one for free
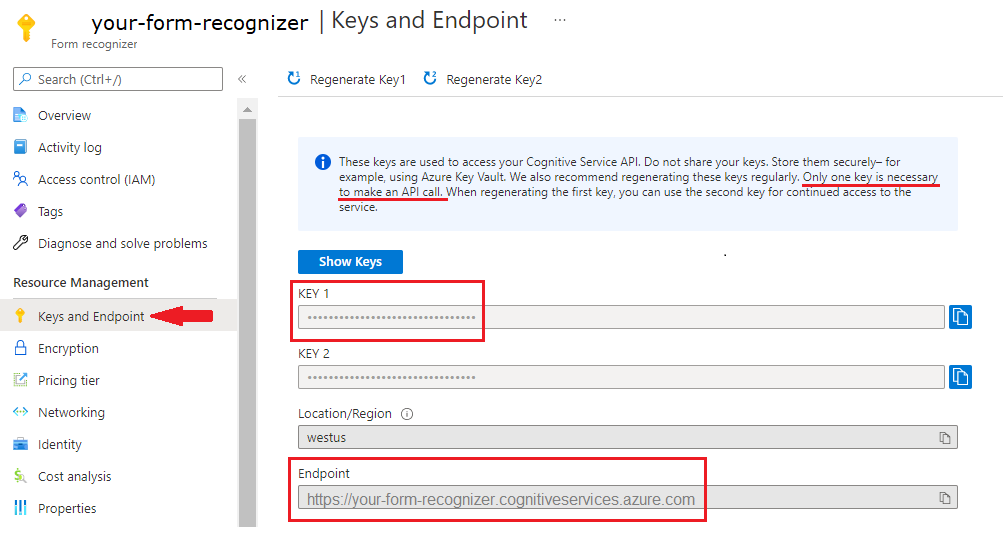
A Document Intelligence resource. Once you have your Azure subscription, create a Document Intelligence resource in the Azure portal to get your key and endpoint. You can use the free pricing tier (
F0) to try the service, and upgrade later to a paid tier for production.After your resource deploys, select Go to resource. You need the key and endpoint from the resource you create to connect your application to the Document Intelligence API. You'll paste your key and endpoint into the code below later in the tutorial:
Python 3.6.x, 3.7.x, 3.8.x or 3.9.x (Python 3.10.x isn't supported for this project).
The latest version of Visual Studio Code (VS Code) with the following extensions installed:
Azure Functions extension. Once it's installed, you should see the Azure logo in the left-navigation pane.
Azure Functions Core Tools version 3.x (Version 4.x isn't supported for this project).
Python Extension for Visual Studio code. For more information, see Getting Started with Python in VS Code
Azure Storage Explorer installed.
A local PDF document to analyze. You can use our sample pdf document for this project.
Create an Azure Storage account
Create a general-purpose v2 Azure Storage account in the Azure portal. If you don't know how to create an Azure storage account with a storage container, follow these quickstarts:
- Create a storage account. When you create your storage account, select Standard performance in the Instance details > Performance field.
- Create a container. When you create your container, set Public access level to Container (anonymous read access for containers and files) in the New Container window.
On the left pane, select the Resource sharing (CORS) tab, and remove the existing CORS policy if any exists.
Once your storage account has deployed, create two empty blob storage containers, named input and output.
Create an Azure Functions project
Create a new folder named functions-app to contain the project and choose Select.
Open Visual Studio Code and open the Command Palette (Ctrl+Shift+P). Search for and choose Python:Select Interpreter → choose an installed Python interpreter that is version 3.6.x, 3.7.x, 3.8.x or 3.9.x. This selection will add the Python interpreter path you selected to your project.
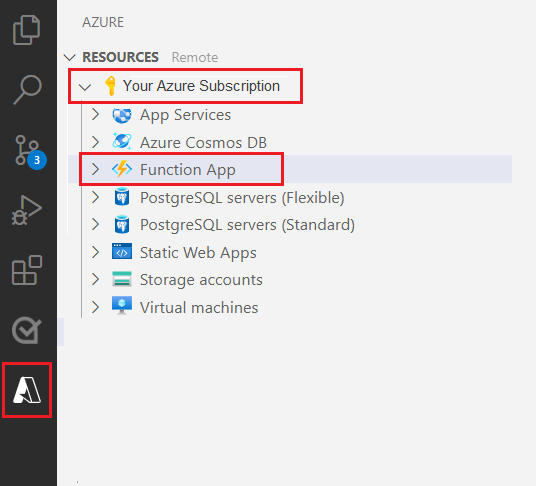
Select the Azure logo from the left-navigation pane.
You'll see your existing Azure resources in the Resources view.
Select the Azure subscription that you're using for this project and below you should see the Azure Function App.
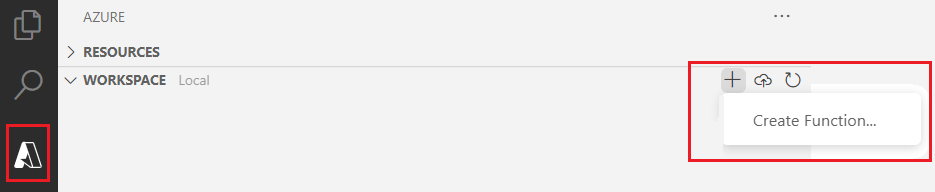
Select the Workspace (Local) section located below your listed resources. Select the plus symbol and choose the Create Function button.
When prompted, choose Create new project and navigate to the function-app directory. Choose Select.
You'll be prompted to configure several settings:
Select a language → choose Python.
Select a Python interpreter to create a virtual environment → select the interpreter you set as the default earlier.
Select a template → choose Azure Blob Storage trigger and give the trigger a name or accept the default name. Press Enter to confirm.
Select setting → choose ➕Create new local app setting from the dropdown menu.
Select subscription → choose your Azure subscription with the storage account you created → select your storage account → then select the name of the storage input container (in this case,
input/{name}). Press Enter to confirm.Select how your would like to open your project → choose Open the project in the current window from the dropdown menu.
Once you've completed these steps, VS Code will add a new Azure Function project with a __init__.py Python script. This script will be triggered when a file is uploaded to the input storage container:
import logging

import azure.functions as func


def main(myblob: func.InputStream):
    logging.info(f"Python blob trigger function processed blob \n"
                 f"Name: {myblob.name}\n"
                 f"Blob Size: {myblob.length} bytes")
Test the function
Press F5 to run the basic function. VS Code will prompt you to select a storage account to interface with.
Select the storage account you created and continue.
Open Azure Storage Explorer and upload the sample PDF document to the input container. Then check the VS Code terminal. The script should log that it was triggered by the PDF upload.
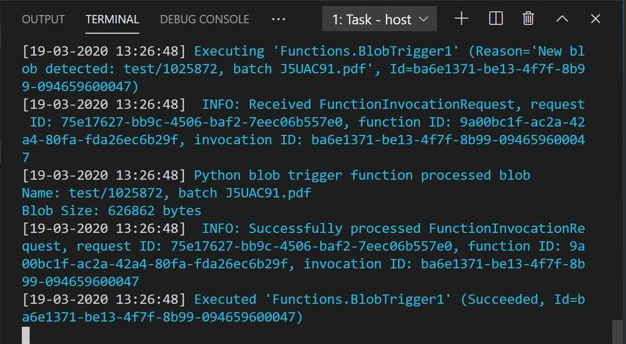
Stop the script before continuing.
Add document processing code
Next, you'll add your own code to the Python script to call the Document Intelligence service and parse the uploaded documents using the Document Intelligence layout model.
In VS Code, navigate to the function's requirements.txt file. This file defines the dependencies for your script. Add the following Python packages to the file:
cryptography
azure-functions
azure-storage-blob
azure-identity
requests
pandas
numpy
Then, open the __init__.py script. Add the following
importstatements:import logging from azure.storage.blob import BlobServiceClient import azure.functions as func import json import time from requests import get, post import os import requests from collections import OrderedDict import numpy as np import pandas as pdYou can leave the generated
mainfunction as-is. You'll add your custom code inside this function.# This part is automatically generated def main(myblob: func.InputStream): logging.info(f"Python blob trigger function processed blob \n" f"Name: {myblob.name}\n" f"Blob Size: {myblob.length} bytes")The following code block calls the Document Intelligence Analyze Layout API on the uploaded document. Fill in your endpoint and key values.
# This is the call to the Document Intelligence endpoint
    endpoint = r"Your Document Intelligence Endpoint"
    apim_key = "Your Document Intelligence Key"
    post_url = endpoint + "/formrecognizer/v2.1/layout/analyze"
    source = myblob.read()

    headers = {
    # Request headers
    'Content-Type': 'application/pdf',
    'Ocp-Apim-Subscription-Key': apim_key,
        }

    text1=os.path.basename(myblob.name)
Important
Remember to remove the key from your code when you're done, and never post it publicly. For production, use a secure way of storing and accessing your credentials like Azure Key Vault. For more information, see Azure AI services security.
Next, add code to query the service and get the returned data.
resp = requests.post(url=post_url, data=source, headers=headers)

if resp.status_code != 202:
    print("POST analyze failed:\n%s" % resp.text)
    quit()
print("POST analyze succeeded:\n%s" % resp.headers)
get_url = resp.headers["operation-location"]

wait_sec = 25

time.sleep(wait_sec)
# The layout API is async therefore the wait statement

resp = requests.get(url=get_url, headers={"Ocp-Apim-Subscription-Key": apim_key})

resp_json = json.loads(resp.text)

status = resp_json["status"]

if status == "succeeded":
    print("POST Layout Analysis succeeded:\n%s")
    results = resp_json
else:
    print("GET Layout results failed:\n%s")
    quit()

results = resp_json
Add the following code to connect to the Azure Storage output container. Fill in your own values for the storage account name and key. You can get the key on the Access keys tab of your storage resource in the Azure portal.
# This is the connection to the blob storage, with the Azure Python SDK
    blob_service_client = BlobServiceClient.from_connection_string("DefaultEndpointsProtocol=https;AccountName="Storage Account Name";AccountKey="storage account key";EndpointSuffix=core.windows.net")
    container_client=blob_service_client.get_container_client("output")
The following code parses the returned Document Intelligence response, constructs a .csv file, and uploads it to the output container.
Important
You will likely need to edit this code to match the structure of your own documents.
    # The code below extracts the json format into tabular data.
    # Please note that you need to adjust the code below to your form structure.
    # It probably won't work out-of-the-box for your specific form.
    pages = results["analyzeResult"]["pageResults"]

    def make_page(p):
        res=[]
        res_table=[]
        y=0
        page = pages[p]
        for tab in page["tables"]:
            for cell in tab["cells"]:
                res.append(cell)
                res_table.append(y)
            y=y+1

        res_table=pd.DataFrame(res_table)
        res=pd.DataFrame(res)
        res["table_num"]=res_table[0]
        h=res.drop(columns=["boundingBox","elements"])
        h.loc[:,"rownum"]=range(0,len(h))
        num_table=max(h["table_num"])
        return h, num_table, p

    h, num_table, p= make_page(0)

    for k in range(num_table+1):
        new_table=h[h.table_num==k]
        new_table.loc[:,"rownum"]=range(0,len(new_table))
        row_table=pages[p]["tables"][k]["rows"]
        col_table=pages[p]["tables"][k]["columns"]
        b=np.zeros((row_table,col_table))
        b=pd.DataFrame(b)
        s=0
        for i,j in zip(new_table["rowIndex"],new_table["columnIndex"]):
            b.loc[i,j]=new_table.loc[new_table.loc[s,"rownum"],"text"]
            s=s+1
Finally, the last block of code uploads the extracted table and text data to your blob storage element.
    # Here is the upload to the blob storage
    tab1_csv=b.to_csv(header=False,index=False,mode='w')
    name1=(os.path.splitext(text1)[0]) +'.csv'
    container_client.upload_blob(name=name1,data=tab1_csv)
Run the function
Press F5 to run the function again.
Use Azure Storage Explorer to upload a sample PDF form to the input storage container. This action should trigger the script to run, and you should then see the resulting .csv file (displayed as a table) in the output container.
You can connect this container to Power BI to create rich visualizations of the data it contains.
Next steps
In this tutorial, you learned how to use an Azure Function written in Python to automatically process uploaded PDF documents and output their contents in a more data-friendly format. Next, learn how to use Power BI to display the data.
- What is Document Intelligence?
- Learn more about the layout model
Feedback
Coming soon: Throughout 2024 we will be phasing out GitHub Issues as the feedback mechanism for content and replacing it with a new feedback system. For more information see: https://aka.ms/ContentUserFeedback.
Submit and view feedback for