Tutorial: Roll out features to targeted audiences in an ASP.NET Core application
In this tutorial, you'll use the targeting filter to roll out a feature to targeted audience for your ASP.NET Core application. For more information about the targeting filter, see Roll out features to targeted audiences.
Prerequisites
- An Azure account with an active subscription. Create one for free.
- An App Configuration store. Create a store.
- A feature flag with targeting filter. Create the feature flag.
- .NET SDK 6.0 or later.
Create a web application with a feature flag
In this section, you will create a web application that allows users to sign in and use the Beta feature flag you created before.
Create a web application that authenticates against a local database using the following command.
dotnet new webapp --auth Individual -o TestFeatureFlagsAdd references to the following NuGet packages.
dotnet add package Microsoft.Azure.AppConfiguration.AspNetCore
dotnet add package Microsoft.FeatureManagement.AspNetCore
Store the connection string for your App Configuration store.
dotnet user-secrets init
dotnet user-secrets set ConnectionStrings:AppConfig "<your_connection_string>"
Add Azure App Configuration and feature management to your application.
Update the Program.cs file with the following code.
// Existing code in Program.cs
// ... ...

var builder = WebApplication.CreateBuilder(args);

// Retrieve the App Config connection string
string AppConfigConnectionString = builder.Configuration.GetConnectionString("AppConfig") ?? throw new InvalidOperationException("Connection string 'AppConfig' not found."); ;

// Load feature flag configuration from Azure App Configuration
builder.Configuration.AddAzureAppConfiguration(options =>
{
    options.Connect(AppConfigConnectionString);
    options.UseFeatureFlags();
});

// Add Azure App Configuration middleware to the container of services
builder.Services.AddAzureAppConfiguration();

// Add feature management to the container of services
builder.Services.AddFeatureManagement();

// The rest of existing code in Program.cs
// ... ...
Enable configuration and feature flag refresh from Azure App Configuration with the App Configuration middleware.
Update Program.cs withe the following code.
// Existing code in Program.cs
// ... ...

var app = builder.Build();

// Use Azure App Configuration middleware for dynamic configuration refresh
app.UseAzureAppConfiguration();

// The rest of existing code in Program.cs
// ... ...
Add a new empty Razor page named Beta under the Pages directory. It includes two files Beta.cshtml and Beta.cshtml.cs.
@page
@model TestFeatureFlags.Pages.BetaModel
@{
    ViewData["Title"] = "Beta Page";
}

<h1>This is the beta website.</h1>
Open Beta.cshtml.cs, and add
FeatureGateattribute to theBetaModelclass.using Microsoft.AspNetCore.Mvc.RazorPages; using Microsoft.FeatureManagement.Mvc; namespace TestFeatureFlags.Pages { [FeatureGate("Beta")] public class BetaModel : PageModel { public void OnGet() { } } }Open Pages/_ViewImports.cshtml, and register the feature manager Tag Helper using an
@addTagHelperdirective.@addTagHelper *, Microsoft.FeatureManagement.AspNetCoreOpen _Layout.cshtml in the Pages/Shared directory. Insert a new
<feature>tag in between the Home and Privacy navbar items, as shown in the highlighted lines below.<nav class="navbar navbar-expand-sm navbar-toggleable-sm navbar-light bg-white border-bottom box-shadow mb-3"> <div class="container"> <a class="navbar-brand" asp-area="" asp-page="/Index">TestAppConfigNet3</a> <button class="navbar-toggler" type="button" data-toggle="collapse" data-target=".navbar-collapse" aria-controls="navbarSupportedContent" aria-expanded="false" aria-label="Toggle navigation"> <span class="navbar-toggler-icon"></span> </button> <div class="navbar-collapse collapse d-sm-inline-flex flex-sm-row-reverse"> <ul class="navbar-nav flex-grow-1"> <li class="nav-item"> <a class="nav-link text-dark" asp-area="" asp-page="/Index">Home</a> </li> <feature name="Beta"> <li class="nav-item"> <a class="nav-link text-dark" asp-area="" asp-page="/Beta">Beta</a> </li> </feature> <li class="nav-item"> <a class="nav-link text-dark" asp-area="" asp-page="/Privacy">Privacy</a> </li> </ul> </div> </div> </nav>
Enable targeting for the web application
The targeting filter evaluates a user's feature state based on the user's targeting context, which comprises the user ID and the groups the user belongs to. In this example, you use the signed-in user's email address as the user ID and the domain name of the email address as the group.
Add an ExampleTargetingContextAccessor.cs file with the following code. You implement the
ITargetingContextAccessorinterface to provide the targeting context for the signed-in user of the current request.using Microsoft.FeatureManagement.FeatureFilters; namespace TestFeatureFlags { public class ExampleTargetingContextAccessor : ITargetingContextAccessor { private const string TargetingContextLookup = "ExampleTargetingContextAccessor.TargetingContext"; private readonly IHttpContextAccessor _httpContextAccessor; public ExampleTargetingContextAccessor(IHttpContextAccessor httpContextAccessor) { _httpContextAccessor = httpContextAccessor ?? throw new ArgumentNullException(nameof(httpContextAccessor)); } public ValueTask<TargetingContext> GetContextAsync() { HttpContext httpContext = _httpContextAccessor.HttpContext; if (httpContext.Items.TryGetValue(TargetingContextLookup, out object value)) { return new ValueTask<TargetingContext>((TargetingContext)value); } List<string> groups = new List<string>(); if (httpContext.User.Identity.Name != null) { groups.Add(httpContext.User.Identity.Name.Split("@", StringSplitOptions.None)[1]); } TargetingContext targetingContext = new TargetingContext { UserId = httpContext.User.Identity.Name, Groups = groups }; httpContext.Items[TargetingContextLookup] = targetingContext; return new ValueTask<TargetingContext>(targetingContext); } } }Open the Program.cs file and enable the targeting filter by calling the
WithTargetingmethod. You pass in the typeExampleTargetingContextAccessorthat the targeting filter will use to get the targeting context during feature flag evaluation. AddHttpContextAccessorto the service collection to allowExampleTargetingContextAccessorto access the signed-in user information from theHttpContext.// Existing code in Program.cs // ... ... // Add feature management to the container of services builder.Services.AddFeatureManagement() .WithTargeting<ExampleTargetingContextAccessor>(); // Add HttpContextAccessor to the container of services. builder.Services.AddHttpContextAccessor(); // The rest of existing code in Program.cs // ... ...Note
For Blazor applications, see instructions for enabling feature management as scoped services.
Targeting filter in action
Build and run the application. Initially, the Beta item doesn't appear on the toolbar, because the Default percentage option is set to 0.
Select the Register link in the upper right corner to create a new user account. Use an email address of
test@contoso.com. On the Register Confirmation screen, select Click here to confirm your account.Sign in as
test@contoso.com, using the password you set when registering the account.The Beta item now appears on the toolbar, because
test@contoso.comis specified as a targeted user.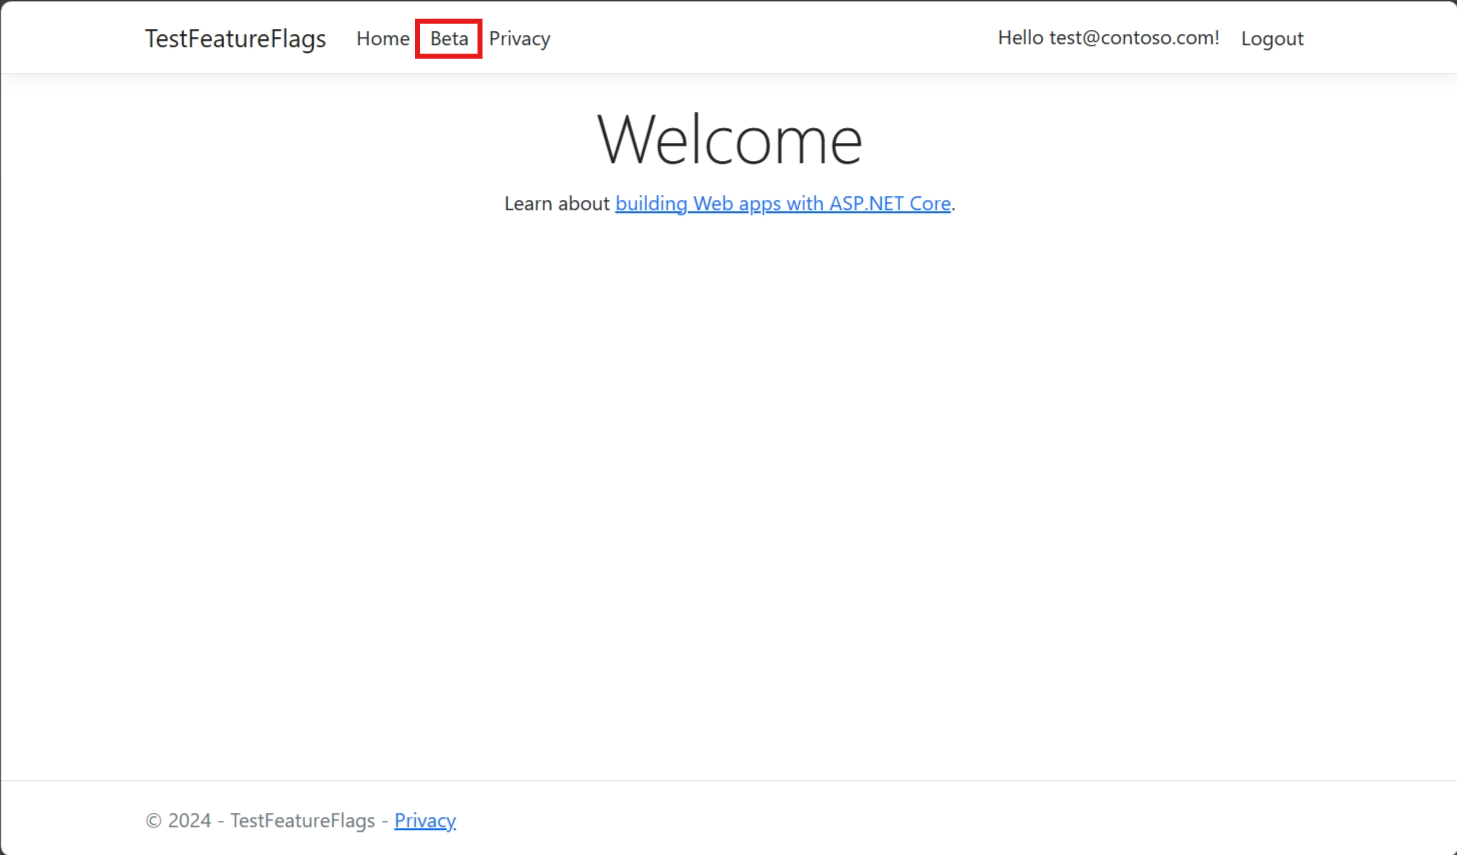
Now sign in as
testuser@contoso.com, using the password you set when registering the account. The Beta item doesn't appear on the toolbar, becausetestuser@contoso.comis specified as an excluded user.You can create more users with
@contoso.comand@contoso-xyz.comemail addresses to see the behavior of the group settings.Users with
contoso-xyz.comemail addresses won't see the Beta item. While 50% of users with@contoso.comemail addresses will see the Beta item, the other 50% won't see the Beta item.
Next steps
To learn more about the feature filters, continue to the following tutorials.
Feedback
Coming soon: Throughout 2024 we will be phasing out GitHub Issues as the feedback mechanism for content and replacing it with a new feedback system. For more information see: https://aka.ms/ContentUserFeedback.
Submit and view feedback for