Tutorial: Get started with Azure Functions triggers and bindings in Azure Cache for Redis
This tutorial shows how to implement basic triggers with Azure Cache for Redis and Azure Functions. It guides you through using Visual Studio Code (VS Code) to write and deploy an Azure function in C#.
In this tutorial, you learn how to:
- Set up the necessary tools.
- Configure and connect to a cache.
- Create an Azure function and deploy code to it.
- Confirm the logging of triggers.
Prerequisites
- An Azure subscription. If you don't have an Azure subscription, create a free account.
- Visual Studio Code.
Set up an Azure Cache for Redis instance
Create a new Azure Cache for Redis instance by using the Azure portal or your preferred CLI tool. This tutorial uses a Standard C1 instance, which is a good starting point. Use the quickstart guide to get started.
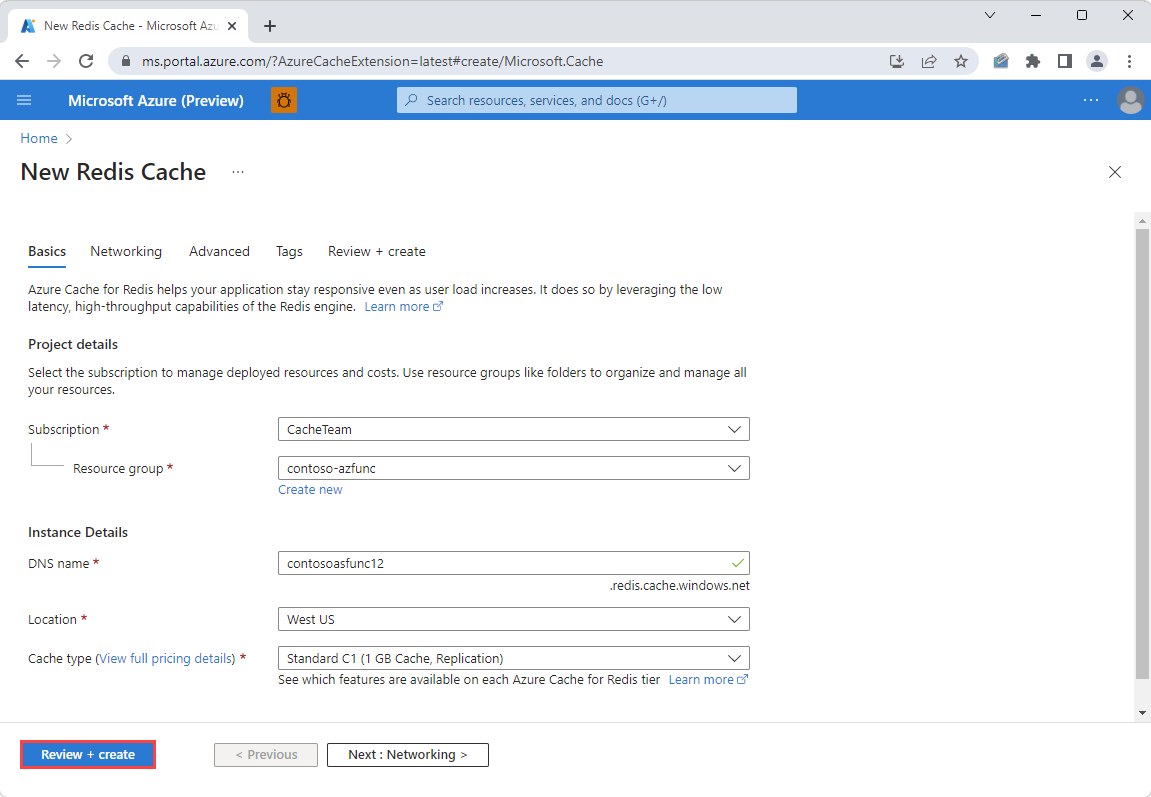
The default settings should suffice. This tutorial uses a public endpoint for demonstration, but we recommend that you use a private endpoint for anything in production.
Creating the cache can take a few minutes. You can move to the next section while the process finishes.
Set up Visual Studio Code
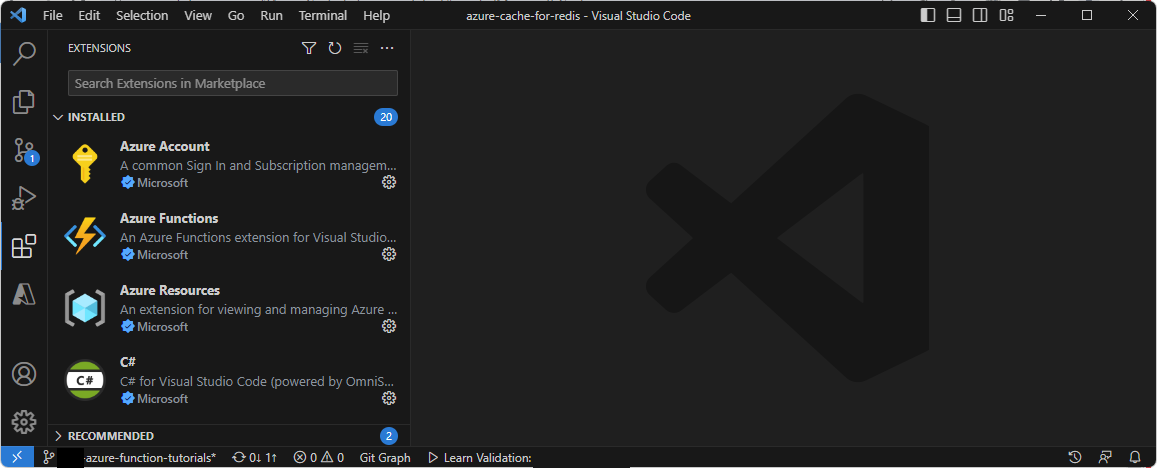
If you didn't install the Azure Functions extension for VS Code yet, search for Azure Functions on the EXTENSIONS menu, and then select Install. If you don't have the C# extension installed, install it, too.
Go to the Azure tab. Sign in to your Azure account.
To store the project that you're building, create a new local folder on your computer. This tutorial uses RedisAzureFunctionDemo as an example.
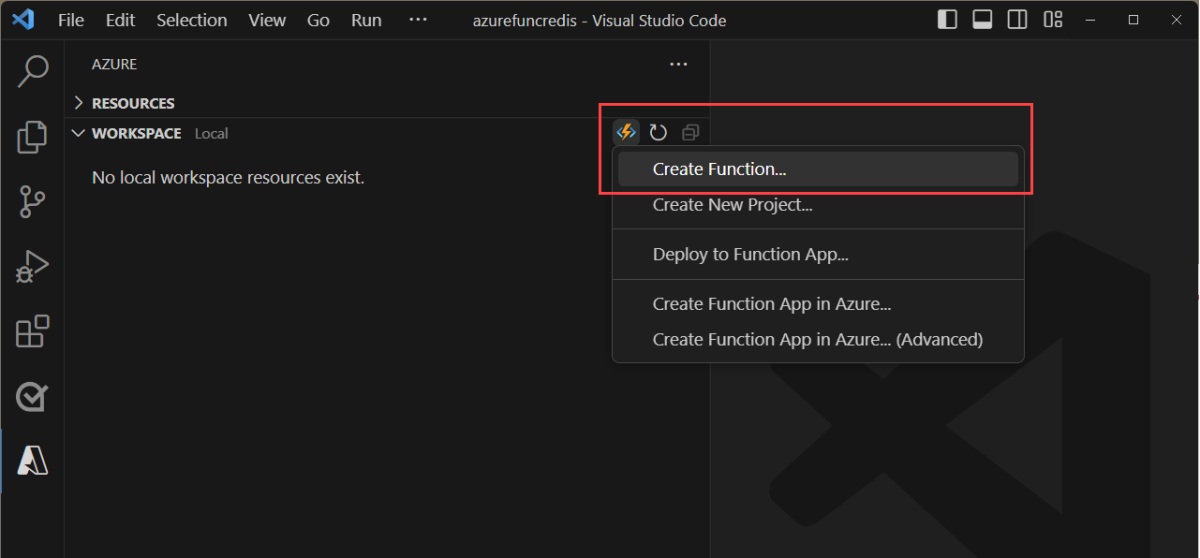
On the Azure tab, create a new function app by selecting the lightning bolt icon in the upper right of the Workspace tab.
Select Create function....
Select the folder that you created to start the creation of a new Azure Functions project. You get several on-screen prompts. Select:
- C# as the language.
- .NET 8.0 Isolated LTS as the .NET runtime.
- Skip for now as the project template.
If you don't have the .NET Core SDK installed, you're prompted to do so.
Important
For .NET functions, using the isolated worker model is recommended over the in-process model. For a comparison of the in-process and isolated worker models, see differences between the isolated worker model and the in-process model for .NET on Azure Functions. This sample uses the isolated worker model.
Confirm that the new project appears on the EXPLORER pane.

Install the necessary NuGet package
You need to install Microsoft.Azure.Functions.Worker.Extensions.Redis, the NuGet package for the Redis extension that allows Redis keyspace notifications to be used as triggers in Azure Functions.
Install this package by going to the Terminal tab in VS Code and entering the following command:
dotnet add package Microsoft.Azure.Functions.Worker.Extensions.Redis --prerelease
Note
The Microsoft.Azure.Functions.Worker.Extensions.Redis package is used for .NET isolated worker process functions. .NET in-process functions and all other languages will use the Microsoft.Azure.WebJobs.Extensions.Redis package instead.
Configure the cache
Go to your newly created Azure Cache for Redis instance.
Go to your cache in the Azure portal, and then:
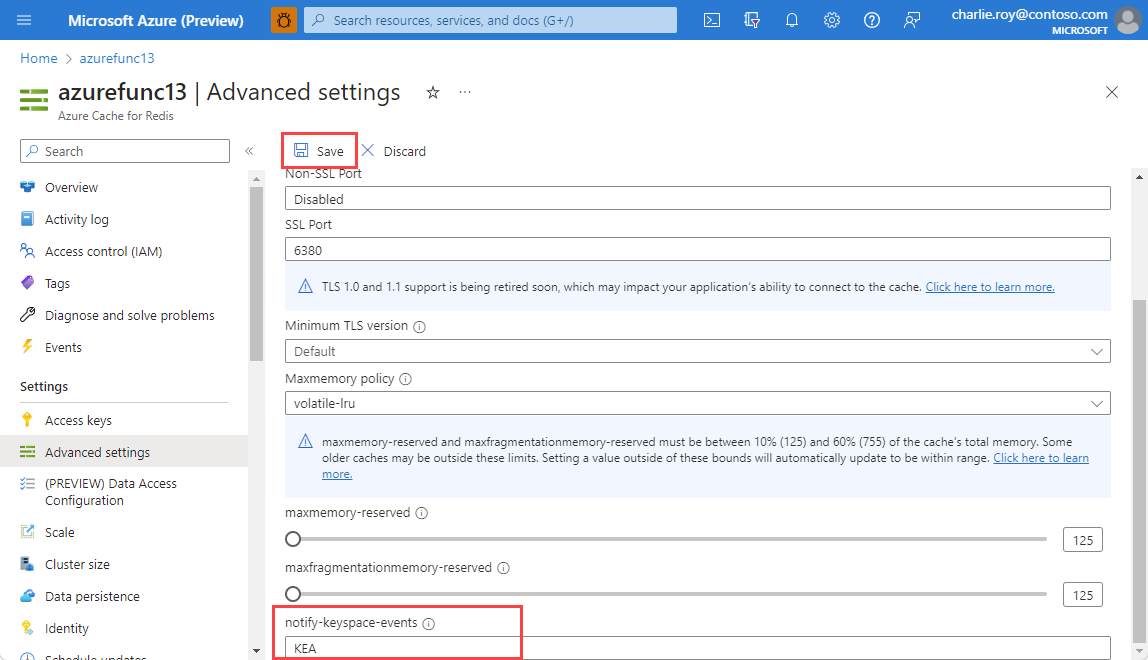
On the resource menu, select Advanced settings.
Scroll down to the notify-keyspace-events box and enter KEA.
KEA is a configuration string that enables keyspace notifications for all keys and events. For more information on keyspace configuration strings, see the Redis documentation.
Select Save at the top of the window.
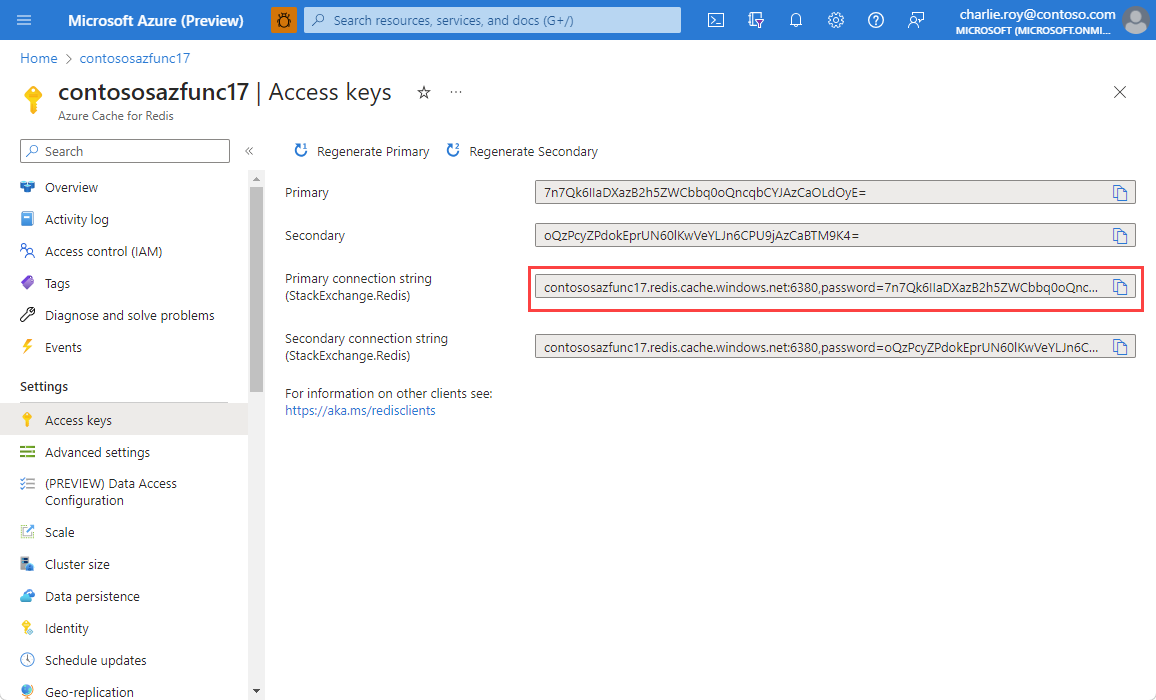
Select Access keys from the resource menu, and then write down or copy the contents of the Primary connection string box. This string is used to connect to the cache.
Set up the example code for Redis triggers
In VS Code, add a file called Common.cs to the project. This class is used to help parse the JSON serialized response for the PubSubTrigger.
Copy and paste the following code into the Common.cs file:
public class Common
{
    public const string connectionString = "redisConnectionString";

    public class ChannelMessage
    {
        public string SubscriptionChannel { get; set; }
        public string Channel { get; set; }
        public string Message { get; set; }
    }
}
Add a file called RedisTriggers.cs to the project.
Copy and paste the following code sample into the new file:
using Microsoft.Extensions.Logging;
using Microsoft.Azure.Functions.Worker;
using Microsoft.Azure.Functions.Worker.Extensions.Redis;

public class RedisTriggers
{
    private readonly ILogger<RedisTriggers> logger;

    public RedisTriggers(ILogger<RedisTriggers> logger)
    {
        this.logger = logger;
    }

    // PubSubTrigger function listens to messages from the 'pubsubTest' channel.
    [Function("PubSubTrigger")]
    public void PubSub(
    [RedisPubSubTrigger(Common.connectionString, "pubsubTest")] Common.ChannelMessage channelMessage)
    {
    logger.LogInformation($"Function triggered on pub/sub message '{channelMessage.Message}' from channel '{channelMessage.Channel}'.");
    }

    // KeyeventTrigger function listens to key events from the 'del' operation.
    [Function("KeyeventTrigger")]
    public void Keyevent(
        [RedisPubSubTrigger(Common.connectionString, "__keyevent@0__:del")] Common.ChannelMessage channelMessage)
    {
        logger.LogInformation($"Key '{channelMessage.Message}' deleted.");
    }

    // KeyspaceTrigger function listens to key events on the 'keyspaceTest' key.
    [Function("KeyspaceTrigger")]
    public void Keyspace(
        [RedisPubSubTrigger(Common.connectionString, "__keyspace@0__:keyspaceTest")] Common.ChannelMessage channelMessage)
    {
        logger.LogInformation($"Key 'keyspaceTest' was updated with operation '{channelMessage.Message}'");
    }

    // ListTrigger function listens to changes to the 'listTest' list.
    [Function("ListTrigger")]
    public void List(
        [RedisListTrigger(Common.connectionString, "listTest")] string response)
    {
        logger.LogInformation(response);
    }

    // StreamTrigger function listens to changes to the 'streamTest' stream.
    [Function("StreamTrigger")]
    public void Stream(
        [RedisStreamTrigger(Common.connectionString, "streamTest")] string response)
    {
        logger.LogInformation(response);
    }
}
This tutorial shows multiple ways to trigger on Redis activity:
PubSubTrigger, which is triggered when an activity is published to the Pub/Sub channel namedpubsubTest.KeyspaceTrigger, which is built on the Pub/Sub trigger. Use it to look for changes to thekeyspaceTestkey.KeyeventTrigger, which is also built on the Pub/Sub trigger. Use it to look for any use of theDELcommand.ListTrigger, which looks for changes to thelistTestlist.StreamTrigger, which looks for changes to thestreamTeststream.
Connect to your cache
To trigger on Redis activity, you need to pass in the connection string of your cache instance. This information is stored in the local.settings.json file that was automatically created in your folder. We recommend that you use the local settings file as a security best practice.
To connect to your cache, add a
ConnectionStringssection in the local.settings.json file, and then add your connection string by using theredisConnectionStringparameter. The section should look like this example:{ "IsEncrypted": false, "Values": { "AzureWebJobsStorage": "", "FUNCTIONS_WORKER_RUNTIME": "dotnet-isolated", "redisConnectionString": "<your-connection-string>" } }The code in Common.cs looks to this value when it's running locally:
public const string connectionString = "redisConnectionString";
Important
This example is simplified for the tutorial. For production use, we recommend that you use Azure Key Vault to store connection string information or authenticate to the Redis instance using EntraID.
Build and run the code locally
Switch to the Run and debug tab in VS Code and select the green arrow to debug the code locally. If you don't have Azure Functions core tools installed, you're prompted to do so. In that case, you'll need to restart VS Code after installing.
The code should build successfully. You can track its progress in the terminal output.
To test the trigger functionality, try creating and deleting the
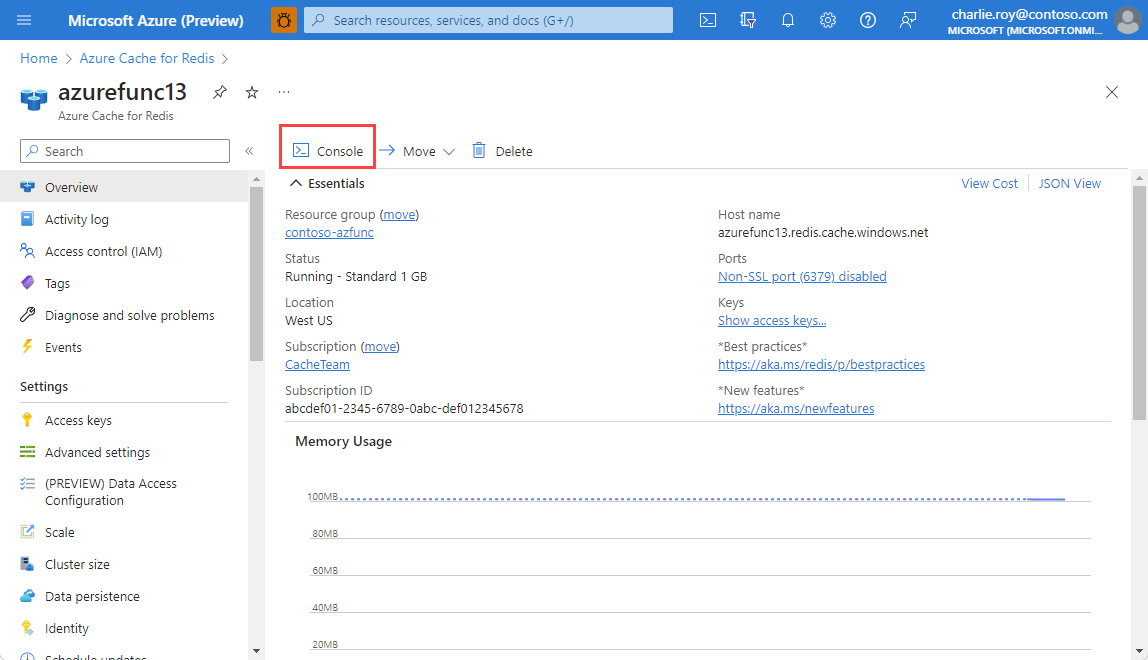
keyspaceTestkey.You can use any way you prefer to connect to the cache. An easy way is to use the built-in console tool in the Azure Cache for Redis portal. Go to the cache instance in the Azure portal, and then select Console to open it.
After the console is open, try the following commands:
SET keyspaceTest 1SET keyspaceTest 2DEL keyspaceTestPUBLISH pubsubTest testMessageLPUSH listTest testXADD streamTest * name Clippy
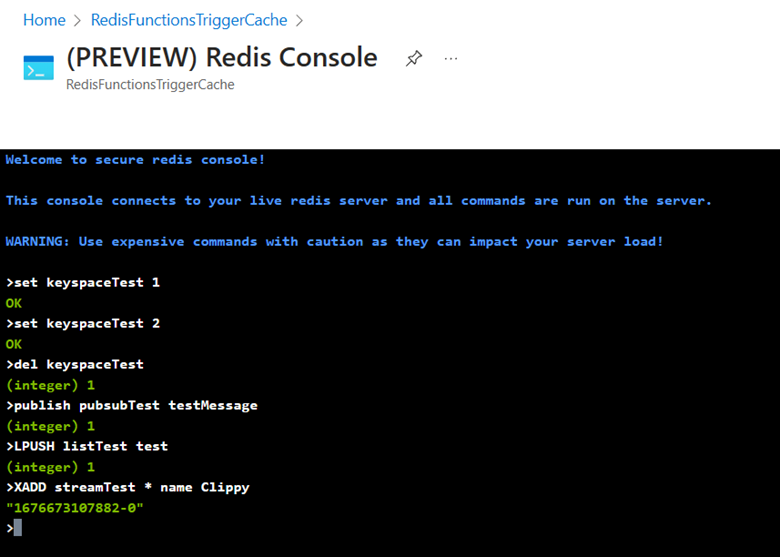
Confirm that the triggers are being activated in the terminal.


Add Redis bindings
Bindings add a streamlined way to read or write data stored on your Redis instance. To demonstrate the benefit of bindings, we add two other functions. One is called SetGetter, which triggers each time a key is set and returns the new value of the key using an input binding. The other is called StreamSetter, which triggers when a new item is added to to the stream myStream and uses an output binding to write the value true to the key newStreamEntry.
Add a file called RedisBindings.cs to the project.
Copy and paste the following code sample into the new file:
using Microsoft.Extensions.Logging;
using Microsoft.Azure.Functions.Worker;
using Microsoft.Azure.Functions.Worker.Extensions.Redis;

public class RedisBindings
{
    private readonly ILogger<RedisBindings> logger;

    public RedisBindings(ILogger<RedisBindings> logger)
    {
        this.logger = logger;
    }

    //This example uses the PubSub trigger to listen to key events on the 'set' operation. A Redis Input binding is used to get the value of the key being set.
    [Function("SetGetter")]
    public void SetGetter(
        [RedisPubSubTrigger(Common.connectionString, "__keyevent@0__:set")] Common.ChannelMessage channelMessage,
        [RedisInput(Common.connectionString, "GET {Message}")] string value)
    {
        logger.LogInformation($"Key '{channelMessage.Message}' was set to value '{value}'");
    }

    //This example uses the PubSub trigger to listen to key events to the key 'key1'. When key1 is modified, a Redis Output binding is used to set the value of the 'key1modified' key to 'true'.
    [Function("SetSetter")]
    [RedisOutput(Common.connectionString, "SET")]
    public string SetSetter(
        [RedisPubSubTrigger(Common.connectionString, "__keyspace@0__:key1")] Common.ChannelMessage channelMessage)
    {
        logger.LogInformation($"Key '{channelMessage.Message}' was updated. Setting the value of 'key1modified' to 'true'");
        return $"key1modified true";
    }
}
Switch to the Run and debug tab in VS Code and select the green arrow to debug the code locally. The code should build successfully. You can track its progress in the terminal output.
To test the input binding functionality, try setting a new value for any key, for instance using the command
SET hello worldYou should see that theSetGetterfunction triggers and returns the updated value.To test the output binding functionality, try adding a new item to the stream
myStreamusing the commandXADD myStream * item Order1. Notice that theStreamSetterfunction triggered on the new stream entry and set the valuetrueto another key callednewStreamEntry. Thissetcommand also triggers theSetGetterfunction.
Deploy code to an Azure function
Create a new Azure function:
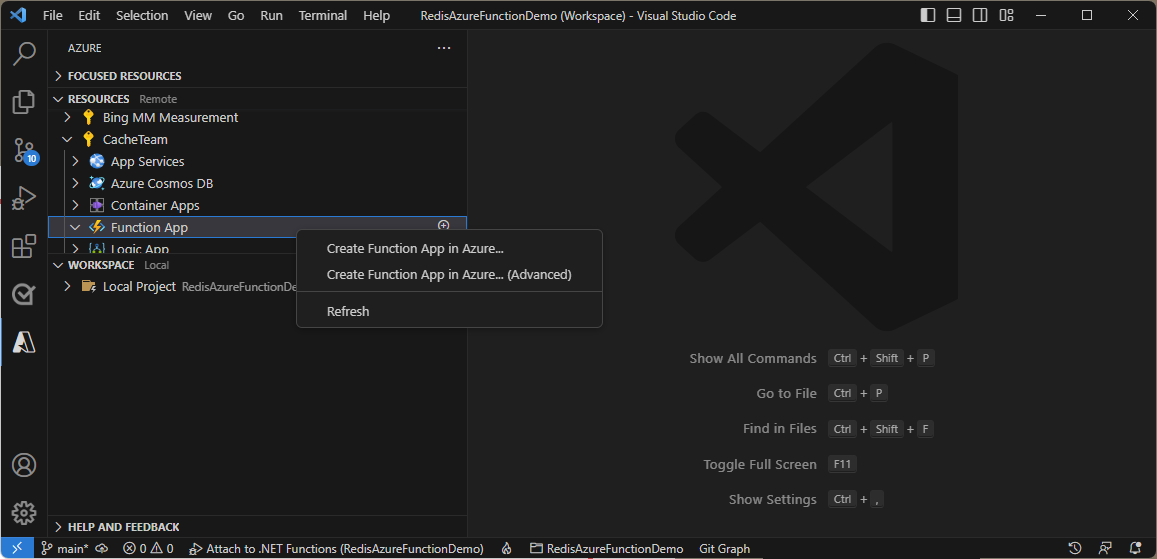
Go back to the Azure tab and expand your subscription.
Right-click Function App, and then select Create Function App in Azure (Advanced).
You get several prompts for information to configure the new function app:
- Enter a unique name.
- Select .NET 8 Isolated as the runtime stack.
- Select either Linux or Windows (either works).
- Select an existing or new resource group to hold the function app.
- Select the same region as your cache instance.
- Select Premium as the hosting plan.
- Create a new Azure App Service plan.
- Select the EP1 pricing tier.
- Select an existing storage account or create a new one.
- Create a new Application Insights resource. You use the resource to confirm that the trigger is working.
Important
Redis triggers aren't currently supported on consumption functions.
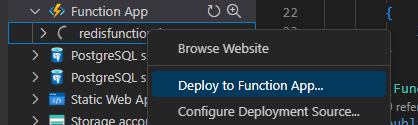
Wait a few minutes for the new function app to be created. It appears under Function App in your subscription. Right-click the new function app, and then select Deploy to Function App.
The app builds and starts deploying. You can track its progress in the output window.
Add connection string information
In the Azure portal, go to your new function app and select Environment variables from the resource menu.
On the working pane, go to App settings.
For Name, enter redisConnectionString.
For Value, enter your connection string.
Select Apply on the page to confirm.
Navigate to the Overview pane and select Restart to reboot the functions app with the connection string information.
Test your triggers and bindings
After deployment is complete and the connection string information is added, open your function app in the Azure portal. Then select Log Stream from the resource menu.
Wait for Log Analytics to connect, and then use the Redis console to activate any of the triggers. Confirm that triggers are being logged here.


Clean up resources
If you want to continue to use the resources you created in this article, keep the resource group.
Otherwise, if you're finished with the resources, you can delete the Azure resource group that you created to avoid charges.
Important
Deleting a resource group is irreversible. When you delete a resource group, all the resources in it are permanently deleted. Make sure that you do not accidentally delete the wrong resource group or resources. If you created the resources inside an existing resource group that contains resources you want to keep, you can delete each resource individually instead of deleting the resource group.
To delete a resource group
Sign in to the Azure portal, and then select Resource groups.
Select the resource group you want to delete.
If there are many resource groups, use the Filter for any field... box, type the name of your resource group you created for this article. Select the resource group in the results list.
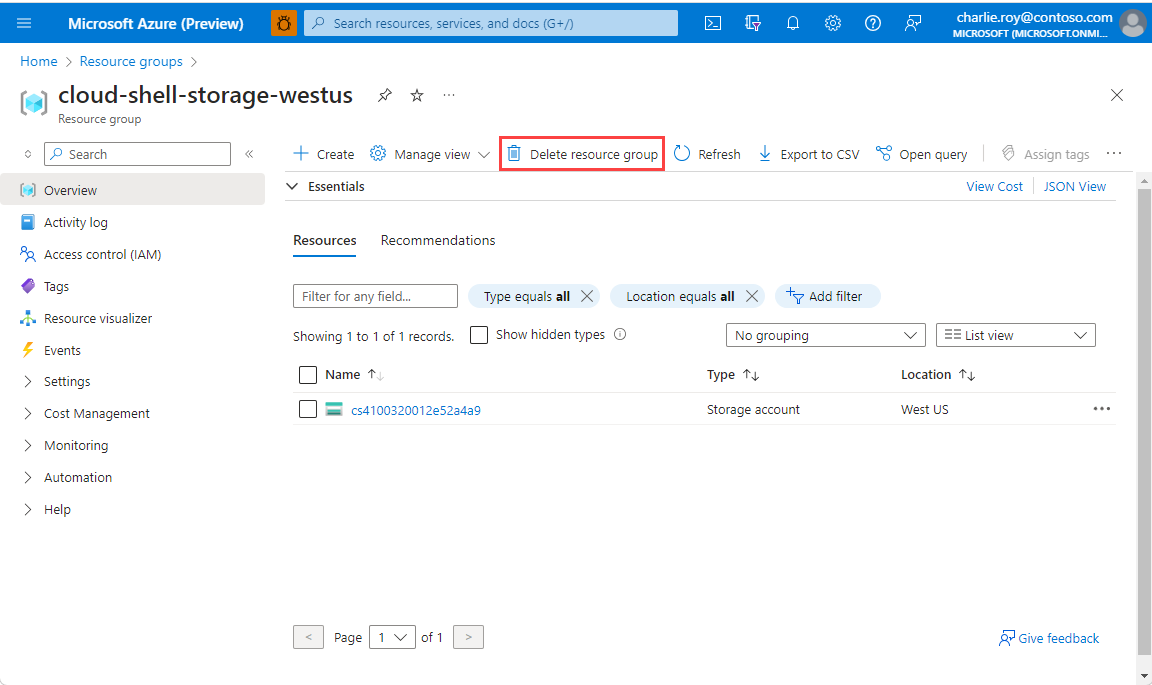
Select Delete resource group.
You're asked to confirm the deletion of the resource group. Type the name of your resource group to confirm, and then select Delete.

After a few moments, the resource group and all of its resources are deleted.
Related content
Feedback
Coming soon: Throughout 2024 we will be phasing out GitHub Issues as the feedback mechanism for content and replacing it with a new feedback system. For more information see: https://aka.ms/ContentUserFeedback.
Submit and view feedback for