Work with Azure Large Instances in the Azure portal
In this article, you learn what to do in the Azure portal with your implementation of Azure Large Instances.
Note
For now, BareMetal Infrastructure and BareMetal Instances are being used as synonyms for Azure Large Instances.
Register the resource provider
An Azure resource provider for Azure Large Instances enables you to see the instances in the Azure portal. By default, the Azure subscription you use for Azure Large Instances deployments registers the Azure Large Instances resource provider. If you don't see your deployed Azure Large Instances, register the resource provider with your subscription.
You can register the Azure Large Instance resource provider using the Azure portal or the Azure CLI.
You need to list your subscription in the Azure portal and then double-click the subscription used to deploy your Azure Large Instances tenant.
- Sign in to the Azure portal.
- On the Azure portal menu, select All services.
- In the All services box, enter subscription, and then select Subscriptions.
- Select the subscription from the subscription list.
- Select Resource providers and type BareMetalInfrastructure in the search box. The resource provider should be registered, as the image shows.

Note
If the resource provider isn't registered, select Register.

Azure Large Instances in the Azure portal
When you submit an Azure Large Instances deployment request, specify the Azure subscription you're connecting to the Azure Large Instances. Use the same subscription you use to deploy the application layer that works against the Azure Large Instances.
During the deployment of your Azure Large Instances, a new Azure resource group is created in the Azure subscription you used in the deployment request. This new resource group lists the Azure Large Instances you've deployed in that subscription.
In the Azure portal, in the Azure Large Instances subscription, select Resource groups.
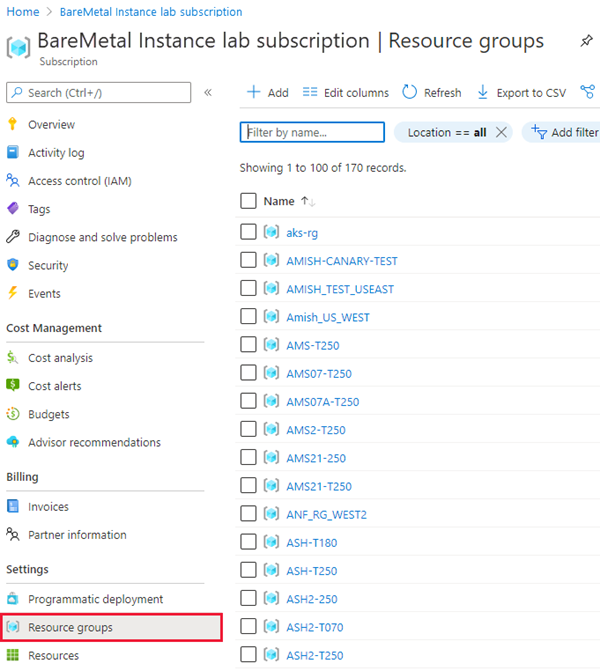
In the list, locate the new resource group.

Select the new resource group to view its details. The image shows one Azure Large Instances tenant deployed.


View the attributes of a single instance
You can view the details of a single instance.
In the list of Azure Large Instances, select the single instance you want to view.

The attributes in the image don't look much different than the Azure virtual machine (VM) attributes. On the left, you see the Resource group, Azure region, and subscription name and ID. If you assigned tags, you see them here as well. By default, the Azure Large Instances don't have tags assigned.
On the right, you see the name of the Azure Large Instances, operating system (OS), IP address, and SKU that shows the number of CPU threads and memory. You also see the power state and hardware version (revision of the Azure Large Instances stamp). The power state indicates whether the hardware unit is powered on or off. The operating system details, however, don't indicate whether it's up and running.
Also on the right is the Azure proximity placement group's name. The placement group's name is created automatically for each deployed Azure Large Instances tenant. Reference the proximity placement group when you deploy the Azure VMs that host the application layer. Use the proximity placement group associated with the Azure Large Instances to ensure the Azure VMs are deployed close to the Azure Large Instances.
Check activities of a single instance
You can check the activities of a single Azure Large Instances tenant. One of the main activities recorded are restarts of the instance. The data listed includes:
- Activity status
- Time the activity triggered
- Subscription ID
- Azure user who triggered the activity

Changes to an instance's metadata in Azure also get recorded in the Activity log. Besides the restart, you can see the activity of WriteBareMetalInstances. This activity makes no changes on the Azure Large Instances tenant itself, but documents the changes to the unit's metadata in Azure.
Another activity that gets recorded is adding a tag to or deleting a tag from an instance.
Add an Azure tag to or delete an Azure tag from an instance
You can add Azure tags to an Azure Large Instances tenant or delete them using either the Portal or Azure CLI.
Tags get assigned just as they do when assigning tags to VMs. As with VMs, the tags exist in the Azure metadata. Tags have the same restrictions for Azure Large Instances as for VMs.
Deleting tags also works the same way as for VMs. Both applying and deleting a tag is listed in the Azure Large Instances instance's Activity log.
Check properties of an instance
When you acquire the instances, you can go to the Properties section to view the data collected about the instances. Data collected includes:
- Azure connectivity
- Storage backend
- ExpressRoute circuit ID
- Unique resource ID
- Subscription ID
This information is important in support requests and when setting up a storage snapshot configuration.
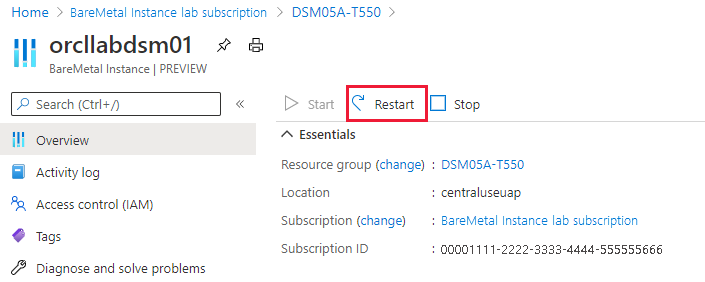
Restart an Azure Large Instances tenant through the Azure portal
There are various situations in which the operating system won't complete a restart, which requires a power restart of the Azure Large Instances.
You can do a power restart of the instance directly from the Azure portal or through Azure CLI.
Select Restart and then Yes to confirm the restart.
When you restart an AKI instance, you'll experience a delay. During this delay, the power state moves from Starting to Started, which means the OS has started up completely. As a result, after a restart, you can only log into the unit once the state switches to Started.
Important
Depending on the amount of memory in your Azure Large Instances, a restart and a reboot of the hardware and operating system can take up to one hour.
Open a support request for Azure Large Instances
You can submit support requests specifically for Azure Large Instances.
In Azure portal, under Help + Support, create a New support request and provide the following information for the ticket:
- Issue type: Select an issue type.
- Subscription: Select your subscription.
- Service: Select Epic on Azure
- Problem type: Azure Large Instances
- Problem subtype: Select a subtype for the problem.
Select the Solutions tab to find a solution to your problem. If you can't find a solution, go to the next step.
Select the Details tab and select whether the issue is with VMs or BareMetal instances. This information helps direct the support request to the correct specialists.
Indicate when the problem began and select the instance region.
Provide more details about the request and upload a file if needed.
Select Review + Create to submit the request.
Support response depends on the support plan chosen by the customer. For more information, see Support scope and responsiveness.
Feedback
Coming soon: Throughout 2024 we will be phasing out GitHub Issues as the feedback mechanism for content and replacing it with a new feedback system. For more information see: https://aka.ms/ContentUserFeedback.
Submit and view feedback for