Tutorial: Search nearby points of interest using Azure Maps
This tutorial shows how to set up an account with Azure Maps, then use the Maps APIs to search for a point of interest. In this tutorial, you learn how to:
- Create an Azure Maps account
- Retrieve the subscription key for your Maps account
- Create a new web page using the map control API
- Use the Maps search service to find a nearby point of interest
Prerequisites
If you don't have an Azure subscription, create a free account before you begin.
Note
For more information on authentication in Azure Maps, see manage authentication in Azure Maps.
Create a new map
The Map Control API is a convenient client library. This API allows you to easily integrate Maps into your web application. It hides the complexity of the bare REST service calls and boosts your productivity with customizable components. The following steps show you how to create a static HTML page embedded with the Map Control API.
On your local machine, create a new file and name it MapSearch.html.
Add the following HTML components to the file:
 <!DOCTYPE html>
 <html>
 <head>
     <title>Map Search</title>
     <meta charset="utf-8" />

     <!-- Add references to the Azure Maps Map control JavaScript and CSS files. -->
     <link rel="stylesheet" href="https://atlas.microsoft.com/sdk/javascript/mapcontrol/3/atlas.min.css" type="text/css" />
     <script src="https://atlas.microsoft.com/sdk/javascript/mapcontrol/3/atlas.min.js"></script>

     <script>
     function GetMap(){
         //Add Map Control JavaScript code here.
     }
     </script>

     <style>
         html,
         body {
             width: 100%;
             height: 100%;
             padding: 0;
             margin: 0;
         }

         #myMap {
             width: 100%;
             height: 100%;
         }
     </style>
 </head>
 <body onload="GetMap()">
     <div id="myMap"></div>
 </body>
 </html>
Some things to know regarding the above HTML:
- The HTML header includes CSS and JavaScript resource files that are hosted by the Azure Map Control library.
- The
onloadevent in the body of the page calls theGetMapfunction when the body of the page has loaded. - The
GetMapfunction contains the inline JavaScript code used to access the Azure Maps APIs. It's added in the next step.
Add the following JavaScript code to the
GetMapfunction of the HTML file. Replace the string<Your Azure Maps Subscription Key>with the subscription key that you copied from your Azure Maps account.//Instantiate a map object var map = new atlas.Map("myMap", { view: 'Auto', // Add your Azure Maps subscription key. https://aka.ms/am-primaryKey authOptions: { authType: 'subscriptionKey', subscriptionKey: '<Your Azure Maps Subscription Key>' } });Some things to know regarding the above JavaScript:
- The core of the
GetMapfunction, which initializes the Map Control API for your Azure Maps account key. atlasis the namespace that contains the API and related visual components.atlas.Mapprovides the control for a visual and interactive web map.
- The core of the
Save your changes to the file and open the HTML page in a browser. The map shown is the most basic map that you can make by calling
atlas.Mapusing your account key.
In the
GetMapfunction, after initializing the map, add the following JavaScript code.//Wait until the map resources are ready. map.events.add('ready', function() { //Create a data source and add it to the map. datasource = new atlas.source.DataSource(); map.sources.add(datasource); //Add a layer for rendering point data. var resultLayer = new atlas.layer.SymbolLayer(datasource, null, { iconOptions: { image: 'pin-round-darkblue', anchor: 'center', allowOverlap: true }, textOptions: { anchor: "top" } }); map.layers.add(resultLayer); });About this code:
- A
readyevent is added to the map, which fires when the map resources finish loading and the map is ready to be accessed. - In the map
readyevent handler, a data source is created to store result data. - A symbol layer is created and attached to the data source. This layer specifies how the result data in the data source should be rendered. In this case, the result is rendered with a dark blue round pin icon, centered over the results coordinate that allows other icons to overlap.
- The result layer is added to the map layers.
- A

Add search capabilities
This section shows how to use the Maps Search API to find a point of interest on your map. It's a RESTful API designed for developers to search for addresses, points of interest, and other geographical information. The Search service assigns a latitude and longitude information to a specified address.
Tip
Azure Maps offers a set of npm modules for the Azure Maps JavaScript REST SDK. These modules include client libraries that simplify the use of Azure Maps REST services in Node.js applications. For a complete list of the available modules, see JavaScript/TypeScript REST SDK Developers Guide (preview).
Search service
Add the following script block in the map
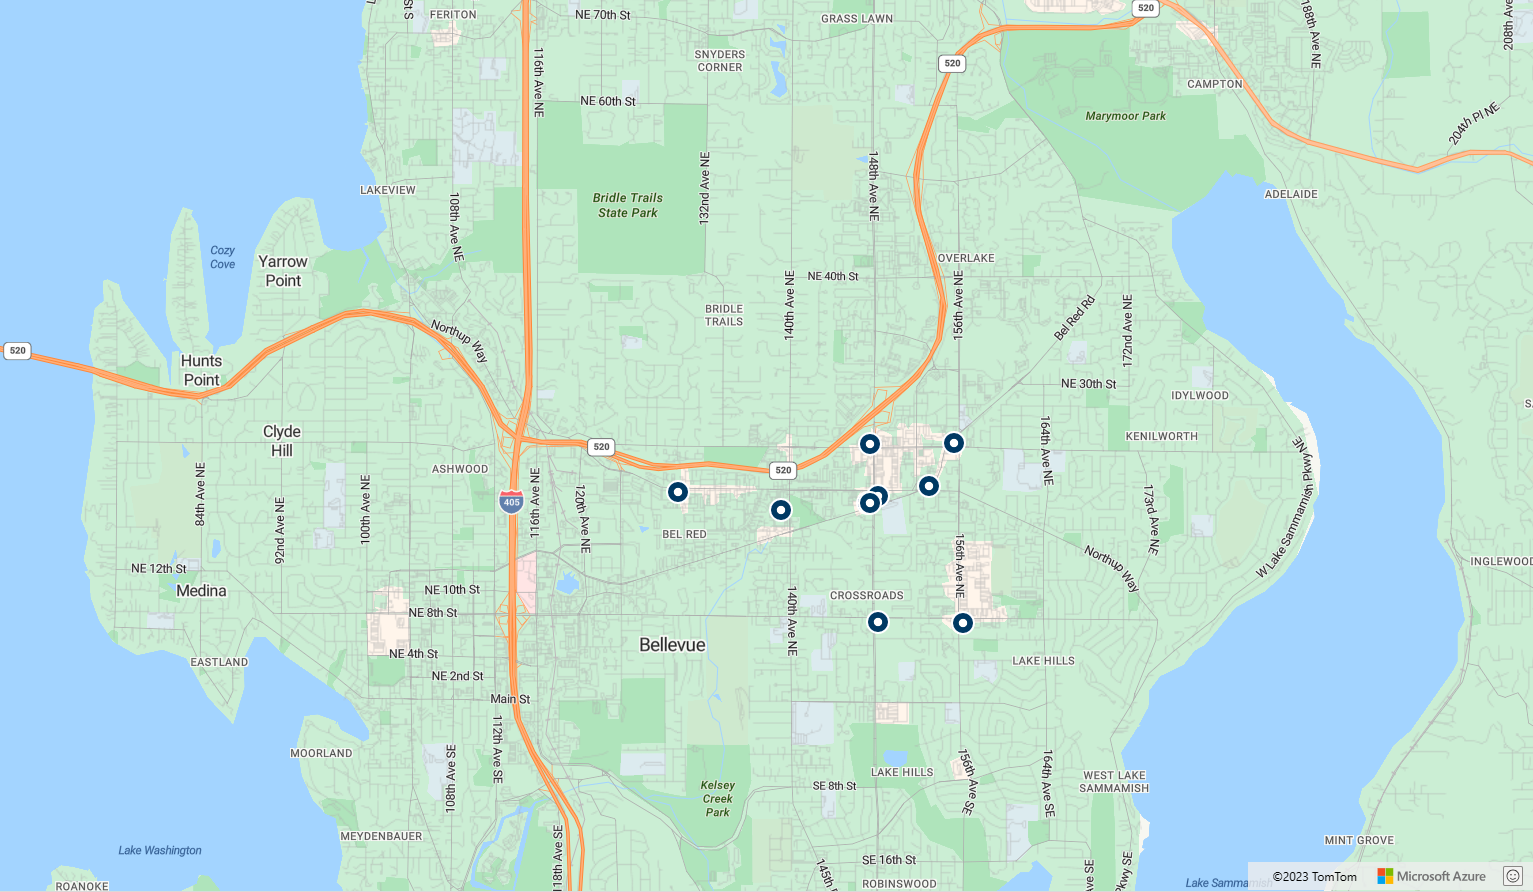
readyevent handler. This is the code to build the search query. It uses the Fuzzy Search service, a basic search API of the Search Service. Fuzzy Search service handles most fuzzy inputs like addresses, places, and points of interest (POI). This code searches for nearby gas stations within the specified radius of the provided latitude and longitude. A GeoJSON feature collection is then extracted and added to the data source, which automatically results in the data being rendered on the maps symbol layer. The last part of this script block sets the maps camera view using the bounding box of the results using the Map's setCamera property.var query = 'gasoline-station'; var radius = 9000; var lat = 47.64452336193245; var lon = -122.13687658309935; var url = `https://atlas.microsoft.com/search/poi/json?api-version=1.0&query=${query}&lat=${lat}&lon=${lon}&radius=${radius}`; fetch(url, { headers: { "Subscription-Key": map.authentication.getToken() } }) .then((response) => response.json()) .then((response) => { var bounds = []; //Extract GeoJSON feature collection from the response and add it to the datasource var data = response.results.map((result) => { var position = [result.position.lon, result.position.lat]; bounds.push(position); return new atlas.data.Feature(new atlas.data.Point(position), { ...result }); }); datasource.add(data); //Set camera to bounds to show the results map.setCamera({ bounds: new atlas.data.BoundingBox.fromLatLngs(bounds), zoom: 10, padding: 15 }); });Save the MapSearch.html file and refresh your browser. You should see the map centered on Seattle with round-blue pins for locations of gas stations in the area.
You can see the raw data that the map is rendering by entering the following HTTPRequest in your browser. Replace
<Your Azure Maps Subscription Key>with your subscription key.https://atlas.microsoft.com/search/poi/json?api-version=1.0&query=gasoline%20station&subscription-key={Your-Azure-Maps-Subscription-key}&lat=47.6292&lon=-122.2337&radius=100000

At this point, the MapSearch page can display the locations of points of interest that are returned from a fuzzy search query. Let's add some interactive capabilities and more information about the locations.
Add interactive data
The map that we've made so far only looks at the longitude/latitude data for the search results. However, the raw JSON that the Maps Search service returns contains additional information about each gas station. Including the name and street address. You can incorporate that data into the map with interactive popup boxes.
Add the following lines of code in the map
readyevent handler after the code to query the fuzzy search service. This code creates an instance of a Popup and adds a mouseover event to the symbol layer.// Create a popup but leave it closed so we can update it and display it later. popup = new atlas.Popup(); //Add a mouse over event to the result layer and display a popup when this event fires. map.events.add('mouseover', resultLayer, showPopup);The API
atlas.Popupprovides an information window anchored at the required position on the map.Add the following lines of code in the map
readyevent handler after the code to create an instance of a Popup and add a mouseover event to the symbol layer. This code shows a popup window with the results when you mouse over a point of interest.function showPopup(e) { //Get the properties and coordinates of the first shape that the event occurred on. var p = e.shapes[0].getProperties(); var position = e.shapes[0].getCoordinates(); //Create HTML from properties of the selected result. var html = ` <div style="padding:5px"> <div><b>${p.poi.name}</b></div> <div>${p.address.freeformAddress}</div> <div>${position[1]}, ${position[0]}</div> </div>`; //Update the content and position of the popup. popup.setPopupOptions({ content: html, position: position }); //Open the popup. popup.open(map); }Save the file and refresh your browser. Now the map in the browser shows information popups when you hover over any of the search pins.


- For the completed code used in this tutorial, see the search tutorial on GitHub.
- To view this sample live, see Search for points of interest on the Azure Maps Code Samples site.
Next steps
The next tutorial demonstrates how to display a route between two locations.
Feedback
Coming soon: Throughout 2024 we will be phasing out GitHub Issues as the feedback mechanism for content and replacing it with a new feedback system. For more information see: https://aka.ms/ContentUserFeedback.
Submit and view feedback for