Workbook text parameters
Text box parameters provide a simple way to collect text input from workbook users. They're used when it isn't practical to use a dropdown list to collect the input, for example, with an arbitrary threshold or generic filters. By using a workbook, you can get the default value of the text box from a query. This functionality allows for interesting scenarios like setting the default threshold based on the p95 of the metric.
A common use of text boxes is as internal variables used by other workbook controls. You use a query for default values and make the input control invisible in read mode. For example, you might want a threshold to come from a formula, not a user, and then use the threshold in subsequent queries.
Create a text parameter
Start with an empty workbook in edit mode.
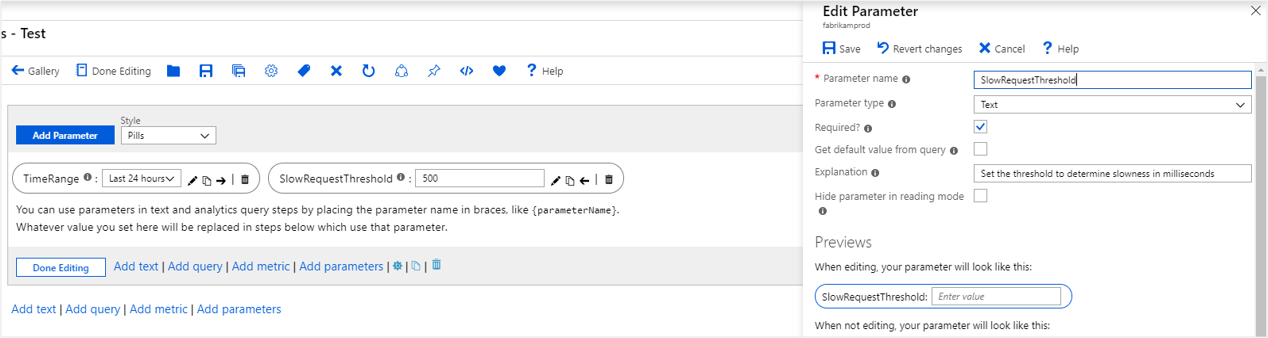
Select Add parameters > Add Parameter.
In the new parameter pane that opens, enter:
- Parameter name:
SlowRequestThreshold - Parameter type:
Text - Required:
checked - Get data from:
None
- Parameter name:
Select Save to create the parameter.
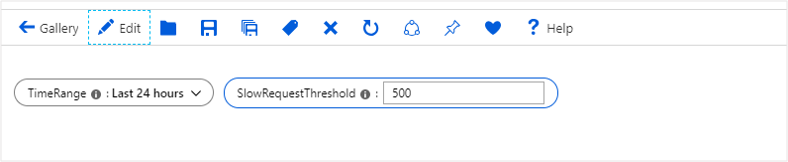
This screenshot shows how the workbook looks in read mode:
Parameter field style
The text parameter supports the following field styles:
Standard: A single line text field.

Password: A single line password field. The password value is only hidden in the UI when you type. The value is fully accessible as a parameter value when referred. It's stored unencrypted when the workbook is saved.

Multiline: A multiline text field with support of rich IntelliSense and syntax colorization for the following languages:
- Text
- Markdown
- JSON
- SQL
- TypeScript
- KQL
- TOML
You can also specify the height for the multiline editor.

Reference a text parameter
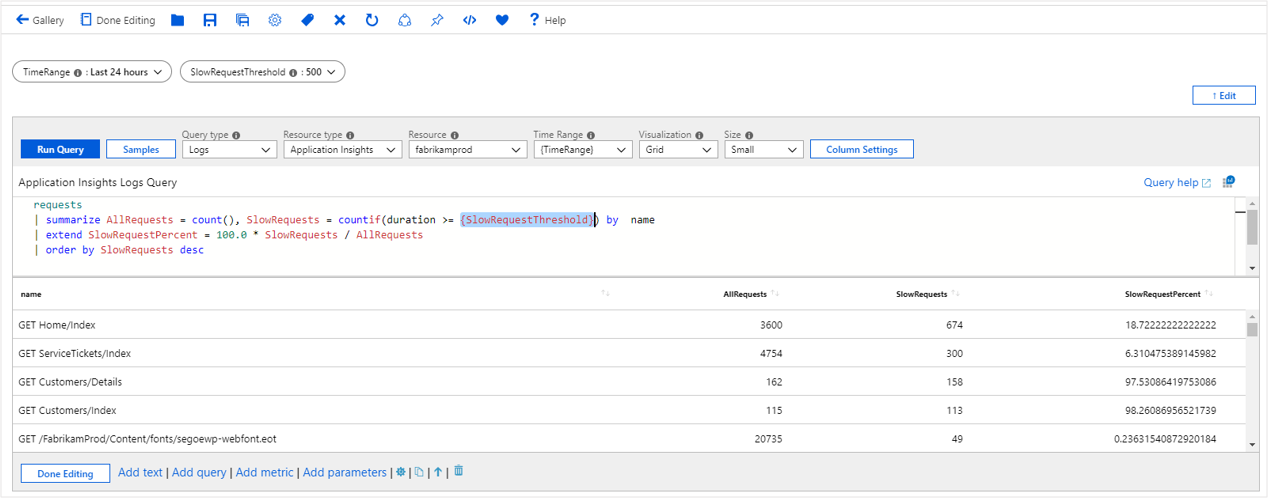
Select Add query to add a query control, and then select an Application Insights resource.
In the KQL box, add this snippet:
requests
| summarize AllRequests = count(), SlowRequests = countif(duration >= {SlowRequestThreshold}) by name
| extend SlowRequestPercent = 100.0 * SlowRequests / AllRequests
| order by SlowRequests desc
By using the text parameter with a value of 500 coupled with the query control, you effectively run the following query:
requests
| summarize AllRequests = count(), SlowRequests = countif(duration >= 500) by name
| extend SlowRequestPercent = 100.0 * SlowRequests / AllRequests
| order by SlowRequests desc
Run the query to see the results.
Note
In the preceding example, {SlowRequestThreshold} represents an integer value. If you were querying for a string like {ComputerName}, you would need to modify your Kusto query to add quotation marks "{ComputerName}" in order for the parameter field to accept an input without quotation marks.
Set the default values using queries
Start with an empty workbook in edit mode.
Select Add parameters > Add Parameter.
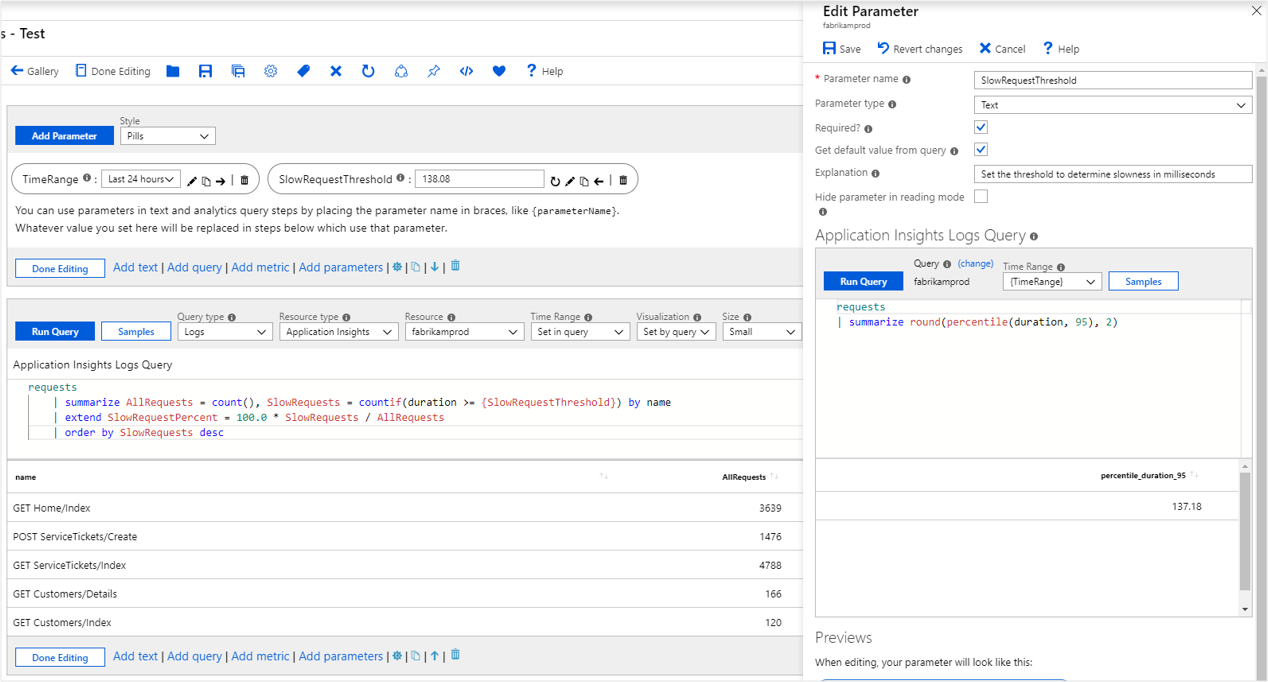
In the new parameter pane that opens, enter:
- Parameter name:
SlowRequestThreshold - Parameter type:
Text - Required:
checked - Get data from:
Query
- Parameter name:
In the KQL box, add this snippet:
requests
| summarize round(percentile(duration, 95), 2)
This query sets the default value of the text box to the 95th percentile duration for all requests in the app.
Run the query to see the results.
Select Save to create the parameter.
Note
While this example queries Application Insights data, the approach can be used for any log-based data source, such as Log Analytics and Azure Resource Graph.
Add validations
For standard and password text parameters, you can add validation rules that are applied to the text field. Add a valid regex with an error message. If the message is set, it's shown as an error when the field is invalid.
If the match is selected, the field is valid if the value matches the regex. If the match isn't selected, the field is valid if it doesn't match the regex.

Format JSON data
If JSON is selected as the language for the multiline text field, the field will have a button that formats the JSON data of the field. You can also use the shortcut Ctrl + \ to format the JSON data.
If data is coming from a query, you can select the option to pre-format the JSON data that's returned by the query.

Next steps
Feedback
Coming soon: Throughout 2024 we will be phasing out GitHub Issues as the feedback mechanism for content and replacing it with a new feedback system. For more information see: https://aka.ms/ContentUserFeedback.
Submit and view feedback for