Install the ASDK
After preparing the ASDK host computer, the Azure Stack Development Kit (ASDK) can be deployed into the CloudBuilder.vhdx image using the following steps in this article.
Install the ASDK
The steps in this article show you how to deploy the ASDK using a graphical user interface (GUI) provided by downloading and running the asdk-installer.ps1 PowerShell script.
Note
The installer user interface for the ASDK is an open-sourced script based on WCF and PowerShell.
After the host computer successfully boots into the CloudBuilder.vhdx image, sign in using the admin credentials specified when you prepared the ASDK host computer for ASDK installation. This should be the same as the ASDK host local admin credentials.
Open an elevated PowerShell console and run the <drive letter>\AzureStack_Installer\asdk-installer.ps1 PowerShell script. Be aware that the script might now be on a different drive than C:\ in the CloudBuilder.vhdx image. Click Install.

In the Identity Provider Type drop-down box, select Azure China Cloud, Azure US Government Cloud, AD FS, or Azure Cloud. Under Local Administrator Password type the local admin password (which must match the current configured local admin password) in the Password box, and then click Next.
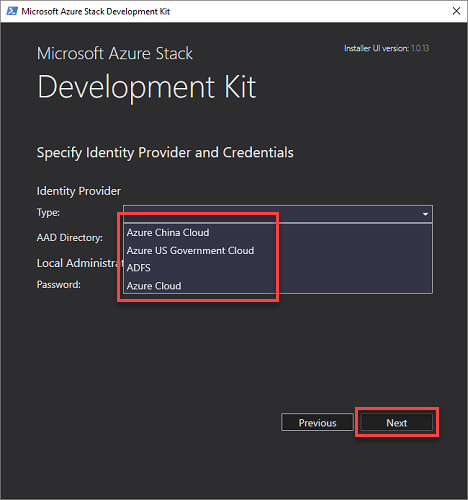
If you choose an Azure subscription identity provider, you need an internet connection, the full name of a Microsoft Entra directory tenant in the form of domainname.onmicrosoft.com, or a Microsoft Entra ID verified custom domain name. You also need global admin credentials for the specified directory.
After deployment, Microsoft Entra global admin permission isn't required. However, some operations may require the global admin credential. For example, a resource provider installer script or a new feature requiring a permission to be granted. You can either temporarily reinstate the account's global admin permissions or use a separate global admin account that's an owner of the default provider subscription.
When using AD FS as the identity provider, the default stamp directory service is used. The default account to sign in with is azurestackadmin@azurestack.local, and the password to use is the one you provided as part of setup.
Note
For best results, even if you want to use a disconnected Azure Stack environment using AD FS as the identity provider, it's best to install the ASDK while connected to the internet. That way, the Windows Server 2016 evaluation version included with the ASDK installation can be activated at deployment time.
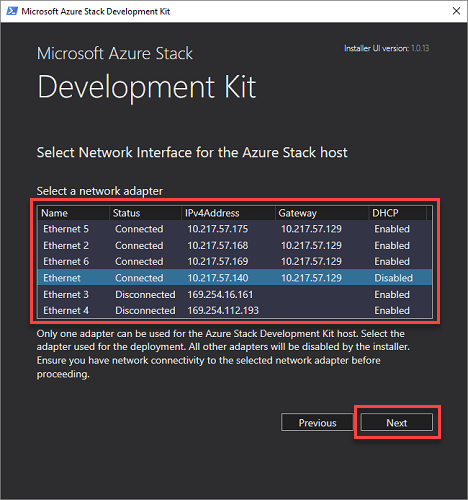
Select a network adapter to use for the ASDK and then click Next.
On the Network Configuration page, provide a valid Time server IP address. This required field sets the time server to be used by the ASDK. This parameter must be provided as a valid time server IP address. Server names aren't supported.
Tip
To find a time server IP address, visit ntppool.org or ping time.windows.com.
Optionally, you can provide a DNS forwarder IP address. A DNS server is created as part of the Azure Stack deployment. To allow computers inside the solution to resolve names outside of the stamp, provide your existing infrastructure DNS server. The in-stamp DNS server forwards unknown name resolution requests to this server.

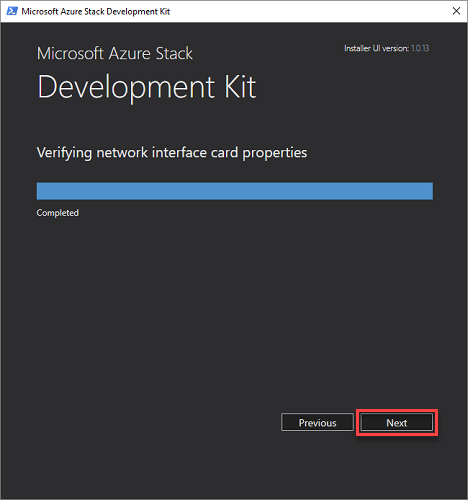
On the Verifying network interface card properties page, you'll see a progress bar. When verification is complete, click Next.
On Summary page, click Deploy to start ASDK installation on the ASDK host computer.

Tip
Here you can also copy the PowerShell setup commands that'll be used to install the ASDK. This is helpful if you ever need to redeploy the ASDK on the host computer using PowerShell.
If you're doing a Microsoft Entra deployment, you'll be prompted to enter your Microsoft Entra global admin account credentials a few minutes after setup starts.
The deployment process will take a few hours, during which time the host computer will automatically reboot once. If you want to monitor the deployment progress, sign in as azurestack\AzureStackAdmin after the ASDK host restarts. When the deployment succeeds, the PowerShell console displays: COMPLETE: Action 'Deployment'.
Important
If you sign in as a local admin after the machine is joined to the azurestack domain, you won't see the deployment progress. Don't rerun deployment, instead sign in as azurestack\AzureStackAdmin to validate that it's running.
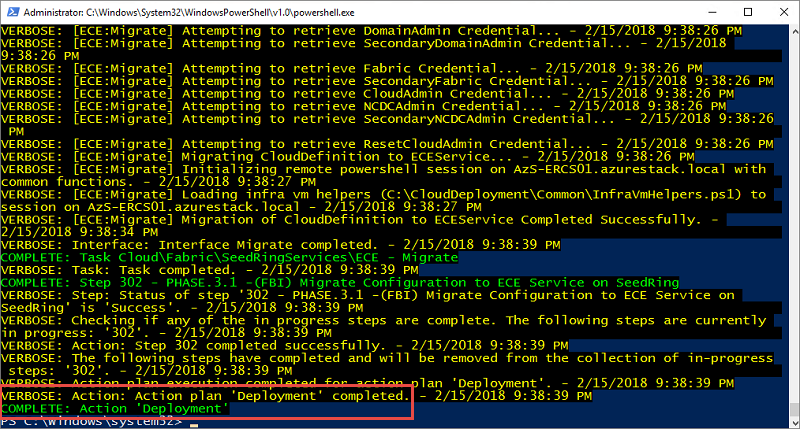
Congratulations, you've successfully installed the ASDK!
If the deployment fails for some reason, you can redeploy from scratch or use the following PowerShell commands to restart the deployment from the last successful step. The commands can be used from the same elevated Powershell window:
cd C:\CloudDeployment\Setup
.\InstallAzureStackPOC.ps1 -Rerun
Next steps
Feedback
Coming soon: Throughout 2024 we will be phasing out GitHub Issues as the feedback mechanism for content and replacing it with a new feedback system. For more information see: https://aka.ms/ContentUserFeedback.
Submit and view feedback for