Build a real-time code-streaming app by using Socket.IO and host it on Azure
Building a real-time experience like the co-creation feature in Microsoft Word can be challenging.
Through its easy-to-use APIs, Socket.IO has proven itself as a library for real-time communication between clients and a server. However, Socket.IO users often report difficulty around scaling Socket.IO's connections. With Web PubSub for Socket.IO, developers no longer need to worry about managing persistent connections.
Overview
This article shows how to build an app that allows a coder to stream coding activities to an audience. You build this application by using:
- Monaco Editor, the code editor that powers Visual Studio Code.
- Express, a Node.js web framework.
- APIs that the Socket.IO library provides for real-time communication.
- Host Socket.IO connections that use Web PubSub for Socket.IO.
The finished app
The finished app allows the user of a code editor to share a web link through which people can watch the typing.
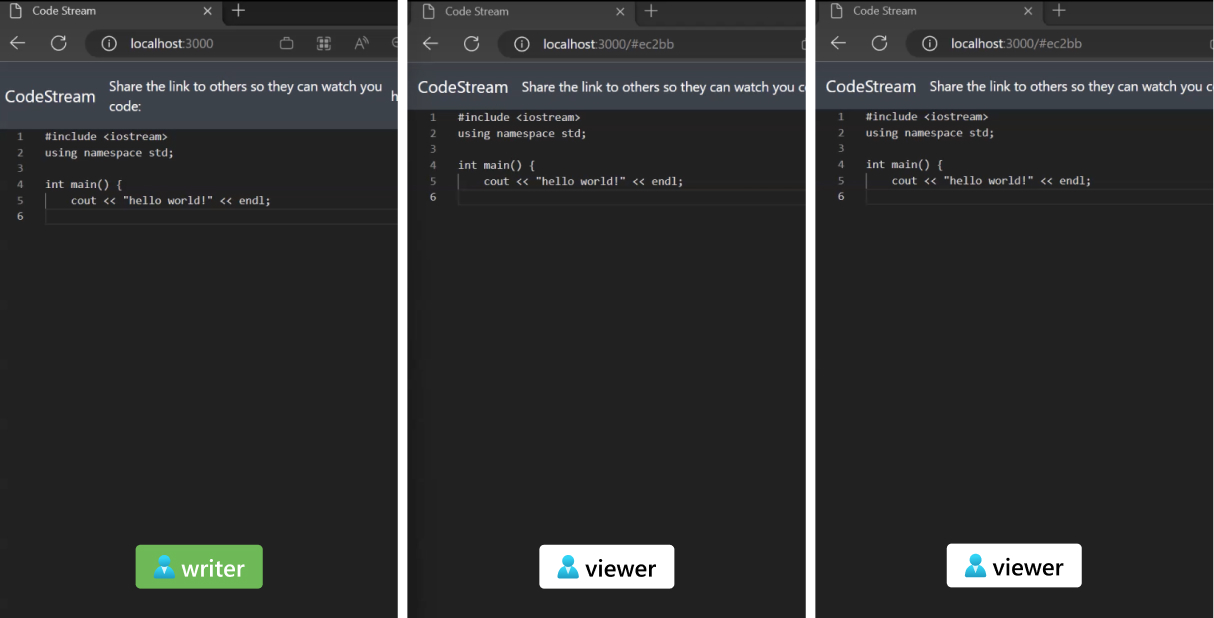
To keep the procedures focused and digestible in around 15 minutes, this article defines two user roles and what they can do in the editor:
- A writer, who can type in the online editor and the content is streamed
- Viewers, who receive real-time content typed by the writer and can't edit the content
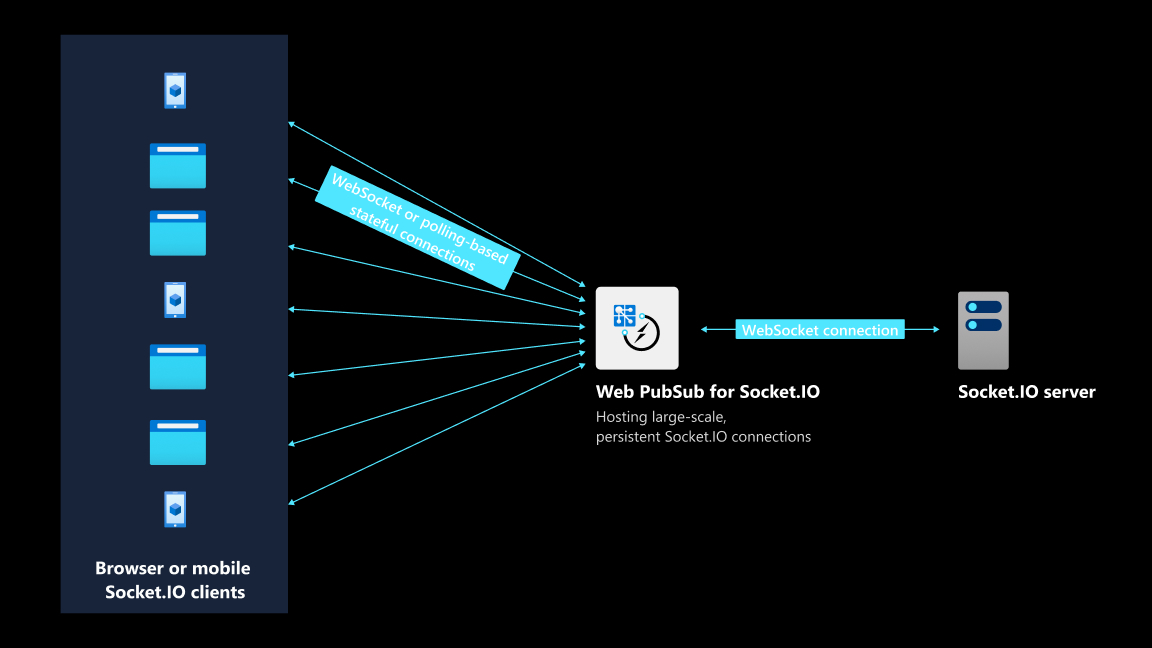
Architecture
| Item | Purpose | Benefits |
|---|---|---|
| Socket.IO library | Provides a low-latency, bidirectional data exchange mechanism between the back-end application and clients | Easy-to-use APIs that cover most real-time communication scenarios |
| Web PubSub for Socket.IO | Hosts WebSocket or poll-based persistent connections with Socket.IO clients | Support for 100,000 concurrent connections; simplified application architecture |
Prerequisites
To follow all the steps in this article, you need:
- An Azure account. If you don't have an Azure subscription, create an Azure free account before you begin.
- The Azure CLI (version 2.29.0 or later) or Azure Cloud Shell to manage Azure resources.
- Basic familiarity with Socket.IO's APIs.
Create a Web PubSub for Socket.IO resource
Use the Azure CLI to create the resource:
az webpubsub create -n <resource-name> \
                    -l <resource-location> \
                    -g <resource-group> \
                    --kind SocketIO \
                    --sku Free_F1
Get a connection string
A connection string allows you to connect with Web PubSub for Socket.IO.
Run the following commands. Keep the returned connection string somewhere, because you'll need it when you run the application later in this article.
az webpubsub key show -n <resource-name> \
                      -g <resource-group> \
                      --query primaryKey \
                      -o tsv
Write the application's server-side code
Start writing your application's code by working on the server side.
Build an HTTP server
Create a Node.js project:
mkdir codestream
cd codestream
npm init
Install the server SDK and Express:
npm install @azure/web-pubsub-socket.io
npm install express
Import required packages and create an HTTP server to serve static files:
/*server.js*/

// Import required packages
const express = require('express');
const path = require('path');

// Create an HTTP server based on Express
const app = express();
const server = require('http').createServer(app);

app.use(express.static(path.join(__dirname, 'public')));
Define an endpoint called
/negotiate. A writer client hits this endpoint first. This endpoint returns an HTTP response. The response contains an endpoint that the client should use to establish a persistent connection. It also returns aroomvalue that the client is assigned to./*server.js*/ app.get('/negotiate', async (req, res) => { res.json({ url: endpoint room_id: Math.random().toString(36).slice(2, 7), }); }); // Make the Socket.IO server listen on port 3000 io.httpServer.listen(3000, () => { console.log('Visit http://localhost:%d', 3000); });
Create the Web PubSub for Socket.IO server
Import the Web PubSub for Socket.IO SDK and define options:
/*server.js*/
const { useAzureSocketIO } = require("@azure/web-pubsub-socket.io");

const wpsOptions = {
    hub: "codestream",
    connectionString: process.argv[2]
}
Create a Web PubSub for Socket.IO server:
/*server.js*/

const io = require("socket.io")();
useAzureSocketIO(io, wpsOptions);
The two steps are slightly different from how you would normally create a Socket.IO server, as described in this Socket.IO documentation. With these two steps, your server-side code can offload managing persistent connections to an Azure service. With the help of an Azure service, your application server acts only as a lightweight HTTP server.
Implement business logic
Now that you've created a Socket.IO server hosted by Web PubSub, you can define how the clients and server communicate by using Socket.IO's APIs. This process is called implementing business logic.
After a client is connected, the application server tells the client that it's logged in by sending a custom event named
login./*server.js*/ io.on('connection', socket => { socket.emit("login"); });Each client emits two events that the server can respond to:
joinRoomandsendToRoom. After the server gets theroom_idvalue that a client wants to join, you usesocket.joinfrom Socket.IO's API to join the target client to the specified room./*server.js*/ socket.on('joinRoom', async (message) => { const room_id = message["room_id"]; await socket.join(room_id); });After a client is joined, the server informs the client of the successful result by sending a
messageevent. When the client receives amessageevent with a type ofackJoinRoom, the client can ask the server to send the latest editor state./*server.js*/ socket.on('joinRoom', async (message) => { // ... socket.emit("message", { type: "ackJoinRoom", success: true }) });/*client.js*/ socket.on("message", (message) => { let data = message; if (data.type === 'ackJoinRoom' && data.success) { sendToRoom(socket, `${room_id}-control`, { data: 'sync'}); } // ... });When a client sends a
sendToRoomevent to the server, the server broadcasts the changes to the code editor state to the specified room. All clients in the room can now receive the latest update.socket.on('sendToRoom', (message) => { const room_id = message["room_id"] const data = message["data"] socket.broadcast.to(room_id).emit("message", { type: "editorMessage", data: data }); });
Write the application's client-side code
Now that the server-side procedures are finished, you can work on the client side.
Initial setup
You need to create a Socket.IO client to communicate with the server. The question is which server the client should establish a persistent connection with. Because you're using Web PubSub for Socket.IO, the server is an Azure service. Recall that you defined a /negotiate route to serve clients an endpoint to Web PubSub for Socket.IO.
/*client.js*/

async function initialize(url) {
    let data = await fetch(url).json()

    updateStreamId(data.room_id);

    let editor = createEditor(...); // Create an editor component

    var socket = io(data.url, {
        path: "/clients/socketio/hubs/codestream",
    });

    return [socket, editor, data.room_id];
}
The initialize(url) function organizes a few setup operations together:
- Fetches the endpoint to an Azure service from your HTTP server
- Creates a Monaco Editor instance
- Establishes a persistent connection with Web PubSub for Socket.IO
Writer client
As mentioned earlier, you have two user roles on the client side: writer and viewer. Anything that the writer types is streamed to the viewer's screen.
Get the endpoint to Web PubSub for Socket.IO and the
room_idvalue:/*client.js*/ let [socket, editor, room_id] = await initialize('/negotiate');When the writer client is connected with the server, the server sends a
loginevent to the writer. The writer can respond by asking the server to join itself to a specified room. Every 200 milliseconds, the writer client sends the latest editor state to the room. A function namedflushorganizes the sending logic./*client.js*/ socket.on("login", () => { updateStatus('Connected'); joinRoom(socket, `${room_id}`); setInterval(() => flush(), 200); // Update editor content // ... });If a writer doesn't make any edits,
flush()does nothing and simply returns. Otherwise, the changes to the editor state are sent to the room./*client.js*/ function flush() { // No changes from editor need to be flushed if (changes.length === 0) return; // Broadcast the changes made to editor content sendToRoom(socket, room_id, { type: 'delta', changes: changes version: version++, }); changes = []; content = editor.getValue(); }When a new viewer client is connected, the viewer needs to get the latest complete state of the editor. To achieve this, a message that contains
syncdata is sent to the writer client. The message asks the writer client to send the complete editor state./*client.js*/ socket.on("message", (message) => { let data = message.data; if (data.data === 'sync') { // Broadcast the full content of the editor to the room sendToRoom(socket, room_id, { type: 'full', content: content version: version, }); } });
Viewer client
Like the writer client, the viewer client creates its Socket.IO client through
initialize(). When the viewer client is connected and receives aloginevent from the server, it asks the server to join itself to the specified room. The queryroom_idspecifies the room./*client.js*/ let [socket, editor] = await initialize(`/register?room_id=${room_id}`) socket.on("login", () => { updateStatus('Connected'); joinRoom(socket, `${room_id}`); });When a viewer client receives a
messageevent from the server and the data type isackJoinRoom, the viewer client asks the writer client in the room to send the complete editor state./*client.js*/ socket.on("message", (message) => { let data = message; // Ensures the viewer client is connected if (data.type === 'ackJoinRoom' && data.success) { sendToRoom(socket, `${id}`, { data: 'sync'}); } else //... });If the data type is
editorMessage, the viewer client updates the editor according to its actual content./*client.js*/ socket.on("message", (message) => { ... else if (data.type === 'editorMessage') { switch (data.data.type) { case 'delta': // ... Let editor component update its status break; case 'full': // ... Let editor component update its status break; } } });Implement
joinRoom()andsendToRoom()by using Socket.IO's APIs:/*client.js*/ function joinRoom(socket, room_id) { socket.emit("joinRoom", { room_id: room_id, }); } function sendToRoom(socket, room_id, data) { socket.emit("sendToRoom", { room_id: room_id, data: data }); }
Run the application
Locate the repo
The preceding sections covered the core logic related to synchronizing the editor state between viewers and the writer. You can find the complete code in the examples repository.
Clone the repo
You can clone the repo and run npm install to install project dependencies.
Start the server
node server.js <web-pubsub-connection-string>
This is the connection string that you received in an earlier step.
Play with the real-time code editor
Open http://localhost:3000 on a browser tab. Open another tab with the URL displayed on the first webpage.
If you write code on the first tab, you should see your typing reflected in real time on the other tab. Web PubSub for Socket.IO facilitates message passing in the cloud. Your express server only serves the static index.html file and the /negotiate endpoint.
Feedback
Coming soon: Throughout 2024 we will be phasing out GitHub Issues as the feedback mechanism for content and replacing it with a new feedback system. For more information see: https://aka.ms/ContentUserFeedback.
Submit and view feedback for