Use Azure Pipelines to build and deploy an HPC solution
Azure DevOps tools can automate building and testing Azure Batch high performance computing (HPC) solutions. Azure Pipelines provides modern continuous integration (CI) and continuous deployment (CD) processes for building, deploying, testing, and monitoring software. These processes accelerate your software delivery, allowing you to focus on your code rather than support infrastructure and operations.
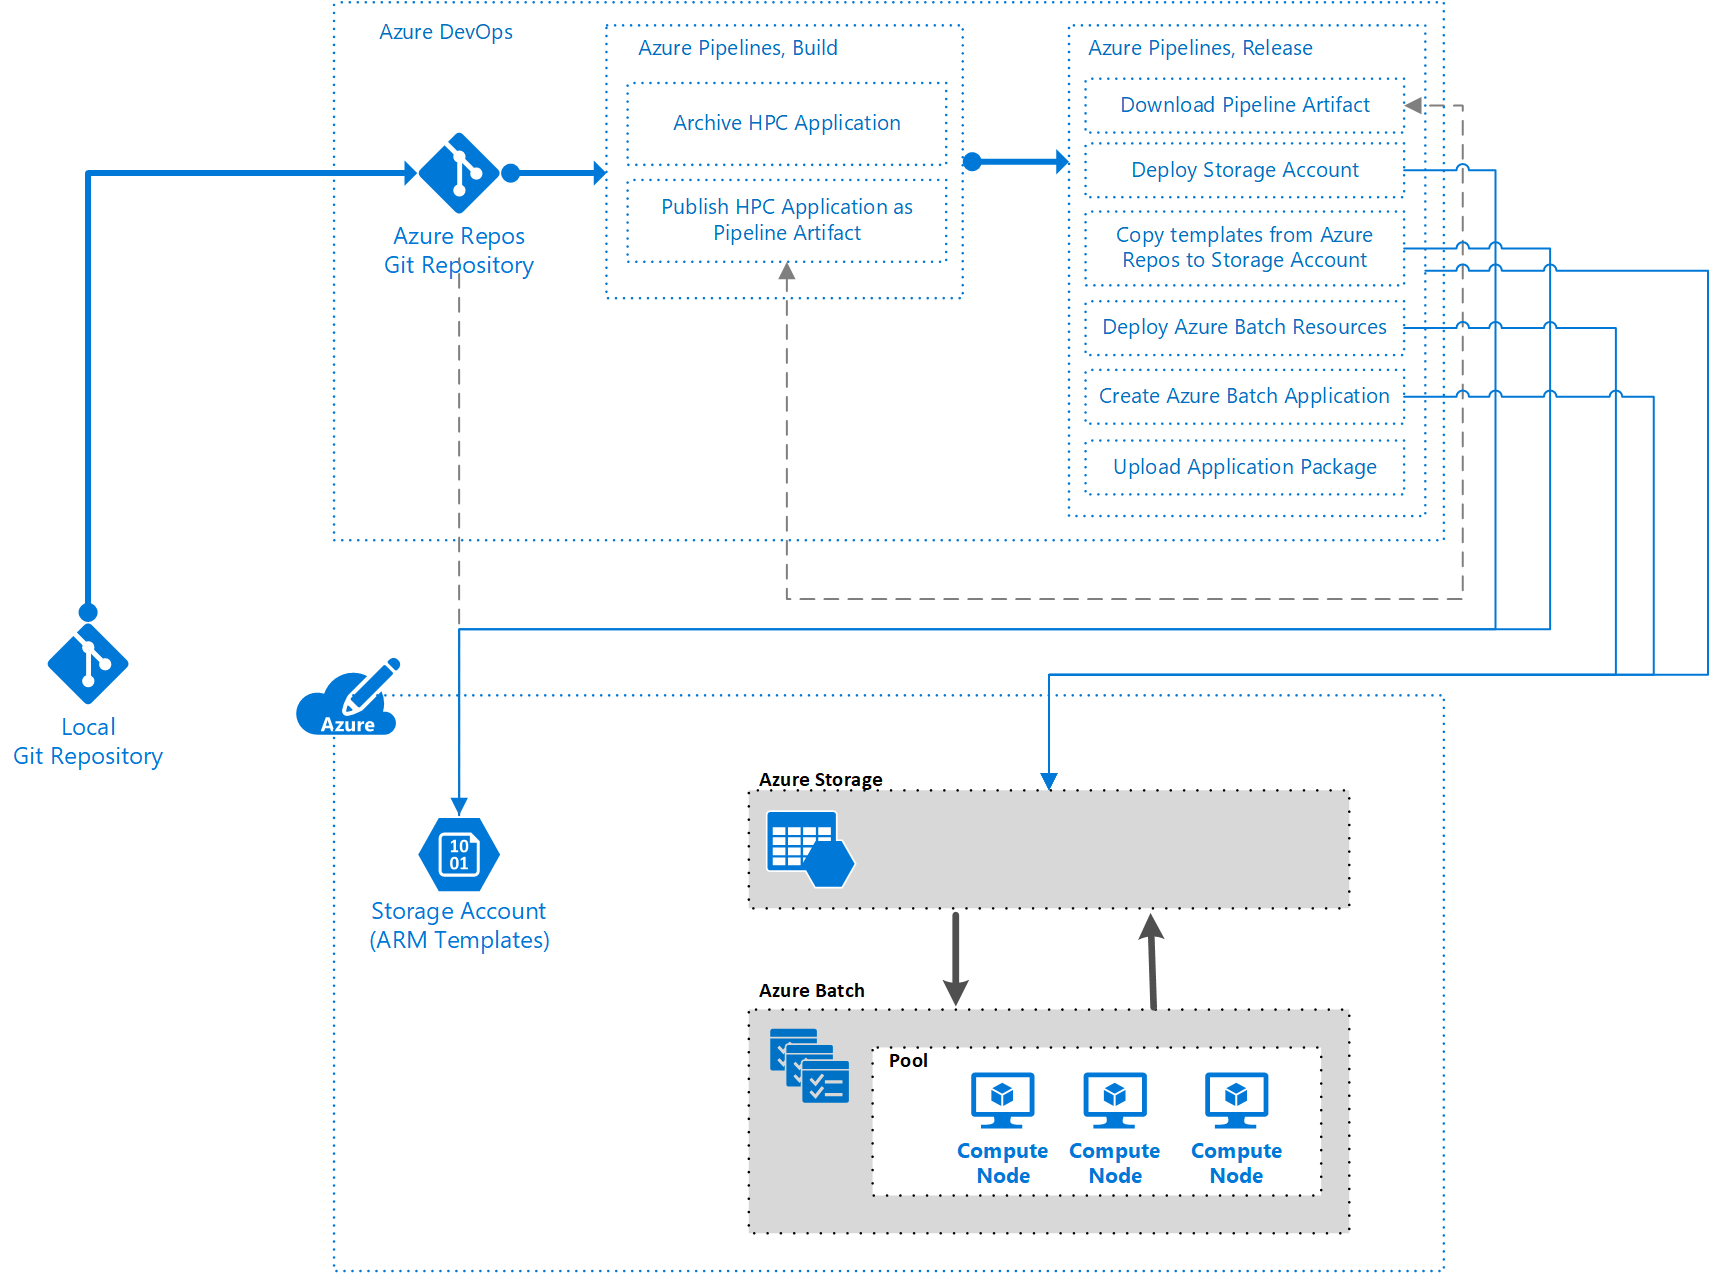
This article shows how to set up CI/CD processes by using Azure Pipelines with Azure Resource Manager templates (ARM templates) to deploy HPC solutions on Azure Batch. The example creates a build and release pipeline to deploy an Azure Batch infrastructure and release an application package. The following diagram shows the general deployment flow, assuming the code is developed locally:
Prerequisites
To follow the steps in this article, you need:
An Azure DevOps organization, and an Azure DevOps project with an Azure Repos repository created in the organization. You must have Project Administrator, Build Administrator, and Release Administrator roles in the Azure DevOps project.
An active Azure subscription with Owner or other role that includes role assignment abilities. For more information, see Understand Azure role assignments.
A basic understanding of source control and ARM template syntax.
Prepare the solution
The example in this article uses several ARM templates and an existing open-source video processing application, FFmpeg. You can copy or download these resources and push them to your Azure Repos repository.
Important
This example deploys Windows software on Windows-based Batch nodes. Azure Pipelines, ARM templates, and Batch also fully support Linux software and nodes.
Understand the ARM templates
Three capability templates, similar to units or modules, implement specific pieces of functionality. An end-to-end solution template then deploys the underlying capability templates. This linked template structure allows each capability template to be individually tested and reused across solutions.
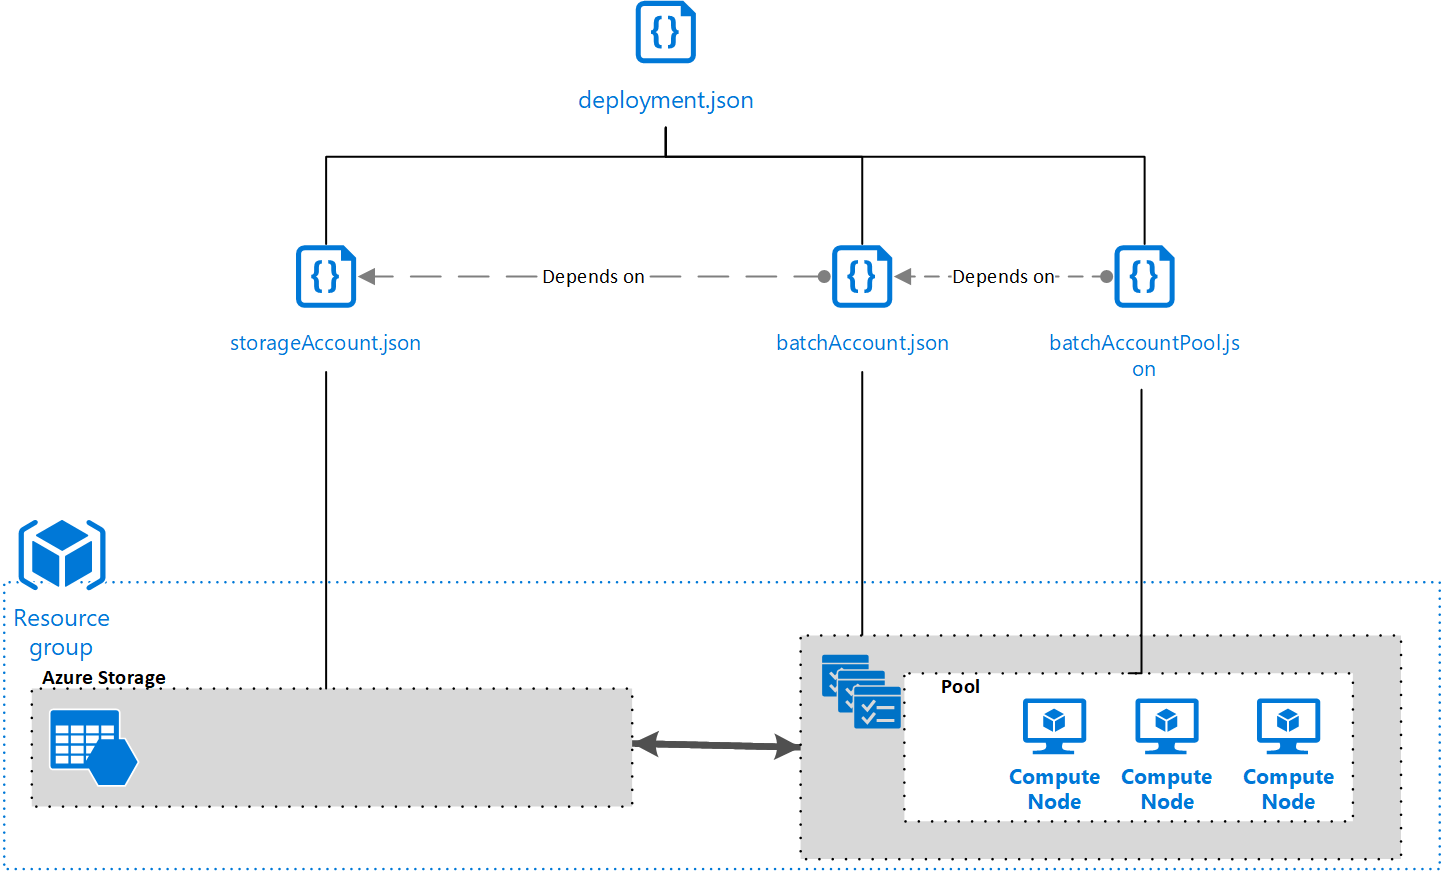
For detailed information about the templates, see the Resource Manager template reference guide for Microsoft.Batch resource types.
Storage account template
Save the following code as a file named storageAccount.json. This template defines an Azure Storage account, which is required to deploy the application to the Batch account.
{
    "$schema": "https://schema.management.azure.com/schemas/2015-01-01/deploymentTemplate.json#",
    "contentVersion": "1.0.0.0",
    "parameters": {
        "accountName": {
            "type": "string",
            "metadata": {
                 "description": "Name of the Azure Storage Account"
             }
         }
    },
    "variables": {},
    "resources": [
        {
            "type": "Microsoft.Storage/storageAccounts",
            "name": "[parameters('accountName')]",
            "sku": {
                "name": "Standard_LRS"
            },
            "apiVersion": "2018-02-01",
            "location": "[resourceGroup().location]",
            "properties": {}
        }
    ],
    "outputs": {
        "blobEndpoint": {
          "type": "string",
          "value": "[reference(resourceId('Microsoft.Storage/storageAccounts', parameters('accountName'))).primaryEndpoints.blob]"
        },
        "resourceId": {
          "type": "string",
          "value": "[resourceId('Microsoft.Storage/storageAccounts', parameters('accountName'))]"
        }
    }
}
Batch account template
Save the following code as a file named batchAccount.json. This template defines a Batch account. The Batch account acts as a platform to run applications across node pools.
{
    "$schema": "https://schema.management.azure.com/schemas/2015-01-01/deploymentTemplate.json#",
    "contentVersion": "1.0.0.0",
    "parameters": {
        "batchAccountName": {
           "type": "string",
           "metadata": {
                "description": "Name of the Azure Batch Account"
            }
        },
        "storageAccountId": {
           "type": "string",
           "metadata": {
                "description": "ID of the Azure Storage Account"
            }
        }
    },
    "variables": {},
    "resources": [
        {
            "name": "[parameters('batchAccountName')]",
            "type": "Microsoft.Batch/batchAccounts",
            "apiVersion": "2017-09-01",
            "location": "[resourceGroup().location]",
            "properties": {
              "poolAllocationMode": "BatchService",
              "autoStorage": {
                  "storageAccountId": "[parameters('storageAccountId')]"
              }
            }
          }
    ],
    "outputs": {}
}
Batch pool template
Save the following code as a file named batchAccountPool.json. This template creates a node pool and nodes in the Batch account.
{
    "$schema": "https://schema.management.azure.com/schemas/2015-01-01/deploymentTemplate.json#",
    "contentVersion": "1.0.0.0",
    "parameters": {
        "batchAccountName": {
           "type": "string",
           "metadata": {
                "description": "Name of the Azure Batch Account"
           }
        },
        "batchAccountPoolName": {
            "type": "string",
            "metadata": {
                 "description": "Name of the Azure Batch Account Pool"
             }
         }
    },
    "variables": {},
    "resources": [
        {
            "name": "[concat(parameters('batchAccountName'),'/', parameters('batchAccountPoolName'))]",
            "type": "Microsoft.Batch/batchAccounts/pools",
            "apiVersion": "2017-09-01",
            "properties": {
                "deploymentConfiguration": {
                    "virtualMachineConfiguration": {
                        "imageReference": {
                            "publisher": "MicrosoftWindowsServer",
                            "offer": "WindowsServer",
                            "sku": "2022-datacenter",
                            "version": "latest"
                        },
                        "nodeAgentSkuId": "batch.node.windows amd64"
                    }
                },
                "vmSize": "Standard_D2s_v3"
            }
          }
    ],
    "outputs": {}
}
Orchestrator template
Save the following code as a file named deployment.json. This final template acts as an orchestrator to deploy the three underlying capability templates.
{
    "$schema": "https://schema.management.azure.com/schemas/2015-01-01/deploymentTemplate.json#",
    "contentVersion": "1.0.0.0",
    "parameters": {
        "StorageContainerUri": {
           "type": "string",
           "metadata": {
                "description": "URI of the Blob Storage Container containing the Azure Resource Manager templates"
            }
        },
        "StorageContainerSasToken": {
           "type": "string",
           "metadata": {
                "description": "The SAS token of the container containing the Azure Resource Manager templates"
            }
        },
        "applicationStorageAccountName": {
            "type": "string",
            "metadata": {
                 "description": "Name of the Azure Storage Account"
            }
         },
        "batchAccountName": {
            "type": "string",
            "metadata": {
                 "description": "Name of the Azure Batch Account"
            }
         },
         "batchAccountPoolName": {
             "type": "string",
             "metadata": {
                  "description": "Name of the Azure Batch Account Pool"
              }
          }
    },
    "variables": {},
    "resources": [
        {
            "apiVersion": "2017-05-10",
            "name": "storageAccountDeployment",
            "type": "Microsoft.Resources/deployments",
            "properties": {
                "mode": "Incremental",
                "templateLink": {
                  "uri": "[concat(parameters('StorageContainerUri'), 'arm-templates/storageAccount.json', parameters('StorageContainerSasToken'))]",
                  "contentVersion": "1.0.0.0"
                },
                "parameters": {
                    "accountName": {"value": "[parameters('applicationStorageAccountName')]"}
                }
            }
        },
        {
            "apiVersion": "2017-05-10",
            "name": "batchAccountDeployment",
            "type": "Microsoft.Resources/deployments",
            "dependsOn": [
                "storageAccountDeployment"
            ],
            "properties": {
                "mode": "Incremental",
                "templateLink": {
                  "uri": "[concat(parameters('StorageContainerUri'), 'arm-templates/batchAccount.json', parameters('StorageContainerSasToken'))]",
                  "contentVersion": "1.0.0.0"
                },
                "parameters": {
                    "batchAccountName": {"value": "[parameters('batchAccountName')]"},
                    "storageAccountId": {"value": "[reference('storageAccountDeployment').outputs.resourceId.value]"}
                }
            }
        },
        {
            "apiVersion": "2017-05-10",
            "name": "poolDeployment",
            "type": "Microsoft.Resources/deployments",
            "dependsOn": [
                "batchAccountDeployment"
            ],
            "properties": {
                "mode": "Incremental",
                "templateLink": {
                  "uri": "[concat(parameters('StorageContainerUri'), 'arm-templates/batchAccountPool.json', parameters('StorageContainerSasToken'))]",
                  "contentVersion": "1.0.0.0"
                },
                "parameters": {
                    "batchAccountName": {"value": "[parameters('batchAccountName')]"},
                    "batchAccountPoolName": {"value": "[parameters('batchAccountPoolName')]"}
                }
            }
        }
    ],
    "outputs": {}
}
Set up your repository
Upload the ARM templates, FFmpeg app, and a YAML build definition file into your Azure Repos repository.
Upload the four ARM templates to an arm-templates folder in your repository.
For the application package, download and extract the Windows 64-bit version of FFmpeg 4.3.1, and upload it to a hpc-application folder in your repository.
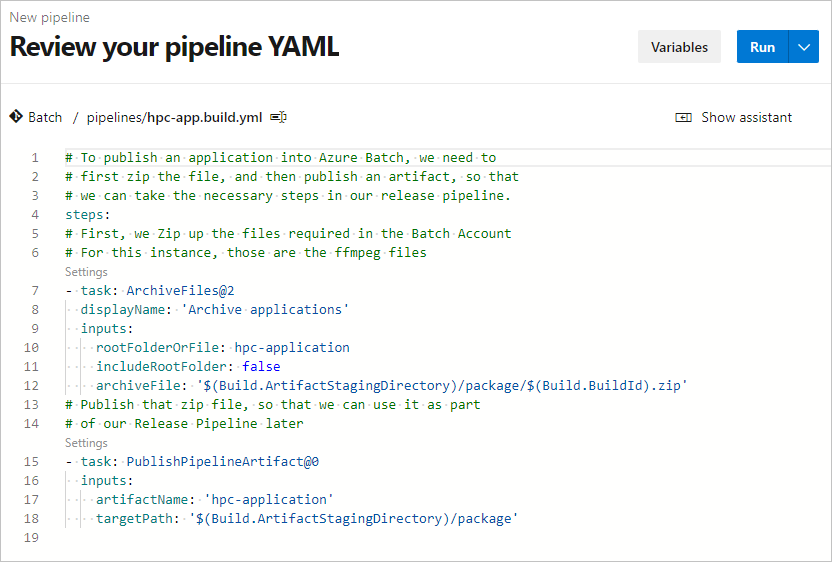
For the build definition, save the following definition as a file named hpc-app.build.yml, and upload it to a pipelines folder in your repository.
# To publish an application into Batch, you need to
# first zip the file, and then publish an artifact, so
# you can take the necessary steps in your release pipeline.
steps:
# First, zip up the files required in the Batch account.
# For this instance, those are the ffmpeg files.
- task: ArchiveFiles@2
  displayName: 'Archive applications'
  inputs:
    rootFolderOrFile: hpc-application
    includeRootFolder: false
    archiveFile: '$(Build.ArtifactStagingDirectory)/package/$(Build.BuildId).zip'
# Publish the zip file, so you can use it as part
# of your Release pipeline later.
- task: PublishPipelineArtifact@0
  inputs:
    artifactName: 'hpc-application'
    targetPath: '$(Build.ArtifactStagingDirectory)/package'
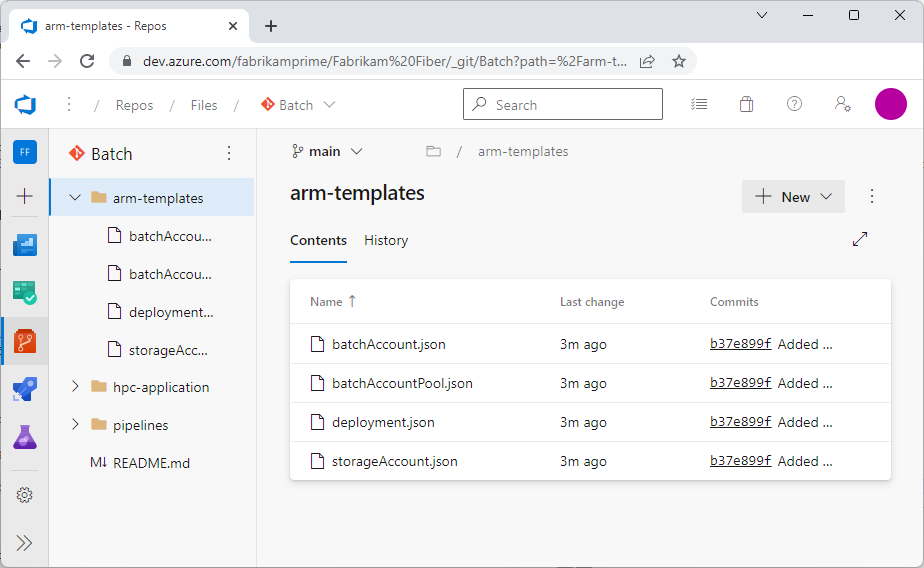
When you're finished setting up your repository, the folder structure should have the following main sections:
- An arm-templates folder that contains the ARM templates.
- A hpc-application folder that contains ffmpeg.
- A pipelines folder that contains the YAML build definition file for the Build pipeline.
Note
This example codebase structure demonstrates that you can store application, infrastructure, and pipeline code in the same repository.
Create the Azure pipeline
After you set up the source code repository, use Azure Pipelines to implement a build, test, and deployment pipeline for your application. In this stage of a pipeline, you typically run tests to validate code and build pieces of the software. The number and types of tests, and any other tasks that you run, depend on your overall build and release strategy.
Create the Build pipeline
In this section, you create a YAML build pipeline to work with the ffmpeg software that runs in the Batch account.
In your Azure DevOps project, select Pipelines from the left navigation, and then select New pipeline.
On the Where is your code screen, select Azure Repos Git.
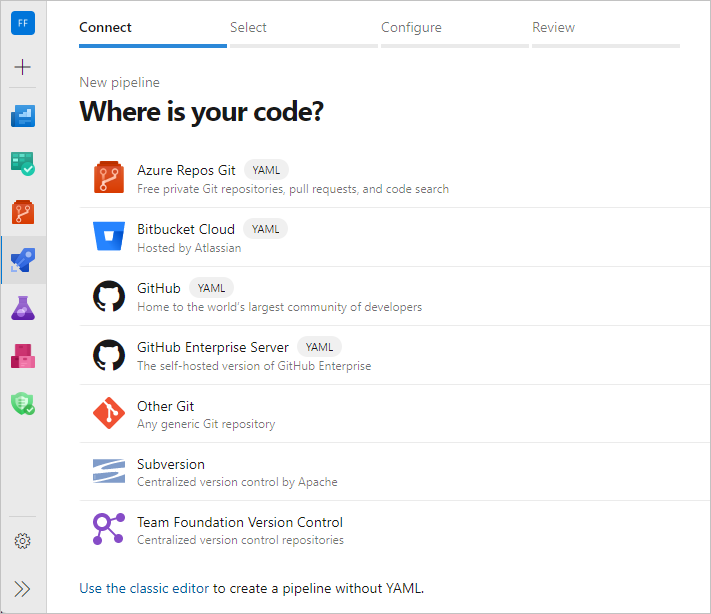
On the Select a repository screen, select your repository.
Note
You can also create a build pipeline by using a visual designer. On the New pipeline page, select Use the classic editor. You can use a YAML template in the visual designer. For more information, see Define your Classic pipeline.
On the Configure your pipeline screen, select Existing Azure Pipelines YAML file.
On the Select an existing YAML file screen, select the hpc-app.build.yml file from your repository, and then select Continue.
On the Review your pipeline YAML screen, review the build configuration, and then select Run, or select the dropdown caret next to Run and select Save. This template enables continuous integration, so the build automatically triggers when a new commit to the repository meets the conditions set in the build.
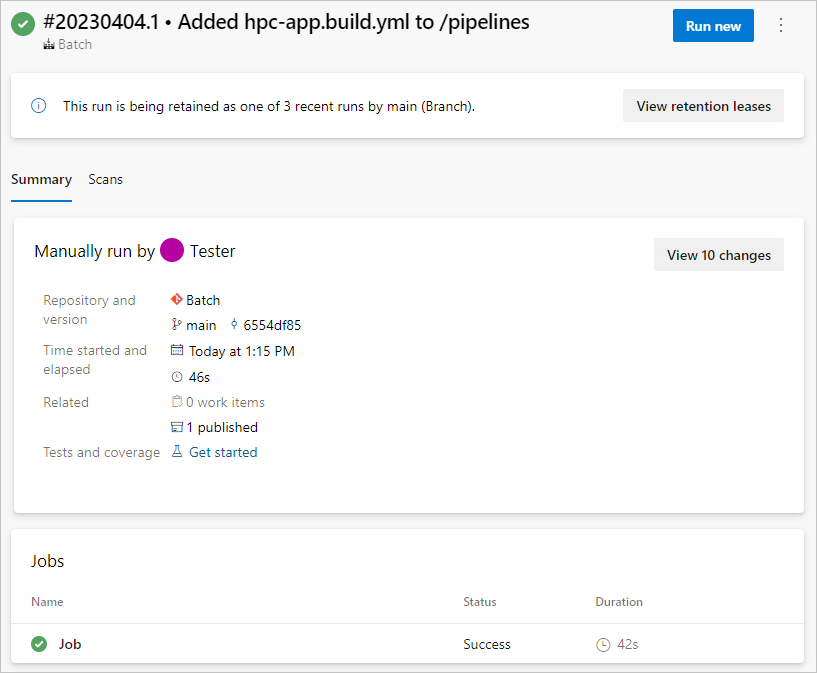
You can view live build progress updates. To see build outcomes, select the appropriate run from your build definition in Azure Pipelines.
Note
If you use a client application to run your HPC solution, you need to create a separate build definition for that application. For how-to guides, see the Azure Pipelines documentation.
Create the Release pipeline
You use an Azure Pipelines Release pipeline to deploy your application and underlying infrastructure. Release pipelines enable CD and automate your release process. There are several steps to deploy your application and underlying infrastructure.
The linked templates for this solution must be accessible from a public HTTP or HTTPS endpoint. This endpoint could be a GitHub repository, an Azure Blob Storage account, or another storage location. To ensure that the uploaded template artifacts remain secure, hold them in a private mode, but access them by using some form of shared access signature (SAS) token.
The following example demonstrates how to deploy an infrastructure and application by using templates from an Azure Storage blob.
Set up the pipeline
In your Azure DevOps project, select Pipelines > Releases in the left navigation.
On the next screen, select New > New release pipeline.
On the Select a template screen, select Empty job, and then close the Stage screen.
Select New release pipeline at the top of the page and rename the pipeline to something relevant for your pipeline, such as Deploy Azure Batch + Pool.

In the Artifacts section, select Add.
On the Add an artifact screen, select Build and then select your Build pipeline to get the output for the HPC application.
Note
You can create a Source alias or accept the default. Take note of the Source alias value, as you need it to create tasks in the release definition.
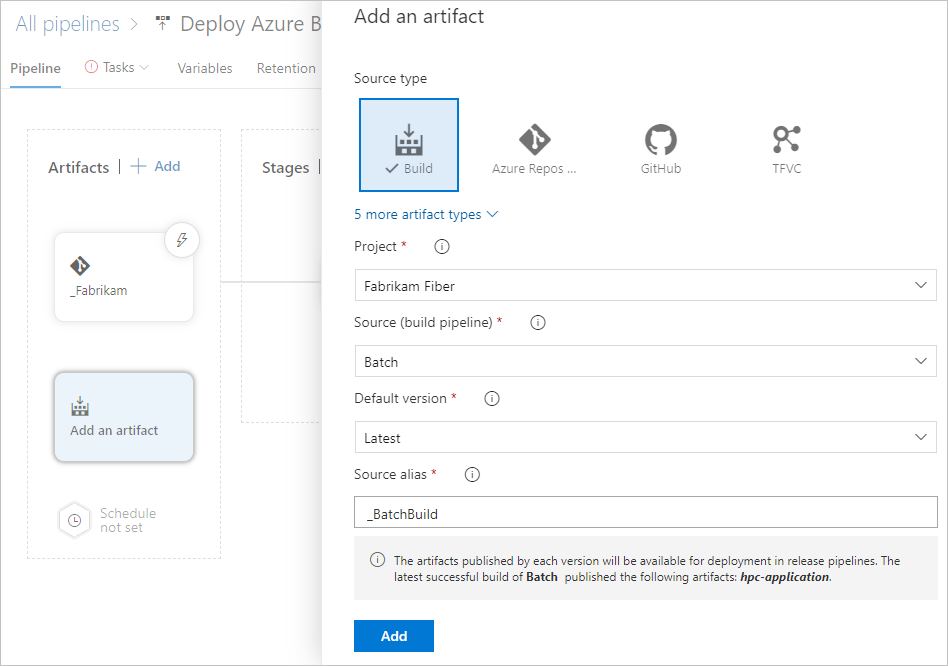
Select Add.
On the pipeline page, select Add next to Artifacts to create a link to another artifact, your Azure Repos repository. This link is required to access the ARM templates in your repository. ARM templates don't need compilation, so you don't need to push them through a build pipeline.
Note
Again note the Source alias value to use later.
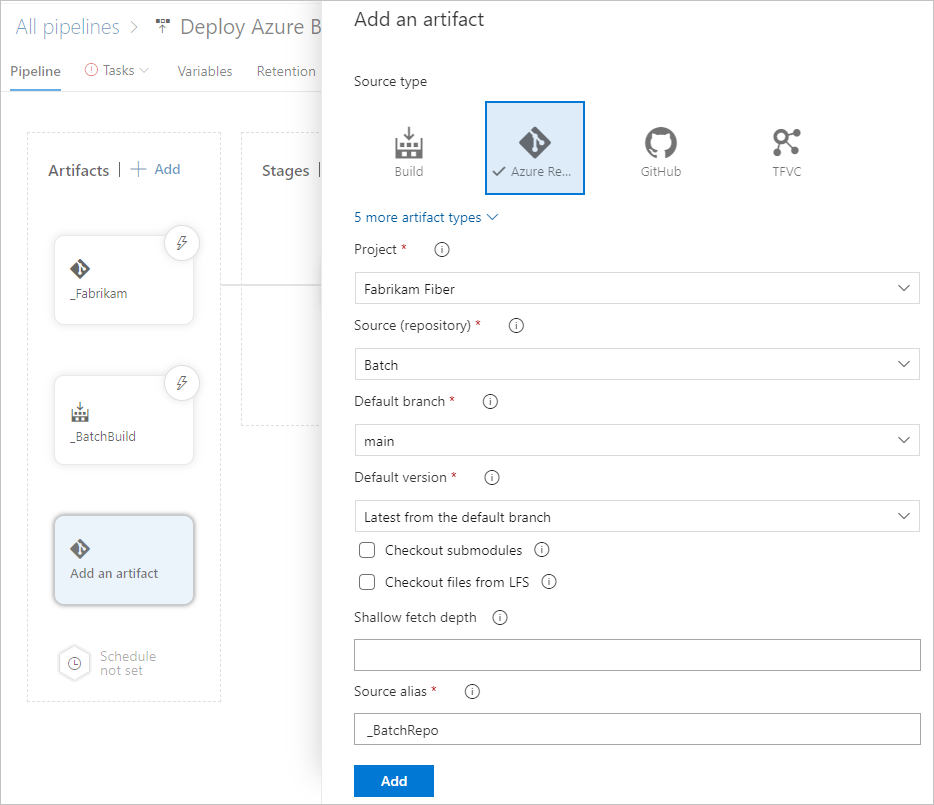
Select the Variables tab. Create the following variables in your pipeline so you don't have to reenter the same information into multiple tasks.
Name Value applicationStorageAccountName Name for the storage account to hold the HPC application binaries. batchAccountApplicationName Name for the application in the Batch account. batchAccountName Name for the Batch account. batchAccountPoolName Name for the pool of virtual machines (VMs) to do the processing. batchApplicationId Unique ID for the Batch application, of the form: /subscriptions/<subscriptionId>/resourceGroups/<resourceGroupName>^/providers/Microsoft.Batch/batchAccounts/<batchAccountName>^/applications/<batchAccountApplicationName>.
Replace the<subscriptionId>placeholder with your Azure subscription ID, and the other placeholders with the values you set for the other variables in this list.batchApplicationVersion Semantic version of your Batch application, in this case 4.3.1. location Azure region for the resources to be deployed. resourceGroupName Name for the resource group to deploy resources in. storageAccountName Name for the storage account to hold the linked ARM templates. StorageContainerSasToken $(<referenceName>.StorageContainerSasToken). Replace the<referenceNameplaceholder with the Reference name value you configure in the Output Variables section of the following Azure File Copy step.StorageContainerUri $(<referenceName>.StorageContainerUri). Replace the<referenceName>placeholder with the Reference name value you configure in the Output Variables section of the Azure File Copy step.
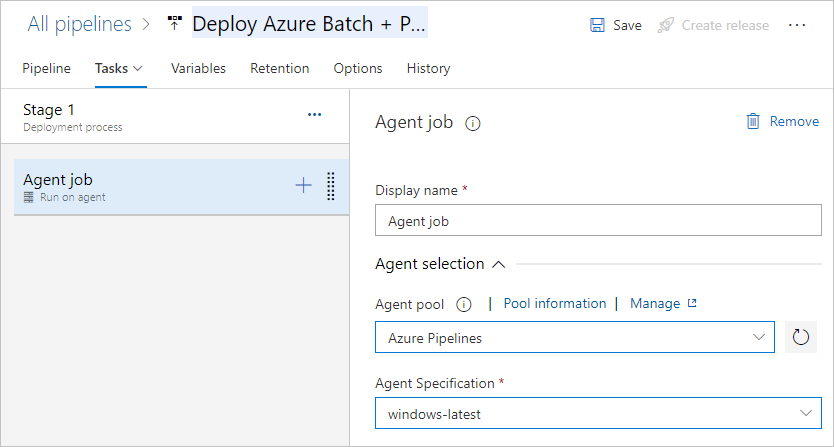
Select the Tasks tab, and then select Agent job.
On the Agent job screen, under Agent pool, select Azure Pipelines.
Under Agent Specification, select windows-latest.
Add tasks
Create six tasks to:
- Download the zipped ffmpeg files.
- Deploy a storage account to host the nested ARM templates.
- Copy the ARM templates to the storage account.
- Deploy the Batch account and required dependencies.
- Create an application in the Batch account.
- Upload the application package to the Batch account.
For each new task that the following steps specify:
Select the + symbol next to Agent job in the left pane.
Search for and select the specified task in the right pane.
Add or select the properties to configure the task.
Select Add.
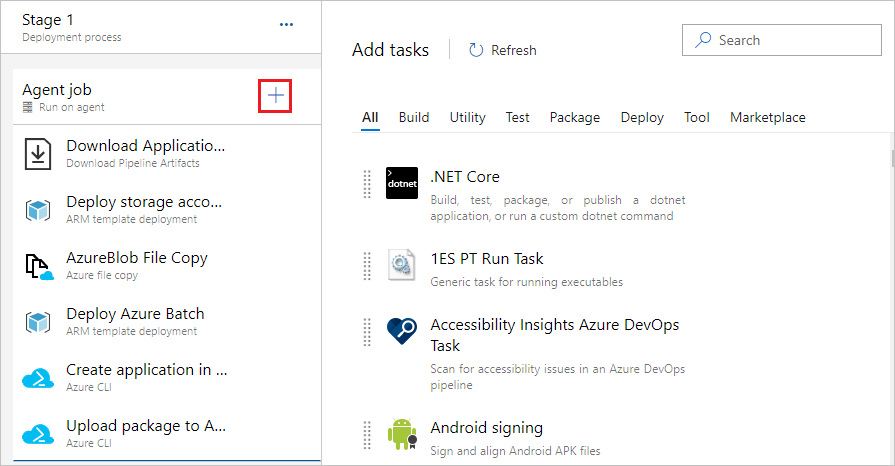
Create the tasks as follows:
Select the Download Pipeline Artifacts task, and set the following properties:
- Display name: Enter Download ApplicationPackage to Agent.
- Artifact name: Enter hpc-application.
- Destination directory: Enter
$(System.DefaultWorkingDirectory).
Create an Azure Storage account to store your ARM templates. You could use an existing storage account, but to support this self-contained example and isolation of content, make a dedicated storage account.
Select the ARM Template deployment: Resource Group scope task, and set the following properties:
- Display name: Enter Deploy storage account for ARM templates.
- Azure Resource Manager connection: Select the appropriate Azure subscription.
- Subscription: Select the appropriate Azure subscription.
- Action: Select Create or update resource group.
- Resource group: Enter
$(resourceGroupName). - Location: Enter
$(location). - Template: Enter
$(System.ArtifactsDirectory)/<AzureRepoArtifactSourceAlias>/arm-templates/storageAccount.json. Replace the<AzureRepoArtifactSourceAlias>placeholder with the repository Source alias you noted previously. - Override template parameters: Enter
-accountName $(storageAccountName).
Upload the artifacts from source control into the storage account. Part of this Azure File Copy task outputs the Storage account container URI and SAS token to a variable, so they can be reused in later steps.
Select the Azure File Copy task, and set the following properties:
- Display name: Enter AzureBlob File Copy.
- Source: Enter
$(System.ArtifactsDirectory)/<AzureRepoArtifactSourceAlias>/arm-templates/. Replace the<AzureRepoArtifactSourceAlias>placeholder with the repository Source alias you noted previously. - Azure Subscription: Select the appropriate Azure subscription.
- Destination Type: Select Azure Blob.
- RM Storage Account: Enter
$(storageAccountName). - Container Name: Enter templates.
- Reference name: Expand Output Variables, then enter ffmpeg.
Note
If this step fails, make sure your Azure DevOps organization has Storage Blob Contributor role in the storage account.
Deploy the orchestrator ARM template to create the Batch account and pool. This template includes parameters for the Storage account container URI and SAS token. The variables required in the ARM template are held in the variables section of the release definition and were set from the AzureBlob File Copy task.
Select the ARM Template deployment: Resource Group scope task, and set the following properties:
- Display name: Enter Deploy Azure Batch.
- Azure Resource Manager connection: Select the appropriate Azure subscription.
- Subscription: Select the appropriate Azure subscription.
- Action: Select Create or update resource group.
- Resource group: Enter
$(resourceGroupName). - Location: Enter
$(location). - Template location: Select URL of the file.
- Template link: Enter
$(StorageContainerUri)arm-templates/deployment.json$(StorageContainerSasToken). - Override template parameters: Enter
-StorageContainerUri $(StorageContainerUri) -StorageContainerSasToken $(StorageContainerSasToken) -applicationStorageAccountName $(applicationStorageAccountName) -batchAccountName $(batchAccountName) -batchAccountPoolName $(batchAccountPoolName).
A common practice is to use Azure Key Vault tasks. If the service principal connected to your Azure subscription has an appropriate access policy set, it can download secrets from Key Vault and be used as a variable in your pipeline. The name of the secret is set with the associated value. For example, you could reference a secret of sshPassword with $(sshPassword) in the release definition.
Call Azure CLI to create an application in Azure Batch.
Select the Azure CLI task, and set the following properties:
- Display name: Enter Create application in Azure Batch account.
- Azure Resource Manager connection: Select the appropriate Azure subscription.
- Script Type: Select PowerShell Core.
- Script Location: Select Inline script.
- Inline Script: Enter
az batch application create --application-name $(batchAccountApplicationName) --name $(batchAccountName) --resource-group $(resourceGroupName).
Call Azure CLI to upload associated packages to the application, in this case the ffmpeg files.
Select the Azure CLI task, and set the following properties:
- Display name: Enter Upload package to Azure Batch account.
- Azure Resource Manager connection: Select the appropriate Azure subscription.
- Script Type: Select PowerShell Core.
- Script Location: Select Inline script.
- Inline Script: Enter
az batch application package create --application-name $(batchAccountApplicationName) --name $(batchAccountName) --resource-group $(resourceGroupName) --version $(batchApplicationVersion) --package-file=$(System.DefaultWorkingDirectory)/$(Release.Artifacts.<AzureBuildArtifactSourceAlias>.BuildId).zip. Replace the<AzureBuildArtifactSourceAlias>placeholder with the Build Source alias you noted previously.
Note
The version number of the application package is set to a variable. The variable allows overwriting previous versions of the package and lets you manually control the package version pushed to Azure Batch.
Create and run the release
When you finish creating all the steps, select Save at the top of the pipeline page, and then select OK.
Select Create release at the top of the page.
To view live release status, select the link at the top of the page that says the release has been created.
To view the log output from the agent, hover over the stage and then select the Logs button.

Test the environment
Once the environment is set up, confirm that the following tests run successfully. Replace the placeholders with your resource group and Batch account values.
Connect to the Batch account
Connect to the new Batch account by using Azure CLI from a command prompt.
- Sign in to your Azure account with
az loginand follow the instructions to authenticate. - Authenticate the Batch account with
az batch account login -g <resourceGroup> -n <batchAccount>.
List the available applications
az batch application list -g <resourceGroup> -n <batchAccount>
Check that the pool is valid
az batch pool list
In the command output, note the value of currentDedicatedNodes to adjust in the next test.
Resize the pool
Run the following command to resize the pool so there are compute nodes available for job and task testing. Replace the <poolName> placeholder with your pool name value, and the <targetNumber> placeholder with a number that's greater than the currentDedicatedNodes from the previous command output. Check status by running the az batch pool list command until the resizing completes and shows the target number of nodes.
az batch pool resize --pool-id <poolname> --target-dedicated-nodes <target number>
Next steps
See these tutorials to learn how to interact with a Batch account via a simple application.
Feedback
Coming soon: Throughout 2024 we will be phasing out GitHub Issues as the feedback mechanism for content and replacing it with a new feedback system. For more information see: https://aka.ms/ContentUserFeedback.
Submit and view feedback for