Back up and recover your custom Text Analytics for health models
When you create a Language resource, you specify a region for it to be created in. From then on, your resource and all of the operations related to it take place in the specified Azure server region. It's rare, but not impossible, to encounter a network issue that affects an entire region. If your solution needs to always be available, then you should design it to fail over into another region. This requires two Azure AI Language resources in different regions and synchronizing custom models across them.
If your app or business depends on the use of a custom Text Analytics for health model, we recommend that you create a replica of your project in an additional supported region. If a regional outage occurs, you can then access your model in the other fail-over region where you replicated your project.
Replicating a project means that you export your project metadata and assets, and import them into a new project. This only makes a copy of your project settings and tagged data. You still need to train and deploy the models to be available for use with prediction APIs.
In this article, you will learn to how to use the export and import APIs to replicate your project from one resource to another existing in different supported geographical regions, guidance on keeping your projects in sync and changes needed to your runtime consumption.
Prerequisites
- Two Azure AI Language resources in different Azure regions. Create your resources and connect them to an Azure storage account. It's recommended that you connect each of your Language resources to different storage accounts. Each storage account should be located in the same respective regions that your separate Language resources are in. You can follow the quickstart to create an additional Language resource and storage account.
Get your resource keys endpoint
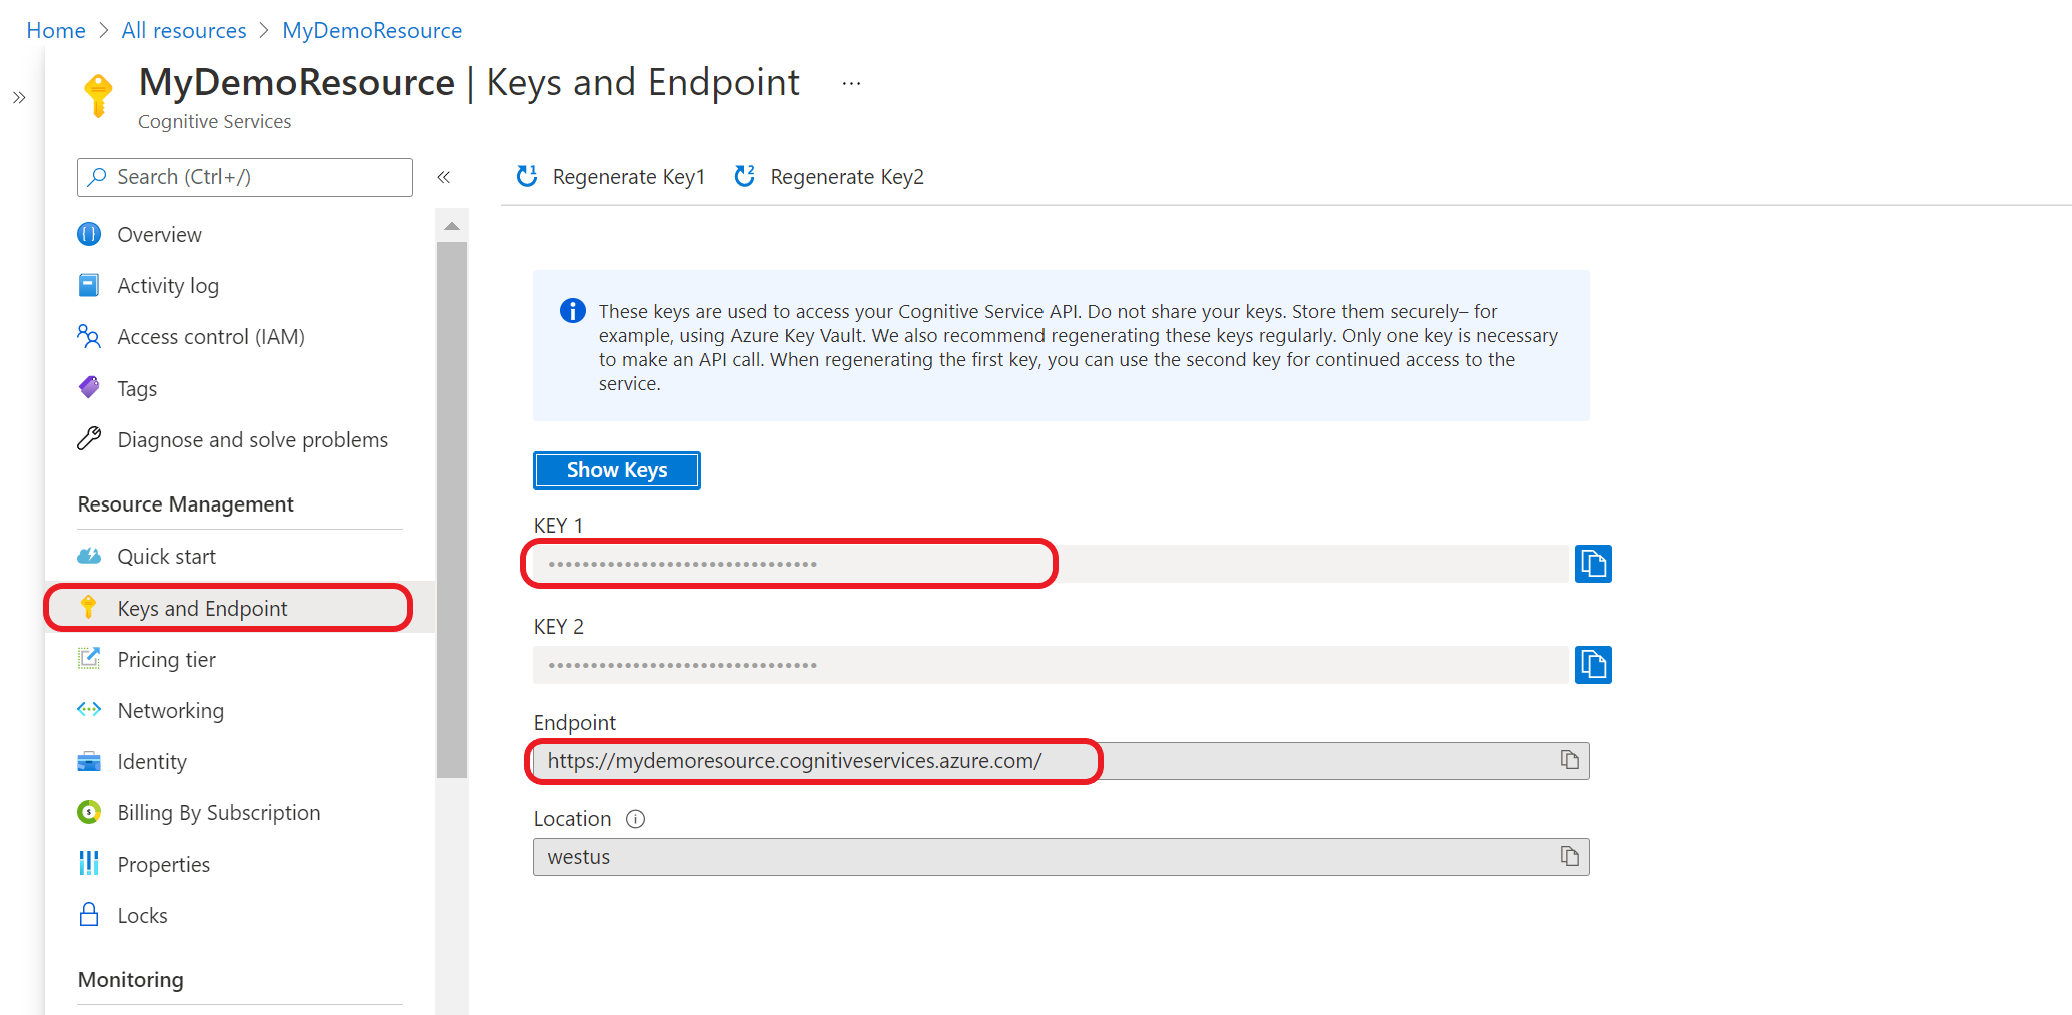
Use the following steps to get the keys and endpoint of your primary and secondary resources. These will be used in the following steps.
Go to your resource overview page in the Azure portal
From the menu on the left side, select Keys and Endpoint. You'll use the endpoint and key for the API requests

Tip
Keep a note of keys and endpoints for both primary and secondary resources as well as the primary and secondary container names. Use these values to replace the following placeholders:
{PRIMARY-ENDPOINT}, {PRIMARY-RESOURCE-KEY}, {PRIMARY-CONTAINER-NAME}, {SECONDARY-ENDPOINT}, {SECONDARY-RESOURCE-KEY}, and {SECONDARY-CONTAINER-NAME}.
Also take note of your project name, your model name and your deployment name. Use these values to replace the following placeholders: {PROJECT-NAME}, {MODEL-NAME} and {DEPLOYMENT-NAME}.
Export your primary project assets
Start by exporting the project assets from the project in your primary resource.
Submit export job
Replace the placeholders in the following request with your {PRIMARY-ENDPOINT} and {PRIMARY-RESOURCE-KEY} that you obtained in the first step.
Create a POST request using the following URL, headers, and JSON body to export your project.
Request URL
Use the following URL when creating your API request. Replace the placeholder values with your own values.
{ENDPOINT}/language/authoring/analyze-text/projects/{PROJECT-NAME}/:export?stringIndexType=Utf16CodeUnit&api-version={API-VERSION}
| Placeholder | Value | Example |
|---|---|---|
{ENDPOINT} |
The endpoint for authenticating your API request. | https://<your-custom-subdomain>.cognitiveservices.azure.com |
{PROJECT-NAME} |
The name for your project. This value is case-sensitive. | MyProject |
{API-VERSION} |
The version of the API you are calling. The value referenced here is the latest model version released. | 2022-05-01 |
Headers
Use the following header to authenticate your request.
| Key | Value |
|---|---|
Ocp-Apim-Subscription-Key |
The key to your resource. Used for authenticating your API requests. |
Body
Use the following JSON in your request body specifying that you want to export all the assets.
{
  "assetsToExport": ["*"]
}
Once you send your API request, you’ll receive a 202 response indicating that the job was submitted correctly. In the response headers, extract the operation-location value. It's formatted like this:
{ENDPOINT}/language/authoring/analyze-text/projects/{PROJECT-NAME}/export/jobs/{JOB-ID}?api-version={API-VERSION}
{JOB-ID} is used to identify your request, since this operation is asynchronous. You’ll use this URL to get the export job status.
Get export job status
Replace the placeholders in the following request with your {PRIMARY-ENDPOINT} and {PRIMARY-RESOURCE-KEY} that you obtained in the first step.
Use the following GET request to get the status of exporting your project assets. Replace the placeholder values below with your own values.
Request URL
{ENDPOINT}/language/authoring/analyze-text/projects/{PROJECT-NAME}/export/jobs/{JOB-ID}?api-version={API-VERSION}
| Placeholder | Value | Example |
|---|---|---|
{ENDPOINT} |
The endpoint for authenticating your API request. | https://<your-custom-subdomain>.cognitiveservices.azure.com |
{PROJECT-NAME} |
The name of your project. This value is case-sensitive. | myProject |
{JOB-ID} |
The ID for locating your model's training status. This is in the location header value you received in the previous step. |
xxxxxxxx-xxxx-xxxx-xxxx-xxxxxxxxxxxxx |
{API-VERSION} |
The version of the API you are calling. The value referenced here is for the latest version released. See Model lifecycle to learn more about other available API versions. | 2022-05-01 |
Headers
Use the following header to authenticate your request.
| Key | Value |
|---|---|
Ocp-Apim-Subscription-Key |
The key to your resource. Used for authenticating your API requests. |
Response body
{
  "resultUrl": "{RESULT-URL}",
  "jobId": "string",
  "createdDateTime": "2021-10-19T23:24:41.572Z",
  "lastUpdatedDateTime": "2021-10-19T23:24:41.572Z",
  "expirationDateTime": "2021-10-19T23:24:41.572Z",
  "status": "unknown",
  "errors": [
    {
      "code": "unknown",
      "message": "string"
    }
  ]
}
Use the URL from the resultUrl key in the body to view the exported assets from this job.
Get export results
Submit a GET request using the {RESULT-URL} you received from the previous step to view the results of the export job.
Headers
Use the following header to authenticate your request.
| Key | Value |
|---|---|
Ocp-Apim-Subscription-Key |
The key to your resource. Used for authenticating your API requests. |
Copy the response body as you will use it as the body for the next import job.
Import to a new project
Now go ahead and import the exported project assets in your new project in the secondary region so you can replicate it.
Submit import job
Replace the placeholders in the following request with your {SECONDARY-ENDPOINT}, {SECONDARY-RESOURCE-KEY}, and {SECONDARY-CONTAINER-NAME} that you obtained in the first step.
Submit a POST request using the following URL, headers, and JSON body to import your labels file. Make sure that your labels file follow the accepted format.
If a project with the same name already exists, the data of that project is replaced.
{Endpoint}/language/authoring/analyze-text/projects/{projectName}/:import?api-version={API-VERSION}
| Placeholder | Value | Example |
|---|---|---|
{ENDPOINT} |
The endpoint for authenticating your API request. | https://<your-custom-subdomain>.cognitiveservices.azure.com |
{PROJECT-NAME} |
The name for your project. This value is case-sensitive. | myProject |
{API-VERSION} |
The version of the API you are calling. The value referenced here is for the latest version released. See Model lifecycle to learn more about other available API versions. | 2022-05-01 |
Headers
Use the following header to authenticate your request.
| Key | Value |
|---|---|
Ocp-Apim-Subscription-Key |
The key to your resource. Used for authenticating your API requests. |
Body
Use the following JSON in your request. Replace the placeholder values below with your own values.
{
	"projectFileVersion": "{API-VERSION}",
	"stringIndexType": "Utf16CodeUnit",
	"metadata": {
		"projectName": "{PROJECT-NAME}",
		"projectKind": "CustomHealthcare",
		"description": "Trying out custom Text Analytics for health",
		"language": "{LANGUAGE-CODE}",
		"multilingual": true,
		"storageInputContainerName": "{CONTAINER-NAME}",
		"settings": {}
	},
	"assets": {
		"projectKind": "CustomHealthcare",
		"entities": [
			{
				"category": "Entity1",
				"compositionSetting": "{COMPOSITION-SETTING}",
				"list": {
					"sublists": [
						{
							"listKey": "One",
							"synonyms": [
								{
									"language": "en",
									"values": [
										"EntityNumberOne",
										"FirstEntity"
									]
								}
							]
						}
					]
				}
			},
			{
				"category": "Entity2"
			},
			{
				"category": "MedicationName",
				"list": {
					"sublists": [
						{
							"listKey": "research drugs",
							"synonyms": [
								{
									"language": "en",
									"values": [
										"rdrug a",
										"rdrug b"
									]
								}
							]

						}
					]
				}
				"prebuilts": "MedicationName"
			}
		],
		"documents": [
			{
				"location": "{DOCUMENT-NAME}",
				"language": "{LANGUAGE-CODE}",
				"dataset": "{DATASET}",
				"entities": [
					{
						"regionOffset": 0,
						"regionLength": 500,
						"labels": [
							{
								"category": "Entity1",
								"offset": 25,
								"length": 10
							},
							{
								"category": "Entity2",
								"offset": 120,
								"length": 8
							}
						]
					}
				]
			},
			{
				"location": "{DOCUMENT-NAME}",
				"language": "{LANGUAGE-CODE}",
				"dataset": "{DATASET}",
				"entities": [
					{
						"regionOffset": 0,
						"regionLength": 100,
						"labels": [
							{
								"category": "Entity2",
								"offset": 20,
								"length": 5
							}
						]
					}
				]
			}
		]
	}
}
| Key | Placeholder | Value | Example |
|---|---|---|---|
multilingual |
true |
A boolean value that enables you to have documents in multiple languages in your dataset and when your model is deployed you can query the model in any supported language (not necessarily included in your training documents). See language support to learn more about multilingual support. | true |
projectName |
{PROJECT-NAME} |
Project name | myproject |
storageInputContainerName |
{CONTAINER-NAME} |
Container name | mycontainer |
entities |
Array containing all the entity types you have in the project. These are the entity types that will be extracted from your documents into. | ||
category |
The name of the entity type, which can be user defined for new entity definitions, or predefined for prebuilt entities. | ||
compositionSetting |
{COMPOSITION-SETTING} |
Rule that defines how to manage multiple components in your entity. Options are combineComponents or separateComponents. |
combineComponents |
list |
Array containing all the sublists you have in the project for a specific entity. Lists can be added to prebuilt entities or new entities with learned components. | ||
sublists |
[] |
Array containing sublists. Each sublist is a key and its associated values. | [] |
listKey |
One |
A normalized value for the list of synonyms to map back to in prediction. | One |
synonyms |
[] |
Array containing all the synonyms | synonym |
language |
{LANGUAGE-CODE} |
A string specifying the language code for the synonym in your sublist. If your project is a multilingual project and you want to support your list of synonyms for all the languages in your project, you have to explicitly add your synonyms to each language. See Language support for more information about supported language codes. | en |
values |
"EntityNumberone", "FirstEntity" |
A list of comma separated strings that will be matched exactly for extraction and map to the list key. | "EntityNumberone", "FirstEntity" |
prebuilts |
MedicationName |
The name of the prebuilt component populating the prebuilt entity. Prebuilt entities are automatically loaded into your project by default but you can extend them with list components in your labels file. | MedicationName |
documents |
Array containing all the documents in your project and list of the entities labeled within each document. | [] | |
location |
{DOCUMENT-NAME} |
The location of the documents in the storage container. Since all the documents are in the root of the container this should be the document name. | doc1.txt |
dataset |
{DATASET} |
The test set to which this file will go to when split before training. Possible values for this field are Train and Test. |
Train |
regionOffset |
The inclusive character position of the start of the text. | 0 |
|
regionLength |
The length of the bounding box in terms of UTF16 characters. Training only considers the data in this region. | 500 |
|
category |
The type of entity associated with the span of text specified. | Entity1 |
|
offset |
The start position for the entity text. | 25 |
|
length |
The length of the entity in terms of UTF16 characters. | 20 |
|
language |
{LANGUAGE-CODE} |
A string specifying the language code for the document used in your project. If your project is a multilingual project, choose the language code of the majority of the documents. See Language support for more information about supported language codes. | en |
Once you send your API request, you’ll receive a 202 response indicating that the job was submitted correctly. In the response headers, extract the operation-location value. It will be formatted like this:
{ENDPOINT}/language/authoring/analyze-text/projects/{PROJECT-NAME}/import/jobs/{JOB-ID}?api-version={API-VERSION}
{JOB-ID} is used to identify your request, since this operation is asynchronous. You’ll use this URL to get the import job status.
Possible error scenarios for this request:
- The selected resource doesn't have proper permissions for the storage account.
- The
storageInputContainerNamespecified doesn't exist. - Invalid language code is used, or if the language code type isn't string.
multilingualvalue is a string and not a boolean.
Get import job status
Replace the placeholders in the following request with your {SECONDARY-ENDPOINT} and {SECONDARY-RESOURCE-KEY} that you obtained in the first step.
Use the following GET request to get the status of your importing your project. Replace the placeholder values below with your own values.
Request URL
{ENDPOINT}/language/authoring/analyze-text/projects/{PROJECT-NAME}/import/jobs/{JOB-ID}?api-version={API-VERSION}
| Placeholder | Value | Example |
|---|---|---|
{ENDPOINT} |
The endpoint for authenticating your API request. | https://<your-custom-subdomain>.cognitiveservices.azure.com |
{PROJECT-NAME} |
The name of your project. This value is case-sensitive. | myProject |
{JOB-ID} |
The ID for locating your model's training status. This value is in the location header value you received in the previous step. |
xxxxxxxx-xxxx-xxxx-xxxx-xxxxxxxxxxxxx |
{API-VERSION} |
The version of the API you are calling. The value referenced here is for the latest version released. See Model lifecycle to learn more about other available API versions. | 2022-05-01 |
Headers
Use the following header to authenticate your request.
| Key | Value |
|---|---|
Ocp-Apim-Subscription-Key |
The key to your resource. Used for authenticating your API requests. |
Train your model
After importing your project, you only have copied the project's assets and metadata and assets. You still need to train your model, which will incur usage on your account.
Submit training job
Replace the placeholders in the following request with your {SECONDARY-ENDPOINT} and {SECONDARY-RESOURCE-KEY} that you obtained in the first step.
Submit a POST request using the following URL, headers, and JSON body to submit a training job. Replace the placeholder values with your own values.
{ENDPOINT}/language/authoring/analyze-text/projects/{PROJECT-NAME}/:train?api-version={API-VERSION}
| Placeholder | Value | Example |
|---|---|---|
{ENDPOINT} |
The endpoint for authenticating your API request. | https://<your-custom-subdomain>.cognitiveservices.azure.com |
{PROJECT-NAME} |
The name of your project. This value is case-sensitive. | myProject |
{API-VERSION} |
The version of the API you're calling. The value referenced here is for the latest version released. See Model lifecycle to learn more about other available API versions. | 2022-05-01 |
Headers
Use the following header to authenticate your request.
| Key | Value |
|---|---|
Ocp-Apim-Subscription-Key |
The key to your resource. Used for authenticating your API requests. |
Request body
Use the following JSON in your request body. The model is given the {MODEL-NAME} once training is complete. Only successful training jobs produce models.
{
	"modelLabel": "{MODEL-NAME}",
	"trainingConfigVersion": "{CONFIG-VERSION}",
	"evaluationOptions": {
		"kind": "percentage",
		"trainingSplitPercentage": 80,
		"testingSplitPercentage": 20
	}
}
| Key | Placeholder | Value | Example |
|---|---|---|---|
| modelLabel | {MODEL-NAME} |
The model name that is assigned to your model once trained successfully. | myModel |
| trainingConfigVersion | {CONFIG-VERSION} |
This is the model version that is used to train the model. | 2022-05-01 |
| evaluationOptions | Option to split your data across training and testing sets. | {} |
|
| kind | percentage |
Split methods. Possible values are percentage or manual. See How to train a model for more information. |
percentage |
| trainingSplitPercentage | 80 |
Percentage of your tagged data to be included in the training set. Recommended value is 80. |
80 |
| testingSplitPercentage | 20 |
Percentage of your tagged data to be included in the testing set. Recommended value is 20. |
20 |
Note
The trainingSplitPercentage and testingSplitPercentage are only required if Kind is set to percentage and the sum of both percentages should be equal to 100.
Once you send your API request, you’ll receive a 202 response indicating that the job was submitted correctly. In the response headers, extract the location value. It is formatted like this:
{ENDPOINT}/language/authoring/analyze-text/projects/{PROJECT-NAME}/train/jobs/{JOB-ID}?api-version={API-VERSION}
{JOB-ID} is used to identify your request, since this operation is asynchronous. You can use this URL to get the training status.
Get training status
Replace the placeholders in the following request with your {SECONDARY-ENDPOINT} and {SECONDARY-RESOURCE-KEY} that you obtained in the first step.
Use the following GET request to get the status of your model's training progress. Replace the placeholder values below with your own values.
Request URL
{ENDPOINT}/language/authoring/analyze-text/projects/{PROJECT-NAME}/train/jobs/{JOB-ID}?api-version={API-VERSION}
| Placeholder | Value | Example |
|---|---|---|
{ENDPOINT} |
The endpoint for authenticating your API request. | https://<your-custom-subdomain>.cognitiveservices.azure.com |
{PROJECT-NAME} |
The name of your project. This value is case-sensitive. | myProject |
{JOB-ID} |
The ID for locating your model's training status. This value is in the location header value you received in the previous step. |
xxxxxxxx-xxxx-xxxx-xxxx-xxxxxxxxxxxxx |
{API-VERSION} |
The version of the API you're calling. The value referenced here is for the latest version released. See Model lifecycle to learn more about other available API versions. | 2022-05-01 |
Headers
Use the following header to authenticate your request.
| Key | Value |
|---|---|
Ocp-Apim-Subscription-Key |
The key to your resource. Used for authenticating your API requests. |
Response Body
After sending the request, you will get the following response.
{
  "result": {
    "modelLabel": "{MODEL-NAME}",
    "trainingConfigVersion": "{CONFIG-VERSION}",
    "estimatedEndDateTime": "2022-04-18T15:47:58.8190649Z",
    "trainingStatus": {
      "percentComplete": 3,
      "startDateTime": "2022-04-18T15:45:06.8190649Z",
      "status": "running"
    },
    "evaluationStatus": {
      "percentComplete": 0,
      "status": "notStarted"
    }
  },
  "jobId": "{JOB-ID}",
  "createdDateTime": "2022-04-18T15:44:44Z",
  "lastUpdatedDateTime": "2022-04-18T15:45:48Z",
  "expirationDateTime": "2022-04-25T15:44:44Z",
  "status": "running"
}
Deploy your model
This is the step where you make your trained model available form consumption via the runtime prediction API.
Tip
Use the same deployment name as your primary project for easier maintenance and minimal changes to your system to handle redirecting your traffic.
Submit deployment job
Replace the placeholders in the following request with your {SECONDARY-ENDPOINT} and {SECONDARY-RESOURCE-KEY} that you obtained in the first step.
Submit a PUT request using the following URL, headers, and JSON body to submit a deployment job. Replace the placeholder values below with your own values.
{Endpoint}/language/authoring/analyze-text/projects/{projectName}/deployments/{deploymentName}?api-version={API-VERSION}
| Placeholder | Value | Example |
|---|---|---|
{ENDPOINT} |
The endpoint for authenticating your API request. | https://<your-custom-subdomain>.cognitiveservices.azure.com |
{PROJECT-NAME} |
The name of your project. This value is case-sensitive. | myProject |
{DEPLOYMENT-NAME} |
The name of your deployment. This value is case-sensitive. | staging |
{API-VERSION} |
The version of the API you're calling. The value referenced here is for the latest version released. See Model lifecycle to learn more about other available API versions. | 2022-05-01 |
Headers
Use the following header to authenticate your request.
| Key | Value |
|---|---|
Ocp-Apim-Subscription-Key |
The key to your resource. Used for authenticating your API requests. |
Request body
Use the following JSON in the body of your request. Use the name of the model you to assign to the deployment.
{
  "trainedModelLabel": "{MODEL-NAME}"
}
| Key | Placeholder | Value | Example |
|---|---|---|---|
| trainedModelLabel | {MODEL-NAME} |
The model name that will be assigned to your deployment. You can only assign successfully trained models. This value is case-sensitive. | myModel |
Once you send your API request, you’ll receive a 202 response indicating that the job was submitted correctly. In the response headers, extract the operation-location value. It will be formatted like this:
{ENDPOINT}/language/authoring/analyze-text/projects/{PROJECT-NAME}/deployments/{DEPLOYMENT-NAME}/jobs/{JOB-ID}?api-version={API-VERSION}
{JOB-ID} is used to identify your request, since this operation is asynchronous. You can use this URL to get the deployment status.
Get the deployment status
Replace the placeholders in the following request with your {SECONDARY-ENDPOINT} and {SECONDARY-RESOURCE-KEY} that you obtained in the first step.
Use the following GET request to query the status of the deployment job. You can use the URL you received from the previous step, or replace the placeholder values below with your own values.
{ENDPOINT}/language/authoring/analyze-text/projects/{PROJECT-NAME}/deployments/{DEPLOYMENT-NAME}/jobs/{JOB-ID}?api-version={API-VERSION}
| Placeholder | Value | Example |
|---|---|---|
{ENDPOINT} |
The endpoint for authenticating your API request. | https://<your-custom-subdomain>.cognitiveservices.azure.com |
{PROJECT-NAME} |
The name of your project. This value is case-sensitive. | myProject |
{DEPLOYMENT-NAME} |
The name of your deployment. This value is case-sensitive. | staging |
{JOB-ID} |
The ID for locating your model's training status. This is in the location header value you received in the previous step. |
xxxxxxxx-xxxx-xxxx-xxxx-xxxxxxxxxxxxx |
{API-VERSION} |
The version of the API you're calling. The value referenced here is for the latest version released. See Model lifecycle to learn more about other available API versions. | 2022-05-01 |
Headers
Use the following header to authenticate your request.
| Key | Value |
|---|---|
Ocp-Apim-Subscription-Key |
The key to your resource. Used for authenticating your API requests. |
Response Body
You'll receive the following request when you send the request. Keep polling this endpoint until the status parameter changes to "succeeded". You should get a 200 code to indicate the success of the request.
{
    "jobId":"{JOB-ID}",
    "createdDateTime":"{CREATED-TIME}",
    "lastUpdatedDateTime":"{UPDATED-TIME}",
    "expirationDateTime":"{EXPIRATION-TIME}",
    "status":"running"
}
Changes in calling the runtime
Within your system, at the step where you call runtime prediction API check for the response code returned from the submit task API. If you observe a consistent failure in submitting the request, this could indicate an outage in your primary region. Failure once doesn't mean an outage, it may be transient issue. Retry submitting the job through the secondary resource you have created. For the second request use your {SECONDARY-ENDPOINT} and {SECONDARY-RESOURCE-KEY}, if you have followed the steps above, {PROJECT-NAME} and {DEPLOYMENT-NAME} would be the same so no changes are required to the request body.
In case you revert to using your secondary resource you will observe slight increase in latency because of the difference in regions where your model is deployed.
Check if your projects are out of sync
Maintaining the freshness of both projects is an important part of the process. You need to frequently check if any updates were made to your primary project so that you move them over to your secondary project. This way if your primary region fails and you move into the secondary region you should expect similar model performance since it already contains the latest updates. Setting the frequency of checking if your projects are in sync is an important choice. We recommend that you do this check daily in order to guarantee the freshness of data in your secondary model.
Get project details
Use the following url to get your project details, one of the keys returned in the body indicates the last modified date of the project. Repeat the following step twice, one for your primary project and another for your secondary project and compare the timestamp returned for both of them to check if they are out of sync.
Use the following GET request to get your project details. Replace the placeholder values with your own values.
{ENDPOINT}/language/authoring/analyze-text/projects/{PROJECT-NAME}?api-version={API-VERSION}
| Placeholder | Value | Example |
|---|---|---|
{ENDPOINT} |
The endpoint for authenticating your API request. | https://<your-custom-subdomain>.cognitiveservices.azure.com |
{PROJECT-NAME} |
The name for your project. This value is case-sensitive. | myProject |
{API-VERSION} |
The version of the API you're calling. The value referenced here is for the latest version released. See Model lifecycle to learn more about other available API versions. | 2022-05-01 |
Headers
Use the following header to authenticate your request.
| Key | Value |
|---|---|
Ocp-Apim-Subscription-Key |
The key to your resource. Used for authenticating your API requests. |
Response body
    {
        "createdDateTime": "2021-10-19T23:24:41.572Z",
        "lastModifiedDateTime": "2021-10-19T23:24:41.572Z",
        "lastTrainedDateTime": "2021-10-19T23:24:41.572Z",
        "lastDeployedDateTime": "2021-10-19T23:24:41.572Z",
        "projectKind": "CustomEntityRecognition",
        "storageInputContainerName": "{CONTAINER-NAME}",
        "projectName": "{PROJECT-NAME}",
        "multilingual": false,
        "description": "Project description",
        "language": "{LANGUAGE-CODE}"
    }
Repeat the same steps for your replicated project using {SECONDARY-ENDPOINT} and {SECONDARY-RESOURCE-KEY}. Compare the returned lastModifiedDateTime from both projects. If your primary project was modified sooner than your secondary one, you need to repeat the steps of exporting, importing, training and deploying.
Next steps
In this article, you have learned how to use the export and import APIs to replicate your project to a secondary Language resource in other region. Next, explore the API reference docs to see what else you can do with authoring APIs.
Feedback
Coming soon: Throughout 2024 we will be phasing out GitHub Issues as the feedback mechanism for content and replacing it with a new feedback system. For more information see: https://aka.ms/ContentUserFeedback.
Submit and view feedback for