Continuous Deployment with Azure DevOps
Important
Custom Commands will be retired on April 30th 2026. As of October 30th 2023 you can't create new Custom Commands applications in Speech Studio. Related to this change, LUIS will be retired on October 1st 2025. As of April 1st 2023 you can't create new LUIS resources.
In this article, you learn how to set up continuous deployment for your Custom Commands applications. The scripts to support the CI/CD workflow are provided to you.
Prerequisite
- A Custom Commands application for development (DEV)
- A Custom Commands application for production (PROD)
- Sign up for Azure Pipelines
Export/Import/Publish
The scripts are hosted at Voice Assistant - Custom Commands. Clone the scripts in the bash directory to your repository. Make sure you maintain the same path.
Set up a pipeline
Go to Azure DevOps - Pipelines and select "New Pipeline"
In Connect section, select the location of your repository where these scripts are located
In Select section, select your repository
In Configure section, select "Starter pipeline"
Next you get an editor with a YAML file, replace the "steps" section with this script.
steps:
- task: Bash@3
  displayName: 'Export source app'
  inputs:
    targetType: filePath
    filePath: ./bash/export.sh
    arguments: '-r westus2 -s $(SubscriptionKey) -c $(Culture) -a $(SourceAppId) -f ExportedDialogModel.json'
    workingDirectory: bash
    failOnStderr: true

- task: Bash@3
  displayName: 'Import to target app'
  inputs:
    targetType: filePath
    filePath: ./bash/import.sh
    arguments: '-r westus2 -s $(SubscriptionKey) -c $(Culture) -a $(TargetAppId) -f ExportedDialogModel.json'
    workingDirectory: bash
    failOnStderr: true

- task: Bash@3
  displayName: 'Train and Publish target app'
  inputs:
    targetType: filePath
    filePath: './bash/train-and-publish.sh'
    arguments: '-r westus2 -s $(SubscriptionKey) -c $(Culture) -a $(TargetAppId)'
    workingDirectory: bash
    failOnStderr: true
These scripts assume that you're using the region
westus2, if that's not the case update the arguments of the tasks accordingly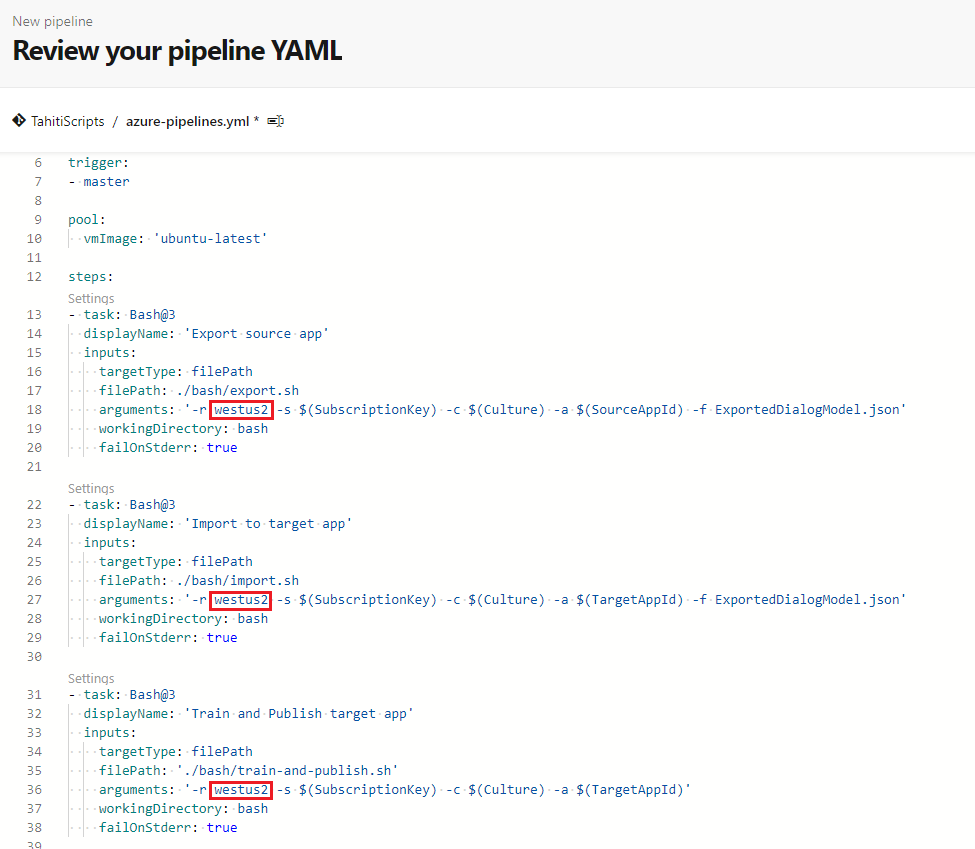
In the "Save and run" button, open the dropdown and select "Save"
Hook up the pipeline with your application
Navigate to the main page of the pipeline.
In the top-right corner dropdown, select Edit pipeline. It gets you to a YAML editor.
In the top-right corner next to "Run" button, select Variables. Select New variable.
Add these variables:
Variable Description SourceAppId ID of the DEV application TargetAppId ID of the PROD application SubscriptionKey The key used for both applications Culture Culture of the applications (en-us) 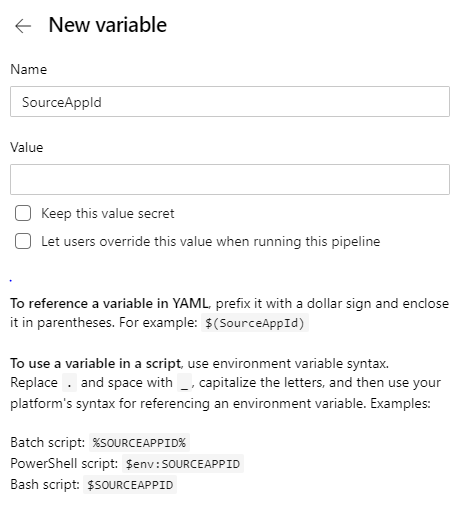
Select "Run" and then select the "Job" running.
You should see a list of tasks running that contains: "Export source app", "Import to target app" & "Train and Publish target app"
Deploy from source code
In case you want to keep the definition of your application in a repository, we provide the scripts for deployments from source code. Since the scripts are in bash, If you're using Windows you need to install the Linux subsystem.
The scripts are hosted at Voice Assistant - Custom Commands. Clone the scripts in the bash directory to your repository. Make sure you maintain the same path.
Prepare your repository
Create a directory for your application, in our example create one called "apps".
Update the arguments of the bash script below, and run. It imports the dialog model of your application to the file myapp.json
bash/export.sh -r <region> -s <subscriptionkey> -c en-us -a <appid> -f apps/myapp.jsonArguments Description region Your Speech resource region. For example: westus2subscriptionkey Your Speech resource key. appid the Custom Commands' application ID you want to export. Push these changes to your repository.
Set up a pipeline
Go to Azure DevOps - Pipelines and select "New Pipeline"
In Connect section, select the location of your repository where these scripts are located
In Select section, select your repository
In Configure section, select "Starter pipeline"
Next you get an editor with a YAML file, replace the "steps" section with this script.
steps:
- task: Bash@3
  displayName: 'Import app'
  inputs:
    targetType: filePath
    filePath: ./bash/import.sh
    arguments: '-r westus2 -s $(SubscriptionKey) -c $(Culture) -a $(TargetAppId) -f ../apps/myapp.json'
    workingDirectory: bash
    failOnStderr: true

- task: Bash@3
  displayName: 'Train and Publish app'
  inputs:
    targetType: filePath
    filePath: './bash/train-and-publish.sh'
    arguments: '-r westus2 -s $(SubscriptionKey) -c $(Culture) -a $(TargetAppId)'
    workingDirectory: bash
    failOnStderr: true
Note
these scripts assume that you are using the region westus2, if that's not the case update the arguments of the tasks accordingly
In the "Save and run" button, open the dropdown and select "Save"
Hook up the pipeline with your target applications
Navigate to the main page of the pipeline.
In the top-right corner dropdown, select Edit pipeline. It gets you to a YAML editor.
In the top-right corner next to "Run" button, select Variables. Select New variable.
Add these variables:
Variable Description TargetAppId ID of the PROD application SubscriptionKey The key used for both applications Culture Culture of the applications (en-us) Select "Run" and then select the "Job" running. You should see a list of tasks running that contains: "Import app" & "Train and Publish app"
Next steps
Feedback
Coming soon: Throughout 2024 we will be phasing out GitHub Issues as the feedback mechanism for content and replacing it with a new feedback system. For more information see: https://aka.ms/ContentUserFeedback.
Submit and view feedback for