Set up IP ingress restrictions in Azure Container Apps
Azure Container Apps allows you to limit inbound traffic to your container app by configuring IP ingress restrictions via ingress configuration.
There are two types of restrictions:
- Allow: Allow inbound traffic only from address ranges you specify in allow rules.
- Deny: Deny all inbound traffic only from address ranges you specify in deny rules.
when no IP restriction rules are defined, all inbound traffic is allowed.
IP restrictions rules contain the following properties:
| Property | Value | Description |
|---|---|---|
| name | string | The name of the rule. |
| description | string | A description of the rule. |
| ipAddressRange | IP address range in CIDR format | The IP address range in CIDR notation. |
| action | Allow or Deny | The action to take for the rule. |
The ipAddressRange parameter accepts IPv4 addresses. Define each IPv4 address block in Classless Inter-Domain Routing (CIDR) notation.
Note
All rules must be the same type. You cannot combine allow rules and deny rules.
Manage IP ingress restrictions
You can manage IP access restrictions rules through the Azure portal or Azure CLI.
Add rules
Go to your container app in the Azure portal.
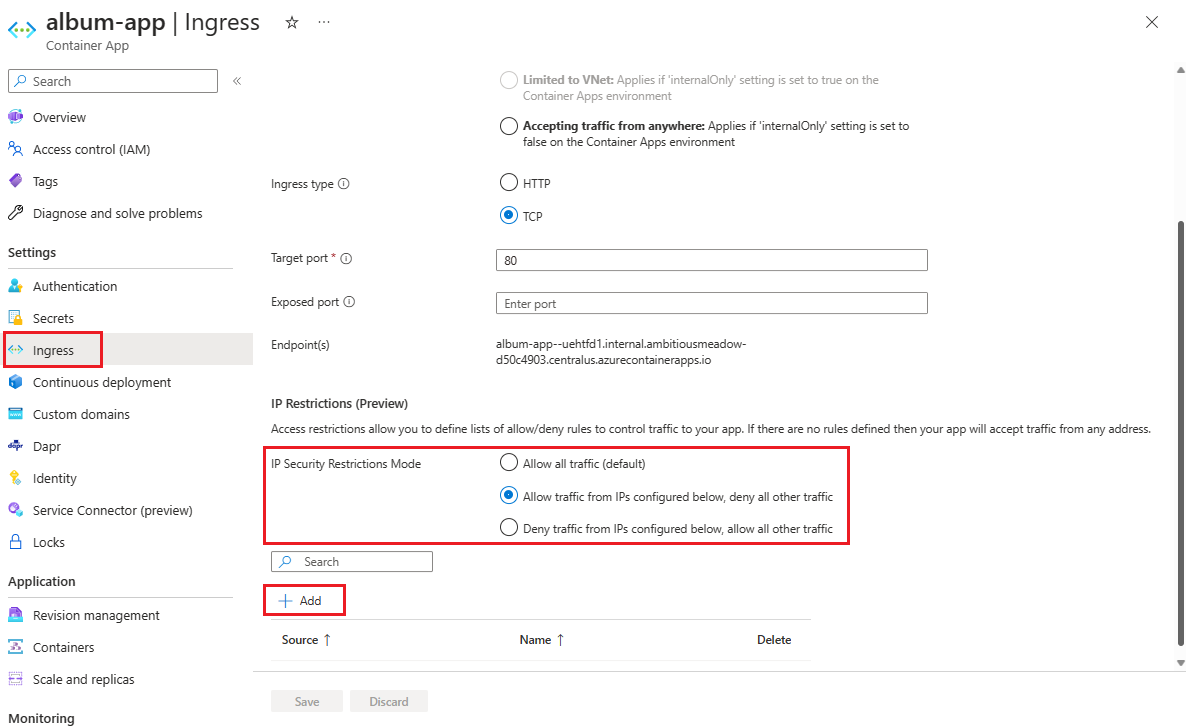
Select Ingress from the left side menu.
Select the IP Security Restrictions Mode toggle to enable IP restrictions. You can choose to allow or deny traffic from the specified IP address ranges.
Select Add to create the rule.
Enter values in the following fields:
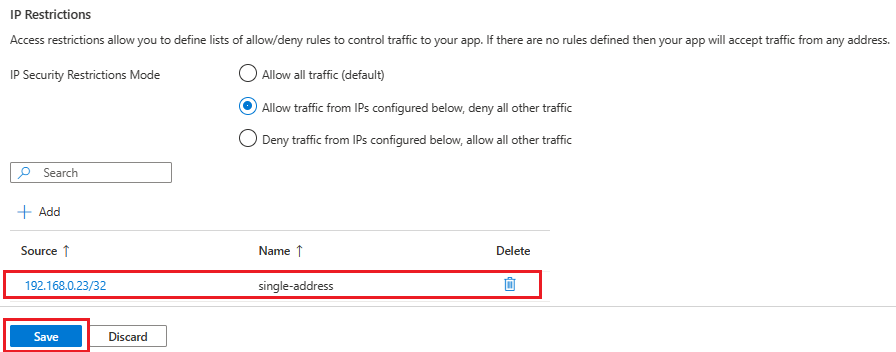
Field Description IPv4 address or range Enter the IP address or range of IP addresses in CIDR notation. For example, to allow access from a single IP address, use the following format: 10.200.10.2/32. Name Enter a name for the rule. Description Enter a description for the rule. Select Add.
Repeat steps 4-6 to add more rules.
When you have finished adding rules, select Save.
Update a rule
- Go to your container app in the Azure portal.
- Select Ingress from the left side menu.
- Select the rule you want to update.
- Change the rule settings.
- Select Save to save the updates.
- Select Save on the Ingress page to save the updated rules.
Delete a rule
- Go to your container app in the Azure portal.
- Select Ingress from the left side menu.
- Select the delete icon next to the rule you want to delete.
- Select Save.
You can manage IP Access Restrictions using the az containerapp ingress access-restriction command group. This command group has the options to:
set: Create or update a rule.remove: Delete a rule.list: List all rules.
Create or update rules
You can create or update IP restrictions using the az containerapp ingress access-restriction set command.
The az containerapp ingress access-restriction set command group uses the following parameters.
| Argument | Values | Description |
|---|---|---|
--rule-name (required) |
String | Specifies the name of the access restriction rule. |
--description |
String | Specifies a description for the access restriction rule. |
--action (required) |
Allow, Deny | Specifies whether to allow or deny access from the specified IP address range. |
--ip-address (required) |
IP address or range of IP addresses in CIDR notation | Specifies the IP address range to allow or deny. |
Add more rules by repeating the command with a different --rule-name and ---ip-address values.
Create allow rules
The following example az containerapp access-restriction set command creates a rule to restrict inbound access to an IP address range. You must delete any existing deny rules before you can add any allow rules.
Replace the values in the following example with your own values.
az containerapp ingress access-restriction set \
   --name <CONTAINER_APP_NAME> \
   --resource-group <RESOURCE_GROUP> \
   --rule-name "my allow rule" \
   --description "example of rule allowing access" \
   --ip-address 192.168.0.1/28 \
   --action Allow
You can add to the allow rules by repeating the command with a different --ip-address and --rule-name values.
Create deny rules
The following example of the az containerapp access-restriction set command creates an access rule to deny inbound traffic from a specified IP range. You must delete any existing allow rules before you can add deny rules.
Replace the placeholders in the following example with your own values.
az containerapp ingress access-restriction set \
  --name <CONTAINER_APP_NAME> \
  --resource-group <RESOURCE_GROUP> \
  --rule-name "my deny rule" \
  --description "example of rule denying access" \
  --ip-address 192.168.0.100/28 \
  --action Deny
You can add to the deny rules by repeating the command with a different --ip-address and --rule-name values. If you use a rule name that already exists, the existing rule is updated.
Update a rule
You can update a rule using the az containerapp ingress access-restriction set command. You can change the IP address range and the rule description, but not the rule name or action.
The --action parameter is required, but you can't change the action from Allow to Deny or vice versa.
If you omit the ---description parameter, the description is deleted.
The following example updates the ip address range.
az containerapp ingress access-restriction set \
  --name <CONTAINER_APP_NAME> \
  --resource-group <RESOURCE_GROUP> \
  --rule-name "my deny rule" \
  --ip-address 192.168.0.1/24 \
  --description "example of rule denying access" \
  --action Deny
Remove access restrictions
The following example az containerapp ingress access-restriction remove command removes a rule.
az containerapp ingress access-restriction list
  --name <CONTAINER_APP_NAME> \
  --resource-group <RESOURCE_GROUP> \
  --rule-name "<your rule name>"
List access restrictions
The following example az containerapp ingress access-restriction list command lists the IP restriction rules for the container app.
az containerapp ingress access-restriction list
  --name <CONTAINER_APP_NAME> \
  --resource-group <RESOURCE_GROUP>
Next steps
Feedback
Coming soon: Throughout 2024 we will be phasing out GitHub Issues as the feedback mechanism for content and replacing it with a new feedback system. For more information see: https://aka.ms/ContentUserFeedback.
Submit and view feedback for