Connect a Node.js Mongoose application to Azure Cosmos DB
APPLIES TO:
![]() MongoDB
MongoDB
This tutorial demonstrates how to use the Mongoose Framework when storing data in Azure Cosmos DB. We use the Azure Cosmos DB's API for MongoDB for this walkthrough. For those of you unfamiliar, Mongoose is an object modeling framework for MongoDB in Node.js and provides a straight-forward, schema-based solution to model your application data.
Azure Cosmos DB is Microsoft's globally distributed multi-model database service. You can quickly create and query document, key/value, and graph databases, all of which benefit from the global distribution and horizontal scale capabilities at the core of Azure Cosmos DB.
Prerequisites
If you don't have an Azure subscription, create an Azure free account before you begin.
You can try Azure Cosmos DB for free, without an Azure subscription, and with no commitment required. Alternatively, you can create an Azure Cosmos DB free tier account, with the first 1000 RU/s and 25 GB of storage for free. You can also use the Azure Cosmos DB emulator with a URI of https://localhost:8081. For the key to use with the emulator, see Authenticating requests.
Node.js version v0.10.29 or higher.
Create an Azure Cosmos DB account
Let's create an Azure Cosmos DB account. If you already have an account you want to use, you can skip ahead to Set up your Node.js application. If you are using the Azure Cosmos DB Emulator, follow the steps at Azure Cosmos DB Emulator to set up the emulator and skip ahead to Set up your Node.js application.
In a new browser window, sign in to the Azure portal.
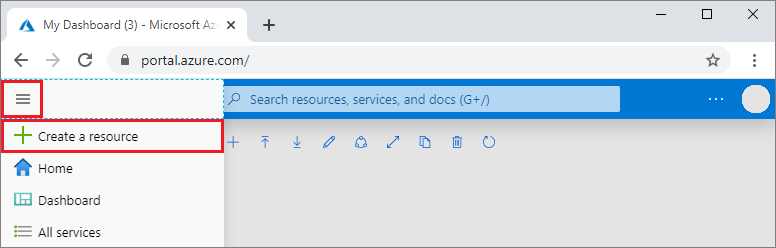
In the left menu, select Create a resource.
On the New page, select Databases > Azure Cosmos DB.
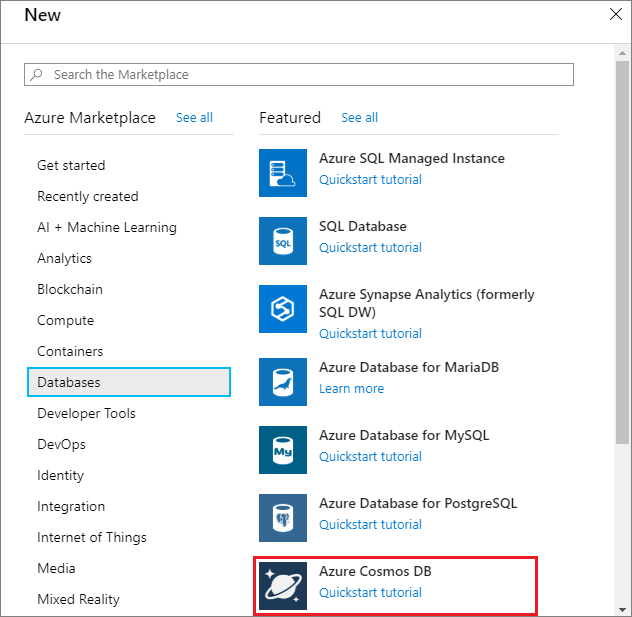
On the Select API option page, select Azure Cosmos DB for MongoDB > Create.
The API determines the type of account to create. Select Azure Cosmos DB for MongoDB because you will create a collection that works with MongoDB in this quickstart. To learn more, see Overview of Azure Cosmos DB for MongoDB.

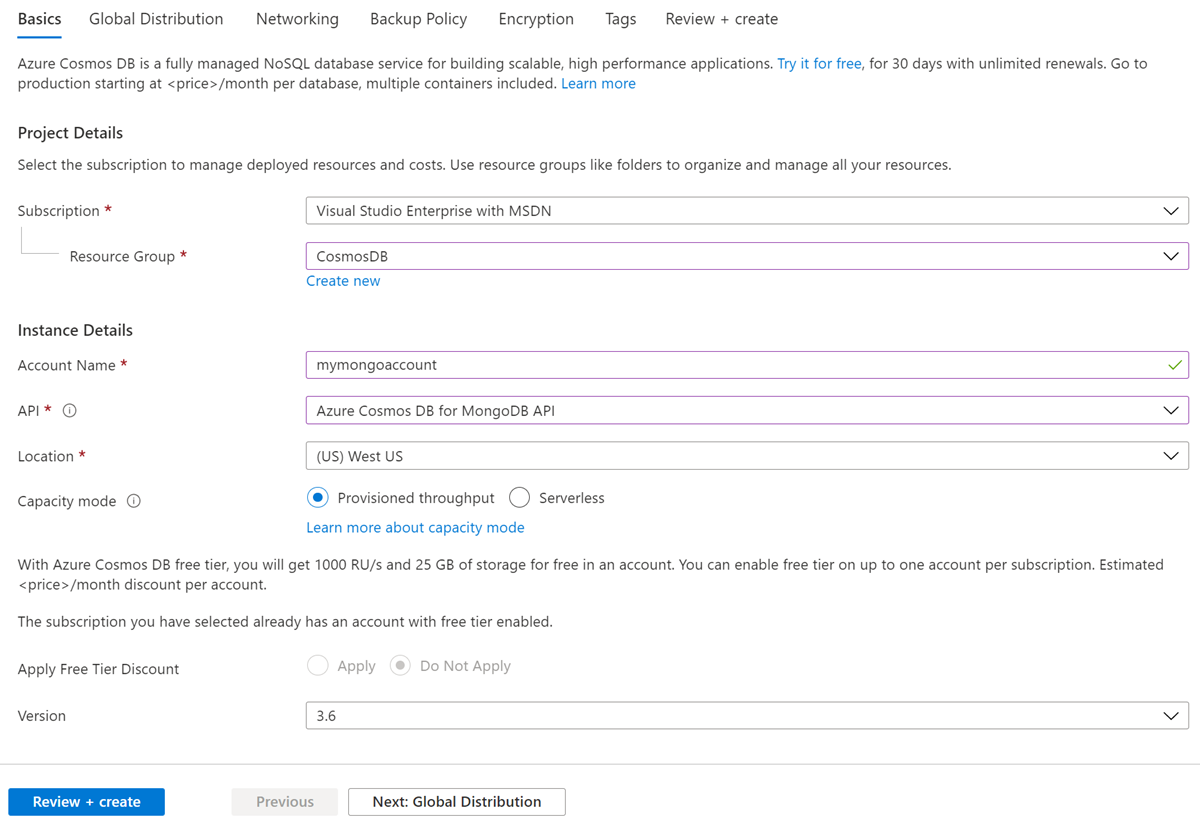
On the Create Azure Cosmos DB Account page, enter the settings for the new Azure Cosmos DB account.
Setting Value Description Subscription Subscription name Select the Azure subscription that you want to use for this Azure Cosmos DB account. Resource Group Resource group name Select a resource group, or select Create new, then enter a unique name for the new resource group. Account Name Enter a unique name Enter a unique name to identify your Azure Cosmos DB account. Your account URI will be mongo.cosmos.azure.com appended to your unique account name.
The account name can use only lowercase letters, numbers, and hyphens (-), and must be between 3 and 44 characters long.Location The region closest to your users Select a geographic location to host your Azure Cosmos DB account. Use the location that is closest to your users to give them the fastest access to the data. Capacity mode Provisioned throughput or Serverless Select Provisioned throughput to create an account in provisioned throughput mode. Select Serverless to create an account in serverless mode.
Note: Only API for MongoDB versions 4.2, 4.0, and 3.6 are supported by serverless accounts. Choosing 3.2 as the version will force the account in provisioned throughput mode.Apply Azure Cosmos DB free tier discount Apply or Do not apply With Azure Cosmos DB free tier, you will get the first 1000 RU/s and 25 GB of storage for free in an account. Learn more about free tier. Version Choose the required server version Azure Cosmos DB for MongoDB is compatible with the server version 4.2, 4.0, 3.6, and 3.2. You can upgrade or downgrade an account after it is created. Note
You can have up to one free tier Azure Cosmos DB account per Azure subscription and must opt-in when creating the account. If you do not see the option to apply the free tier discount, this means another account in the subscription has already been enabled with free tier.
In the Global Distribution tab, configure the following details. You can leave the default values for the purpose of this quickstart:
Setting Value Description Geo-Redundancy Disable Enable or disable global distribution on your account by pairing your region with a pair region. You can add more regions to your account later. Multi-region Writes Disable Multi-region writes capability allows you to take advantage of the provisioned throughput for your databases and containers across the globe. Note
The following options are not available if you select Serverless as the Capacity mode:
- Apply Free Tier Discount
- Geo-redundancy
- Multi-region Writes
Optionally you can configure additional details in the following tabs:
- Networking - Configure access from a virtual network.
- Backup Policy - Configure either periodic or continuous backup policy.
- Encryption - Use either service-managed key or a customer-managed key.
- Tags - Tags are name/value pairs that enable you to categorize resources and view consolidated billing by applying the same tag to multiple resources and resource groups.
Select Review + create.
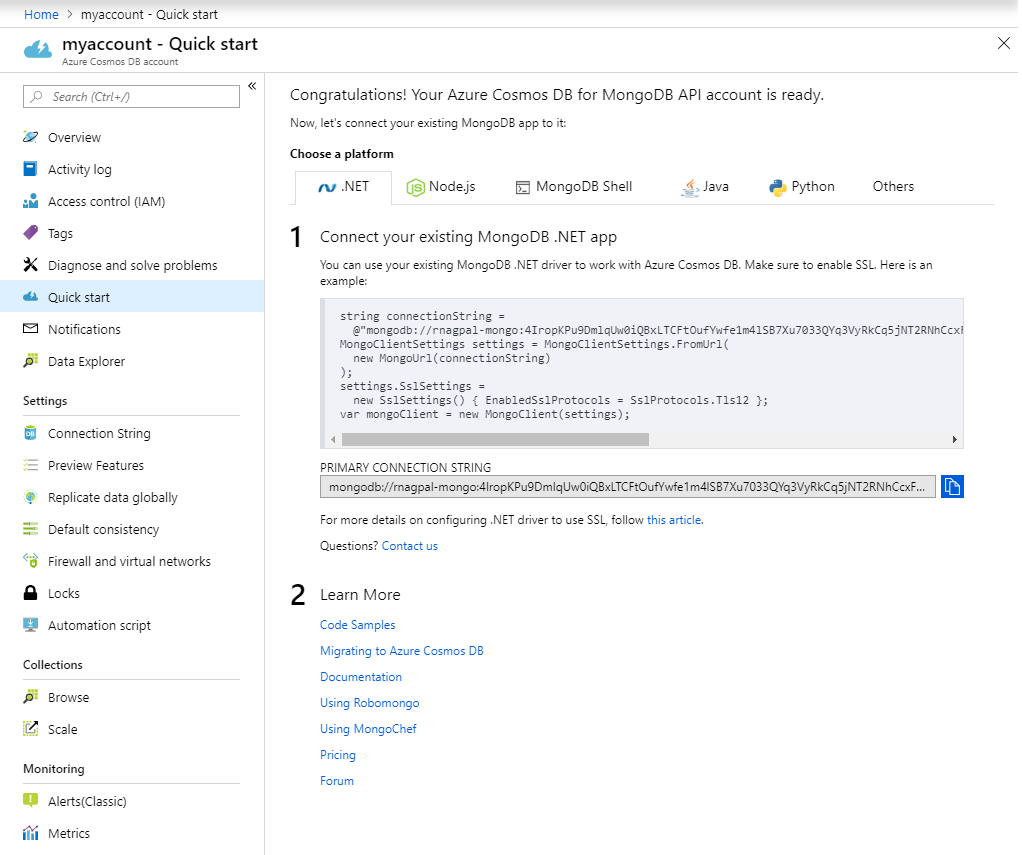
The account creation takes a few minutes. Wait for the portal to display the Congratulations! Your Azure Cosmos DB for MongoDB account is ready page.
Create a database
In this application we will cover two ways of creating collections in Azure Cosmos DB:
Storing each object model in a separate collection: We recommend creating a database with dedicated throughput. Using this capacity model will give you better cost efficiency.

Storing all object models in a single Azure Cosmos DB collection: If you'd prefer to store all models in a single collection, you can just create a new database without selecting the Provision Throughput option. Using this capacity model will create each collection with its own throughput capacity for every object model.
After you create the database, you'll use the name in the COSMOSDB_DBNAME environment variable below.
Set up your Node.js application
Note
If you'd like to just walkthrough the sample code instead of setup the application itself, clone the sample used for this tutorial and build your Node.js Mongoose application on Azure Cosmos DB.
To create a Node.js application in the folder of your choice, run the following command in a node command prompt.
npm initAnswer the questions and your project will be ready to go.
Add a new file to the folder and name it
index.js.Install the necessary packages using one of the
npm installoptions:- Mongoose:
npm install mongoose --save
Note
For more information on which version of mongoose is compatible with your API for MongoDB server version, see Mongoose compatability.
Dotenv (if you'd like to load your secrets from an .env file):
npm install dotenv --saveNote
The
--saveflag adds the dependency to the package.json file.
- Mongoose:
Import the dependencies in your
index.jsfile.var mongoose = require('mongoose'); var env = require('dotenv').config(); //Use the .env file to load the variablesAdd your Azure Cosmos DB connection string and Azure Cosmos DB Name to the
.envfile. Replace the placeholders {cosmos-account-name} and {dbname} with your own Azure Cosmos DB account name and database name, without the brace symbols.// You can get the following connection details from the Azure portal. You can find the details on the Connection string pane of your Azure Cosmos DB account. COSMOSDB_USER = "<Azure Cosmos DB account's user name, usually the database account name>" COSMOSDB_PASSWORD = "<Azure Cosmos DB account password, this is one of the keys specified in your account>" COSMOSDB_DBNAME = "<Azure Cosmos DB database name>" COSMOSDB_HOST= "<Azure Cosmos DB Host name>" COSMOSDB_PORT=10255Connect to Azure Cosmos DB using the Mongoose framework by adding the following code to the end of index.js.
mongoose.connect("mongodb://"+process.env.COSMOSDB_HOST+":"+process.env.COSMOSDB_PORT+"/"+process.env.COSMOSDB_DBNAME+"?ssl=true& replicaSet=globaldb", {
   auth: {
     username: process.env.COSMOSDB_USER,
     password: process.env.COSMOSDB_PASSWORD
   },
   useNewUrlParser: true,
   useUnifiedTopology: true,
   retryWrites: false
})
.then(() => console.log('Connection to CosmosDB successful'))
.catch((err) => console.error(err));
Note
Here, the environment variables are loaded using process.env.{variableName} using the
dotenvnpm package.Once you are connected to Azure Cosmos DB, you can now start setting up object models in Mongoose.
Best practices for using Mongoose with Azure Cosmos DB
For every model you create, Mongoose creates a new collection. This is best addressed using the Database Level Throughput option, which was previously discussed. To use a single collection, you need to use Mongoose Discriminators. Discriminators are a schema inheritance mechanism. They enable you to have multiple models with overlapping schemas on top of the same underlying MongoDB collection.
You can store the various data models in the same collection and then use a filter clause at query time to pull down only the data needed. Let's walk through each of the models.
One collection per object model
This section explores how to achieve this with Azure Cosmos DB's API for MongoDB. This method is our recommended approach since it allows you to control cost and capacity. As a result, the amount of Request Units on the database does not depend on the number of object models. This is the default operating model for Mongoose, so, you might be familiar with this.
Open your
index.jsagain.Create the schema definition for 'Family'.
const Family = mongoose.model('Family', new mongoose.Schema({
    lastName: String,
    parents: [{
        familyName: String,
        firstName: String,
        gender: String
    }],
    children: [{
        familyName: String,
        firstName: String,
        gender: String,
        grade: Number
    }],
    pets:[{
        givenName: String
    }],
    address: {
        country: String,
        state: String,
        city: String
    }
}));
Create an object for 'Family'.
const family = new Family({
    lastName: "Volum",
    parents: [
        { firstName: "Thomas" },
        { firstName: "Mary Kay" }
    ],
    children: [
        { firstName: "Ryan", gender: "male", grade: 8 },
        { firstName: "Patrick", gender: "male", grade: 7 }
    ],
    pets: [
        { givenName: "Buddy" }
    ],
    address: { country: "USA", state: "WA", city: "Seattle" }
});
Finally, let's save the object to Azure Cosmos DB. This creates a collection underneath the covers.
family.save((err, saveFamily) => {
    console.log(JSON.stringify(saveFamily));
});
Now, let's create another schema and object. This time, let's create one for 'Vacation Destinations' that the families might be interested in.
Just like last time, let's create the scheme
const VacationDestinations = mongoose.model('VacationDestinations', new mongoose.Schema({
 name: String,
 country: String
}));
Create a sample object (You can add multiple objects to this schema) and save it.
const vacaySpot = new VacationDestinations({
 name: "Honolulu",
 country: "USA"
});

vacaySpot.save((err, saveVacay) => {
 console.log(JSON.stringify(saveVacay));
});
Now, going into the Azure portal, you notice two collections created in Azure Cosmos DB.

Finally, let's read the data from Azure Cosmos DB. Since we're using the default Mongoose operating model, the reads are the same as any other reads with Mongoose.
Family.find({ 'children.gender' : "male"}, function(err, foundFamily){
    foundFamily.forEach(fam => console.log("Found Family: " + JSON.stringify(fam)));
});
Using Mongoose discriminators to store data in a single collection
In this method, we use Mongoose Discriminators to help optimize for the costs of each collection. Discriminators allow you to define a differentiating 'Key', which allows you to store, differentiate and filter on different object models.
Here, we create a base object model, define a differentiating key and add 'Family' and 'VacationDestinations' as an extension to the base model.
Let's set up the base config and define the discriminator key.
const baseConfig = {
    discriminatorKey: "_type", //If you've got a lot of different data types, you could also consider setting up a secondary index here.
    collection: "alldata"   //Name of the Common Collection
};
Next, let's define the common object model
const commonModel = mongoose.model('Common', new mongoose.Schema({}, baseConfig));We now define the 'Family' model. Notice here that we're using
commonModel.discriminatorinstead ofmongoose.model. Additionally, we're also adding the base config to the mongoose schema. So, here, the discriminatorKey isFamilyType.const Family_common = commonModel.discriminator('FamilyType', new mongoose.Schema({ lastName: String, parents: [{ familyName: String, firstName: String, gender: String }], children: [{ familyName: String, firstName: String, gender: String, grade: Number }], pets:[{ givenName: String }], address: { country: String, state: String, city: String } }, baseConfig));Similarly, let's add another schema, this time for the 'VacationDestinations'. Here, the DiscriminatorKey is
VacationDestinationsType.const Vacation_common = commonModel.discriminator('VacationDestinationsType', new mongoose.Schema({ name: String, country: String }, baseConfig));Finally, let's create objects for the model and save it.
Let's add object(s) to the 'Family' model.
const family_common = new Family_common({
 lastName: "Volum",
 parents: [
     { firstName: "Thomas" },
     { firstName: "Mary Kay" }
 ],
 children: [
     { firstName: "Ryan", gender: "male", grade: 8 },
     { firstName: "Patrick", gender: "male", grade: 7 }
 ],
 pets: [
     { givenName: "Buddy" }
 ],
 address: { country: "USA", state: "WA", city: "Seattle" }
});

family_common.save((err, saveFamily) => {
 console.log("Saved: " + JSON.stringify(saveFamily));
});
Next, let's add object(s) to the 'VacationDestinations' model and save it.
const vacay_common = new Vacation_common({
 name: "Honolulu",
 country: "USA"
});

vacay_common.save((err, saveVacay) => {
 console.log("Saved: " + JSON.stringify(saveVacay));
});
Now, if you go back to the Azure portal, you notice that you have only one collection called
alldatawith both 'Family' and 'VacationDestinations' data.
Also, notice that each object has another attribute called as
__type, which help you differentiate between the two different object models.Finally, let's read the data that is stored in Azure Cosmos DB. Mongoose takes care of filtering data based on the model. So, you have to do nothing different when reading data. Just specify your model (in this case,
Family_common) and Mongoose handles filtering on the 'DiscriminatorKey'.Family_common.find({ 'children.gender' : "male"}, function(err, foundFamily){ foundFamily.forEach(fam => console.log("Found Family (using discriminator): " + JSON.stringify(fam))); });
As you can see, it is easy to work with Mongoose discriminators. So, if you have an app that uses the Mongoose framework, this tutorial is a way for you to get your application up and running using Azure Cosmos DB's API for MongoDB without requiring too many changes.
Clean up resources
When you're done with your app and Azure Cosmos DB account, you can delete the Azure resources you created so you don't incur more charges. To delete the resources:
In the Azure portal Search bar, search for and select Resource groups.
From the list, select the resource group you created for this quickstart.

On the resource group Overview page, select Delete resource group.
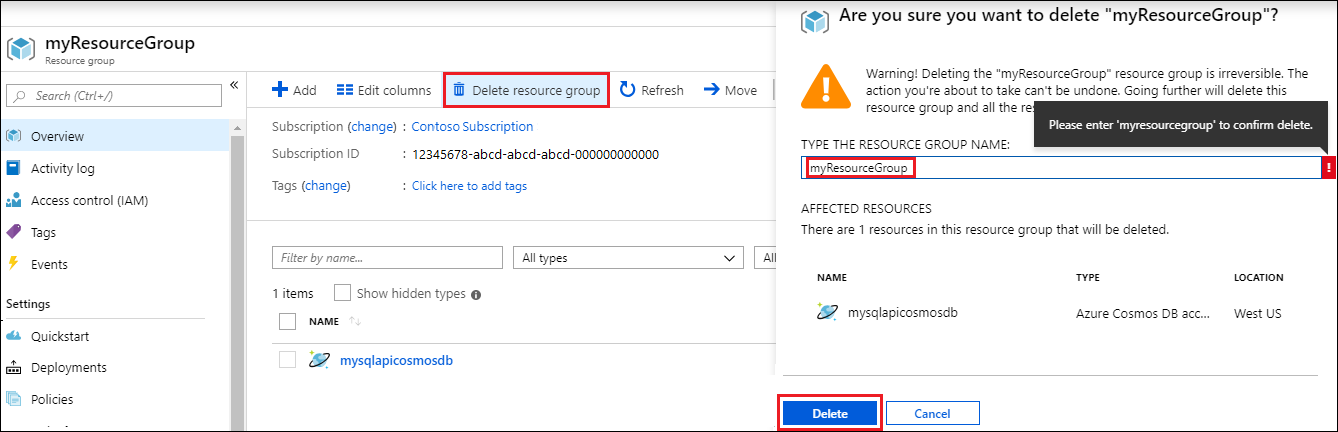
In the next window, enter the name of the resource group to delete, and then select Delete.
Next steps
- Learn how to use Studio 3T with Azure Cosmos DB's API for MongoDB.
- Learn how to use Robo 3T with Azure Cosmos DB's API for MongoDB.
- Explore MongoDB samples with Azure Cosmos DB's API for MongoDB.
- Trying to do capacity planning for a migration to Azure Cosmos DB? You can use information about your existing database cluster for capacity planning.
- If all you know is the number of vcores and servers in your existing database cluster, read about estimating request units using vCores or vCPUs
- If you know typical request rates for your current database workload, read about estimating request units using Azure Cosmos DB capacity planner
Feedback
Coming soon: Throughout 2024 we will be phasing out GitHub Issues as the feedback mechanism for content and replacing it with a new feedback system. For more information see: https://aka.ms/ContentUserFeedback.
Submit and view feedback for