Update tax details for an Azure billing account
When you buy Azure products and services, the taxes that you pay are determined by one of two things: your sold-to address, or your ship-to/service usage address, if it's different.
This article helps you review and update the sold to information, ship-to/service usage address, and tax IDs for your Azure billing account. The instructions to update vary by the billing account type. For more information about billing accounts and how to identify your billing account type, see View billing accounts in Azure portal. An Azure billing account is separate from your Azure user account and Microsoft account.
Note
When you update the sold to information, ship-to address, and Tax IDs in the Azure portal, the updated values are only used for invoices that are generated in the future. To make changes to an existing invoice, create a support request.
Update the sold to address
- Sign in to the Azure portal using the email address with an owner or a contributor role on the billing account for a Microsoft Customer Agreement (MCA). Or, sign in with an account administrator role for a Microsoft Online Subscription Program (MOSP) billing account. MOSP is also referred to as pay-as-you-go.
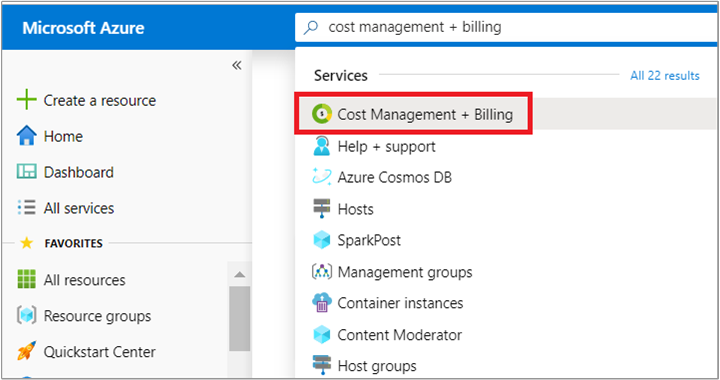
- Search for Cost Management + Billing.

- In the left menu, select Properties and then select Update sold-to.

- Enter the new address and select Save.
Note
Some accounts require additional verification before their sold-to can be updated. If your account requires manual approval, you are prompted to contact Azure support.
Update ship-to address for an MCA billing account
Customers in Canada, Puerto Rico, and the United States can set the ship-to address for their MCA billing accounts. Each billing profile in their account can have its own ship-to address. To use multiple ship-to addresses, create multiple billing profiles, one for each ship-to address.
- Sign in to the Azure portal using the email address with an owner or a contributor role for the billing account or a billing profile for an MCA.
- Search for Cost Management + Billing.
- In the left menu under Billing, select Billing profiles.
- Select a billing profile to update the ship-to address.

- In the left menu under Settings, select Properties.
- Select Update ship-to/service usage address.

- Enter the new address and then select Save.
Update ship-to address for a MOSP billing account
Customers with a Microsoft Online Service Program (MOSP) account, also called pay-as-you-go, can set ship-to address for their billing account. Each subscription in their account can have its own ship-to address. To use multiple ship-to addresses, create multiple subscriptions, one for each ship-to address.
- Sign in to the Azure portal using the email address that has account administrator permission on the account.
- Search for Subscriptions.

- Select a subscription from the list.
- In the left menu under Settings, select Properties.
- Select Update Address.

- Enter the new address and then select Save.
Add your tax IDs
In the Azure portal, tax IDs can only be updated for Microsoft Online Service Program (MOSP) or Microsoft Customer Agreement billing accounts that are created through the Azure website.
Customers in the following countries or regions can add their Tax IDs.
| Country/region | Country/region |
|---|---|
| Armenia | Australia |
| Armenia | Australia |
| Austria | Bahamas |
| Bahrain | Bangladesh |
| Belarus | Belgium |
| Brazil | Bulgaria |
| Cambodia | Cameroon |
| Chile | Colombia |
| Croatia | Cyprus |
| Czech Republic | Denmark |
| Estonia | Fiji |
| Finland | France |
| Georgia | Germany |
| Ghana | Greece |
| Guatemala | Hungary |
| Iceland | Italy ¹ |
| India ² | Indonesia |
| Ireland | Isle of Man |
| Kenya | Korea |
| Latvia | Liechtenstein |
| Lithuania | Luxembourg |
| Malaysia | Malta |
| Mexico | Moldova |
| Monaco | Netherlands |
| New Zealand | Nigeria |
| Oman | Philippines |
| Poland | Portugal |
| Romania | Saudi Arabia |
| Serbia | Slovakia |
| Slovenia | South Africa |
| Spain | Sweden |
| Switzerland | Taiwan |
| Tajikistan | Thailand |
| Türkiye | Ukraine |
| United Arab Emirates | United Kingdom |
| Uzbekistan | Vietnam |
| Zimbabwe |
¹ For Italy, you must enter your organization's Codice Fiscale using the following steps with the Manage Tax IDs option.
² Follow the instructions in the next section to add your Goods and Services Taxpayer Identification Number (GSTIN).
- Sign in to the Azure portal using the email address that has an owner or a contributor role on the billing account for an MCA or an account administrator role for a MOSP billing account.
- Search for Cost Management + Billing.

- In the left menu under Settings, select Properties.
- Select Manage Tax IDs.

- Enter new tax IDs and then select Save.
Note
If you don't see the Tax IDs section, Tax IDs are not yet collected for your region. Or, updating Tax IDs in the Azure portal isn't supported for your account.
Add your GSTIN for billing accounts in India
- Sign in to the Azure portal using the email address that has account administrator permission on the account.
- Search for Subscriptions.
- Select a subscription from the list.
- In the left menu, select Properties.
- Select Update Address.

- Enter the new GSTIN and then select Save.

Need help? Contact us.
If you have questions or need help, create a support request.
Next steps
Feedback
Coming soon: Throughout 2024 we will be phasing out GitHub Issues as the feedback mechanism for content and replacing it with a new feedback system. For more information see: https://aka.ms/ContentUserFeedback.
Submit and view feedback for