Create and configure a self-hosted integration runtime
APPLIES TO:  Azure Data Factory
Azure Synapse Analytics
Azure Data Factory
Azure Synapse Analytics
Tip
Try out Data Factory in Microsoft Fabric, an all-in-one analytics solution for enterprises. Microsoft Fabric covers everything from data movement to data science, real-time analytics, business intelligence, and reporting. Learn how to start a new trial for free!
The integration runtime (IR) is the compute infrastructure that Azure Data Factory and Synapse pipelines use to provide data-integration capabilities across different network environments. For details about IR, see Integration runtime overview.
A self-hosted integration runtime can run copy activities between a cloud data store and a data store in a private network. It also can dispatch transform activities against compute resources in an on-premises network or an Azure virtual network. The installation of a self-hosted integration runtime needs an on-premises machine or a virtual machine inside a private network.
This article describes how you can create and configure a self-hosted IR.
Note
We recommend that you use the Azure Az PowerShell module to interact with Azure. See Install Azure PowerShell to get started. To learn how to migrate to the Az PowerShell module, see Migrate Azure PowerShell from AzureRM to Az.
Considerations for using a self-hosted IR
- You can use a single self-hosted integration runtime for multiple on-premises data sources. You can also share it with another data factory within the same Microsoft Entra tenant. For more information, see Sharing a self-hosted integration runtime.
- You can install only one instance of a self-hosted integration runtime on any single machine. If you have two data factories that need to access on-premises data sources, either use the self-hosted IR sharing feature to share the self-hosted IR, or install the self-hosted IR on two on-premises computers, one for each data factory or Synapse workspace. Synapse workspace doesn't support Integration Runtime Sharing.
- The self-hosted integration runtime doesn't need to be on the same machine as the data source. However, having the self-hosted integration runtime close to the data source reduces the time for the self-hosted integration runtime to connect to the data source. We recommend that you install the self-hosted integration runtime on a machine that differs from the one that hosts the on-premises data source. When the self-hosted integration runtime and data source are on different machines, the self-hosted integration runtime doesn't compete with the data source for resources.
- You can have multiple self-hosted integration runtimes on different machines that connect to the same on-premises data source. For example, if you have two self-hosted integration runtimes that serve two data factories, the same on-premises data source can be registered with both data factories.
- Use a self-hosted integration runtime to support data integration within an Azure virtual network.
- Treat your data source as an on-premises data source that is behind a firewall, even when you use Azure ExpressRoute. Use the self-hosted integration runtime to connect the service to the data source.
- Use the self-hosted integration runtime even if the data store is in the cloud on an Azure Infrastructure as a Service (IaaS) virtual machine.
- Tasks might fail in a self-hosted integration runtime that you installed on a Windows server for which FIPS-compliant encryption is enabled. To work around this problem, you have two options: store credentials/secret values in an Azure Key Vault or disable FIPS-compliant encryption on the server. To disable FIPS-compliant encryption, change the following registry subkey's value from 1 (enabled) to 0 (disabled):
HKLM\System\CurrentControlSet\Control\Lsa\FIPSAlgorithmPolicy\Enabled. If you use the self-hosted integration runtime as a proxy for SSIS integration runtime, FIPS-compliant encryption can be enabled and will be used when moving data from on premises to Azure Blob Storage as a staging area. - Full licensing details are provided on the first page of the self-hosted integration runtime setup.
Note
Currently self-hosted integration runtime can only be shared with multiple data factories, it can't be shared across Synapse workspaces or between data factory and Synapse workspace.
Command flow and data flow
When you move data between on-premises and the cloud, the activity uses a self-hosted integration runtime to transfer the data between an on-premises data source and the cloud.
Here's a high-level summary of the data-flow steps for copying with a self-hosted IR:
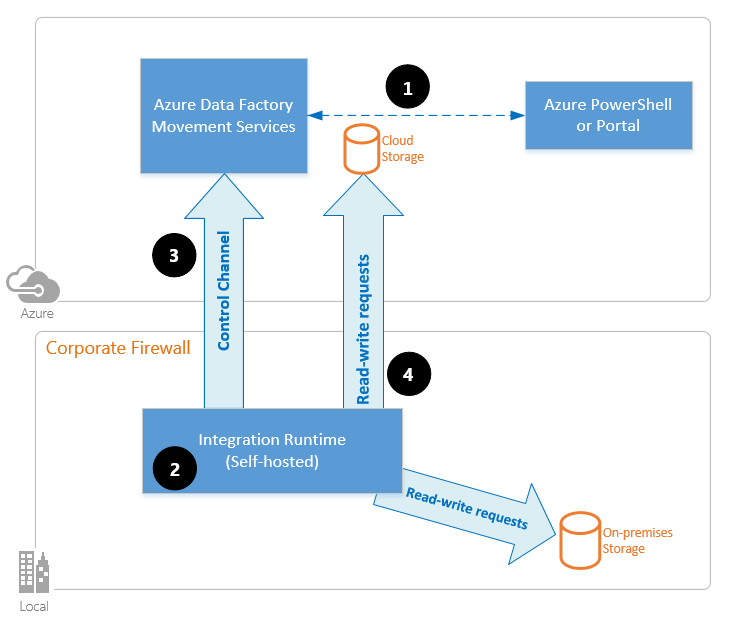
A data developer first creates a self-hosted integration runtime within an Azure data factory or Synapse workspace by using the Azure portal or the PowerShell cmdlet. Then the data developer creates a linked service for an on-premises data store, specifying the self-hosted integration runtime instance that the service should use to connect to data stores.
The self-hosted integration runtime node encrypts the credentials by using Windows Data Protection Application Programming Interface (DPAPI) and saves the credentials locally. If multiple nodes are set for high availability, the credentials are further synchronized across other nodes. Each node encrypts the credentials by using DPAPI and stores them locally. Credential synchronization is transparent to the data developer and is handled by the self-hosted IR.
Azure Data Factory and Synapse pipelines communicate with the self-hosted integration runtime to schedule and manage jobs. Communication is via a control channel that uses a shared Azure Relay connection. When an activity job needs to be run, the service queues the request along with any credential information. It does so in case credentials aren't already stored on the self-hosted integration runtime. The self-hosted integration runtime starts the job after it polls the queue.
The self-hosted integration runtime copies data between an on-premises store and cloud storage. The direction of the copy depends on how the copy activity is configured in the data pipeline. For this step, the self-hosted integration runtime directly communicates with cloud-based storage services like Azure Blob storage over a secure HTTPS channel.
Prerequisites
- The supported versions of Windows are:
- Windows 8.1
- Windows 10
- Windows 11
- Windows Server 2012
- Windows Server 2012 R2
- Windows Server 2016
- Windows Server 2019
- Windows Server 2022
Installation of the self-hosted integration runtime on a domain controller isn't supported.
- Self-hosted integration runtime requires a 64-bit Operating System with .NET Framework 4.7.2 or above. See .NET Framework System Requirements for details.
- The recommended minimum configuration for the self-hosted integration runtime machine is a 2-GHz processor with 4 cores, 8 GB of RAM, and 80 GB of available hard drive space. For the details of system requirements, see Download.
- If the host machine hibernates, the self-hosted integration runtime doesn't respond to data requests. Configure an appropriate power plan on the computer before you install the self-hosted integration runtime. If the machine is configured to hibernate, the self-hosted integration runtime installer prompts with a message.
- You must be an administrator on the machine to successfully install and configure the self-hosted integration runtime.
- Copy-activity runs happen with a specific frequency. Processor and RAM usage on the machine follows the same pattern with peak and idle times. Resource usage also depends heavily on the amount of data that is moved. When multiple copy jobs are in progress, you see resource usage go up during peak times.
- Tasks might fail during extraction of data in Parquet, ORC, or Avro formats. For more on Parquet, see Parquet format in Azure Data Factory. File creation runs on the self-hosted integration machine. To work as expected, file creation requires the following prerequisites:
- Java Runtime (JRE) version 11 from a JRE provider such as Microsoft OpenJDK 11 or Eclipse Temurin 11. Ensure that the JAVA_HOME system environment variable is set to the JDK folder (not just the JRE folder) you may also need to add the bin folder to your system's PATH environment variable.
Note
It might be necessary to adjust the Java settings if memory errors occur, as described in the Parquet format documentation.
Note
If you are running in government cloud, please review Connect to government cloud.
Setting up a self-hosted integration runtime
To create and set up a self-hosted integration runtime, use the following procedures.
Create a self-hosted IR via Azure PowerShell
You can use Azure PowerShell for this task. Here is an example:
Set-AzDataFactoryV2IntegrationRuntime -ResourceGroupName $resourceGroupName -DataFactoryName $dataFactoryName -Name $selfHostedIntegrationRuntimeName -Type SelfHosted -Description "selfhosted IR description"Download and install the self-hosted integration runtime on a local machine.
Retrieve the authentication key and register the self-hosted integration runtime with the key. Here is a PowerShell example:
Get-AzDataFactoryV2IntegrationRuntimeKey -ResourceGroupName $resourceGroupName -DataFactoryName $dataFactoryName -Name $selfHostedIntegrationRuntimeName
Note
Run PowerShell command in Azure government, please see Connect to Azure Government with PowerShell.
Create a self-hosted IR via UI
Use the following steps to create a self-hosted IR using the Azure Data Factory or Azure Synapse UI.
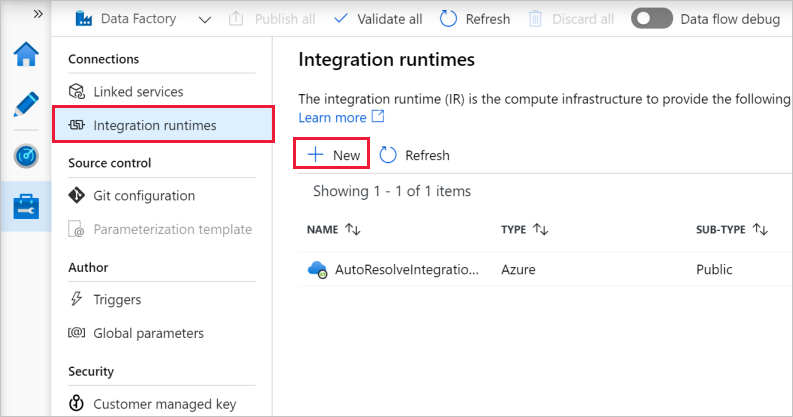
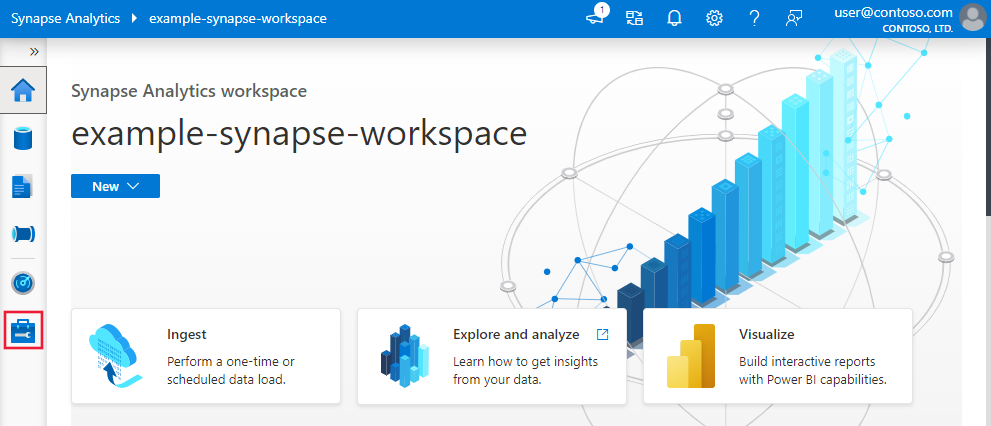
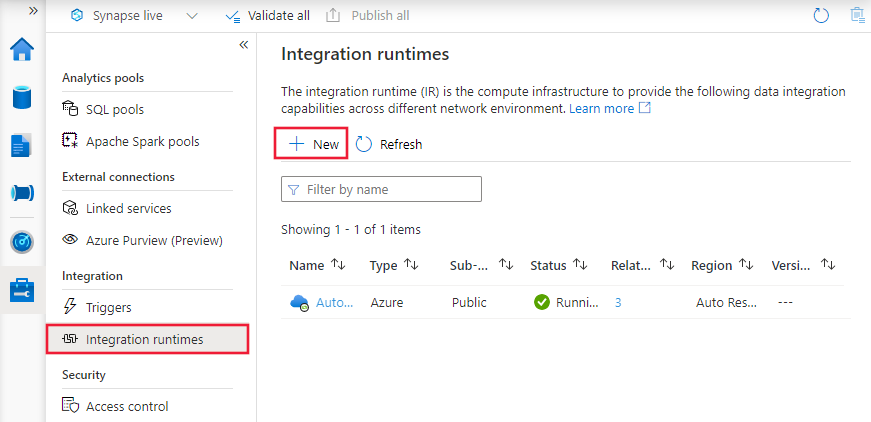
On the home page of the Azure Data Factory UI, select the Manage tab from the leftmost pane.

Select Integration runtimes on the left pane, and then select +New.
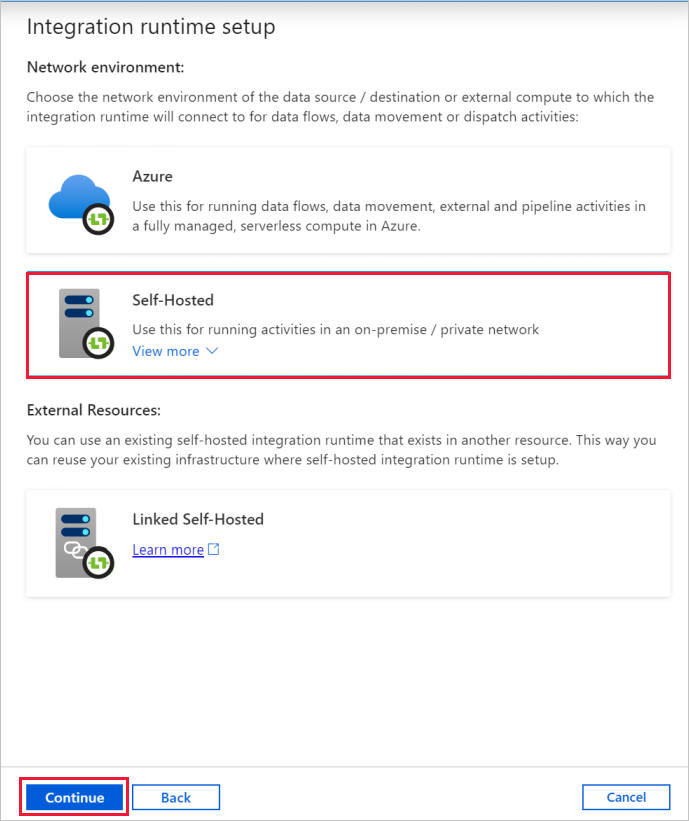
On the Integration runtime setup page, select Azure, Self-Hosted, and then select Continue.
On the following page, select Self-Hosted to create a Self-Hosted IR, and then select Continue.

Configure a self-hosted IR via UI
Enter a name for your IR, and select Create.
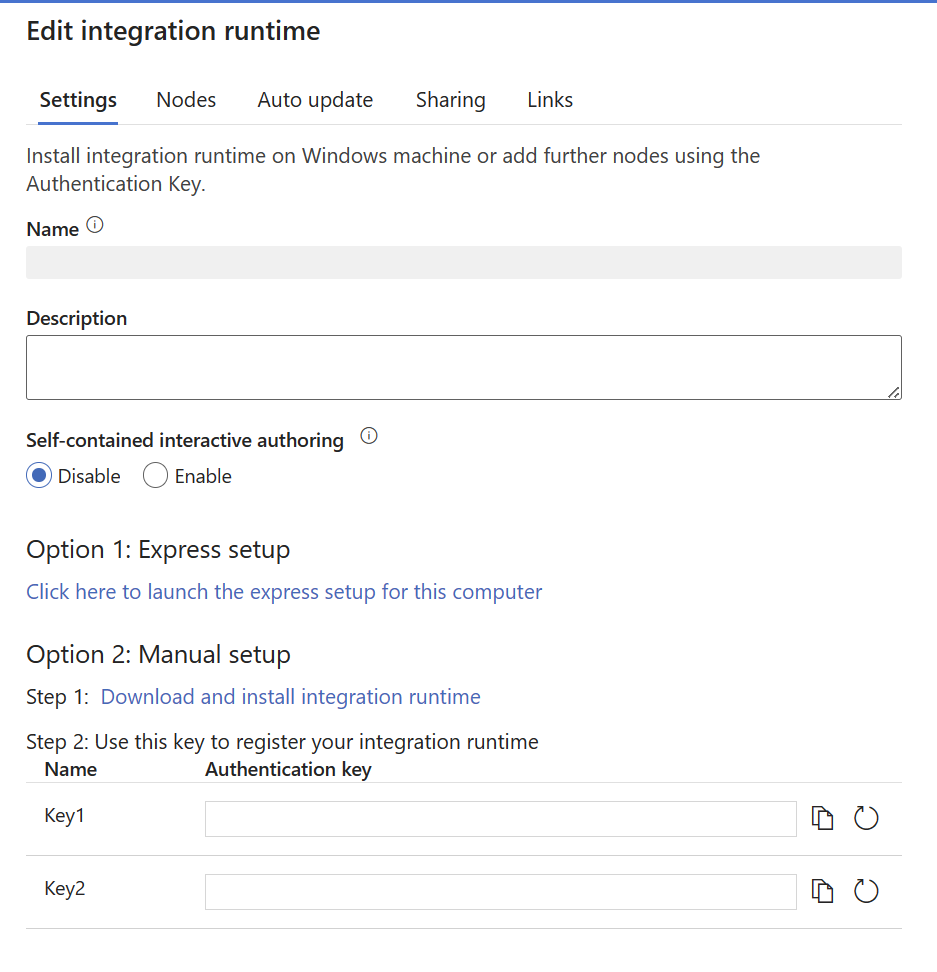
On the Integration runtime setup page, select the link under Option 1 to open the express setup on your computer. Or follow the steps under Option 2 to set up manually. The following instructions are based on manual setup:
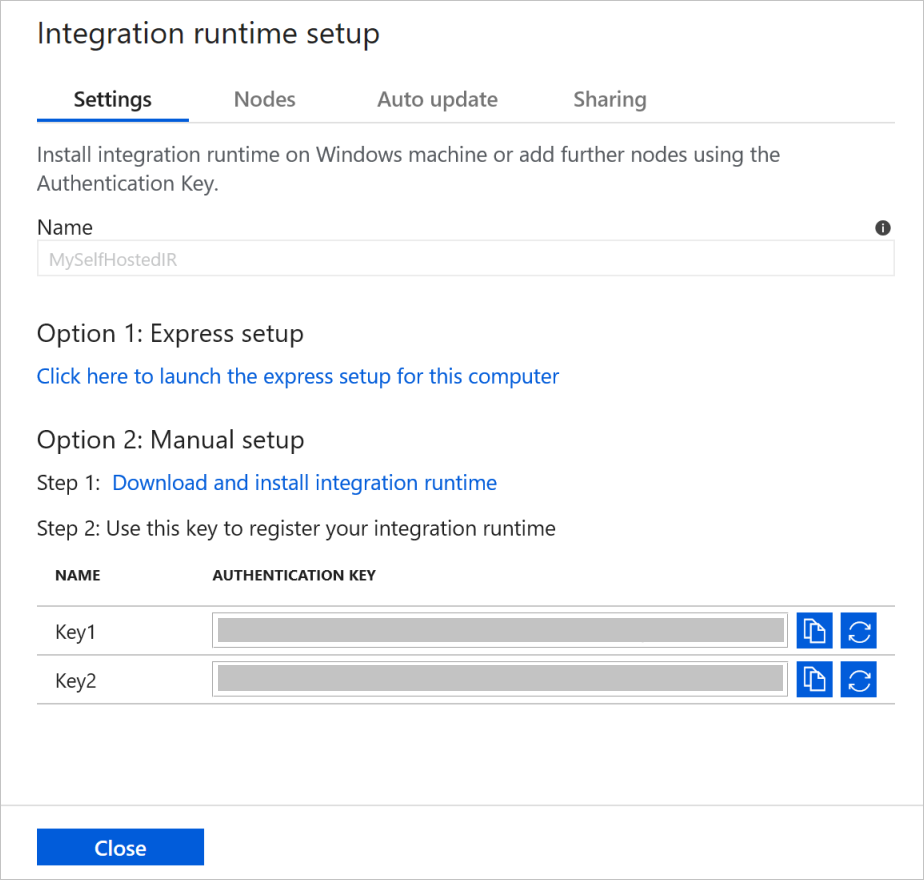
Copy and paste the authentication key. Select Download and install integration runtime.
Download the self-hosted integration runtime on a local Windows machine. Run the installer.
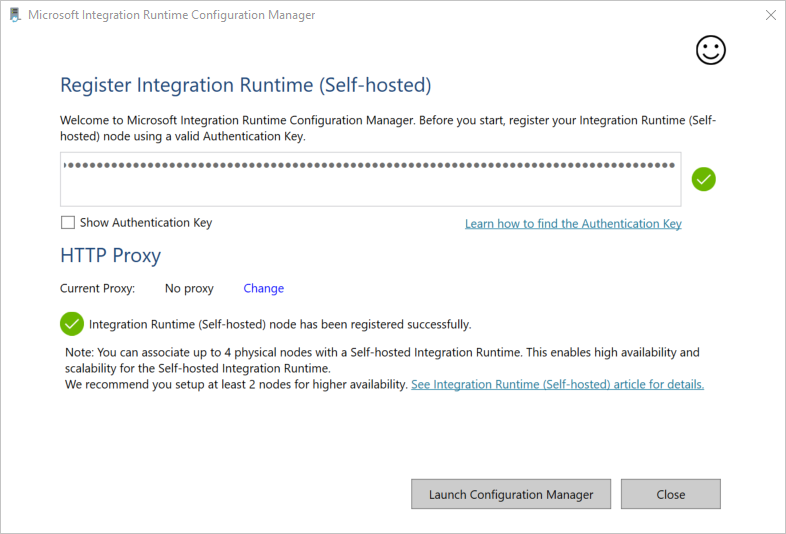
On the Register Integration Runtime (Self-hosted) page, paste the key you saved earlier, and select Register.

On the New Integration Runtime (Self-hosted) Node page, select Finish.
After the self-hosted integration runtime is registered successfully, you see the following window:
Set up a self-hosted IR on an Azure VM via an Azure Resource Manager template
You can automate self-hosted IR setup on an Azure virtual machine by using the Create self host IR template. The template provides an easy way to have a fully functional self-hosted IR inside an Azure virtual network. The IR has high-availability and scalability features, as long as you set the node count to 2 or higher.
Set up an existing self-hosted IR via local PowerShell
You can use a command line to set up or manage an existing self-hosted IR. This usage can especially help to automate the installation and registration of self-hosted IR nodes.
Dmgcmd.exe is included in the self-hosted installer. It's typically located in the C:\Program Files\Microsoft Integration Runtime\5.0\Shared\ folder. This application supports various parameters and can be invoked via a command line using batch scripts for automation.
Use the application as follows:
dmgcmd ACTION args...
Here are details of the application's actions and arguments:
| ACTION | args | Description |
|---|---|---|
-rn,-RegisterNewNode |
"<AuthenticationKey>" ["<NodeName>"] |
Register a self-hosted integration runtime node with the specified authentication key and node name. |
-era,-EnableRemoteAccess |
"<port>" ["<thumbprint>"] |
Enable remote access on the current node to set up a high-availability cluster. Or enable setting credentials directly against the self-hosted IR without going through an Azure Data Factory or Azure Synapse workspace. You do the latter by using the New-AzDataFactoryV2LinkedServiceEncryptedCredential cmdlet from a remote machine in the same network. |
-erac,-EnableRemoteAccessInContainer |
"<port>" ["<thumbprint>"] |
Enable remote access to the current node when the node runs in a container. |
-dra,-DisableRemoteAccess |
Disable remote access to the current node. Remote access is needed for multinode setup. The New-AzDataFactoryV2LinkedServiceEncryptedCredential PowerShell cmdlet still works even when remote access is disabled. This behavior is true as long as the cmdlet is executed on the same machine as the self-hosted IR node. | |
-k,-Key |
"<AuthenticationKey>" |
Overwrite or update the previous authentication key. Be careful with this action. Your previous self-hosted IR node can go offline if the key is of a new integration runtime. |
-gbf,-GenerateBackupFile |
"<filePath>" "<password>" |
Generate a backup file for the current node. The backup file includes the node key and data-store credentials. |
-ibf,-ImportBackupFile |
"<filePath>" "<password>" |
Restore the node from a backup file. |
-r,-Restart |
Restart the self-hosted integration runtime host service. | |
-s,-Start |
Start the self-hosted integration runtime host service. | |
-t,-Stop |
Stop the self-hosted integration runtime host service. | |
-sus,-StartUpgradeService |
Start the self-hosted integration runtime upgrade service. | |
-tus,-StopUpgradeService |
Stop the self-hosted integration runtime upgrade service. | |
-tonau,-TurnOnAutoUpdate |
Turn on the self-hosted integration runtime auto-update. This command is for Azure Data Factory V1 only. | |
-toffau,-TurnOffAutoUpdate |
Turn off the self-hosted integration runtime auto-update. This command is for Azure Data Factory V1 only. | |
-ssa,-SwitchServiceAccount |
"<domain\user>" ["<password>"] |
Set DIAHostService to run as a new account. Use the empty password "" for system accounts and virtual accounts. |
-elma,-EnableLocalMachineAccess |
Enable local machine access (localhost, private IP) on the current self-hosted IR node. In self-hosted IR High Availability scenario, the action needs to be invoked on every self-hosted IR node. | |
-dlma,-DisableLocalMachineAccess |
Disable local machine access (localhost, private IP) on the current self-hosted IR node. In self-hosted IR High Availability scenario, the action needs to be invoked on every self-hosted IR node. | |
-DisableLocalFolderPathValidation |
Disable security validation to enable access to file system of the local machine. | |
-EnableLocalFolderPathValidation |
Enable security validation to disable access to file system of the local machine. | |
-eesp,-EnableExecuteSsisPackage |
Enable SSIS package execution on self-hosted IR node. | |
-desp,-DisableExecuteSsisPackage |
Disable SSIS package execution on self-hosted IR node. | |
-gesp,-GetExecuteSsisPackage |
Get the value if ExecuteSsisPackage option is enabled on self-hosted IR node. If the returned value is true, then ExecuteSSISPackage is enabled; If the returned value is false or null, then ExecuteSSISPackage is disabled. |
Install and register a self-hosted IR from Microsoft Download Center
Go to the Microsoft integration runtime download page.
Select Download, select the 64-bit version, and select Next. The 32-bit version isn't supported.
Run the MSI file directly, or save it to your hard drive and run it.
On the Welcome window, select a language and select Next.
Accept the Microsoft Software License Terms and select Next.
Select folder to install the self-hosted integration runtime, and select Next.
On the Ready to install page, select Install.
Select Finish to complete installation.
Get the authentication key by using PowerShell. Here's a PowerShell example for retrieving the authentication key:
Get-AzDataFactoryV2IntegrationRuntimeKey -ResourceGroupName $resourceGroupName -DataFactoryName $dataFactoryName -Name $selfHostedIntegrationRuntimeNameOn the Register Integration Runtime (Self-hosted) window of Microsoft Integration Runtime Configuration Manager running on your machine, take the following steps:
Paste the authentication key in the text area.
Optionally, select Show authentication key to see the key text.
Select Register.
Note
Release Notes are available on the same Microsoft integration runtime download page.
Service account for self-hosted integration runtime
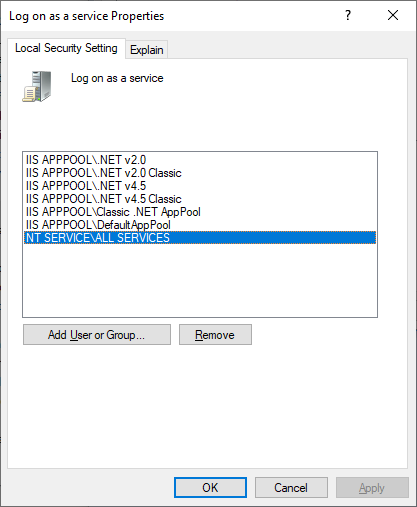
The default log on service account of the self-hosted integration runtime is NT SERVICE\DIAHostService. You can see it in Services -> Integration Runtime Service -> Properties -> Log on.
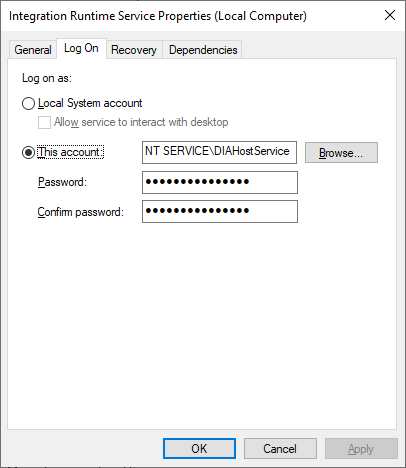
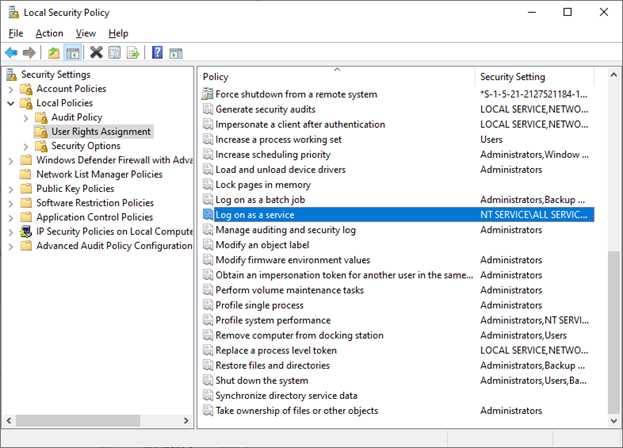
Make sure the account has the permission of Log on as a service. Otherwise self-hosted integration runtime can't start successfully. You can check the permission in Local Security Policy -> Security Settings -> Local Policies -> User Rights Assignment -> Log on as a service
Notification area icons and notifications
If you move your cursor over the icon or message in the notification area, you can see details about the state of the self-hosted integration runtime.

High availability and scalability
You can associate a self-hosted integration runtime with multiple on-premises machines or virtual machines in Azure. These machines are called nodes. You can have up to four nodes associated with a self-hosted integration runtime. The benefits of having multiple nodes on on-premises machines that have a gateway installed for a logical gateway are:
- Higher availability of the self-hosted integration runtime so that it's no longer the single point of failure in your big data solution or cloud data integration. This availability helps ensure continuity when you use up to four nodes.
- Improved performance and throughput during data movement between on-premises and cloud data stores. Get more information on performance comparisons.
You can associate multiple nodes by installing the self-hosted integration runtime software from Download Center. Then, register it by using either of the authentication keys that were obtained from the New-AzDataFactoryV2IntegrationRuntimeKey cmdlet, as described in the tutorial.
Note
You don't need to create a new self-hosted integration runtime to associate each node. You can install the self-hosted integration runtime on another machine and register it by using the same authentication key.
Note
Before you add another node for high availability and scalability, ensure that the Remote access to intranet option is enabled on the first node. To do so, select Microsoft Integration Runtime Configuration Manager > Settings > Remote access to intranet.
Scale considerations
Scale out
When processor usage is high and available memory is low on the self-hosted IR, add a new node to help scale out the load across machines. If activities fail because they time out or the self-hosted IR node is offline, it helps if you add a node to the gateway.
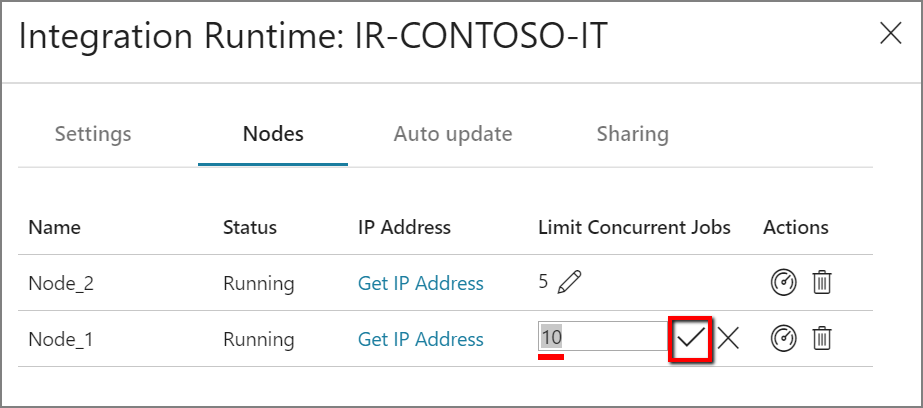
Scale up
When the processor and available RAM aren't well utilized, but the execution of concurrent jobs reaches a node's limits, scale up by increasing the number of concurrent jobs that a node can run. You might also want to scale up when activities time out because the self-hosted IR is overloaded. As shown in the following image, you can increase the maximum capacity for a node:
TLS/SSL certificate requirements
If you want to enable remote access from intranet with TLS/SSL certificate (Advanced) to secure communication between integration runtime nodes, you can follow steps in Enable remote access from intranet with TLS/SSL certificate.
Note
This certificate is used:
- To encrypt ports on a self-hosted IR node.
- For node-to-node communication for state synchronization, which includes credentials synchronization of linked services across nodes.
- When a PowerShell cmdlet is used for linked-service credential settings from within a local network.
We suggest you use this certificate if your private network environment is not secure or if you want to secure the communication between nodes within your private network.
Data movement in transit from a self-hosted IR to other data stores always happens within an encrypted channel, regardless of whether or not this certificate is set.
Credential sync
If you don't store credentials or secret values in an Azure Key Vault, the credentials or secret values will be stored in the machines where your self-hosted integration runtime locates. Each node will have a copy of credential with certain version. In order to make all nodes work together, the version number should be the same for all nodes.
Proxy server considerations
If your corporate network environment uses a proxy server to access the internet, configure the self-hosted integration runtime to use appropriate proxy settings. You can set the proxy during the initial registration phase.

When configured, the self-hosted integration runtime uses the proxy server to connect to the cloud service's source and destination (which use the HTTP or HTTPS protocol). This is why you select Change link during initial setup.

There are three configuration options:
- Do not use proxy: The self-hosted integration runtime doesn't explicitly use any proxy to connect to cloud services.
- Use system proxy: The self-hosted integration runtime uses the proxy setting that is configured in diahost.exe.config and diawp.exe.config. If these files specify no proxy configuration, the self-hosted integration runtime connects to the cloud service directly without going through a proxy.
- Use custom proxy: Configure the HTTP proxy setting to use for the self-hosted integration runtime, instead of using configurations in diahost.exe.config and diawp.exe.config. Address and Port values are required. User Name and Password values are optional, depending on your proxy's authentication setting. All settings are encrypted with Windows DPAPI on the self-hosted integration runtime and stored locally on the machine.
The integration runtime host service restarts automatically after you save the updated proxy settings.
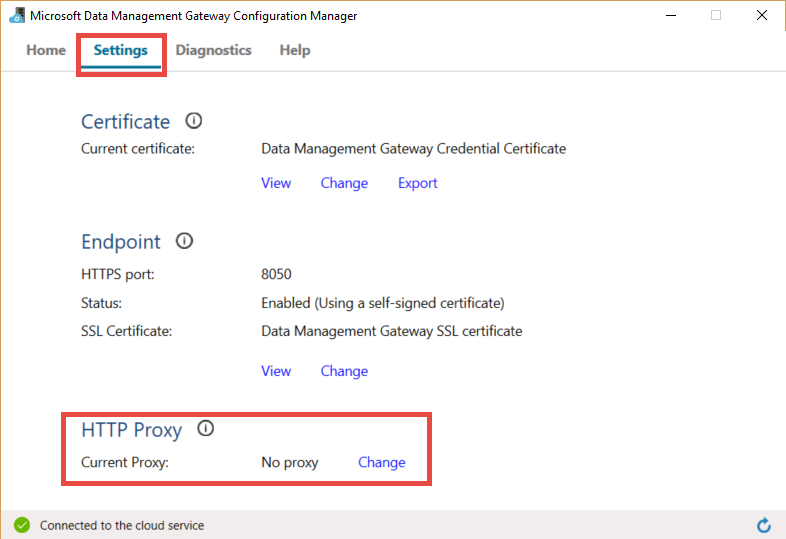
After you register the self-hosted integration runtime, if you want to view or update proxy settings, use Microsoft Integration Runtime Configuration Manager.
- Open Microsoft Integration Runtime Configuration Manager.
- Select the Settings tab.
- Under HTTP Proxy, select the Change link to open the Set HTTP Proxy dialog box.
- Select Next. You then see a warning that asks for your permission to save the proxy setting and restart the integration runtime host service.
You can use the configuration manager tool to view and update the HTTP proxy.
Note
If you set up a proxy server with NTLM authentication, the integration runtime host service runs under the domain account. If you later change the password for the domain account, remember to update the configuration settings for the service and restart the service. Because of this requirement, we suggest that you access the proxy server by using a dedicated domain account that doesn't require you to update the password frequently.
Configure proxy server settings
If you select the Use system proxy option for the HTTP proxy, the self-hosted integration runtime uses the proxy settings in diahost.exe.config and diawp.exe.config. When these files specify no proxy, the self-hosted integration runtime connects to the cloud service directly without going through a proxy. The following procedure provides instructions for updating the diahost.exe.config file:
In File Explorer, make a safe copy of C:\Program Files\Microsoft Integration Runtime\5.0\Shared\diahost.exe.config as a backup of the original file.
Open Notepad running as administrator.
In Notepad, open the text file C:\Program Files\Microsoft Integration Runtime\5.0\Shared\diahost.exe.config.
Find the default system.net tag as shown in the following code:
<system.net>
    <defaultProxy useDefaultCredentials="true" />
</system.net>
You can then add proxy server details as shown in the following example:
<system.net>
    <defaultProxy enabled="true">
          <proxy bypassonlocal="true" proxyaddress="http://proxy.domain.org:8888/" />
    </defaultProxy>
</system.net>
The proxy tag allows additional properties to specify required settings like
scriptLocation. See <proxy> Element (Network Settings) for syntax.<proxy autoDetect="true|false|unspecified" bypassonlocal="true|false|unspecified" proxyaddress="uriString" scriptLocation="uriString" usesystemdefault="true|false|unspecified "/>Save the configuration file in its original location. Then restart the self-hosted integration runtime host service, which picks up the changes.
To restart the service, use the services applet from Control Panel. Or from Integration Runtime Configuration Manager, select the Stop Service button, and then select Start Service.
If the service doesn't start, you likely added incorrect XML tag syntax in the application configuration file that you edited.
Important
Don't forget to update both diahost.exe.config and diawp.exe.config.
You also need to make sure that Microsoft Azure is in your company's allowlist. You can download the list of valid Azure IP addresses. IP Ranges for each cloud, broken down by region and by the tagged services in that cloud are now available on MS Download:
- Public: https://www.microsoft.com/download/details.aspx?id=56519
- US Gov: https://www.microsoft.com/download/details.aspx?id=57063
- Germany: https://www.microsoft.com/download/details.aspx?id=57064
- China: https://www.microsoft.com/download/details.aspx?id=57062
Configure proxy server settings when using a private endpoint
If your company's network architure involves the use of private endpoints and for security reasons, and your company's policy does not allow a direct internet connection from the VM hosting the Self Hosted Integration Runtime to the Azure Data Factory service URL, then you will need to allow bypass the ADF Service URL for full connectivity. The following procedure provides instructions for updating the diahost.exe.config file. You should also repeat these steps for the diawp.exe.config file.
In File Explorer, make a safe copy of C:\Program Files\Microsoft Integration Runtime\5.0\Shared\diahost.exe.config as a backup of the original file.
Open Notepad running as administrator.
In Notepad, open C:\Program Files\Microsoft Integration Runtime\5.0\Shared\diahost.exe.config.
Find the default system.net tag as shown here:
<system.net>
    <defaultProxy useDefaultCredentials="true" />
</system.net>
You can then add bypasslist details as shown in the following example:
<system.net>
  <defaultProxy>
      <bypasslist>
          <add address = "[adfresourcename].[adfresourcelocation].datafactory.azure.net" />
      </bypasslist>
      <proxy
      usesystemdefault="True"
      proxyaddress="http://proxy.domain.org:8888/"
      bypassonlocal="True"
      />
  </defaultProxy>
</system.net>
Possible symptoms for issues related to the firewall and proxy server
If you see error messages like the following ones, the likely reason is improper configuration of the firewall or proxy server. Such configuration prevents the self-hosted integration runtime from connecting to Data Factory or Synapse pipelines to authenticate itself. To ensure that your firewall and proxy server are properly configured, refer to the previous section.
When you try to register the self-hosted integration runtime, you receive the following error message: "Failed to register this Integration Runtime node! Confirm that the Authentication key is valid and the integration service host service is running on this machine."
When you open Integration Runtime Configuration Manager, you see a status of Disconnected or Connecting. When you view Windows event logs, under Event Viewer > Application and Services Logs > Microsoft Integration Runtime, you see error messages like this one:
Unable to connect to the remote server
A component of Integration Runtime has become unresponsive and restarts automatically. Component name: Integration Runtime (self-hosted).
Enable remote access from an intranet
If you use PowerShell to encrypt credentials from a networked machine other than where you installed the self-hosted integration runtime, you can enable the Remote Access from Intranet option. If you run PowerShell to encrypt credentials on the machine where you installed the self-hosted integration runtime, you can't enable Remote Access from Intranet.
Enable Remote Access from Intranet before you add another node for high availability and scalability.
When you run the self-hosted integration runtime setup version 3.3 or later, by default the self-hosted integration runtime installer disables Remote Access from Intranet on the self-hosted integration runtime machine.
When you use a firewall from a partner or others, you can manually open port 8060 or the user-configured port. If you have a firewall problem while setting up the self-hosted integration runtime, use the following command to install the self-hosted integration runtime without configuring the firewall:
msiexec /q /i IntegrationRuntime.msi NOFIREWALL=1
If you choose not to open port 8060 on the self-hosted integration runtime machine, use mechanisms other than the Setting Credentials application to configure data-store credentials. For example, you can use the New-AzDataFactoryV2LinkedServiceEncryptCredential PowerShell cmdlet.
Ports and firewalls
There are two firewalls to consider:
- The corporate firewall that runs on the central router of the organization
- The Windows firewall that is configured as a daemon on the local machine where the self-hosted integration runtime is installed
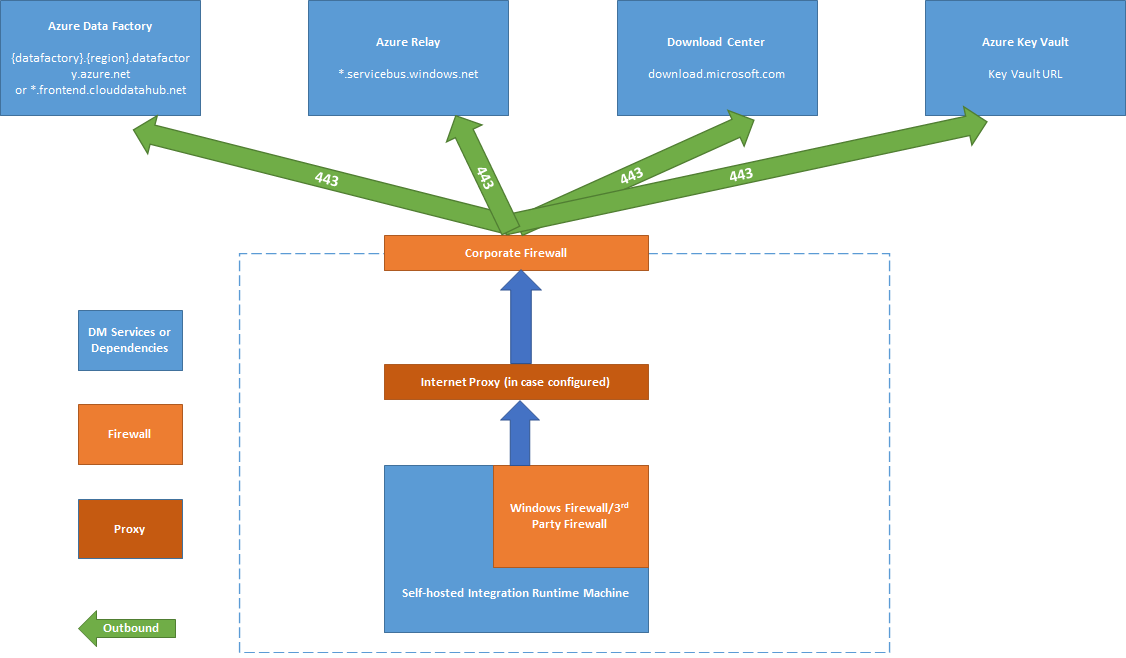
At the corporate firewall level, you need to configure the following domains and outbound ports:
| Domain names | Outbound ports | Description |
|---|---|---|
Public Cloud: *.servicebus.windows.net Azure Government: *.servicebus.usgovcloudapi.net China: *.servicebus.chinacloudapi.cn |
443 | Required by the self-hosted integration runtime for interactive authoring. It's not required if self-contained interactive authoring is enabled. |
Public Cloud: {datafactory}.{region}.datafactory.azure.netor *.frontend.clouddatahub.net Azure Government: {datafactory}.{region}.datafactory.azure.us China: {datafactory}.{region}.datafactory.azure.cn |
443 | Required by the self-hosted integration runtime to connect to the Data Factory service. For new created Data Factory in public cloud, find the FQDN from your Self-hosted Integration Runtime key, which is in format {datafactory}.{region}.datafactory.azure.net. For old Data factory and Azure Synapse Analytics, if you don't see the FQDN in your Self-hosted Integration key, use *.frontend.clouddatahub.net instead. |
download.microsoft.com |
443 | Required by the self-hosted integration runtime for downloading the updates. If you have disabled auto-update, you can skip configuring this domain. |
| Key Vault URL | 443 | Required by Azure Key Vault if you store the credential in Key Vault. |
At the Windows firewall level or machine level, these outbound ports are normally enabled. If they aren't, you can configure the domains and ports on a self-hosted integration runtime machine.
Note
As currently Azure Relay doesn't support service tag, you have to use service tag AzureCloud or Internet in NSG rules for the communication to Azure Relay. For the communication to Azure Data Factory and Synapse workspaces, you can use service tag DataFactoryManagement in the NSG rule setup.
Based on your source and sinks, you might need to allow additional domains and outbound ports in your corporate firewall or Windows firewall.
| Domain names | Outbound ports | Description |
|---|---|---|
*.core.windows.net |
443 | Used by the self-hosted integration runtime to connect to the Azure storage account when you use the staged copy feature. |
*.database.windows.net |
1433 | Required only when you copy from or to Azure SQL Database or Azure Synapse Analytics and optional otherwise. Use the staged-copy feature to copy data to SQL Database or Azure Synapse Analytics without opening port 1433. |
*.azuredatalakestore.netlogin.microsoftonline.com/<tenant>/oauth2/token |
443 | Required only when you copy from or to Azure Data Lake Store and optional otherwise. |
For some cloud databases, such as Azure SQL Database and Azure Data Lake, you might need to allow IP addresses of self-hosted integration runtime machines on their firewall configuration.
Note
It is not right to install both Integration Runtime and Power BI gateway in same machine, because mainly Integration Runtime uses port number 443, which is one of the main ports being used by Power BI gateway as well.
Self-contained interactive authoring (preview)
In order to perform interactive authoring actions such as data preview and connection testing, the self-hosted integration runtime requires a connection to Azure Relay. If the connection is not established, there are two possible solutions to ensure uninterrupted functionality. The first option is to add the Azure Relay endpoints to your firewall's allowlist Get URL of Azure Relay. Alternatively, you can enable self-contained interactive authoring.
Note
If the self-hosted integration runtime fails to establish a connection to Azure Relay, its status will be marked as "limited".
Note
While self-contained interactive authoring is enabled, all interactive authoring traffic will be routed exclusively through this functionality, bypassing Azure Relay. The traffic will only be redirected back to Azure Relay once you choose to disable this feature.
Note
Both "Get IP" and "Send log" are not supported when self-contained interactive authoring is enabled.
Get URL of Azure Relay
One required domain and port that need to be put in the allowlist of your firewall is for the communication to Azure Relay. The self-hosted integration runtime uses it for interactive authoring such as test connection, browse folder list and table list, get schema, and preview data. If you don't want to allow .servicebus.windows.net and would like to have more specific URLs, then you can see all the FQDNs that are required by your self-hosted integration runtime from the service portal. Follow these steps:
Go to the service portal and select your self-hosted integration runtime.
In Edit page, select Nodes.
Select View Service URLs to get all FQDNs.

You can add these FQDNs in the allowlist of firewall rules.
Note
For the details related to Azure Relay connections protocol, see Azure Relay Hybrid Connections protocol.
Copy data from a source to a sink
Ensure that you properly enable firewall rules on the corporate firewall, the Windows firewall of the self-hosted integration runtime machine, and the data store itself. Enabling these rules lets the self-hosted integration runtime successfully connect to both source and sink. Enable rules for each data store that is involved in the copy operation.
For example, to copy from an on-premises data store to a SQL Database sink or an Azure Synapse Analytics sink, take the following steps:
- Allow outbound TCP communication on port 1433 for both the Windows firewall and the corporate firewall.
- Configure the firewall settings of the SQL Database to add the IP address of the self-hosted integration runtime machine to the list of allowed IP addresses.
Note
If your firewall doesn't allow outbound port 1433, the self-hosted integration runtime can't access the SQL database directly. In this case, you can use a staged copy to SQL Database and Azure Synapse Analytics. In this scenario, you require only HTTPS (port 443) for the data movement.
If all your data source and sink and self-hosted integration runtime are in on-premises environment, then the copied data will not go to cloud but strictly remain within on-premises.
Credentials store
There are two ways to store the credentials when using self-hosted integration runtime:
- Use Azure Key Vault.
This is the recommended way to store your credentials in Azure. The self-hosted integration runtime can directly get the credentials from Azure Key Vault which can highly avoid some potential security issues or any credential in-sync problems between self-hosted integration runtime nodes. 2. Store credentials locally.
The credentials will be push to the machine of your self-hosted integration runtime and be encrypted. When your self-hosted integration runtime is recovered from crash, you can either recover credential from the one you back up before or edit linked service and let the credential be pushed to self-hosted integration runtime again. Otherwise, the pipeline doesn't work due to the lack of credential when running via self-hosted integration runtime.
Note
If you prefer to store the credential locally, your need to put the domain for interactive authoring in the allowlist of your firewall and open the port. This channel is also for the self-hosted integration runtime to get the credentials. For the domain and port needed for interactive authoring, refer to Ports and firewalls
Installation best practices
You can install the self-hosted integration runtime by downloading a Managed Identity setup package from Microsoft Download Center. See the article Move data between on-premises and cloud for step-by-step instructions.
- Configure a power plan on the host machine for the self-hosted integration runtime so that the machine doesn't hibernate. If the host machine hibernates, the self-hosted integration runtime goes offline.
- Regularly back up the credentials associated with the self-hosted integration runtime.
- To automate self-hosted IR setup operations, refer to Set up an existing self hosted IR via PowerShell.
Important considerations
When installing a self-hosted integration runtime consider following
- Keep it close to your data source but not necessarily on the same machine
- Don't install it on the same machine as Power BI gateway
- Windows Server only(FIPS-compliant encryption servers might cause jobs to fail)
- Share across multiple data sources
- Share across multiple data factories
Related content
For step-by-step instructions, see Tutorial: Copy on-premises data to cloud.
Feedback
Coming soon: Throughout 2024 we will be phasing out GitHub Issues as the feedback mechanism for content and replacing it with a new feedback system. For more information see: https://aka.ms/ContentUserFeedback.
Submit and view feedback for