Incrementally load data from Azure SQL Database to Azure Blob Storage using change tracking information using PowerShell
APPLIES TO:  Azure Data Factory
Azure Synapse Analytics
Azure Data Factory
Azure Synapse Analytics
Tip
Try out Data Factory in Microsoft Fabric, an all-in-one analytics solution for enterprises. Microsoft Fabric covers everything from data movement to data science, real-time analytics, business intelligence, and reporting. Learn how to start a new trial for free!
In this tutorial, you create an Azure data factory with a pipeline that loads delta data based on change tracking information in the source database in Azure SQL Database to an Azure blob storage.
You perform the following steps in this tutorial:
- Prepare the source data store
- Create a data factory.
- Create linked services.
- Create source, sink, and change tracking datasets.
- Create, run, and monitor the full copy pipeline
- Add or update data in the source table
- Create, run, and monitor the incremental copy pipeline
Note
We recommend that you use the Azure Az PowerShell module to interact with Azure. See Install Azure PowerShell to get started. To learn how to migrate to the Az PowerShell module, see Migrate Azure PowerShell from AzureRM to Az.
Overview
In a data integration solution, incrementally loading data after initial data loads is a widely used scenario. In some cases, the changed data within a period in your source data store can be easily to sliced up (for example, LastModifyTime, CreationTime). In some cases, there is no explicit way to identify the delta data from last time you processed the data. The Change Tracking technology supported by data stores such as Azure SQL Database and SQL Server can be used to identify the delta data. This tutorial describes how to use Azure Data Factory with SQL Change Tracking technology to incrementally load delta data from Azure SQL Database into Azure Blob Storage. For more concrete information about SQL Change Tracking technology, see Change tracking in SQL Server.
End-to-end workflow
Here are the typical end-to-end workflow steps to incrementally load data using the Change Tracking technology.
Note
Both Azure SQL Database and SQL Server support the Change Tracking technology. This tutorial uses Azure SQL Database as the source data store. You can also use a SQL Server instance.
- Initial loading of historical data (run once):
- Enable Change Tracking technology in the source database in Azure SQL Database.
- Get the initial value of SYS_CHANGE_VERSION in the database as the baseline to capture changed data.
- Load full data from the source database into an Azure blob storage.
- Incremental loading of delta data on a schedule (run periodically after the initial loading of data):
- Get the old and new SYS_CHANGE_VERSION values.
- Load the delta data by joining the primary keys of changed rows (between two SYS_CHANGE_VERSION values) from sys.change_tracking_tables with data in the source table, and then move the delta data to destination.
- Update the SYS_CHANGE_VERSION for the delta loading next time.
High-level solution
In this tutorial, you create two pipelines that perform the following two operations:
Initial load: you create a pipeline with a copy activity that copies the entire data from the source data store (Azure SQL Database) to the destination data store (Azure Blob Storage).

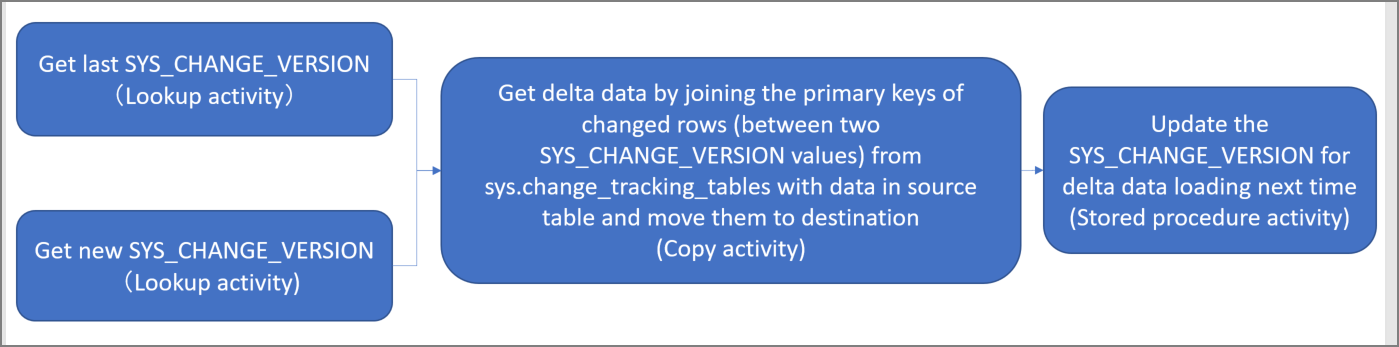
Incremental load: you create a pipeline with the following activities, and run it periodically.
- Create two lookup activities to get the old and new SYS_CHANGE_VERSION from Azure SQL Database and pass it to copy activity.
- Create one copy activity to copy the inserted/updated/deleted data between the two SYS_CHANGE_VERSION values from Azure SQL Database to Azure Blob Storage.
- Create one stored procedure activity to update the value of SYS_CHANGE_VERSION for the next pipeline run.
If you don't have an Azure subscription, create a free account before you begin.
Prerequisites
- Azure PowerShell. Install the latest Azure PowerShell modules by following instructions in How to install and configure Azure PowerShell.
- Azure SQL Database. You use the database as the source data store. If you don't have a database in Azure SQL Database, see the Create a database in Azure SQL Database article for steps to create one.
- Azure Storage account. You use the blob storage as the sink data store. If you don't have an Azure storage account, see the Create a storage account article for steps to create one. Create a container named adftutorial.
Create a data source table in your database
Launch SQL Server Management Studio, and connect to SQL Database.
In Server Explorer, right-click your database and choose the New Query.
Run the following SQL command against your database to create a table named
data_source_tableas data source store.create table data_source_table ( PersonID int NOT NULL, Name varchar(255), Age int PRIMARY KEY (PersonID) ); INSERT INTO data_source_table (PersonID, Name, Age) VALUES (1, 'aaaa', 21), (2, 'bbbb', 24), (3, 'cccc', 20), (4, 'dddd', 26), (5, 'eeee', 22);Enable Change Tracking mechanism on your database and the source table (data_source_table) by running the following SQL query:
Note
- Replace <your database name> with the name of your database that has the data_source_table.
- The changed data is kept for two days in the current example. If you load the changed data for every three days or more, some changed data is not included. You need to either change the value of CHANGE_RETENTION to a bigger number. Alternatively, ensure that your period to load the changed data is within two days. For more information, see Enable change tracking for a database
ALTER DATABASE <your database name>
SET CHANGE_TRACKING = ON
(CHANGE_RETENTION = 2 DAYS, AUTO_CLEANUP = ON)

ALTER TABLE data_source_table
ENABLE CHANGE_TRACKING
WITH (TRACK_COLUMNS_UPDATED = ON)
Create a new table and store the ChangeTracking_version with a default value by running the following query:
create table table_store_ChangeTracking_version
(
    TableName varchar(255),
    SYS_CHANGE_VERSION BIGINT,
);

DECLARE @ChangeTracking_version BIGINT
SET @ChangeTracking_version = CHANGE_TRACKING_CURRENT_VERSION();

INSERT INTO table_store_ChangeTracking_version
VALUES ('data_source_table', @ChangeTracking_version)
Note
If the data is not changed after you enabled the change tracking for SQL Database, the value of the change tracking version is 0.
Run the following query to create a stored procedure in your database. The pipeline invokes this stored procedure to update the change tracking version in the table you created in the previous step.
CREATE PROCEDURE Update_ChangeTracking_Version @CurrentTrackingVersion BIGINT, @TableName varchar(50)
AS

BEGIN

UPDATE table_store_ChangeTracking_version
SET [SYS_CHANGE_VERSION] = @CurrentTrackingVersion
WHERE [TableName] = @TableName

END
Azure PowerShell
Install the latest Azure PowerShell modules by following instructions in How to install and configure Azure PowerShell.
Create a data factory
Define a variable for the resource group name that you use in PowerShell commands later. Copy the following command text to PowerShell, specify a name for the Azure resource group in double quotes, and then run the command. For example:
"adfrg".$resourceGroupName = "ADFTutorialResourceGroup";If the resource group already exists, you may not want to overwrite it. Assign a different value to the
$resourceGroupNamevariable and run the command againDefine a variable for the location of the data factory:
$location = "East US"To create the Azure resource group, run the following command:
New-AzResourceGroup $resourceGroupName $locationIf the resource group already exists, you may not want to overwrite it. Assign a different value to the
$resourceGroupNamevariable and run the command again.Define a variable for the data factory name.
Important
Update the data factory name to be globally unique.
$dataFactoryName = "IncCopyChgTrackingDF";To create the data factory, run the following Set-AzDataFactoryV2 cmdlet:
Set-AzDataFactoryV2 -ResourceGroupName $resourceGroupName -Location $location -Name $dataFactoryName
Note the following points:
The name of the Azure data factory must be globally unique. If you receive the following error, change the name and try again.
The specified Data Factory name 'ADFIncCopyChangeTrackingTestFactory' is already in use. Data Factory names must be globally unique.To create Data Factory instances, the user account you use to log in to Azure must be a member of contributor or owner roles, or an administrator of the Azure subscription.
For a list of Azure regions in which Data Factory is currently available, select the regions that interest you on the following page, and then expand Analytics to locate Data Factory: Products available by region. The data stores (Azure Storage, Azure SQL Database, etc.) and computes (HDInsight, etc.) used by data factory can be in other regions.
Create linked services
You create linked services in a data factory to link your data stores and compute services to the data factory. In this section, you create linked services to your Azure Storage account and your database in Azure SQL Database.
Create Azure Storage linked service.
In this step, you link your Azure Storage Account to the data factory.
Create a JSON file named AzureStorageLinkedService.json in C:\ADFTutorials\IncCopyChangeTrackingTutorial folder with the following content: (Create the folder if it does not already exist.). Replace
<accountName>,<accountKey>with name and key of your Azure storage account before saving the file.{ "name": "AzureStorageLinkedService", "properties": { "type": "AzureStorage", "typeProperties": { "connectionString": "DefaultEndpointsProtocol=https;AccountName=<accountName>;AccountKey=<accountKey>" } } }In Azure PowerShell, switch to the C:\ADFTutorials\IncCopyChangeTrackingTutorial folder.
Run the Set-AzDataFactoryV2LinkedService cmdlet to create the linked service: AzureStorageLinkedService. In the following example, you pass values for the ResourceGroupName and DataFactoryName parameters.
Set-AzDataFactoryV2LinkedService -DataFactoryName $dataFactoryName -ResourceGroupName $resourceGroupName -Name "AzureStorageLinkedService" -File ".\AzureStorageLinkedService.json"Here is the sample output:
LinkedServiceName : AzureStorageLinkedService
ResourceGroupName : ADFTutorialResourceGroup
DataFactoryName   : IncCopyChgTrackingDF
Properties        : Microsoft.Azure.Management.DataFactory.Models.AzureStorageLinkedService
Create Azure SQL Database linked service.
In this step, you link your database to the data factory.
Create a JSON file named AzureSQLDatabaseLinkedService.json in C:\ADFTutorials\IncCopyChangeTrackingTutorial folder with the following content: Replace <server> <database name>, <user id>, and <password> with name of your server, name of your database, user ID, and password before saving the file.
{
    "name": "AzureSQLDatabaseLinkedService",
    "properties": {
        "type": "AzureSqlDatabase",
        "typeProperties": {
            "connectionString": "Server = tcp:<server>.database.windows.net,1433;Initial Catalog=<database name>; Persist Security Info=False; User ID=<user name>; Password=<password>; MultipleActiveResultSets = False; Encrypt = True; TrustServerCertificate = False; Connection Timeout = 30;"
        }
    }
}
In Azure PowerShell, run the Set-AzDataFactoryV2LinkedService cmdlet to create the linked service: AzureSQLDatabaseLinkedService.
Set-AzDataFactoryV2LinkedService -DataFactoryName $dataFactoryName -ResourceGroupName $resourceGroupName -Name "AzureSQLDatabaseLinkedService" -File ".\AzureSQLDatabaseLinkedService.json"Here is the sample output:
LinkedServiceName : AzureSQLDatabaseLinkedService
ResourceGroupName : ADFTutorialResourceGroup
DataFactoryName   : IncCopyChgTrackingDF
Properties        : Microsoft.Azure.Management.DataFactory.Models.AzureSqlDatabaseLinkedService
Create datasets
In this step, you create datasets to represent data source, data destination. and the place to store the SYS_CHANGE_VERSION.
Create a source dataset
In this step, you create a dataset to represent the source data.
Create a JSON file named SourceDataset.json in the same folder with the following content:
{
    "name": "SourceDataset",
    "properties": {
        "type": "AzureSqlTable",
        "typeProperties": {
            "tableName": "data_source_table"
        },
        "linkedServiceName": {
            "referenceName": "AzureSQLDatabaseLinkedService",
            "type": "LinkedServiceReference"
        }
    }
}
Run the Set-AzDataFactoryV2Dataset cmdlet to create the dataset: SourceDataset
Set-AzDataFactoryV2Dataset -DataFactoryName $dataFactoryName -ResourceGroupName $resourceGroupName -Name "SourceDataset" -File ".\SourceDataset.json"Here is the sample output of the cmdlet:
DatasetName       : SourceDataset
ResourceGroupName : ADFTutorialResourceGroup
DataFactoryName   : IncCopyChgTrackingDF
Structure         :
Properties        : Microsoft.Azure.Management.DataFactory.Models.AzureSqlTableDataset
Create a sink dataset
In this step, you create a dataset to represent the data that is copied from the source data store.
Create a JSON file named SinkDataset.json in the same folder with the following content:
{
    "name": "SinkDataset",
    "properties": {
        "type": "AzureBlob",
        "typeProperties": {
            "folderPath": "adftutorial/incchgtracking",
            "fileName": "@CONCAT('Incremental-', pipeline().RunId, '.txt')",
            "format": {
                "type": "TextFormat"
            }
        },
        "linkedServiceName": {
            "referenceName": "AzureStorageLinkedService",
            "type": "LinkedServiceReference"
        }
    }
}
You create the adftutorial container in your Azure Blob Storage as part of the prerequisites. Create the container if it does not exist (or) set it to the name of an existing one. In this tutorial, the output file name is dynamically generated by using the expression: @CONCAT('Incremental-', pipeline().RunId, '.txt').
Run the Set-AzDataFactoryV2Dataset cmdlet to create the dataset: SinkDataset
Set-AzDataFactoryV2Dataset -DataFactoryName $dataFactoryName -ResourceGroupName $resourceGroupName -Name "SinkDataset" -File ".\SinkDataset.json"Here is the sample output of the cmdlet:
DatasetName       : SinkDataset
ResourceGroupName : ADFTutorialResourceGroup
DataFactoryName   : IncCopyChgTrackingDF
Structure         :
Properties        : Microsoft.Azure.Management.DataFactory.Models.AzureBlobDataset
Create a change tracking dataset
In this step, you create a dataset for storing the change tracking version.
Create a JSON file named ChangeTrackingDataset.json in the same folder with the following content:
{
    "name": " ChangeTrackingDataset",
    "properties": {
        "type": "AzureSqlTable",
        "typeProperties": {
            "tableName": "table_store_ChangeTracking_version"
        },
        "linkedServiceName": {
            "referenceName": "AzureSQLDatabaseLinkedService",
            "type": "LinkedServiceReference"
        }
    }
}
You create the table table_store_ChangeTracking_version as part of the prerequisites.
Run the Set-AzDataFactoryV2Dataset cmdlet to create the dataset: ChangeTrackingDataset
Set-AzDataFactoryV2Dataset -DataFactoryName $dataFactoryName -ResourceGroupName $resourceGroupName -Name "ChangeTrackingDataset" -File ".\ChangeTrackingDataset.json"Here is the sample output of the cmdlet:
DatasetName       : ChangeTrackingDataset
ResourceGroupName : ADFTutorialResourceGroup
DataFactoryName   : IncCopyChgTrackingDF
Structure         :
Properties        : Microsoft.Azure.Management.DataFactory.Models.AzureSqlTableDataset
Create a pipeline for the full copy
In this step, you create a pipeline with a copy activity that copies the entire data from the source data store (Azure SQL Database) to the destination data store (Azure Blob Storage).
Create a JSON file: FullCopyPipeline.json in same folder with the following content:
{
    "name": "FullCopyPipeline",
    "properties": {
        "activities": [{
            "name": "FullCopyActivity",
            "type": "Copy",
            "typeProperties": {
                "source": {
                    "type": "SqlSource"
                },
                "sink": {
                    "type": "BlobSink"
                }
            },

            "inputs": [{
                "referenceName": "SourceDataset",
                "type": "DatasetReference"
            }],
            "outputs": [{
                "referenceName": "SinkDataset",
                "type": "DatasetReference"
            }]
        }]
    }
}
Run the Set-AzDataFactoryV2Pipeline cmdlet to create the pipeline: FullCopyPipeline.
Set-AzDataFactoryV2Pipeline -DataFactoryName $dataFactoryName -ResourceGroupName $resourceGroupName -Name "FullCopyPipeline" -File ".\FullCopyPipeline.json"Here is the sample output:
 PipelineName      : FullCopyPipeline
 ResourceGroupName : ADFTutorialResourceGroup
 DataFactoryName   : IncCopyChgTrackingDF
 Activities        : {FullCopyActivity}
 Parameters        :
Run the full copy pipeline
Run the pipeline: FullCopyPipeline by using Invoke-AzDataFactoryV2Pipeline cmdlet.
Invoke-AzDataFactoryV2Pipeline -PipelineName "FullCopyPipeline" -ResourceGroup $resourceGroupName -dataFactoryName $dataFactoryName
Monitor the full copy pipeline
Log in to Azure portal.
Click All services, search with the keyword
data factories, and select Data factories.
Search for your data factory in the list of data factories, and select it to launch the Data factory page.

In the Data factory page, click Monitor & Manage tile.

The Data Integration Application launches in a separate tab. You can see all the pipeline runs and their statuses. Notice that in the following example, the status of the pipeline run is Succeeded. You can check parameters passed to the pipeline by clicking link in the Parameters column. If there was an error, you see a link in the Error column. Click the link in the Actions column.

When you click the link in the Actions column, you see the following page that shows all the activity runs for the pipeline.
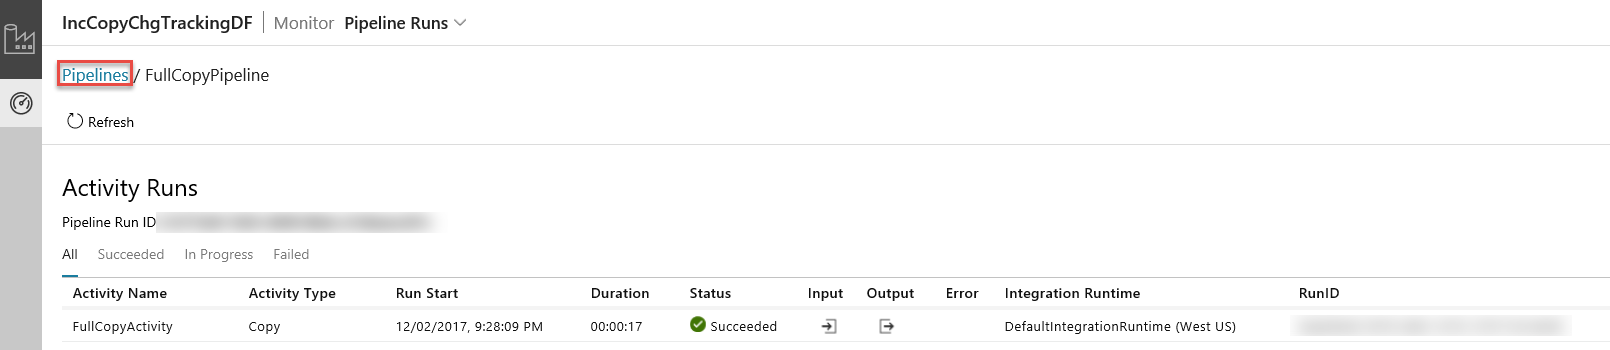
To switch back to the Pipeline runs view, click Pipelines as shown in the image.
Review the results
You see a file named incremental-<GUID>.txt in the incchgtracking folder of the adftutorial container.

The file should have the data from your database:
1,aaaa,21
2,bbbb,24
3,cccc,20
4,dddd,26
5,eeee,22
Add more data to the source table
Run the following query against your database to add a row and update a row.
INSERT INTO data_source_table
(PersonID, Name, Age)
VALUES
(6, 'new','50');


UPDATE data_source_table
SET [Age] = '10', [name]='update' where [PersonID] = 1
Create a pipeline for the delta copy
In this step, you create a pipeline with the following activities, and run it periodically. The lookup activities get the old and new SYS_CHANGE_VERSION from Azure SQL Database and pass it to copy activity. The copy activity copies the inserted/updated/deleted data between the two SYS_CHANGE_VERSION values from Azure SQL Database to Azure Blob Storage. The stored procedure activity updates the value of SYS_CHANGE_VERSION for the next pipeline run.
Create a JSON file: IncrementalCopyPipeline.json in same folder with the following content:
{
    "name": "IncrementalCopyPipeline",
    "properties": {
        "activities": [
            {
                "name": "LookupLastChangeTrackingVersionActivity",
                "type": "Lookup",
                "typeProperties": {
                    "source": {
                        "type": "SqlSource",
                        "sqlReaderQuery": "select * from table_store_ChangeTracking_version"
                    },
                    "dataset": {
                        "referenceName": "ChangeTrackingDataset",
                        "type": "DatasetReference"
                    }
                }
            },
            {
                "name": "LookupCurrentChangeTrackingVersionActivity",
                "type": "Lookup",
                "typeProperties": {
                    "source": {
                        "type": "SqlSource",
                        "sqlReaderQuery": "SELECT CHANGE_TRACKING_CURRENT_VERSION() as CurrentChangeTrackingVersion"
                    },
                    "dataset": {
                        "referenceName": "SourceDataset",
                        "type": "DatasetReference"
                    }
                }
            },
            {
                "name": "IncrementalCopyActivity",
                "type": "Copy",
                "typeProperties": {
                    "source": {
                        "type": "SqlSource",
                        "sqlReaderQuery": "select data_source_table.PersonID,data_source_table.Name,data_source_table.Age, CT.SYS_CHANGE_VERSION, SYS_CHANGE_OPERATION from data_source_table RIGHT OUTER JOIN CHANGETABLE(CHANGES data_source_table, @{activity('LookupLastChangeTrackingVersionActivity').output.firstRow.SYS_CHANGE_VERSION}) as CT on data_source_table.PersonID = CT.PersonID where CT.SYS_CHANGE_VERSION <= @{activity('LookupCurrentChangeTrackingVersionActivity').output.firstRow.CurrentChangeTrackingVersion}"
                    },
                    "sink": {
                        "type": "BlobSink"
                    }
                },
                "dependsOn": [
                    {
                        "activity": "LookupLastChangeTrackingVersionActivity",
                        "dependencyConditions": [
                            "Succeeded"
                        ]
                    },
                    {
                        "activity": "LookupCurrentChangeTrackingVersionActivity",
                        "dependencyConditions": [
                            "Succeeded"
                        ]
                    }
                ],
                "inputs": [
                    {
                        "referenceName": "SourceDataset",
                        "type": "DatasetReference"
                    }
                ],
                "outputs": [
                    {
                        "referenceName": "SinkDataset",
                        "type": "DatasetReference"
                    }
                ]
            },
            {
                "name": "StoredProceduretoUpdateChangeTrackingActivity",
                "type": "SqlServerStoredProcedure",
                "typeProperties": {
                    "storedProcedureName": "Update_ChangeTracking_Version",
                    "storedProcedureParameters": {
                        "CurrentTrackingVersion": {
                            "value": "@{activity('LookupCurrentChangeTrackingVersionActivity').output.firstRow.CurrentChangeTrackingVersion}",
                            "type": "INT64"
                        },
                        "TableName": {
                            "value": "@{activity('LookupLastChangeTrackingVersionActivity').output.firstRow.TableName}",
                            "type": "String"
                        }
                    }
                },
                "linkedServiceName": {
                    "referenceName": "AzureSQLDatabaseLinkedService",
                    "type": "LinkedServiceReference"
                },
                "dependsOn": [
                    {
                        "activity": "IncrementalCopyActivity",
                        "dependencyConditions": [
                            "Succeeded"
                        ]
                    }
                ]
            }
        ]
    }
}
Run the Set-AzDataFactoryV2Pipeline cmdlet to create the pipeline: FullCopyPipeline.
Set-AzDataFactoryV2Pipeline -DataFactoryName $dataFactoryName -ResourceGroupName $resourceGroupName -Name "IncrementalCopyPipeline" -File ".\IncrementalCopyPipeline.json"Here is the sample output:
 PipelineName      : IncrementalCopyPipeline
 ResourceGroupName : ADFTutorialResourceGroup
 DataFactoryName   : IncCopyChgTrackingDF
 Activities        : {LookupLastChangeTrackingVersionActivity, LookupCurrentChangeTrackingVersionActivity, IncrementalCopyActivity, StoredProceduretoUpdateChangeTrackingActivity}
 Parameters        :
Run the incremental copy pipeline
Run the pipeline: IncrementalCopyPipeline by using Invoke-AzDataFactoryV2Pipeline cmdlet.
Invoke-AzDataFactoryV2Pipeline -PipelineName "IncrementalCopyPipeline" -ResourceGroup $resourceGroupName -dataFactoryName $dataFactoryName
Monitor the incremental copy pipeline
In the Data Integration Application, refresh the pipeline runs view. Confirm that you see the IncrementalCopyPipeline in the list. Click the link in the Actions column.

When you click the link in the Actions column, you see the following page that shows all the activity runs for the pipeline.

To switch back to the Pipeline runs view, click Pipelines as shown in the image.
Review the results
You see the second file in the incchgtracking folder of the adftutorial container.
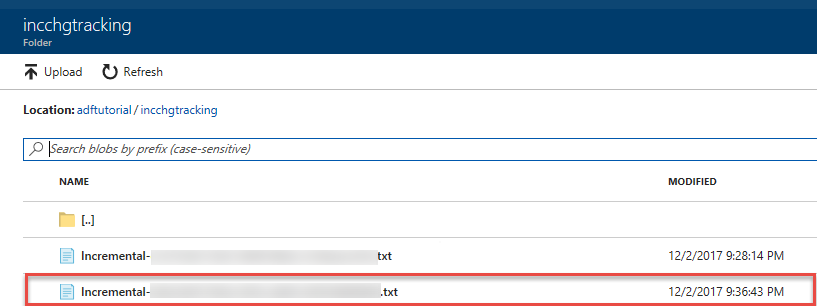
The file should have only the delta data from your database. The record with U is the updated row in the database and I is the one added row.
1,update,10,2,U
6,new,50,1,I
The first three columns are changed data from data_source_table. The last two columns are the metadata from change tracking system table. The fourth column is the SYS_CHANGE_VERSION for each changed row. The fifth column is the operation: U = update, I = insert. For details about the change tracking information, see CHANGETABLE.
==================================================================
PersonID Name    Age    SYS_CHANGE_VERSION    SYS_CHANGE_OPERATION
==================================================================
1        update  10            2                                 U
6        new     50            1                                 I
Related content
Advance to the following tutorial to learn about copying new and changed files only based on their LastModifiedDate:
Feedback
Coming soon: Throughout 2024 we will be phasing out GitHub Issues as the feedback mechanism for content and replacing it with a new feedback system. For more information see: https://aka.ms/ContentUserFeedback.
Submit and view feedback for