Deploy an IoT Edge workload using GPU sharing on your Azure Stack Edge Pro
This article describes how containerized workloads can share the GPUs on your Azure Stack Edge Pro GPU device. The approach involves enabling the Multi-Process Service (MPS) and then specifying the GPU workloads via an IoT Edge deployment.
Prerequisites
Before you begin, make sure that:
You've access to an Azure Stack Edge Pro GPU device that is activated and has compute configured. You have the Kubernetes API endpoint and you have added this endpoint to the
hostsfile on your client that will be accessing the device.You've access to a client system with a Supported operating system. If using a Windows client, the system should run PowerShell 5.0 or later to access the device.
Save the following deployment
jsonon your local system. You'll use information from this file to run the IoT Edge deployment. This deployment is based on Simple CUDA containers that are publicly available from Nvidia.{ "modulesContent": { "$edgeAgent": { "properties.desired": { "modules": { "cuda-sample1": { "settings": { "image": "nvidia/samples:nbody", "createOptions": "{\"Entrypoint\":[\"/bin/sh\"],\"Cmd\":[\"-c\",\"/tmp/nbody -benchmark -i=1000; while true; do echo no-op; sleep 10000;done\"],\"HostConfig\":{\"IpcMode\":\"host\",\"PidMode\":\"host\"}}" }, "type": "docker", "version": "1.0", "env": { "NVIDIA_VISIBLE_DEVICES": { "value": "0" } }, "status": "running", "restartPolicy": "never" }, "cuda-sample2": { "settings": { "image": "nvidia/samples:nbody", "createOptions": "{\"Entrypoint\":[\"/bin/sh\"],\"Cmd\":[\"-c\",\"/tmp/nbody -benchmark -i=1000; while true; do echo no-op; sleep 10000;done\"],\"HostConfig\":{\"IpcMode\":\"host\",\"PidMode\":\"host\"}}" }, "type": "docker", "version": "1.0", "env": { "NVIDIA_VISIBLE_DEVICES": { "value": "0" } }, "status": "running", "restartPolicy": "never" } }, "runtime": { "settings": { "minDockerVersion": "v1.25" }, "type": "docker" }, "schemaVersion": "1.1", "systemModules": { "edgeAgent": { "settings": { "image": "mcr.microsoft.com/azureiotedge-agent:1.0", "createOptions": "" }, "type": "docker" }, "edgeHub": { "settings": { "image": "mcr.microsoft.com/azureiotedge-hub:1.0", "createOptions": "{\"HostConfig\":{\"PortBindings\":{\"443/tcp\":[{\"HostPort\":\"443\"}],\"5671/tcp\":[{\"HostPort\":\"5671\"}],\"8883/tcp\":[{\"HostPort\":\"8883\"}]}}}" }, "type": "docker", "status": "running", "restartPolicy": "always" } } } }, "$edgeHub": { "properties.desired": { "routes": { "route": "FROM /messages/* INTO $upstream" }, "schemaVersion": "1.1", "storeAndForwardConfiguration": { "timeToLiveSecs": 7200 } } }, "cuda-sample1": { "properties.desired": {} }, "cuda-sample2": { "properties.desired": {} } } }
Verify GPU driver, CUDA version
The first step is to verify that your device is running required GPU driver and CUDA versions.
Run the following command:
Get-HcsGpuNvidiaSmiIn the Nvidia smi output, make a note of the GPU version and the CUDA version on your device. If you are running Azure Stack Edge 2102 software, this version would correspond to the following driver versions:
- GPU driver version: 460.32.03
- CUDA version: 11.2
Here is an example output:
[10.100.10.10]: PS>Get-HcsGpuNvidiaSmi
K8S-1HXQG13CL-1HXQG13:

Tue Feb 23 10:34:01 2021
+-----------------------------------------------------------------------------+
| NVIDIA-SMI 460.32.03    Driver Version: 460.32.03    CUDA Version: 11.2     |
|-------------------------------+----------------------+----------------------+
| GPU  Name        Persistence-M| Bus-Id        Disp.A | Volatile Uncorr. ECC |
| Fan  Temp  Perf  Pwr:Usage/Cap|         Memory-Usage | GPU-Util  Compute M. |
|                               |                      |               MIG M. |
|===============================+======================+======================|
|   0  Tesla T4            On   | 0000041F:00:00.0 Off |                    0 |
| N/A   40C    P8    15W /  70W |      0MiB / 15109MiB |      0%      Default |
|                               |                      |                  N/A |
+-------------------------------+----------------------+----------------------+

+-----------------------------------------------------------------------------+
| Processes:                                                                  |
|  GPU   GI   CI        PID   Type   Process name                  GPU Memory |
|        ID   ID                                                   Usage      |
|=============================================================================|
|  No running processes found                                                 |
+-----------------------------------------------------------------------------+
[10.100.10.10]: PS>
Keep this session open as you will use it to view the Nvidia smi output throughout the article.
Deploy without context-sharing
You can now deploy an application on your device when the Multi-Process Service is not running and there is no context-sharing. The deployment is via the Azure portal in the iotedge namespace that exists on your device.
Create user in IoT Edge namespace
First you'll create a user that will connect to the iotedge namespace. The IoT Edge modules are deployed in the iotedge namespace. For more information, see Kubernetes namespaces on your device.
Follow these steps to create a user and grant user the access to the iotedge namespace.
Create a new user in the
iotedgenamespace. Run the following command:New-HcsKubernetesUser -UserName <user name>Here is an example output:
[10.100.10.10]: PS>New-HcsKubernetesUser -UserName iotedgeuser
apiVersion: v1
clusters:
- cluster:
    certificate-authority-data:
===========================//snipped //======================// snipped //=============================
    server: https://compute.myasegpudev.wdshcsso.com:6443
  name: kubernetes
contexts:
- context:
    cluster: kubernetes
    user: iotedgeuser
  name: iotedgeuser@kubernetes
current-context: iotedgeuser@kubernetes
kind: Config
preferences: {}
users:
- name: iotedgeuser
  user:
    client-certificate-data:
===========================//snipped //======================// snipped //=============================
    client-key-data:
===========================//snipped //======================// snipped ============================
PQotLS0tLUVORCBSU0EgUFJJVkFURSBLRVktLS0tLQo=
Copy the output displayed in plain text. Save the output as a config file (with no extension) in the
.kubefolder of your user profile on your local machine, for example,C:\Users\<username>\.kube.Grant the user that you created, access to the
iotedgenamespace. Run the following command:Grant-HcsKubernetesNamespaceAccess -Namespace iotedge -UserName <user name>Here is an example output:
[10.100.10.10]: PS>Grant-HcsKubernetesNamespaceAccess -Namespace iotedge -UserName iotedgeuser
[10.100.10.10]: PS>
For detailed instructions, see Connect to and manage a Kubernetes cluster via kubectl on your Azure Stack Edge Pro GPU device.
Deploy modules via portal
Deploy IoT Edge modules via the Azure portal. You'll deploy publicly available Nvidia CUDA sample modules that run n-body simulation.
Make sure that the IoT Edge service is running on your device.
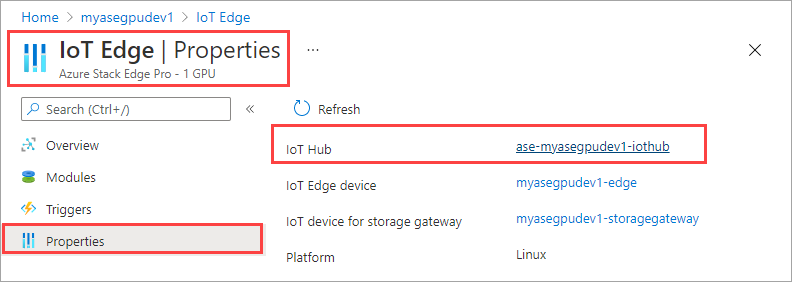
Select the IoT Edge tile in the right-pane. Go to IoT Edge > Properties. In the right-pane, select the IoT Hub resource associated with your device.
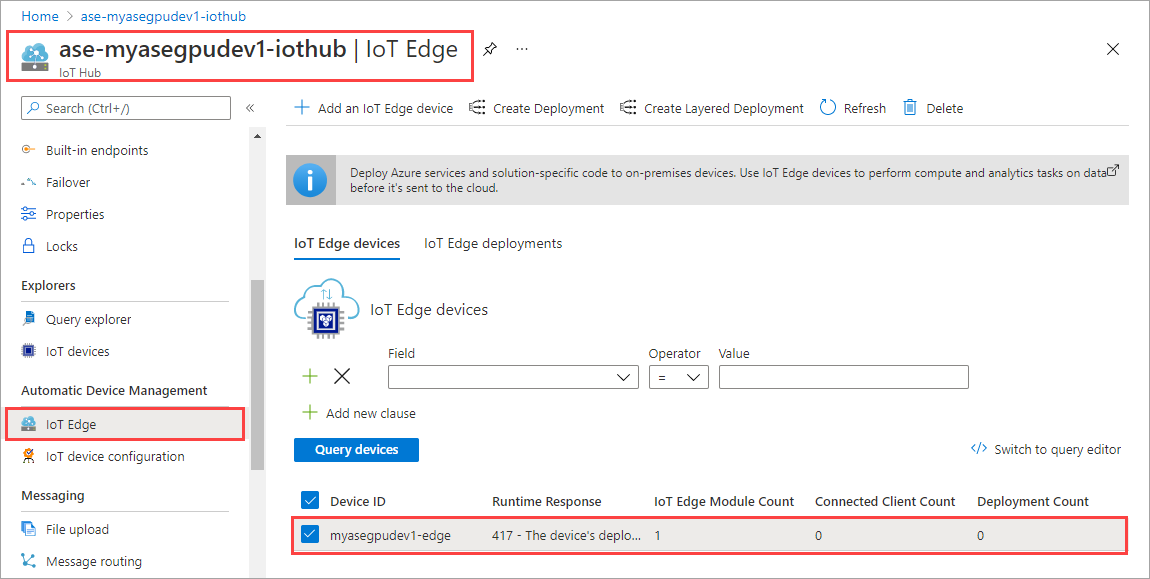
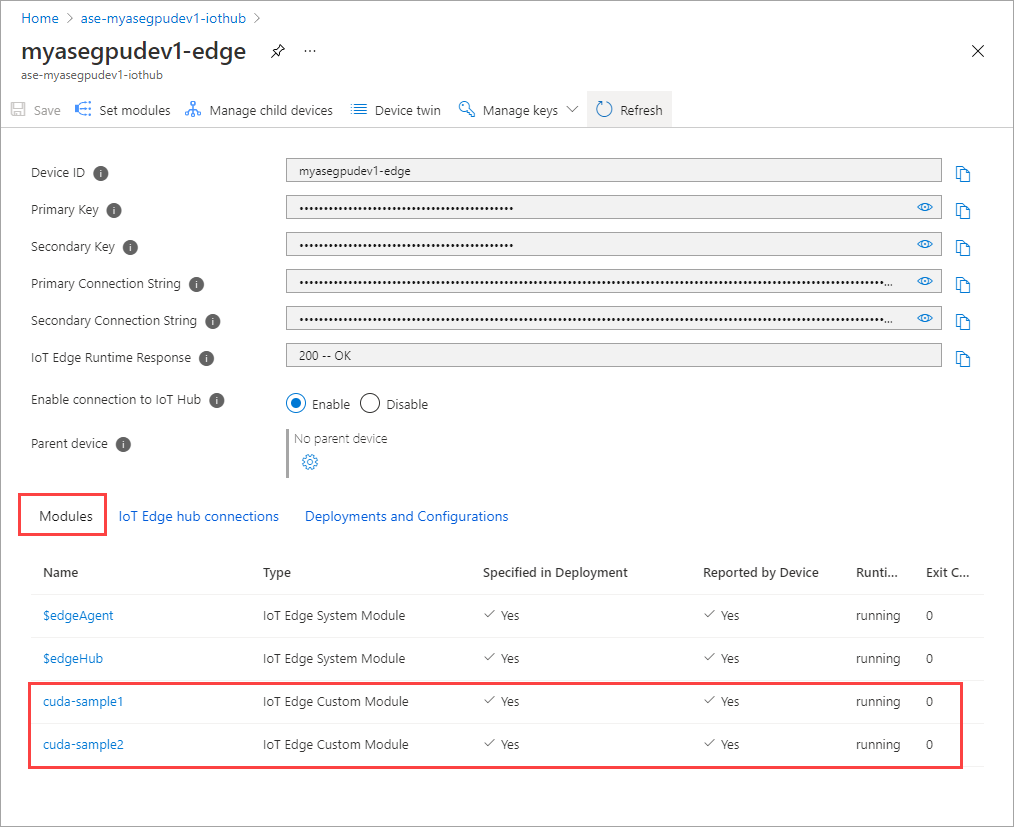
In the IoT Hub resource, go to Automatic Device Management > IoT Edge. In the right-pane, select the IoT Edge device associated with your device.
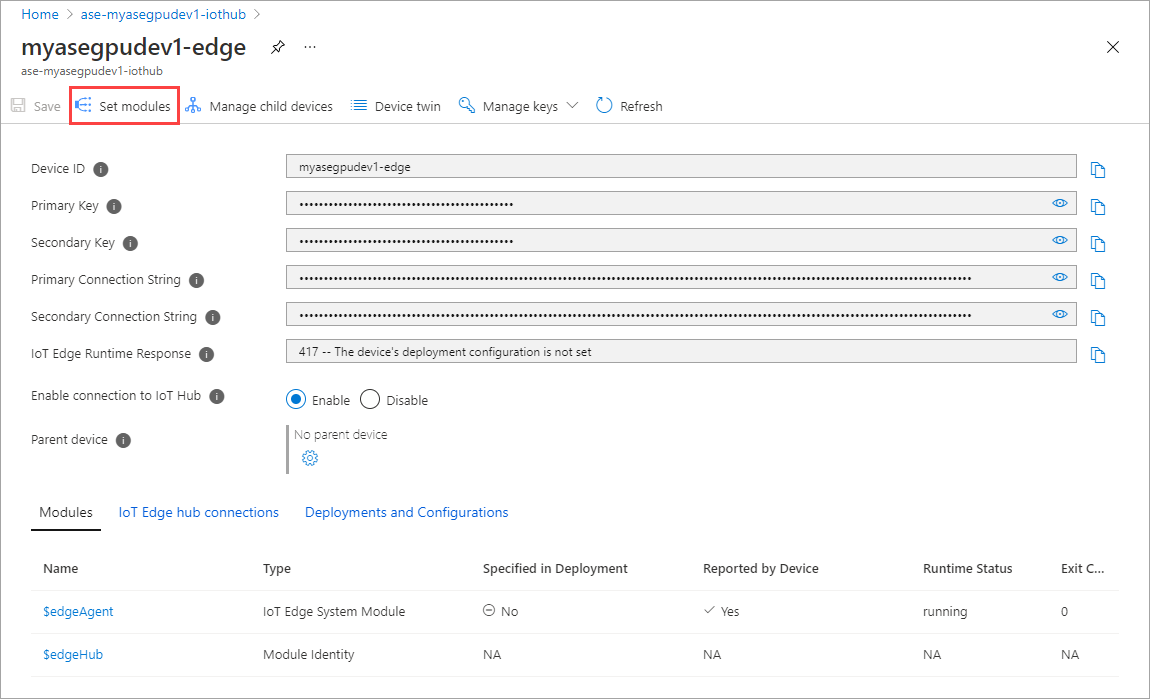
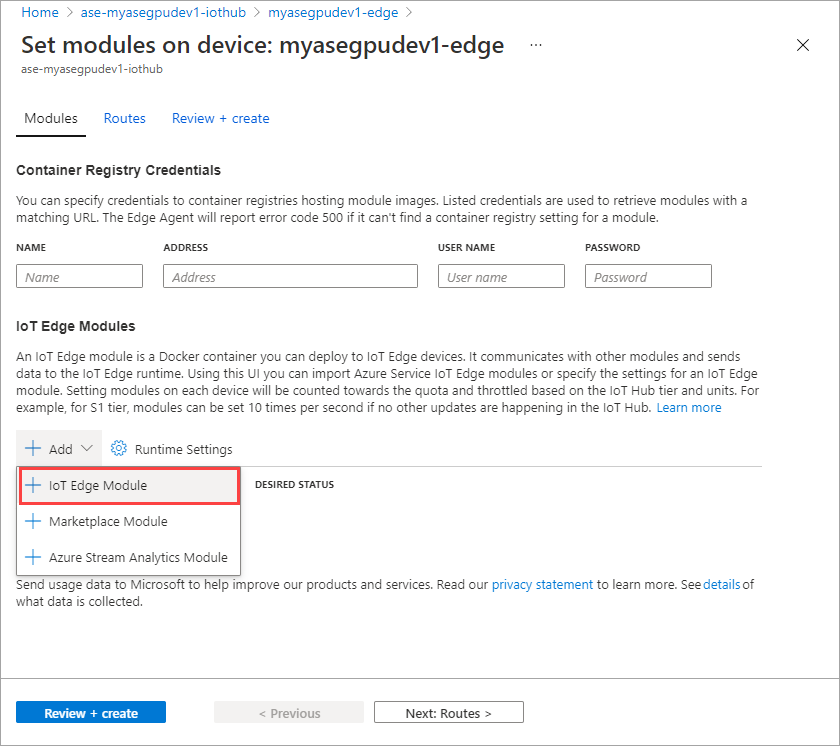
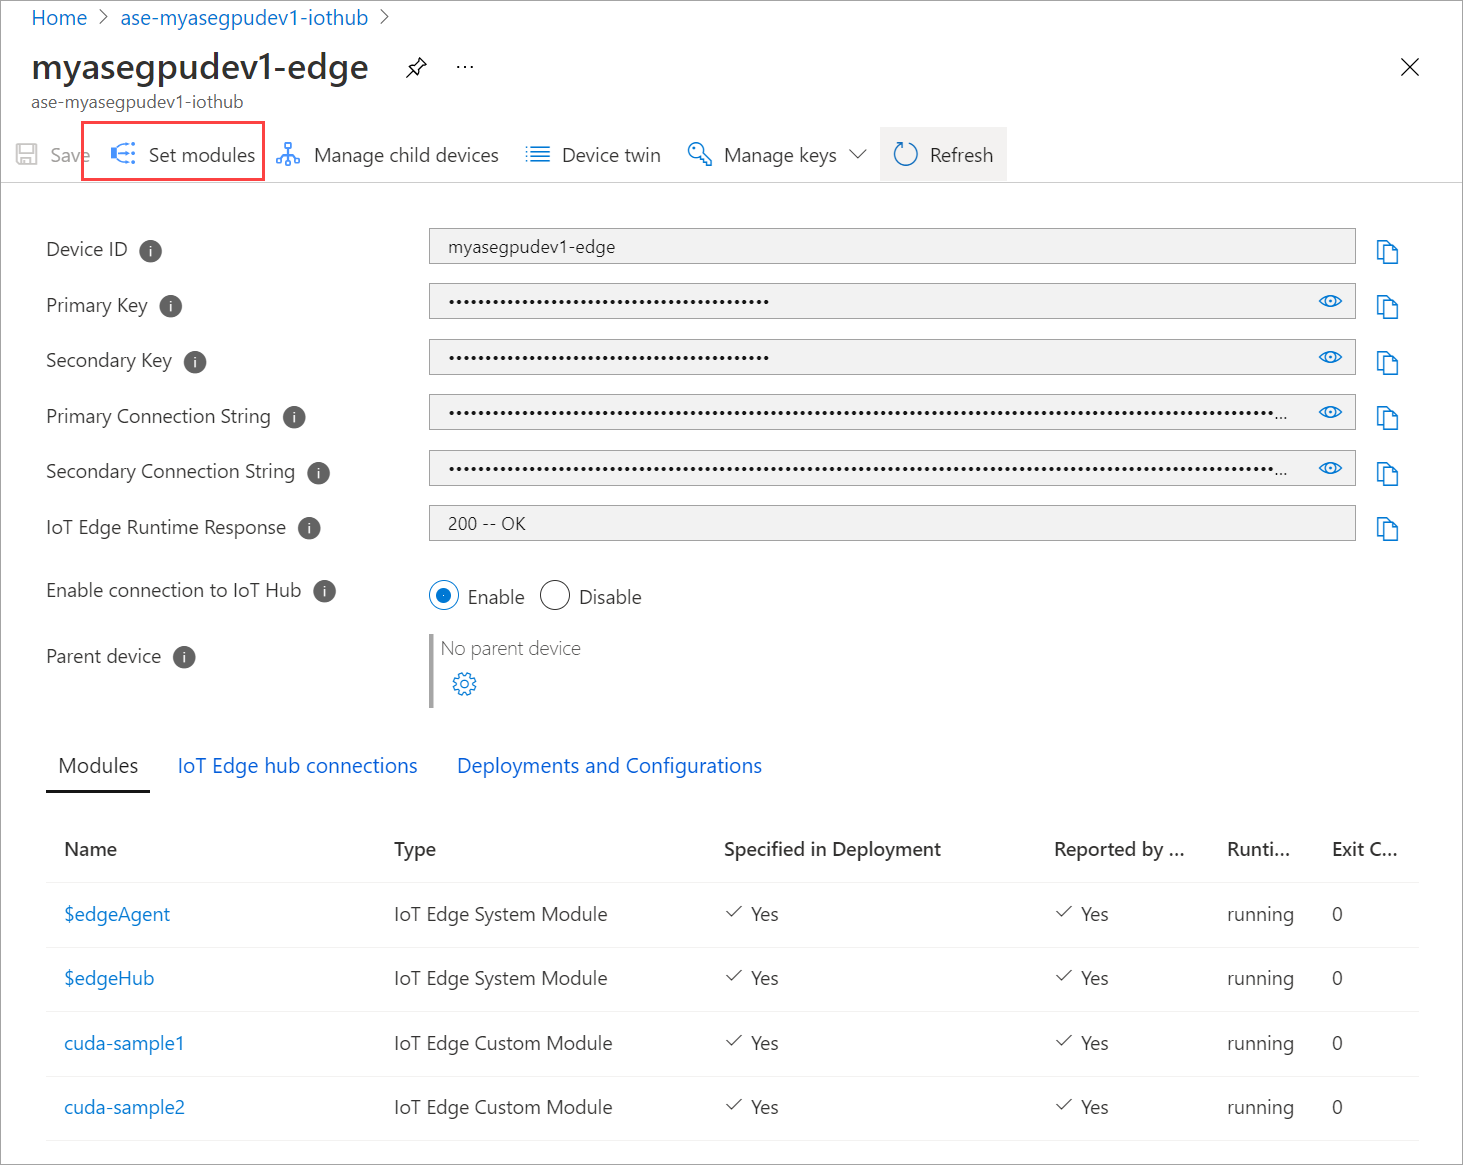
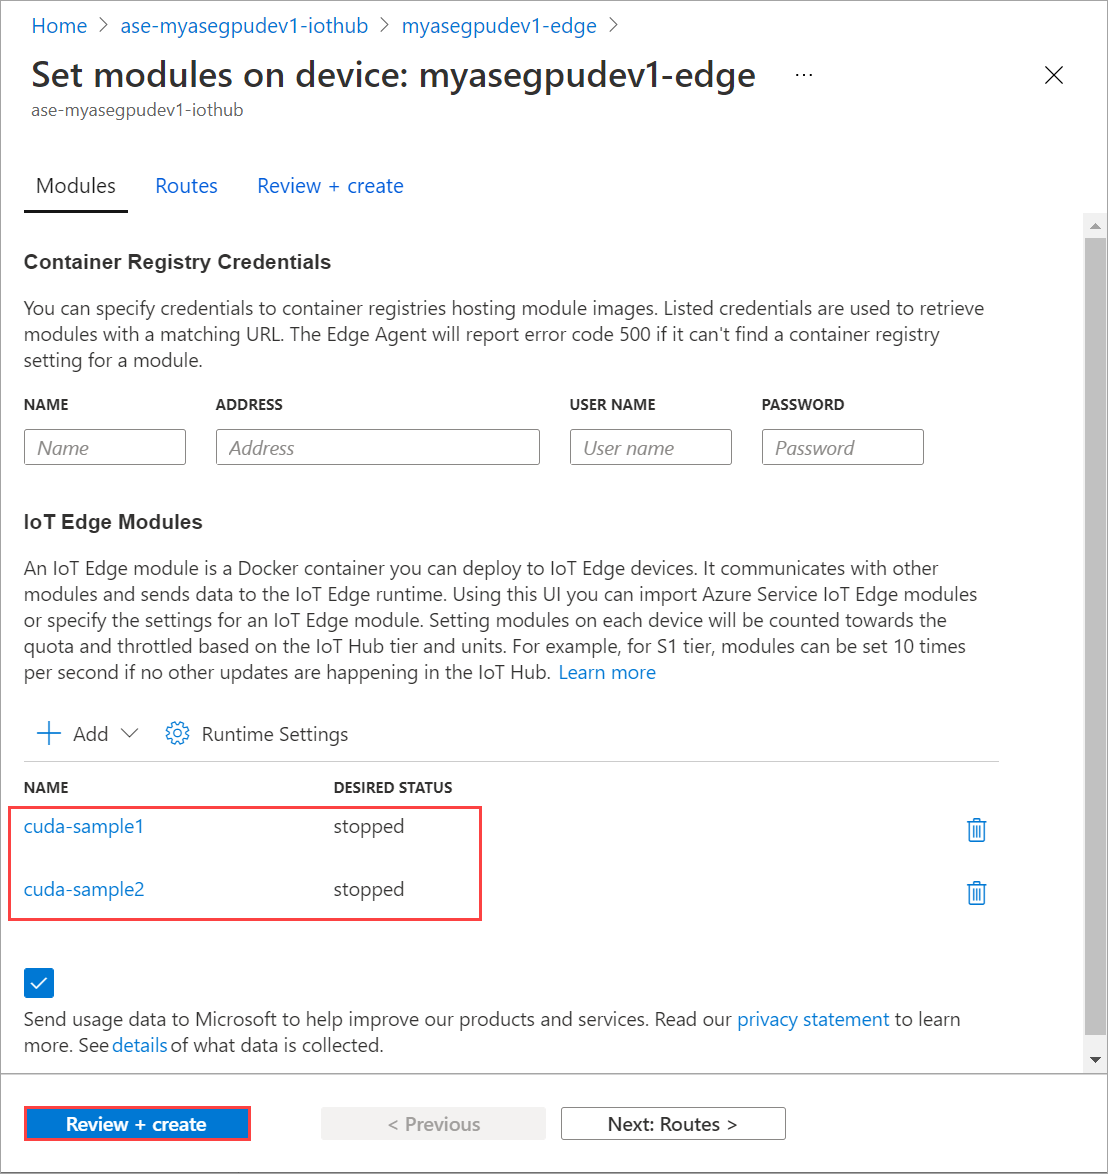
Select Set modules.
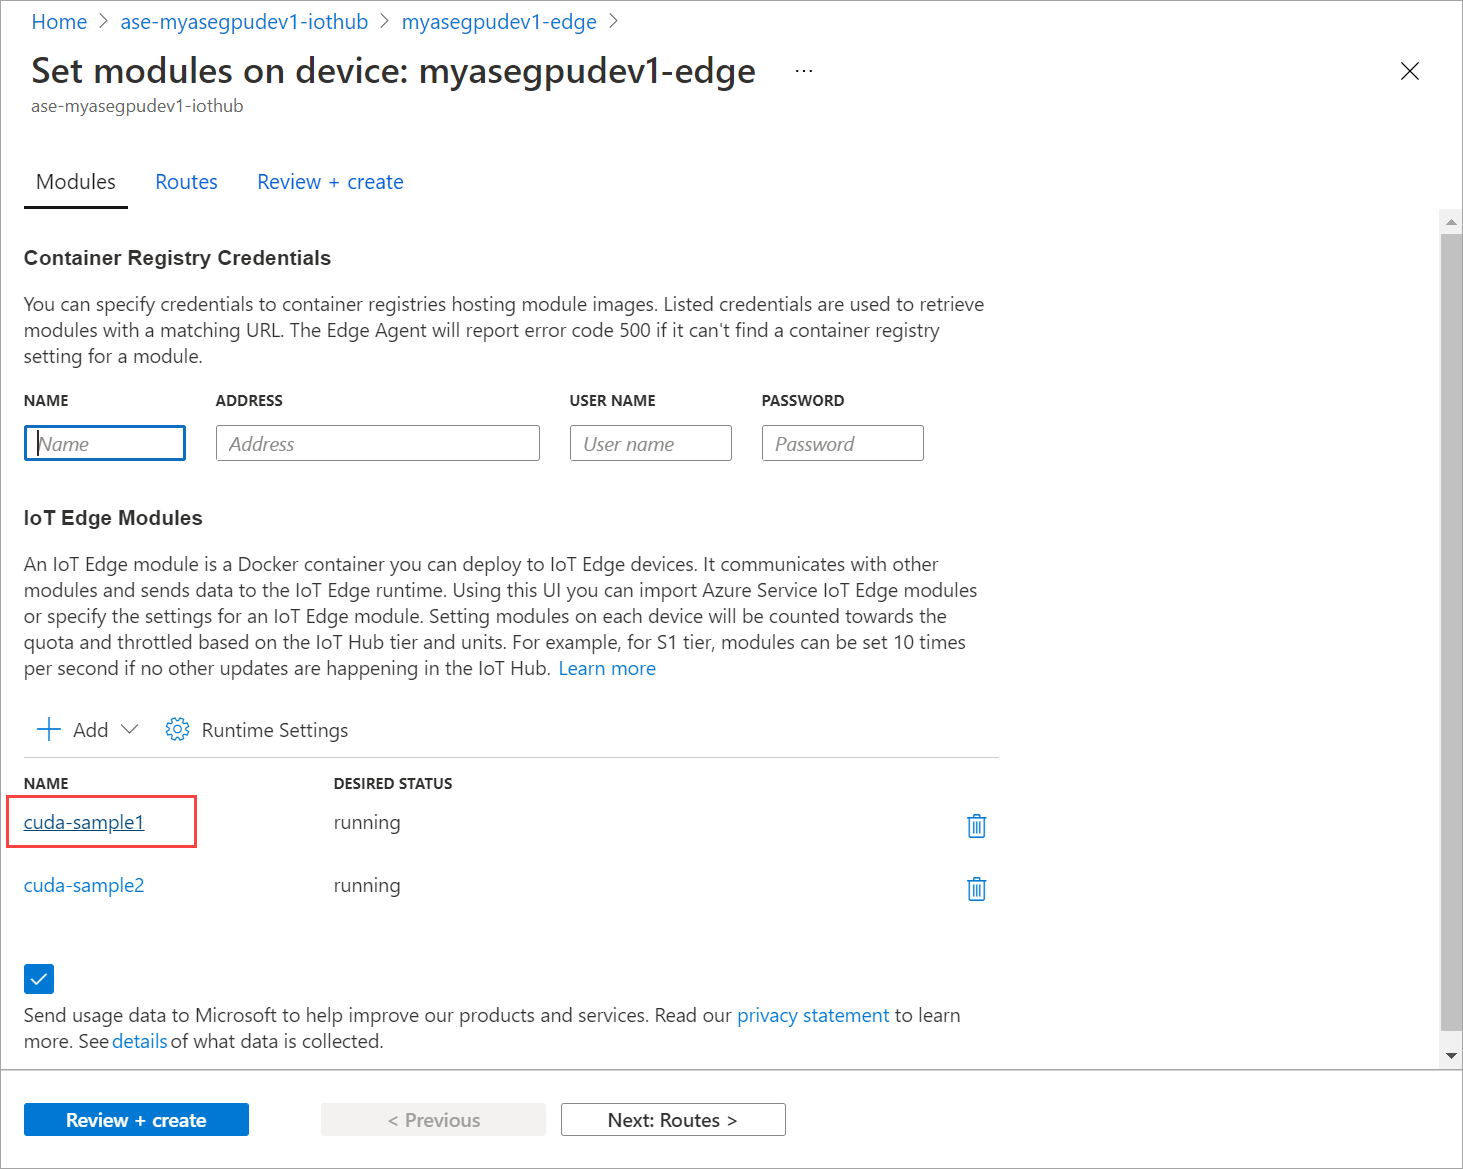
Select + Add > + IoT Edge module.
On the Module Settings tab, provide the IoT Edge module name and Image URI. Set Image pull policy to On create.
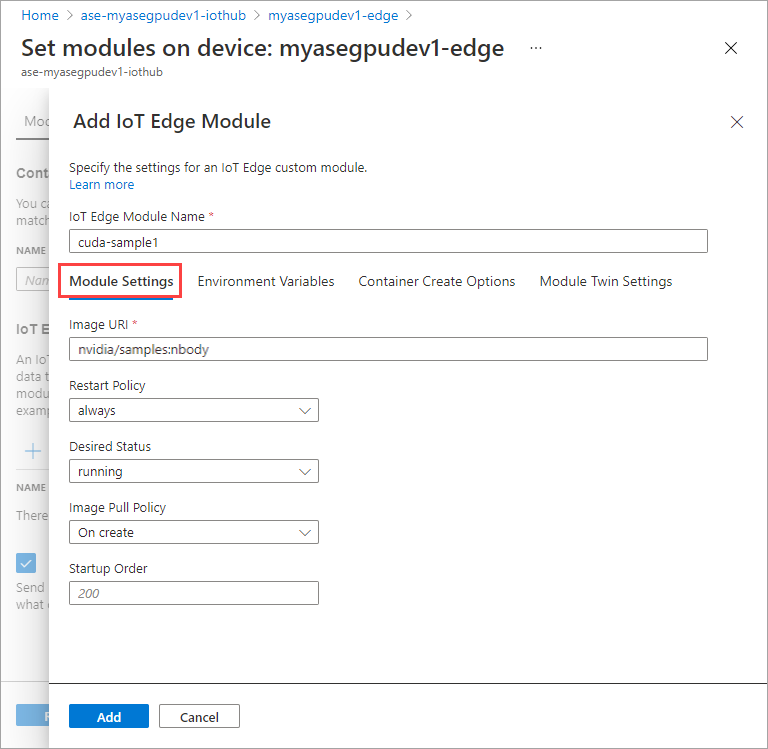
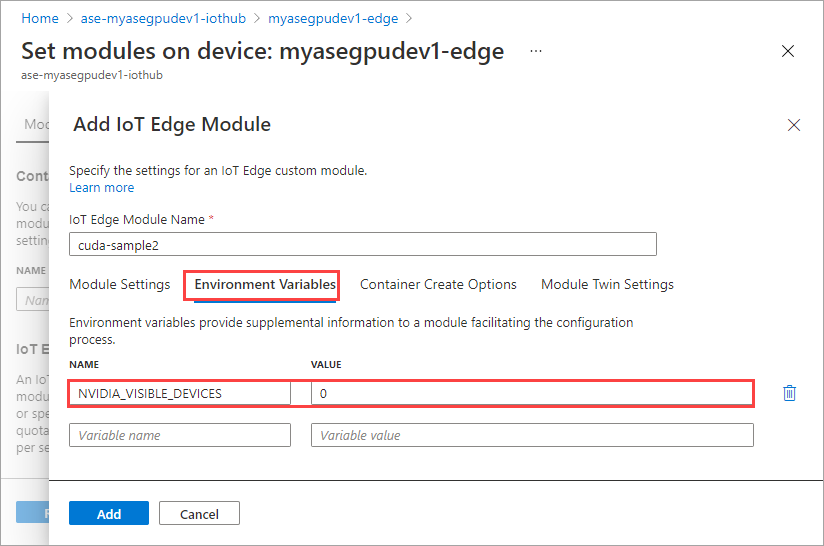
On the Environment Variables tab, specify NVIDIA_VISIBLE_DEVICES as 0.

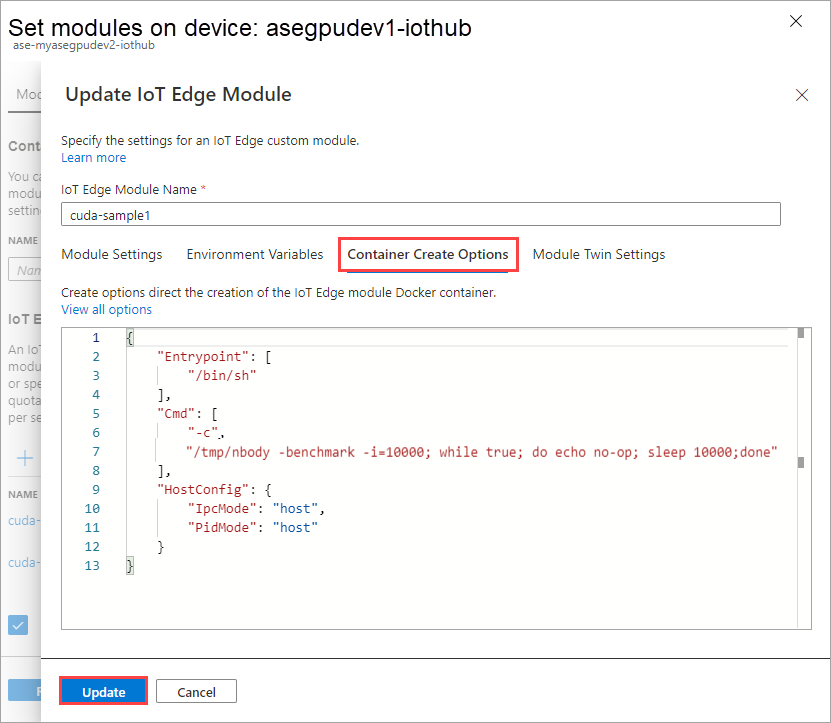
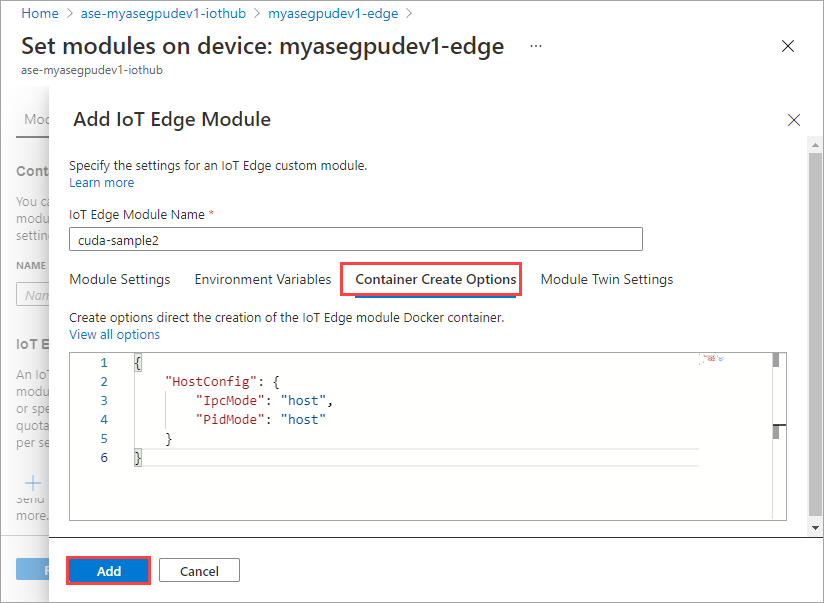
On the Container Create Options tab, provide the following options:
{
    "Entrypoint": [
        "/bin/sh"
    ],
    "Cmd": [
        "-c",
        "/tmp/nbody -benchmark -i=1000; while true; do echo no-op; sleep 10000;done"
    ],
    "HostConfig": {
        "IpcMode": "host",
        "PidMode": "host"
    }
}
The options are displayed as follows:
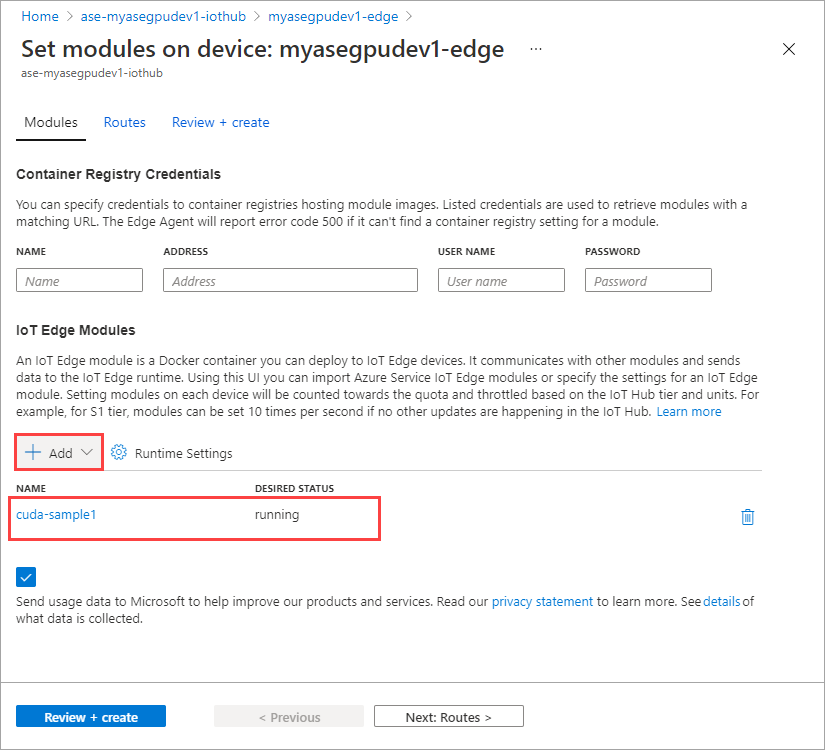
Select Add.
The module that you added should show as Running.
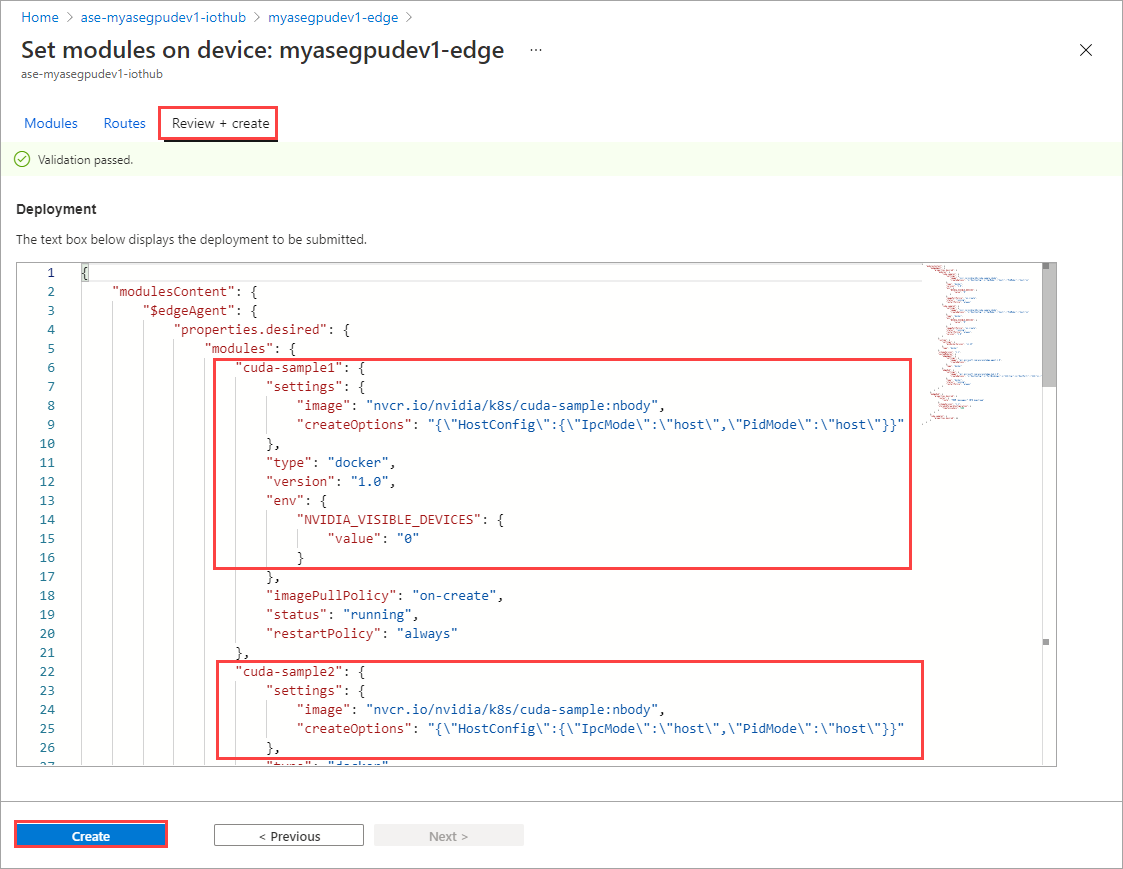
Repeat all the steps to add a module that you followed when adding the first module. In this example, provide the name of the module as
cuda-sample2.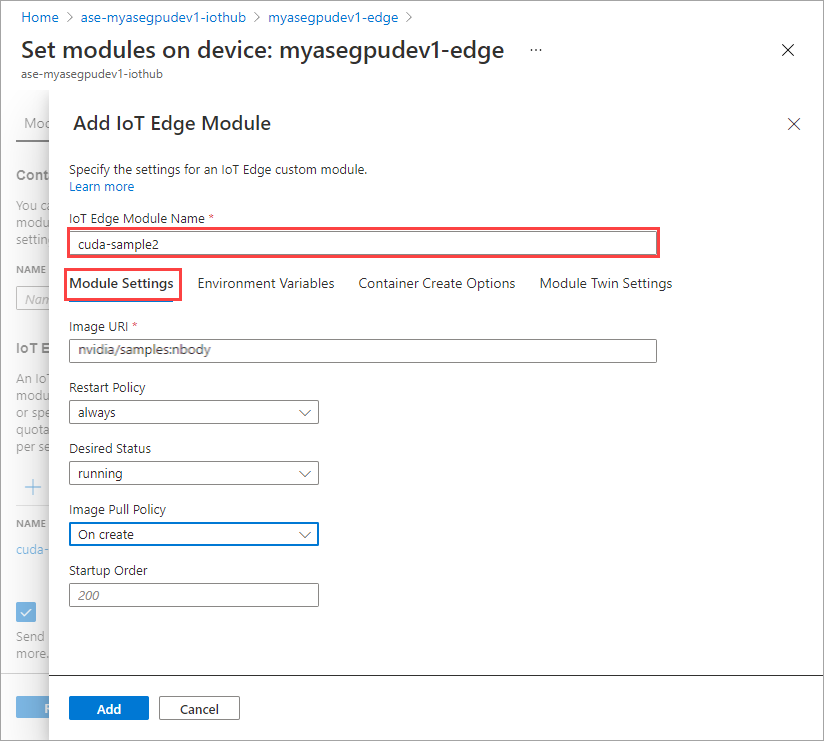
Use the same environment variable as both the modules will share the same GPU.
Use the same container create options that you provided for the first module and select Add.
On the Set modules page, select Review + Create and then select Create.
The Runtime status of both the modules should now show as Running.
Monitor workload deployment
Open a new PowerShell session.
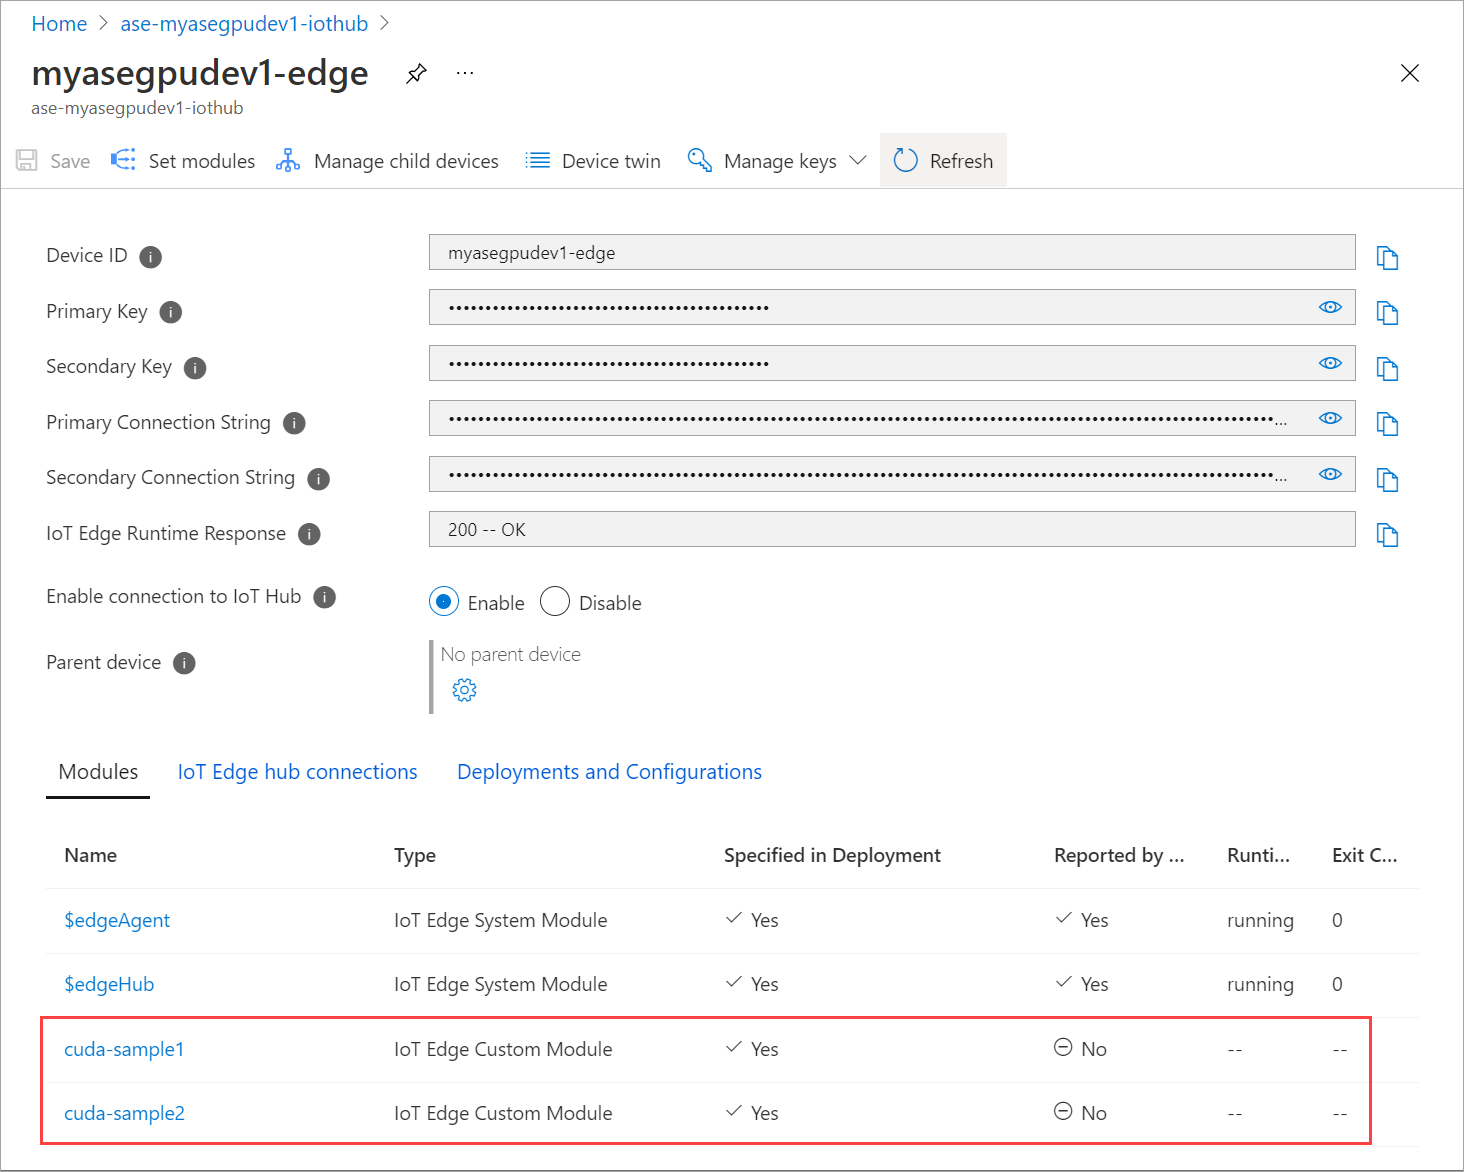
List the pods running in the
iotedgenamespace. Run the following command:kubectl get pods -n iotedgeHere is an example output:
PS C:\WINDOWS\system32> kubectl get pods -n iotedge --kubeconfig C:\GPU-sharing\kubeconfigs\configiotuser1
NAME                            READY   STATUS    RESTARTS   AGE
cuda-sample1-869989578c-ssng8   2/2     Running   0          5s
cuda-sample2-6db6d98689-d74kb   2/2     Running   0          4s
edgeagent-79f988968b-7p2tv      2/2     Running   0          6d21h
edgehub-d6c764847-l8v4m         2/2     Running   0          24h
iotedged-55fdb7b5c6-l9zn8       1/1     Running   1          6d21h
PS C:\WINDOWS\system32>
There are two pods,
cuda-sample1-97c494d7f-lnmnsandcuda-sample2-d9f6c4688-2rld9running on your device.While both the containers are running the n-body simulation, view the GPU utilization from the Nvidia smi output. Go to the PowerShell interface of the device and run
Get-HcsGpuNvidiaSmi.Here is an example output when both the containers are running the n-body simulation:
[10.100.10.10]: PS>Get-HcsGpuNvidiaSmi
K8S-1HXQG13CL-1HXQG13:

Fri Mar  5 13:31:16 2021
+-----------------------------------------------------------------------------+
| NVIDIA-SMI 460.32.03    Driver Version: 460.32.03    CUDA Version: 11.2     |
|-------------------------------+----------------------+----------------------+
| GPU  Name        Persistence-M| Bus-Id        Disp.A | Volatile Uncorr. ECC |
| Fan  Temp  Perf  Pwr:Usage/Cap|         Memory-Usage | GPU-Util  Compute M. |
|                               |                      |               MIG M. |
|===============================+======================+======================|
|   0  Tesla T4            On   | 00002C74:00:00.0 Off |                    0 |
| N/A   52C    P0    69W /  70W |    221MiB / 15109MiB |    100%      Default |
|                               |                      |                  N/A |
+-------------------------------+----------------------+----------------------+

+-----------------------------------------------------------------------------+
| Processes:                                                                  |
|  GPU   GI   CI        PID   Type   Process name                  GPU Memory |
|        ID   ID                                                   Usage      |
|=============================================================================|
|    0   N/A  N/A    188342      C   /tmp/nbody                        109MiB |
|    0   N/A  N/A    188413      C   /tmp/nbody                        109MiB |
+-----------------------------------------------------------------------------+
[10.100.10.10]: PS>
As you can see, there are two containers running with n-body simulation on GPU 0. You can also view their corresponding memory usage.
Once the simulation has completed, the Nvidia smi output will show that there are no processes running on the device.
[10.100.10.10]: PS>Get-HcsGpuNvidiaSmi
K8S-1HXQG13CL-1HXQG13:

Fri Mar  5 13:54:48 2021
+-----------------------------------------------------------------------------+
| NVIDIA-SMI 460.32.03    Driver Version: 460.32.03    CUDA Version: 11.2     |
|-------------------------------+----------------------+----------------------+
| GPU  Name        Persistence-M| Bus-Id        Disp.A | Volatile Uncorr. ECC |
| Fan  Temp  Perf  Pwr:Usage/Cap|         Memory-Usage | GPU-Util  Compute M. |
|                               |                      |               MIG M. |
|===============================+======================+======================|
|   0  Tesla T4            On   | 00002C74:00:00.0 Off |                    0 |
| N/A   34C    P8     9W /  70W |      0MiB / 15109MiB |      0%      Default |
|                               |                      |                  N/A |
+-------------------------------+----------------------+----------------------+

+-----------------------------------------------------------------------------+
| Processes:                                                                  |
|  GPU   GI   CI        PID   Type   Process name                  GPU Memory |
|        ID   ID                                                   Usage      |
|=============================================================================|
|  No running processes found                                                 |
+-----------------------------------------------------------------------------+
[10.100.10.10]: PS>
After the n-body simulation has completed, view the logs to understand the details of the deployment and the time required for the simulation to complete.
Here is an example output from the first container:
PS C:\WINDOWS\system32> kubectl -n iotedge  --kubeconfig C:\GPU-sharing\kubeconfigs\configiotuser1 logs cuda-sample1-869989578c-ssng8 cuda-sample1
Run "nbody -benchmark [-numbodies=<numBodies>]" to measure performance.
==============// snipped //===================//  snipped  //=============
> Windowed mode
> Simulation data stored in video memory
> Single precision floating point simulation
> 1 Devices used for simulation
GPU Device 0: "Turing" with compute capability 7.5

> Compute 7.5 CUDA device: [Tesla T4]
40960 bodies, total time for 10000 iterations: 170171.531 ms
= 98.590 billion interactions per second
= 1971.801 single-precision GFLOP/s at 20 flops per interaction
no-op
PS C:\WINDOWS\system32>
Here is an example output from the second container:
PS C:\WINDOWS\system32> kubectl -n iotedge  --kubeconfig C:\GPU-sharing\kubeconfigs\configiotuser1 logs cuda-sample2-6db6d98689-d74kb cuda-sample2
Run "nbody -benchmark [-numbodies=<numBodies>]" to measure performance.
==============// snipped //===================//  snipped  //=============
> Windowed mode
> Simulation data stored in video memory
> Single precision floating point simulation
> 1 Devices used for simulation
GPU Device 0: "Turing" with compute capability 7.5

> Compute 7.5 CUDA device: [Tesla T4]
40960 bodies, total time for 10000 iterations: 170054.969 ms
= 98.658 billion interactions per second
= 1973.152 single-precision GFLOP/s at 20 flops per interaction
no-op
PS C:\WINDOWS\system32>
Stop the module deployment. In the IoT Hub resource for your device:
Go to Automatic Device Deployment > IoT Edge. Select the IoT Edge device corresponding to your device.
Go to Set modules and select a module.
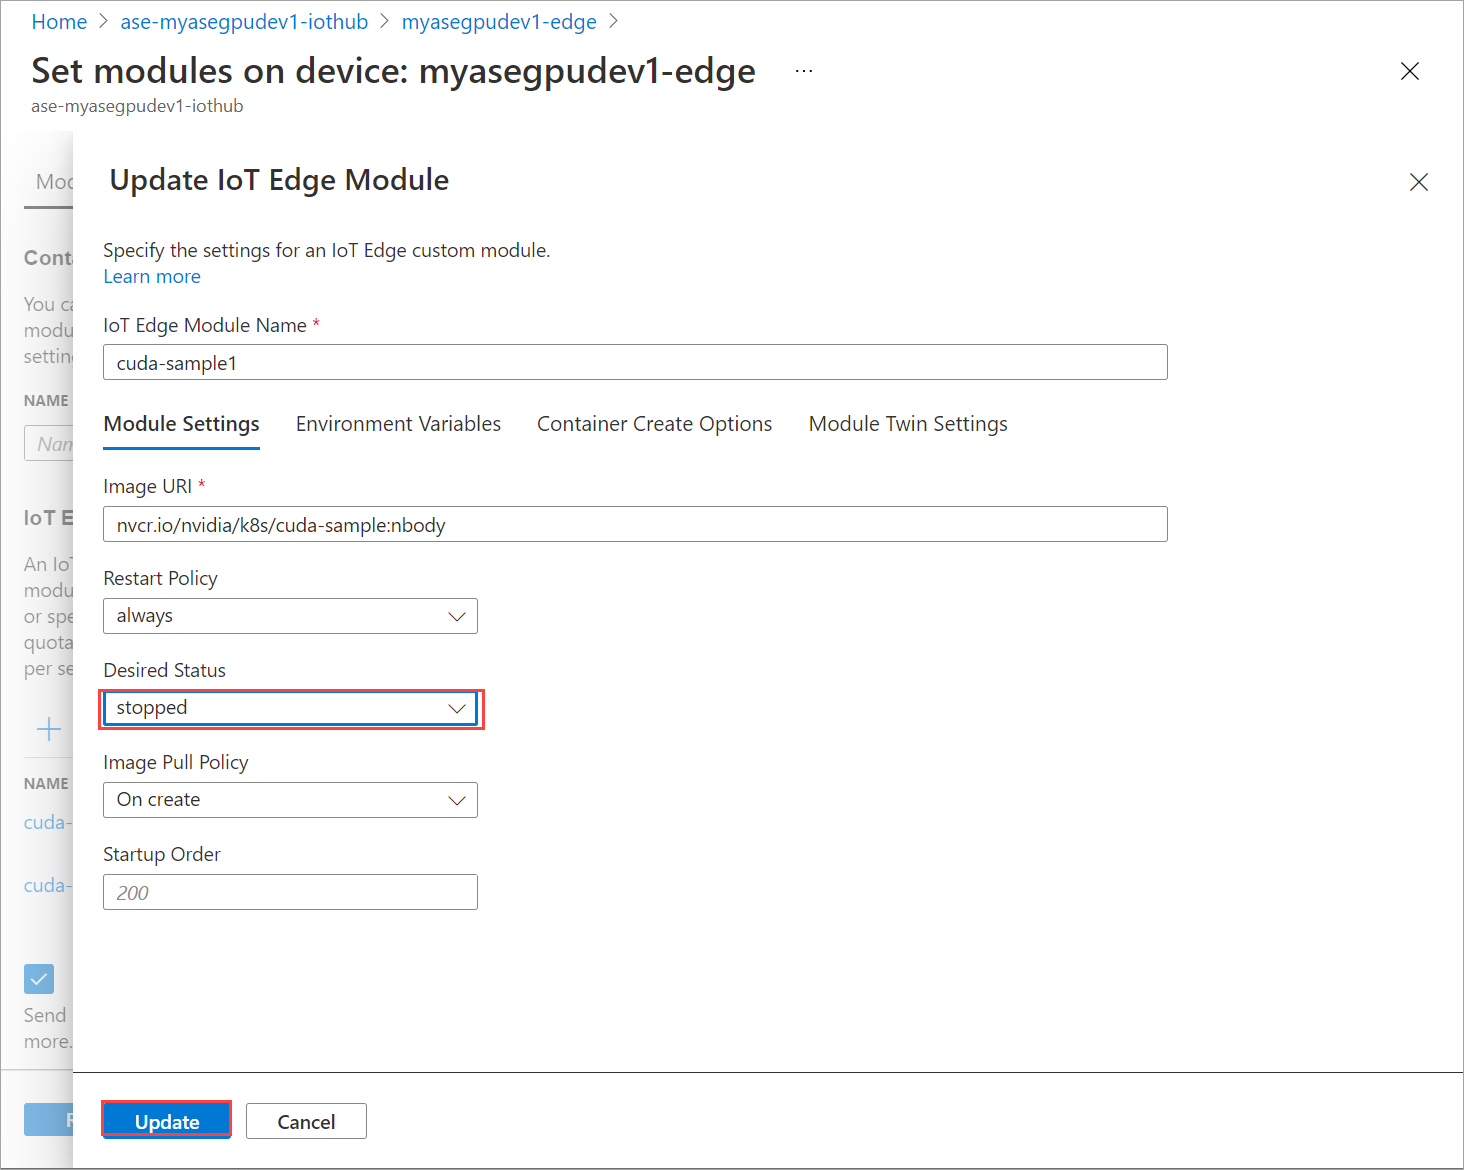
On the Modules tab, select a module.
On the Module settings tab, set Desired status to stopped. Select Update.
Repeat the steps to stop the second module deployed on the device. Select Review + create and then select Create. This should update the deployment.
Refresh Set modules page multiple times. until the module Runtime status shows as Stopped.
Deploy with context-sharing
You can now deploy the n-body simulation on two CUDA containers when MPS is running on your device. First, you'll enable MPS on the device.
To enable MPS on your device, run the
Start-HcsGpuMPScommand.[10.100.10.10]: PS>Start-HcsGpuMPS K8S-1HXQG13CL-1HXQG13: Set compute mode to EXCLUSIVE_PROCESS for GPU 0000191E:00:00.0. All done. Created nvidia-mps.service [10.100.10.10]: PS>Get the Nvidia smi output from the PowerShell interface of the device. You can see the
nvidia-cuda-mps-serverprocess or the MPS service is running on the device.Here is an example output:
[10.100.10.10]: PS>Get-HcsGpuNvidiaSmi
K8S-1HXQG13CL-1HXQG13:

Thu Mar  4 12:37:39 2021
+-----------------------------------------------------------------------------+
| NVIDIA-SMI 460.32.03    Driver Version: 460.32.03    CUDA Version: 11.2     |
|-------------------------------+----------------------+----------------------+
| GPU  Name        Persistence-M| Bus-Id        Disp.A | Volatile Uncorr. ECC |
| Fan  Temp  Perf  Pwr:Usage/Cap|         Memory-Usage | GPU-Util  Compute M. |
|                               |                      |               MIG M. |
|===============================+======================+======================|
|   0  Tesla T4            On   | 00002C74:00:00.0 Off |                    0 |
| N/A   36C    P8     9W /  70W |     28MiB / 15109MiB |      0%   E. Process |
|                               |                      |                  N/A |
+-------------------------------+----------------------+----------------------+

+-----------------------------------------------------------------------------+
| Processes:                                                                  |
|  GPU   GI   CI        PID   Type   Process name                  GPU Memory |
|        ID   ID                                                   Usage      |
|=============================================================================|
|    0   N/A  N/A    122792      C   nvidia-cuda-mps-server             25MiB |
+-----------------------------------------------------------------------------+
[10.100.10.10]: PS>Get-HcsGpuNvidiaSmi
Deploy the modules that you stopped earlier. Set the Desired status to running via Set modules.
Here is the example output:
PS C:\WINDOWS\system32> kubectl get pods -n iotedge --kubeconfig C:\GPU-sharing\kubeconfigs\configiotuser1
NAME                            READY   STATUS    RESTARTS   AGE
cuda-sample1-869989578c-2zxh6   2/2     Running   0          44s
cuda-sample2-6db6d98689-fn7mx   2/2     Running   0          44s
edgeagent-79f988968b-7p2tv      2/2     Running   0          5d20h
edgehub-d6c764847-l8v4m         2/2     Running   0          27m
iotedged-55fdb7b5c6-l9zn8       1/1     Running   1          5d20h
PS C:\WINDOWS\system32>
You can see that the modules are deployed and running on your device.
When the modules are deployed, the n-body simulation also starts running on both the containers. Here is the example output when the simulation has completed on the first container:
PS C:\WINDOWS\system32> kubectl -n iotedge logs cuda-sample1-869989578c-2zxh6 cuda-sample1
Run "nbody -benchmark [-numbodies=<numBodies>]" to measure performance.
==============// snipped //===================//  snipped  //=============

> Windowed mode
> Simulation data stored in video memory
> Single precision floating point simulation
> 1 Devices used for simulation
GPU Device 0: "Turing" with compute capability 7.5

> Compute 7.5 CUDA device: [Tesla T4]
40960 bodies, total time for 10000 iterations: 155256.062 ms
= 108.062 billion interactions per second
= 2161.232 single-precision GFLOP/s at 20 flops per interaction
no-op
PS C:\WINDOWS\system32>
Here is the example output when the simulation has completed on the second container:
PS C:\WINDOWS\system32> kubectl -n iotedge  --kubeconfig C:\GPU-sharing\kubeconfigs\configiotuser1 logs cuda-sample2-6db6d98689-fn7mx cuda-sample2
Run "nbody -benchmark [-numbodies=<numBodies>]" to measure performance.
==============// snipped //===================//  snipped  //=============

> Windowed mode
> Simulation data stored in video memory
> Single precision floating point simulation
> 1 Devices used for simulation
GPU Device 0: "Turing" with compute capability 7.5

> Compute 7.5 CUDA device: [Tesla T4]
40960 bodies, total time for 10000 iterations: 155366.359 ms
= 107.985 billion interactions per second
= 2159.697 single-precision GFLOP/s at 20 flops per interaction
no-op
PS C:\WINDOWS\system32>
Get the Nvidia smi output from the PowerShell interface of the device when both the containers are running the n-body simulation. Here is an example output. There are three processes, the
nvidia-cuda-mps-serverprocess (type C) corresponds to the MPS service and the/tmp/nbodyprocesses (type M + C) correspond to the n-body workloads deployed by the modules.[10.100.10.10]: PS>Get-HcsGpuNvidiaSmi K8S-1HXQG13CL-1HXQG13: Thu Mar 4 12:59:44 2021 +-----------------------------------------------------------------------------+ | NVIDIA-SMI 460.32.03 Driver Version: 460.32.03 CUDA Version: 11.2 | |-------------------------------+----------------------+----------------------+ | GPU Name Persistence-M| Bus-Id Disp.A | Volatile Uncorr. ECC | | Fan Temp Perf Pwr:Usage/Cap| Memory-Usage | GPU-Util Compute M. | | | | MIG M. | |===============================+======================+======================| | 0 Tesla T4 On | 00002C74:00:00.0 Off | 0 | | N/A 54C P0 69W / 70W | 242MiB / 15109MiB | 100% E. Process | | | | N/A | +-------------------------------+----------------------+----------------------+ +-----------------------------------------------------------------------------+ | Processes: | | GPU GI CI PID Type Process name GPU Memory | | ID ID Usage | |=============================================================================| | 0 N/A N/A 56832 M+C /tmp/nbody 107MiB | | 0 N/A N/A 56900 M+C /tmp/nbody 107MiB | | 0 N/A N/A 122792 C nvidia-cuda-mps-server 25MiB | +-----------------------------------------------------------------------------+ [10.100.10.10]: PS>Get-HcsGpuNvidiaSmi
Next steps
Feedback
Coming soon: Throughout 2024 we will be phasing out GitHub Issues as the feedback mechanism for content and replacing it with a new feedback system. For more information see: https://aka.ms/ContentUserFeedback.
Submit and view feedback for