Tutorial: Use Data Box to import data as managed disks in Azure
This tutorial describes how to use the Azure Data Box to migrate you on-premises VHDs to managed disks in Azure. The VHDs from on-premises VMs are copied to Data Box as page blobs and are uploaded into Azure as managed disks. These managed disks can then be attached to Azure VMs.
In this tutorial, you learn how to:
- Review prerequisites
- Connect to Data Box
- Copy data to Data Box
Prerequisites
Before you begin, make sure that:
You've completed the Tutorial: Set up Azure Data Box.
You've received your Data Box and the order status in the portal is Delivered.
You're connected to a high-speed network. We strongly recommend that you have at least one 10-GbE connection. If a 10-GbE connection isn't available, use a 1-GbE data link but the copy speeds are affected.
You've reviewed the:
You've maintained a copy of the source data until you've confirmed that the Data Box transferred your data into Azure Storage.
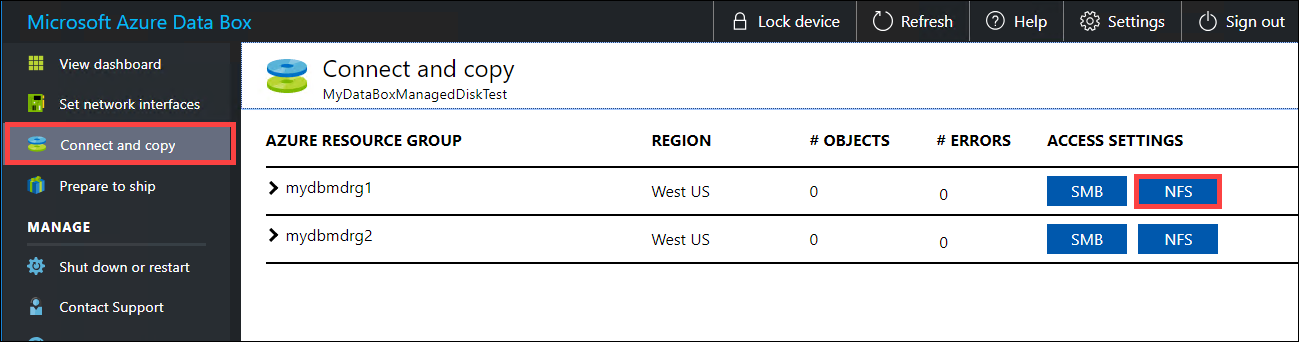
Connect to Data Box
Based on the resource groups specified, Data Box creates one share for each associated resource group. For example, if mydbmdrg1 and mydbmdrg2 were created when placing the order, the following shares are created:
mydbmdrg1_MDiskmydbmdrg2_MDisk
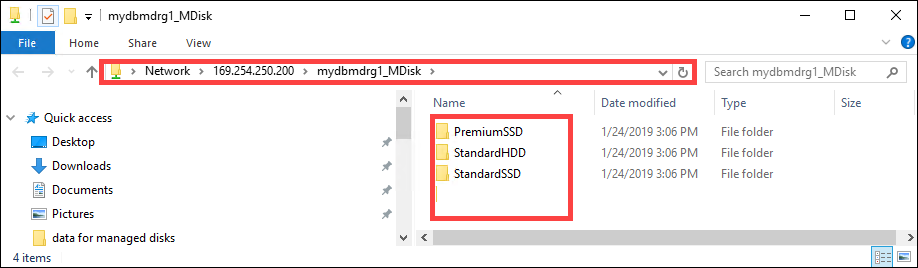
Within each share, the following three folders are created which correspond to containers in your storage account.
- Premium SSD
- Standard HDD
- Standard SSD
The following table shows the UNC paths to the shares on your Data Box.
| Connection protocol | UNC path to the share |
|---|---|
| SMB | \\<DeviceIPAddress>\<ResourceGroupName_MDisk>\<PremiumSSD>\file1.vhd\\<DeviceIPAddress>\<ResourceGroupName_MDisk>\<StandardHDD>\file2.vhd\\<DeviceIPAddress>\<ResourceGroupName_MDisk>\<StandardSSD>\file3.vhd |
| NFS | //<DeviceIPAddress>/<ResourceGroup1_MDisk>/<PremiumSSD>/file1.vhd//<DeviceIPAddress>/<ResourceGroupName_MDisk>/<StandardHDD>/file2.vhd//<DeviceIPAddress>/<ResourceGroupName_MDisk>/<StandardSSD>/file3.vhd |
Based on whether you use SMB or NFS to connect to Data Box shares, the steps to connect are different.
Note
Connecting via REST is not supported for this feature.
Connect to Data Box via SMB
If using a Windows Server host computer, follow these steps to connect to the Data Box.
The first step is to authenticate and start a session. Go to Connect and copy. Click Get credentials to get the access credentials for the shares associated with your resource group. You can also get the access credentials from the Device details in the Azure portal.
Note
The credentials for all the shares for managed disks are identical.
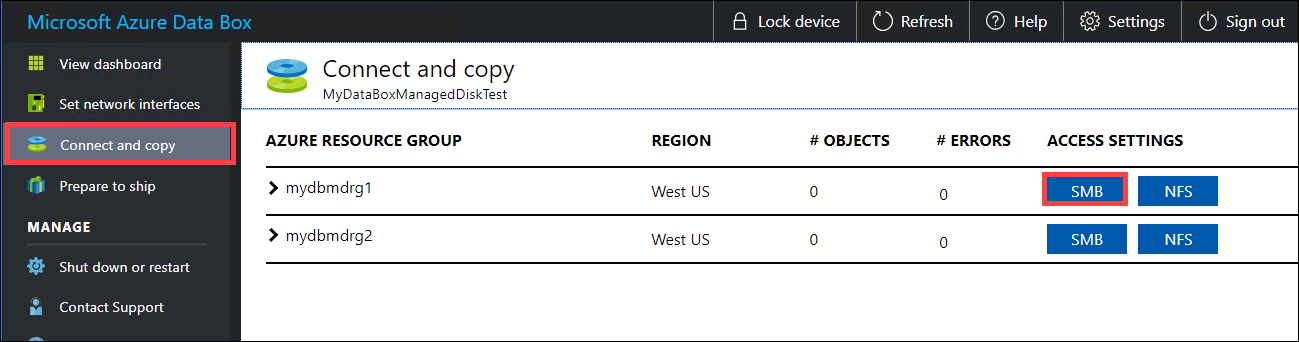
From the Access share and copy data dialog box, copy the Username and the Password for the share. Click OK.
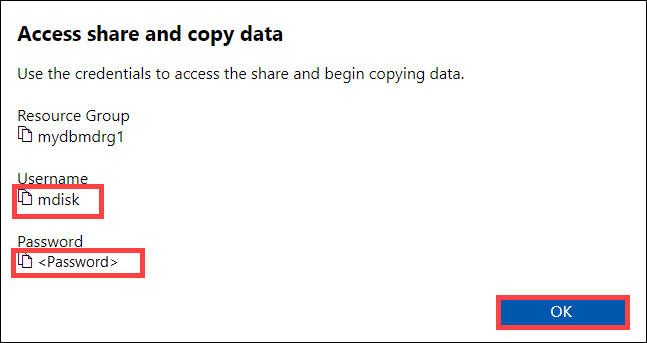
To access the shares associated with your resource (mydbmdrg1 in the following example) from your host computer, open a command window. At the command prompt, type:
net use \\<IP address of the device>\<share name> /u:<user name for the share>Your UNC share paths in this example are as follows:
\\169.254.250.200\mydbmdrg1_MDisk\\169.254.250.200\mydbmdrg2_MDisk
Enter the password for the share when prompted. The following sample shows connecting to a share via the preceding command.
C:\>net use \\169.254.250.200\mydbmdrgl_MDisk /u:mdisk
Enter the password for 'mdisk' to connect to '169.254.250.200':
The command completed successfully.
C: \>
Press Windows + R. In the Run window, specify the
\\<device IP address>\<ShareName>. Click OK to open File Explorer.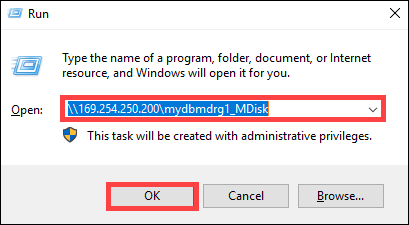
You should now see the following precreated folders within each share.
Connect to Data Box via NFS
If you are using a Linux host computer, perform the following steps to configure Data Box to allow access to NFS clients.
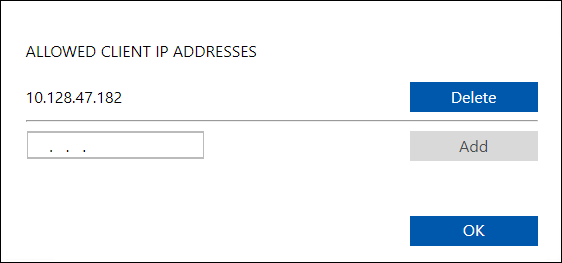
Supply the IP addresses of the allowed clients that can access the share. In the local web UI, go to the Connect and copy page. Under NFS settings, click NFS client access.
Supply the IP address of the NFS client and click Add. You can configure access for multiple NFS clients by repeating this step. Click OK.
Ensure that the Linux host computer has a supported version of NFS client installed. Use the specific version for your Linux distribution.
Once the NFS client is installed, use the following command to mount the NFS share on your Data Box device:
sudo mount <Data Box device IP>:/<NFS share on Data Box device> <Path to the folder on local Linux computer>The following example shows how to connect via NFS to a Data Box share. The Data Box device IP is
169.254.250.200, the sharemydbmdrg1_MDiskis mounted on the ubuntuVM, mount point being/home/databoxubuntuhost/databox.sudo mount -t nfs 169.254.250.200:/mydbmdrg1_MDisk /home/databoxubuntuhost/databox
Copy data to Data Box
After you're connected to the data server, the next step is to copy data. The VHD file is copied to the staging storage account as page blob. The page blob is then converted to a managed disk and moved to a resource group.
Review the following considerations before you begin data copy:
- Always copy the VHDs to one of the precreated folders. If you copy the VHDs outside of these folders or in a folder that you created, the VHDs will be uploaded to Azure Storage account as page blobs and not managed disks.
- Only the fixed VHDs can be uploaded to create managed disks. VHDX files or dynamic and differencing VHDs are not supported.
- You can only have one managed disk with a given name in a resource group across all the precreated folders. This implies that the VHDs uploaded to the precreated folders should have unique names. Make sure that the given name does not match an already existing managed disk in a resource group.
- Review managed disk limits in Azure object size limits.
Depending on whether you are connecting via SMB or NFS, you can use:
Wait for the copy jobs to finish. Make sure that the copy jobs have finished with no errors before you go to the next step.
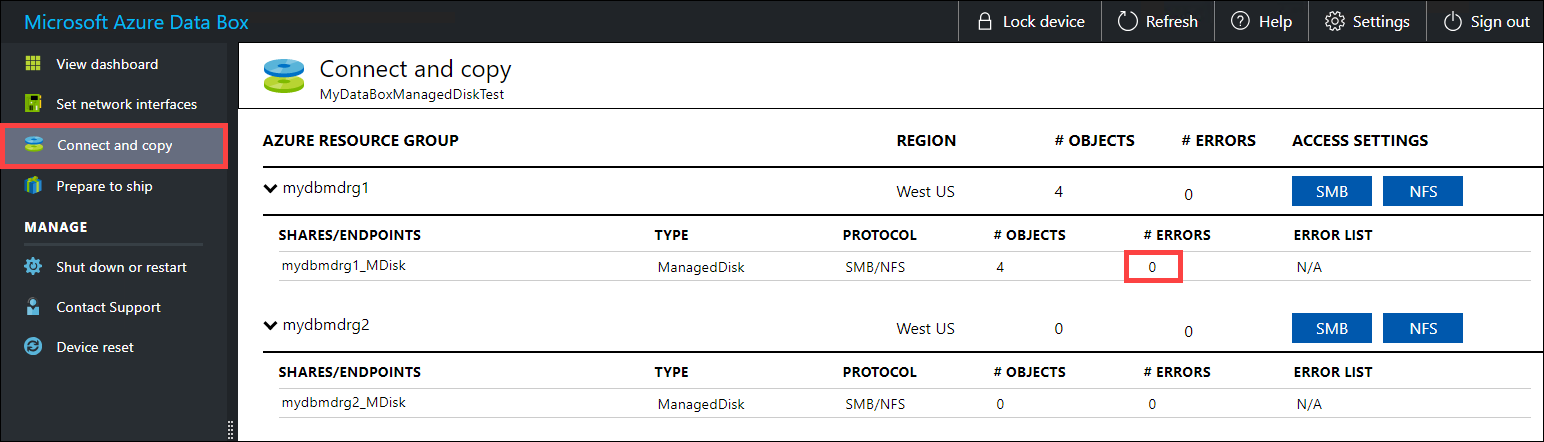
If there are errors during the copy process, download the logs from the Connect and copy page.
If you copied a file that is not 512 bytes aligned, the file isn't uploaded as page blob to your staging storage account. You will see an error in the logs. Remove the file and copy a file that is 512 bytes aligned.
If you copied a VHDX (these files are not supported) with a long name, you will see an error in the logs.

Resolve the errors before you proceed to the next step.
To ensure data integrity, checksum is computed inline as the data is copied. Once the copy is complete, verify the used space and the free space on your device.
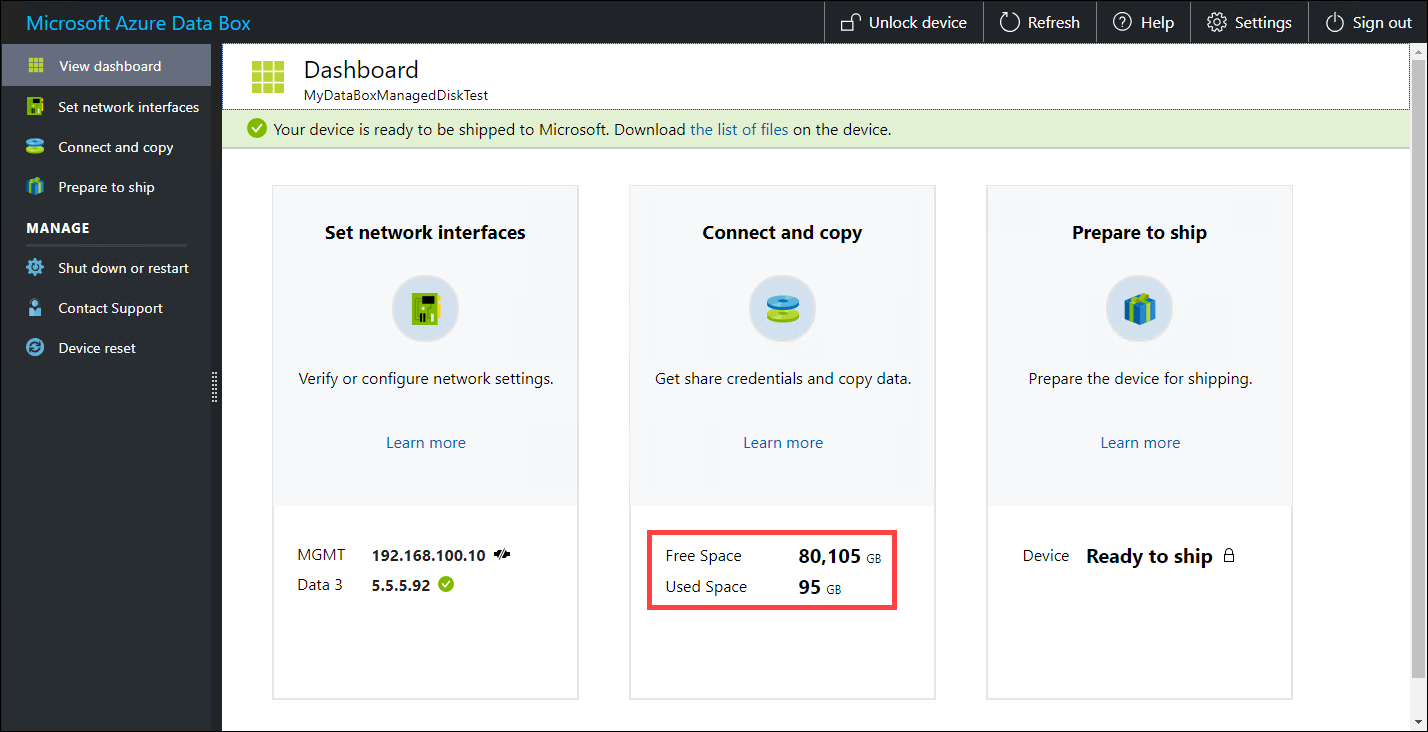
Once the copy job is finished, you can go to Prepare to ship.
Next steps
In this tutorial, you learned about Azure Data Box topics such as:
- Review prerequisites
- Connect to Data Box
- Copy data to Data Box
Advance to the next tutorial to learn how to ship your Data Box back to Microsoft.
Feedback
Coming soon: Throughout 2024 we will be phasing out GitHub Issues as the feedback mechanism for content and replacing it with a new feedback system. For more information see: https://aka.ms/ContentUserFeedback.
Submit and view feedback for