Sync device time for Azure Data Box and Azure Data Box Heavy
This article describes how to diagnose that your Data Box is out of sync and then change the time on your Data Box device. The information in this article applies to import and export orders on both Data Box and Data Box Heavy devices.
About device time sync
Data Box automatically synchronizes time when it is connected to the internet using the default Windows time server time.windows.com. However, if Data Box is not connected to the internet, the device time may be out of sync. This situation may affect the data copy from the source data to Data Box specifically if the copy is via the REST API or certain tools that have time constraints.
If you see any time difference between the time on Data Box and other local devices on your site, you can sync the time on your Data Box by accessing its PowerShell interface. The Set-Date API is used to modify the device time. For more information, see Set-Date cmdlet.
Connect to PowerShell interface
To troubleshoot time sync issues, you'll first need to connect to the PowerShell interface of your device.
Depending on the software version, that your Data Box is running, you may need to take different steps to connect to the PowerShell interface of the device. The first step in all these cases would be to identify the software version running on your Data Box.
Identify software version of the device
Note
The version number is displayed in the local UI starting v 4.9 and later. If you don't see a version number as described here in your local UI, contact Microsoft Support to identify the version number and then follow the steps to connect to the PowerShell interface of the device.
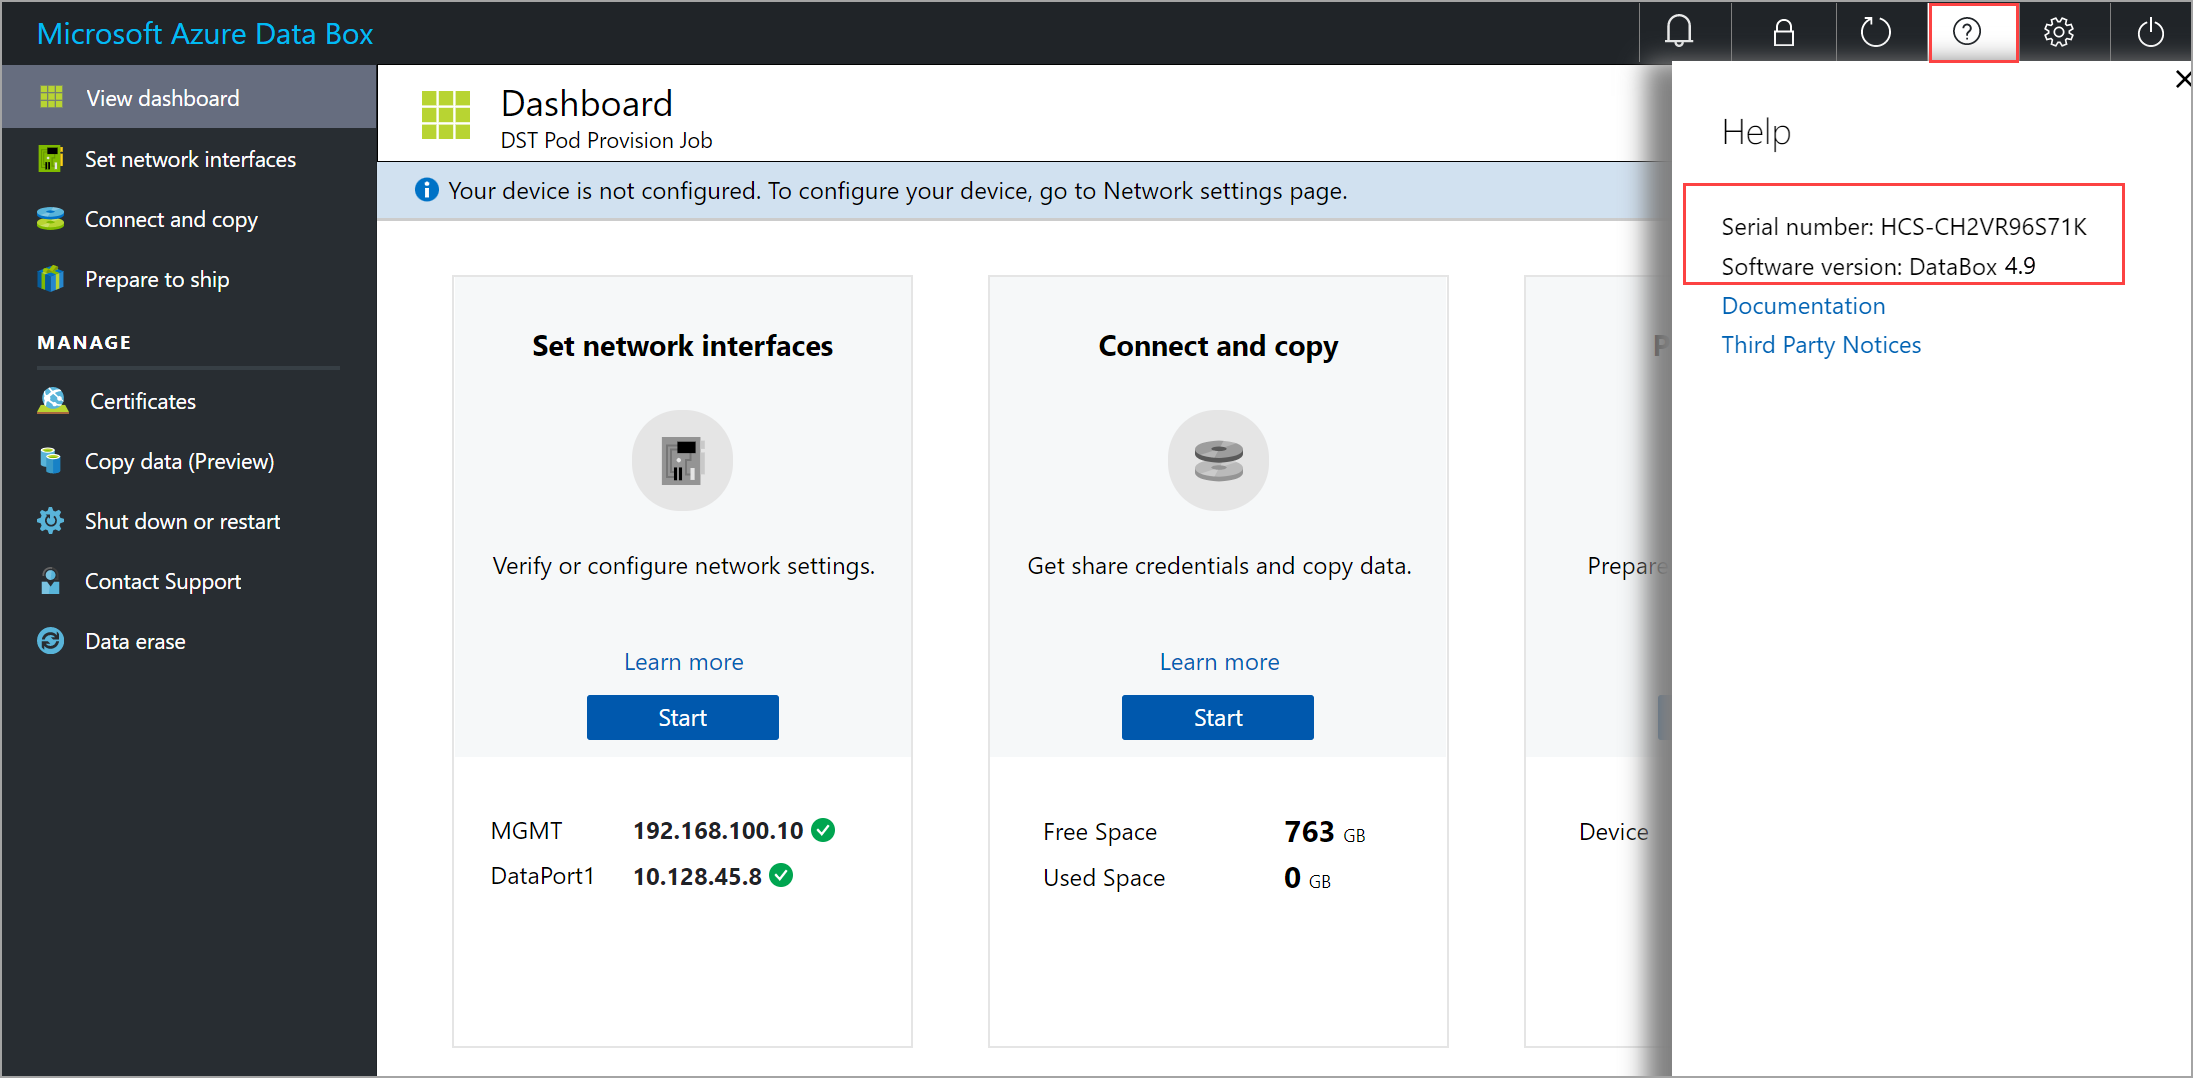
Use one of the following ways to identify the software version running on your device and the device serial number.
Go to the Sign in page. The software version is displayed on this page.

In the local web UI, select the Help icon. In the Help pane, the software version and the device serial number are displayed. Make a note of both the device serial number and the software version.
The next steps are determined by the version of software that your Data Box is running.
For these versions of software, you must first install certificates on the host accessing your Data Box and then connect to the PowerShell interface of the device. When you install certificates, you can use the default certificates that the device is shipped with or bring your own certificates. In each case, the specific steps that you'll take are slightly different.
Step 1: Install certificate on host or client
Use default certificates
Follow these steps if you'll use the default certificates (shipped with the device) on Data Box.
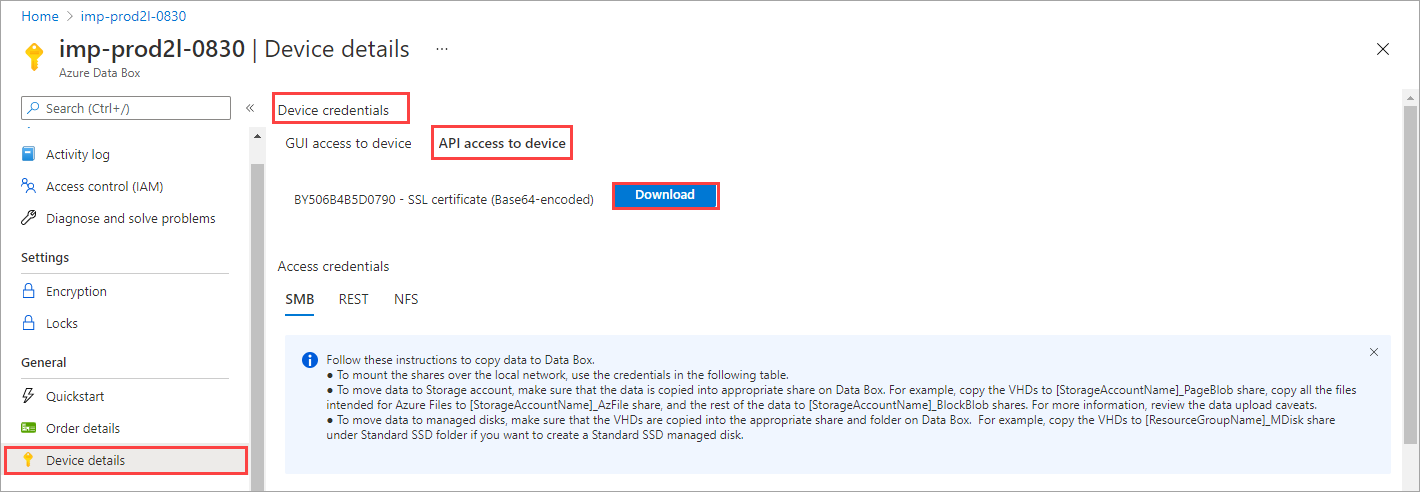
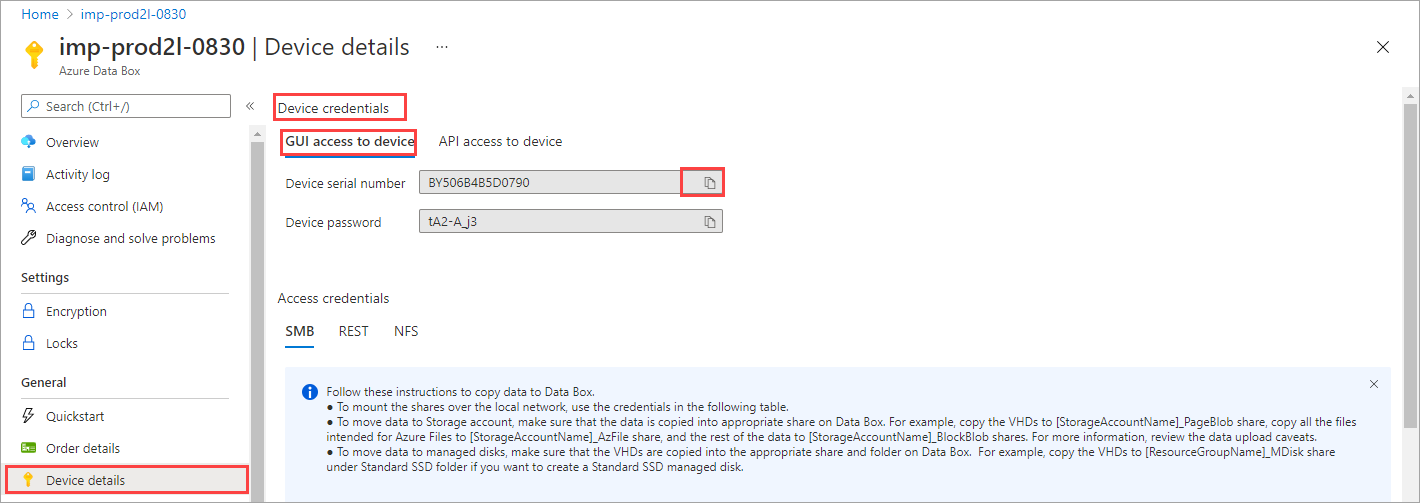
In the Azure portal, go to your Data Box order resource. Go to General > Device details. On the API access to the device tab, select Download.
Copy the certificate to the host connecting to your Data Box. If using a Windows host, open Explorer. Right-click the certificate file that you copied to the host and select Install certificate.
Complete the installation steps through the Certificate Import Wizard. For detailed steps, see Import certificate to the client.
Add an entry to host file that maps the device IP address to the FQDN of the device. The format of the entry would be:
<Device IP address> <Device serial number>.microsoftdatabox.comProvide the device serial number from the earlier step.
Use your own certificates
Follow these steps if you'll bring your own certificates on Data Box.
Install the signing chain certificate that you are bringing, on the host machine that you'll connect to the Data Box. Open the certificate via Explorer, right-click the file and select Install certificate.
Follow steps in Import certificates to client and install the certificate in Local machine/root.
Add an entry to the host file that maps the device IP address to the FQDN of the device. The format of the entry would be:
<Device IP address> <Name>.<DNS domain>To get the Name and DNS domain for your device, in the local UI, go to the Certificates page.
To upload the certificates, in the local UI, go to the Certificates page. Select + Add certificates and provide your certificate. See Upload certificates.
Step 2: Connect to the PowerShell interface
Set
$Nameparameter.$Name = <Name>.<DNS domain>Provide the Name and DNS domain for your device from the earlier steps.
Add your Data Box to the
TrustedHostslist using the$Nameparameter. Type:Set-Item wsman:\localhost\Client\TrustedHosts $NameGet password for local UI from the Azure portal. Create a secure string containing the password.
$Pwd = ConvertTo-SecureString <Password from Azure portal> -AsPlainText -ForceEstablish the connection.
Enter-PSSession -ComputerName $Name -ConfigurationName Minishell -Credential ~\StorSimpleAdmin -UseSSLHere is an example output:
PS C:\Users\Administrator> winrm quickconfig
WinRM service is already running on this machine.
WinRM is already set up for remote management on this computer.
PS C:\Users\Administrator> $Name = "by506b4b5d0790.microsoftdatabox.com"
PS C:\Users\Administrator> Set-Item WSMan:\localhost\Client\TrustedHosts $Name -Concatenate -Force
PS C:\Users\Administrator> Enter-PSSession -ComputerName $Name -Credential ~\StorSimpleAdmin -ConfigurationName Minishell -UseSSL
WARNING: Please engage Microsoft Support if you need to access this interface
to troubleshoot any potential issues you may be experiencing.
Changes made through this interface without involving Microsoft
Support could result in an unsupported configuration.
[by506b4b5d0790.microsoftdatabox.com]: PS>
Skip certificate validation
If you are not using the certificates (we recommend that you use the certificates!), you can skip the certificate validation check by using the session options: -SkipCACheck -SkipCNCheck -SkipRevocationCheck.
Follow these steps to skip certificate validation:
Set
$Nameparameter.$Name = <Name>.<DNS domain>Use session options when opening a PowerShell session.
$sessOptions = New-PSSessionOption -SkipCACheck -SkipCNCheck -SkipRevocationCheckEstablish the connection.
Enter-PSSession -ComputerName $Name -ConfigurationName Minishell -Credential ~\StorSimpleAdmin -UseSSL -SessionOption $sessOptions
Change device time
To change the device time, follow these steps.
To diagnose if the device time is out of sync, get the device time first. Use the
Get-Datecmdlet to view the date and time on your Data Box.Get-DateIf the device time is out of sync, use the
Set-Datecmdlet to change the time on your Data Box.Set the time forward by 2 minutes.
Set-Date -Adjust <time change in hours:mins:secs format> -DisplayHint TimeSet the time back by 2 minutes.
Set-Date -Adjust -<time change in hours:mins:secs format> -DisplayHint TimeHere is an example output:
[by506b4b5d0790.microsoftdatabox.com]: PS>Get-date
Friday, September 3, 2021 2:22:50 PM
[by506b4b5d0790.microsoftdatabox.com]: PS>Set-Date -Adjust 00:02:00 -DisplayHint Time
2:25:18 PM
[by506b4b5d0790.microsoftdatabox.com]: PS>Set-Date -Adjust -00:02:00 -DisplayHint Time
2:23:28 PM
[by506b4b5d0790.microsoftdatabox.com]: PS>Get-date
Friday, September 3, 2021 2:23:42 PM
[by506b4b5d0790.microsoftdatabox.com]: PS>
For more information, see Set-Date cmdlet.
Next steps
To troubleshoot other Data Box issues, see one of the following articles:
Feedback
Coming soon: Throughout 2024 we will be phasing out GitHub Issues as the feedback mechanism for content and replacing it with a new feedback system. For more information see: https://aka.ms/ContentUserFeedback.
Submit and view feedback for