Configure HSM customer-managed keys for Azure managed disks
Azure Databricks compute workloads in the compute plane store temporary data on Azure managed disks. By default, data stored on managed disks is encrypted at rest using server-side encryption with Microsoft-managed keys. This article describes how to configure a customer-managed key from Azure Key Vault HSM for your Azure Databricks workspace to use for managed disk encryption. For instructions on using a key from Azure Key Vault vaults, see Configure customer-managed keys for Azure managed disks.
Important
- Customer-managed keys for managed disk storage apply to data disks, but do not apply to operating system (OS) disks.
- Customer-managed keys for managed disk storage do not apply to serverless compute resources such as serverless SQL warehouses and Model Serving. The disks used for serverless compute resources are short-lived and tied to the lifecycle of the serverless workload. When compute resources are stopped or scaled down, the VMs and their storage are destroyed.
Requirements
Your Azure Databricks workspace must be on the Premium plan.
If you want to enable auto-rotation, only RSA-HSM keys of sizes 2048-bit, 3072-bit, and 4096-bit are supported.
This feature is unsupported for workspaces with FedRAMP compliance. Contact your Azure Databricks account team for more information.
To use the Azure CLI for these tasks, install the Azure CLI tool and install the Databricks extension:
az extension add --name databricksTo use Powershell for these tasks, install Azure PowerShell and install the Databricks Powershell module. You must also log in:
Connect-AzAccountTo log in to your Azure account as a user, see PowerShell login with an Azure Databricks user account. To log in to your Azure account as a service principal, see PowerShell login with a Microsoft Entra ID service principal.
Step 1: Create an Azure Key Vault Managed HSM and an HSM key
You can use an existing Azure Key Vault Managed HSM or create and activate a new one following the quickstarts in the Managed HSM documentation. See Quickstart: Provision and activate a Managed HSM using Azure CLI. The Azure Key Vault Managed HSM must have Purge Protection enabled.
To create an HSM key, follow Create an HSM key.
Step 2: Stop all compute resources if you’re updating a workspace to initially add a key
If you’re adding a customer-managed key for managed disks initially on an existing workspace, stop all your compute resources (clusters, pools, classic or pro SQL warehouses) before the update.
After the update completes, you can start the compute resources that you stopped. For a workspace that already has a customer-managed key for managed disks, you can rotate the key without terminating compute resources.
Step 3: Create or update a workspace
You can create or update a workspace with a customer-managed key for managed disks, using the Azure portal, Azure CLI, or Azure Powershell.
Use the Azure portal
This section describes how to use the Azure portal to create or update a workspace with customer-managed keys for managed disks.
Start to create or update a workspace:
Create a new workspace with a key:
- Go to the Azure Portal homepage and click Create a resource in the top-left corner of the page.
- Within the search bar, type
Azure Databricksand click Azure Databricks. - Select Create from within the Azure Databricks widget.
- Enter values in the form fields on the tabs Basics and Networking.
- In the Encryption tab, select the Use your own key checkbox in the Managed Disks section.
Initially add a key to an existing workspace:
- Go to the Azure portal’s home page for Azure Databricks.
- Navigate to your existing Azure Databricks workspace.
- Open the Encryption tab from the left-side panel.
- Under the Customer-managed keys section, enable Managed Disks.
Set the encryption fields.
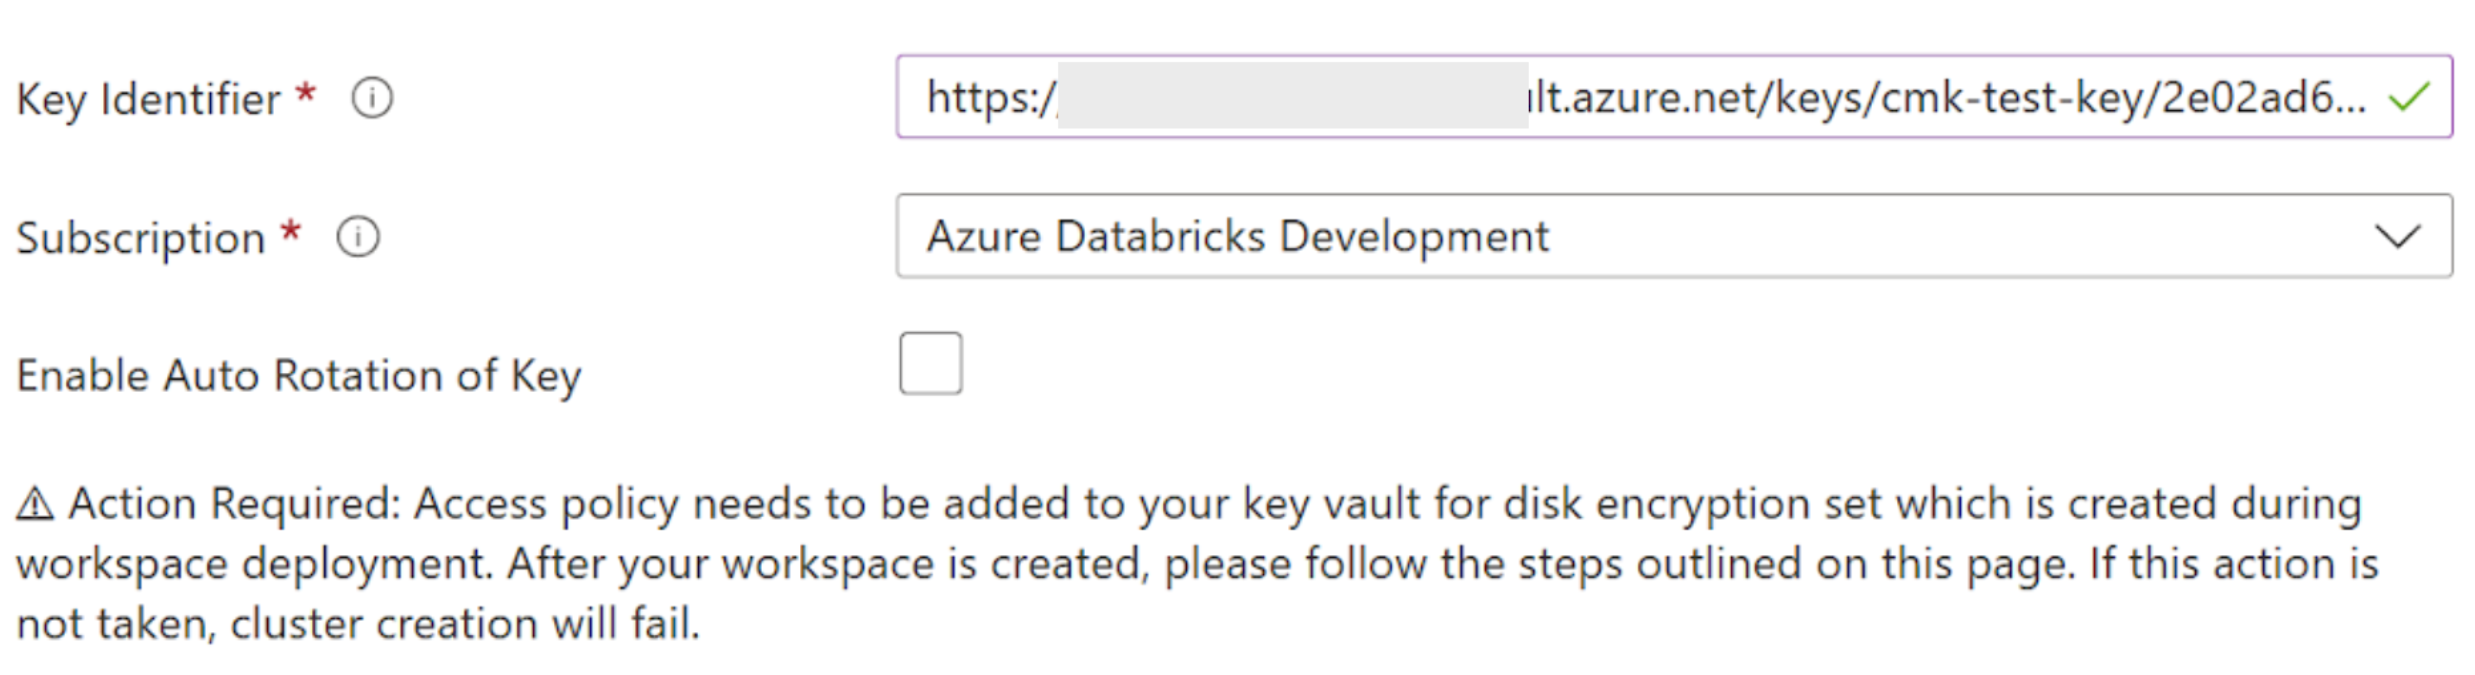
- In the Key Identifier field, paste the Key Identifier of your Managed HSM key.
- In the Subscription dropdown, enter the subscription name of your Managed HSM key.
- To enable auto-rotation of your key, enable Enable Auto Rotation of Key.
Complete the remaining tabs and click Review + Create (for new workspace) or Save (for updating a workspace).
After your workspace deploys, navigate to your new Azure Databricks workspace.
From the Overview tab of your Azure Databricks workspace, click Managed Resource Group.
In the Overview tab of the managed resource group, look for the object of type Disk Encryption Set that was created in this resource group. Copy the name of that Disk Encryption Set.
Use the Azure CLI
For both new and updated workspaces, add these parameters to your command:
disk-key-name: Managed HSM namedisk-key-vault: Managed HSM URIdisk-key-version: Managed HSM versiondisk-key-auto-rotation: Enable auto-rotation of the key (trueorfalse). This is an optional field. The default isfalse.
Create or update a workspace:
Example creating a workspace using these managed disk parameters:
az databricks workspace create --name <workspace-name> \
--resource-group <resource-group-name> \
--location <location> \
--sku premium --disk-key-name <hsm-name> \
--disk-key-vault <hsm-uri> \
--disk-key-version <hsm-version> \
--disk-key-auto-rotation <true-or-false>
Example updating a workspace using these managed disk parameters:
az databricks workspace update \
--name <workspace-name> \
--resource-group <resource-group-name> \
--disk-key-name <hsm-name> \
--disk-key-vault <hsm-uri> \
--disk-key-version <hsm-version> \
--disk-key-auto-rotation <true-or-false>
In the output of either of these commands, there is a
managedDiskIdentityobject. Save the value of theprincipalIdproperty within this object. That is used in a later step as the principal ID.
Use Powershell
For both new and updated workspaces, add these parameters to your command:
location: Workspace locationManagedDiskKeyVaultPropertiesKeyName: Managed HSM nameManagedDiskKeyVaultPropertiesKeyVaultUri: Managed HSM URIManagedDiskKeyVaultPropertiesKeyVersion: Managed HSM versionManagedDiskRotationToLatestKeyVersionEnabled: Enable auto-rotation of the key (trueorfalse). This is an optional field. The default is false.
- Create or update a workspace:
Example creating a workspace using managed disk parameters:
$workspace = New-AzDatabricksWorkspace -Name <workspace-name> \
-ResourceGroupName <resource-group-name> \
-location <location> \
-Sku premium \
-ManagedDiskKeyVaultPropertiesKeyName <key-name> \
-ManagedDiskKeyVaultPropertiesKeyVaultUri <hsm-uri> \
-ManagedDiskKeyVaultPropertiesKeyVersion <key-version> -ManagedDiskRotationToLatestKeyVersionEnabled
Example updating a workspace using managed disk parameters:
$workspace = Update-AzDatabricksworkspace -Name <workspace-name> \
-ResourceGroupName <resource-group-name> \
-ManagedDiskKeyVaultPropertiesKeyName <key-name> \
-ManagedDiskKeyVaultPropertiesKeyVaultUri <hsm-uri> \
-ManagedDiskKeyVaultPropertiesKeyVersion <key-version> -ManagedDiskRotationToLatestKeyVersionEnabled
Step 4: Configure the Managed HSM role assignment
Configure a role assignment for the Key Vault Managed HSM so that your Azure Databricks workspace has permission to access it. You can configure a role assignment using the Azure portal, Azure CLI, or powershell.
Use the Azure portal
- Go to your Managed HSM resource in the Azure portal.
- In the left menu, under Settings, select Local RBAC.
- Click Add.
- In the Role field, select Managed HSM Crypto Service Encryption User.
- In the Scope field, choose
All keys (/). - In the Security principal field, enter the name of the Disk Encryption Set within the managed resource group of your Azure Databricks workspace in the search bar. Select the result.
- Click Create.
Use Azure CLI
Configure the Managed HSM role assignment. Replace <hsm-name> with the your Managed HSM name and replace <principal-id> with the principalId ID of the managedDiskIdentity from the previous step.
az keyvault role assignment create --role "Managed HSM Crypto Service Encryption User"
    --scope "/" --hsm-name <hsm-name>
    --assignee-object-id <principal-id>
Use Azure Powershell
Replace <hsm-name> with the your Managed HSM name.
New-AzKeyVaultRoleAssignment -HsmName <hsm-name> \
-RoleDefinitionName "Managed HSM Crypto Service Encryption User" \
-ObjectId $workspace.ManagedDiskIdentityPrincipalId
Step 5: Start previously-terminated compute resources
This step is necessary only if you updated a workspace to add a key for the first time, in which case you terminated any running compute resources in a previous step. If you created a new workspace or are just rotating the key, the compute resources were not terminated in previous steps, in which case you can skip this step.
- Ensure that the workspace update is complete. If the key was the only change to the template, this typically completes in less than five minutes, otherwise it could take more time.
- Manually start any compute resources that you terminated earlier.
If any compute resources fail to start successfully, it typically is because you need to grant the disk encryption set permission to access your Key Vault.
Rotate the key at a later time
There are two types of key rotations on an existing workspace that already has a key:
- Auto-rotation: If
rotationToLatestKeyVersionEnabledistruefor your workspace, the disk encryption set detects the key version change and points to the latest key version. - Manual rotation: You can update an existing managed disk customer-managed key workspace with a new key. Follow the instructions above as if you were initially adding a key to existing workspace, with the important difference that you do not need to terminate any running compute resources.
For both rotation types, the Azure Virtual Machine storage service automatically picks up the new key and uses it to encrypt the data encryption key. Your Azure Databricks compute resources aren’t impacted. For more information, see Customer-managed keys in the Azure documentation.
You do not need to terminate compute resources before rotating the key.
Feedback
Coming soon: Throughout 2024 we will be phasing out GitHub Issues as the feedback mechanism for content and replacing it with a new feedback system. For more information see: https://aka.ms/ContentUserFeedback.
Submit and view feedback for