How to consume and export scan results
Defender for SQL's Vulnerability Assessment (VA) ability scans your databases on a weekly basis and produces reports on any misconfigurations that are identified.
All findings are stored in Azure Resource Graph (ARG) which is also the source for most of the Defender for SQL UI experience. When findings are written to ARG, they're also enriched with other Microsoft Defender for Cloud settings such as disabled rules or exempt recommendations so that consuming the data from ARG represents the effective status of all findings and recommendations.
This article describes several ways to consume and export your scan results.
Query and export findings in ARG with Defender for Cloud
To query and export your findings with ARG with Defender for Cloud:
Sign in to the Azure portal.
Navigate to Microsoft Defender for Cloud > Recommendations.
Search for and select either:
For Azure SQL databases -
SQL databases should have vulnerability findings resolved.For SQL on machines -
SQL servers on machines should have vulnerability findings resolved.
Select Open Query.
Select either
- Query returning affected resources - Returns a list of the resources that are currently affected (recommendation status per resource).
- Query returning security findings - Returns a list of all security findings (findings and subassessments aggregated per applicable resources).
Select Run query.
Select Download a CSV, to export your results to a CSV file.
These queries are editable and can be customized to a specific resource, set of findings, findings status or more.
Query and export findings in ARG
To query and export your findings with ARG:
Sign in to the Azure portal.
Navigate to Resource Graph Explorer.
Edit and enter the following query:
securityresources
| where type =~ "microsoft.security/assessments/subassessments"
| extend assessmentKey=extract(@"(?i)providers/Microsoft.Security/assessments/([^/]*)", 1, id), subAssessmentId=tostring(properties.id), parentResourceId= extract("(.+)/providers/Microsoft.Security", 1, id)
| extend resourceIdTemp = iff(properties.resourceDetails.id != "", properties.resourceDetails.id, extract("(.+)/providers/Microsoft.Security", 1, id))
| extend resourceId = iff(properties.resourceDetails.source =~ "OnPremiseSql", strcat(resourceIdTemp, "/servers/", properties.resourceDetails.serverName, "/databases/" , properties.resourceDetails.databaseName), resourceIdTemp)
| where resourceId =~ "/subscriptions/resourcegroups/rgname/providers/microsoft.sql/servers/servername/databases/dbname"
| where assessmentKey =~ "82e20e14-edc5-4373-bfc4-f13121257c37"
| project resourceId,
assessmentKey,
subAssessmentId,
name=properties.displayName,
description=properties.description,
severity=properties.status.severity,
status=properties.status.code,
cause=properties.status.cause,
category=properties.category,
impact=properties.impact,
remediation=properties.remediation,
benchmarks=properties.additionalData.benchmarks
Select Run query.
Select Download a CSV, to export your results to a CSV file.
This query is editable and can be customized to a specific resource, set of findings, findings status or more.
Open a Query from your SQL database
To open a query from your SQL database:
Sign in to the Azure portal.
Navigate to
Your SQL database> Microsoft Defender for Cloud.Select Open Query.
Select Run query.
Select Download a CSV, to export your results to a CSV file.
This query is editable and can be customized to a specific resource, set of findings, findings status or more.
Automate email notifications with LogicApps
Azure Logic Apps is a low-code or no-code cloud-based service that provides you with a way to automate workflows and integrate data and services across different systems, both in the cloud and on-premises. You can use Logic App to automate the reports of your vulnerability assessment findings across all supported versions of SQL, to send a weekly vulnerability report summary for any servers that were scanned. You can customize Logic App to run on different schedules such as daily, weekly, monthly or more. You can also customize Logic App to report on different scopes such as per database, server, resource group or more.
You can use these instructions, to learn how to use Logic Apps to automate email notifications using an example template.
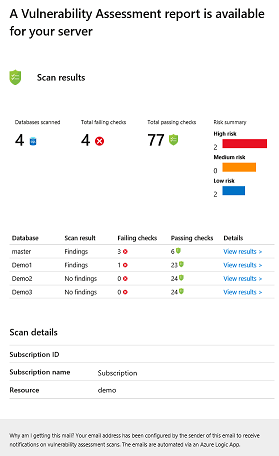
This example Logic App template automates a weekly email report that summarizes the vulnerability scan results for every database from a selected list of servers. After you deploy the template, you must authorize the Office 365 connector to generate a valid access token to authenticate your credentials.
The recipients will then receive emails with the findings of the scan results.
Sample email Azure SQL server:
Sample email SQL VM:
Other options
You can use workflow automations to trigger actions based on changes to the recommendation's status.
You can also use the Vulnerability Assessments workbook to view an interactive report of your findings. The data from the workbook can be exported, and a copy of the workbook can be customized and stored. Learn how to create rich, interactive reports of Defender for Cloud data
You can also enable Continuous export to stream alerts and recommendations as they're generated or to define a schedule to send periodic snapshots of all of the new data.
Next steps
Feedback
Coming soon: Throughout 2024 we will be phasing out GitHub Issues as the feedback mechanism for content and replacing it with a new feedback system. For more information see: https://aka.ms/ContentUserFeedback.
Submit and view feedback for


