Review team delivery plans in Azure Boards
Azure DevOps Services | Azure DevOps Server 2022
Use the visualization options provided by the Delivery Plans feature of Azure Boards to review the schedule of stories or features that your teams plan to deliver. A delivery plan shows the scheduled work items by sprint (iteration path) of selected teams against a calendar view.
Use the Delivery Plans feature to ensure that your teams are aligned with your organizational goals. You can view multiple backlogs and multiple teams across your whole account. Interact with the plan by using simple drag-and-drop operations to update or modify the schedule, open cards, expand and collapse teams, and more.
Delivery Plans supports the following tasks:
- View up to 20 team backlogs, including a mix of backlogs and teams from different projects.
- Add custom portfolio backlogs and epics
- View work items that span several iterations
- Reset start date and target date through drag-and-drop borders
- Add backlog items to a team from a plan
- View rollup progress of features, epics, and other portfolio items
- View dependencies that exist between work items
- Enable stakeholders to view plans
Any plan that you created with the original Delivery Plans extension works with the Delivery Plans feature. You don't have to migrate any data or reconfigure plan settings. For more information, see Add or edit a delivery plan.
In this article, learn how to:
- Open a plan from the list of defined plans
- Review a plan with your teams
- Use the interactive elements of plans and change a plan view
- View rollups
For information on working with dependencies, see Track dependencies.
Prerequisites
- To view a delivery plan, you must be a member of the Project Collection Valid Users group. Users granted Stakeholder access for a private project can view plans. Users granted Stakeholder access for a public project can add and view plans.
- To open or modify a work item or add work items to a plan, you must have Edit work items in this node set to Allow for the area paths assigned to the work item. For more information, see Set permissions and access for work tracking.
For work items and dependency lines to appear on the plan:
- Work items must belong to a team's product backlog or portfolio backlog. Only work items that belong to a category selected for viewing on a team's backlog appear on the plan.
- Team product or portfolio backlog must be enabled.
- Sprints must be selected for each team defined in the plan.
- Start and end dates must be defined for each iteration.
- Iteration paths must be assigned to each work item.
- For dependency icons and lines to show, work items must be linked via the Predecessor-Successor link type or other custom dependency link type. (Remote link types aren't supported.) You can add custom link types only for on-premises environments.
Tip
If you edit a plan and the changes that you make don't seem to appear in the plan, refresh your browser. A browser refresh is sometimes needed to trigger the updates.
Review a plan with your teams
It takes multiple autonomous teams to develop large software projects. Autonomous teams manage their own backlog and priority, which contributes to a unified direction for that project. Review Agile culture for a discussion of autonomous teams and organizational alignment.
Regular reviews of the project schedule with these teams help ensure that the teams are working toward common goals. Delivery plans provide the needed multiple-team view of your project schedule.
Questions that you might address during the review include:
- How confident are the teams in meeting the deliverables scheduled for each sprint?
- Are dependencies across teams adequately addressed via the planned deliverables?
- Are there gaps in the schedule, where no deliverables are scheduled? What's the cause? Can the issue be mitigated?
For example, you might use delivery plans internally to share the schedule of features. By seeing the work that many teams have planned for the next three sprints, you can easily see if a plan has the right priorities and spot dependencies.
In this way, a delivery plan is a driver of alignment while letting each team remain autonomous. Individual teams can work to different sprint cadences, if needed, and manage different work item types (stories, features, or epics). Their work is all visible with the same plan view. Teams can even be part of different projects if they use different processes. Customize the card fields so that you see only the data fields that interest you and that apply for each work item type.
Best practices for using a delivery plan
- Determine how you want to use the delivery plan. Some ideas are:
- Review quarterly plans for features to be delivered
- Sync up monthly with several teams that have dependencies
- Review cross-project deliverables and identify dependencies
- Use a consistent sprint schedule across your project teams and organization when possible. Although the plan can accommodate various sprint schedules, it adds to visual clutter. Use the same sprints for backlogs, features, and epics. Don't create specific sprints for epics or other portfolio backlogs.
- Use Start Date and Iteration to specify the time frame for a work item. Or, use Start Date and Target Date. However, don't specify both Iteration and Target Date for a work item. Target Date always overrides the Iteration end date on the plan.
- Minimize the number of fields that you choose to display on your cards.
- Eliminate cross-team ownership of area paths. Cross-team ownership of area paths can lead to undesirable edge cases.
- Keep your work items up to date. When changes occur, update the target dates or iteration paths.
- Know the following information:
- Plan views display the set of months that correspond to the iteration paths selected by the teams whose backlogs appear in the plan.
- Plan views are limited to a maximum of 20 teams or backlogs.
- Zooming out can cause fields and tags to disappear from the cards. The farther you zoom out, the harder it is to fit items on a card. Certain items might be hidden, depending on the zoom level.
- Rollup isn't supported for child work items that belong to a different project than that of the originating parent work item.
- If Start Date or Target Date is missing from a work item, you can add it to the custom process defined for the project, as discussed in Add and manage fields (inheritance process).
Open a plan
After you define a few plans, they're listed on the Plans page under All. Or you can see them under Favorites, showing the title, description, and most recent creator/editor.
Use Add to favorites ![]() to favorite a plan so you can quickly return to the plan. You can also search for other plans in the project.
to favorite a plan so you can quickly return to the plan. You can also search for other plans in the project.
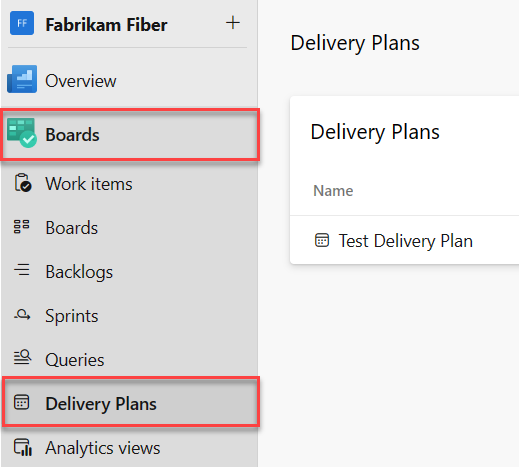
To open a plan, open Boards > Delivery Plans and then choose the plan name. You can sort by any of the columns: Name, Created By, Description, Last configured, or Favorites.
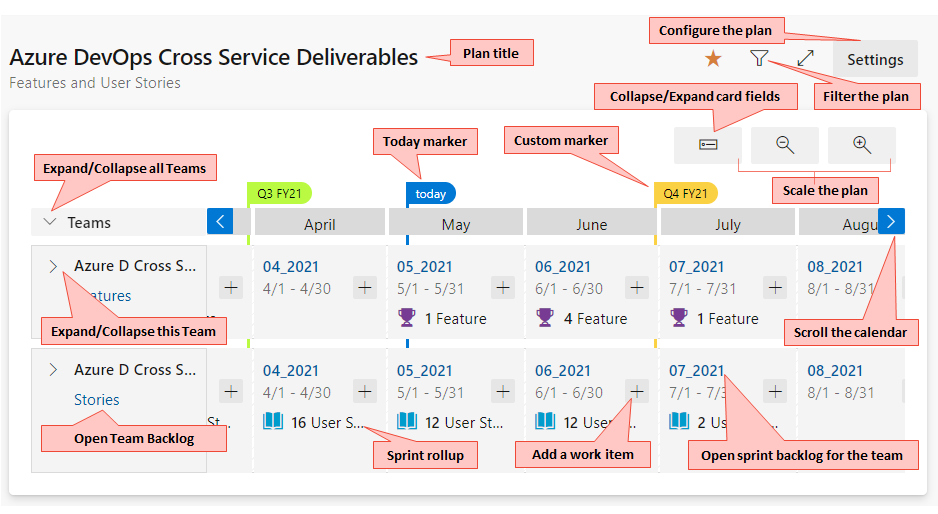
Interact with a plan
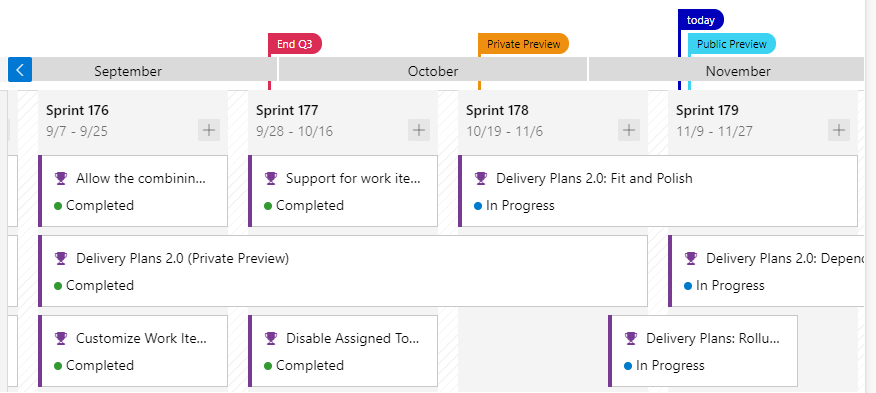
Each team's backlog specified in a delivery plan appears as a row within the plan view. When a row is collapsed, a rollup of the backlog items appears. When a row is expanded, a card for each backlog item appears, organized by its assigned iteration.
Tip
Work items appear in the prioritized order listed for the sprint backlog, which inherits the priority from the product backlog.
Use your plan in the following ways:
- Filter the plan: Select Filter
 . You can filter on any field that you include in the plan. Settings are based on the keyword or text filter. For more information, see Interactively filter your backlogs, boards, and plans.
 - Scale the size of the cards and calendar: Select Zoom out
 or Zoom in
  .
. - View previous or future months: Select Scroll calendar left
 or Scroll calendar right
  . You can also scroll through the plan by selecting the plan and dragging your mouse horizontally.
 - View details for a team: Select Expand team row.
- Expand and collapse all team rows: Select Expand all team rows or Collapse all team rows next to Teams.
- Scroll the view vertically to view teams that appear lower within the plan view.
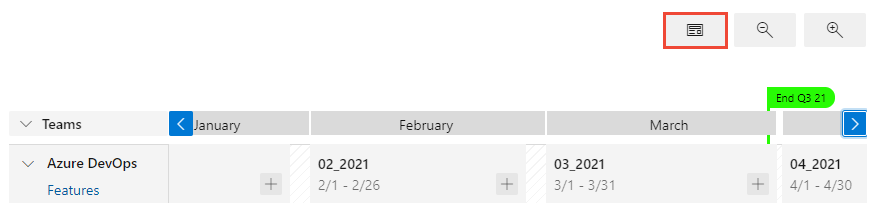
- View titles only: Select Collapsed card fields
 . To view all fields, select Expand card fields
  .
. - Select a card title to open the backlog item and view details. Close the work item to return to the plan.
- Add a work item to a sprint: Select Add item
 within the sprint and team that you want to add it to.
 - Change the fields displayed on the cards: Select More actions
 .
.
Collapse teams for summary information
A benefit of Delivery Plans is the ability to view multiple teams across the projects that you care about. There are two main ways to view more teams within the plan view:
- Collapse all teams to focus on summary data.
- Minimize the number of fields displayed on cards.
To gain a summary view of work that's scheduled, collapse all teams. You can then more easily look for gaps in the forecast.
Expand or collapse each team row by selecting Expand team row or Collapse team row next to the team name.
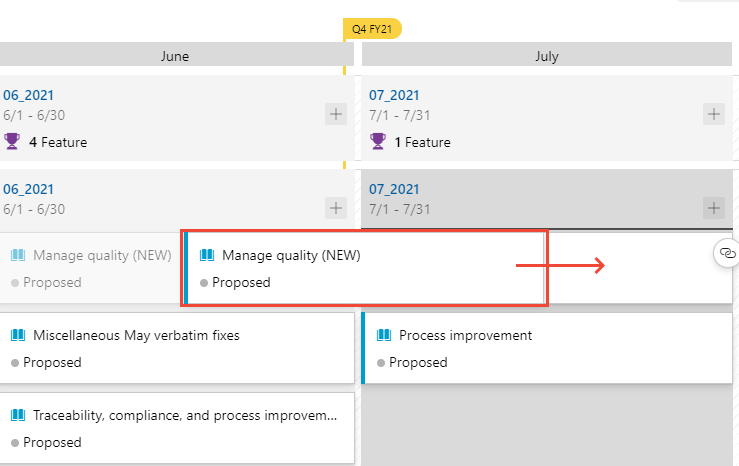
Show work that spans one or more iterations
For work items that span one or more iterations, define Start Date and Target Date. The plan displays cards that start and end according to the dates that you set, as shown in the following image. You can also grab the left or right border of a work item and drag it to a new start date or target date.
View titles only in the collapsed card view
The collapsed card view allows you to quickly switch back and forth between cards that show titles only and cards that show all fields configured for the plan. To view titles only, select Collapsed card fields ![]() . To view all fields, select Expand card fields
. To view all fields, select Expand card fields ![]() .
.
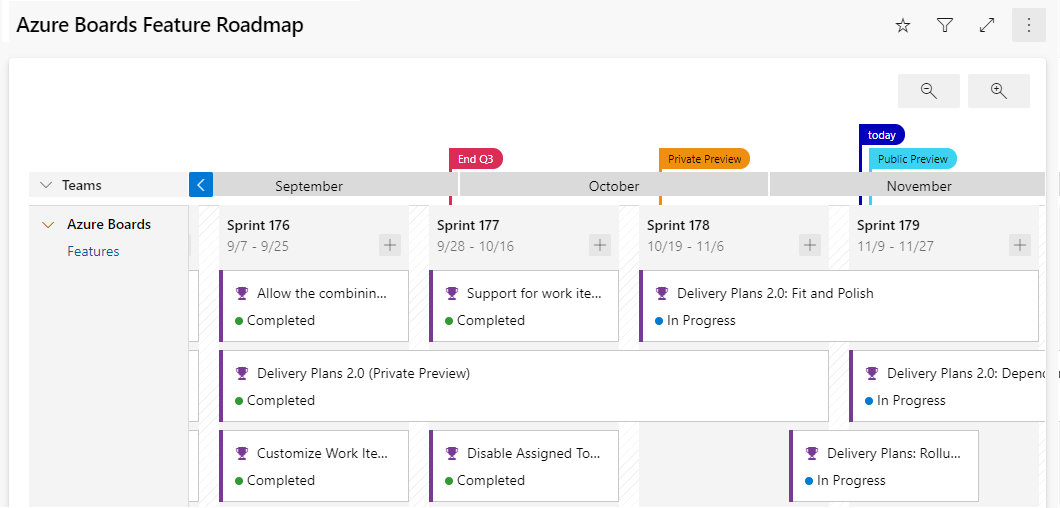
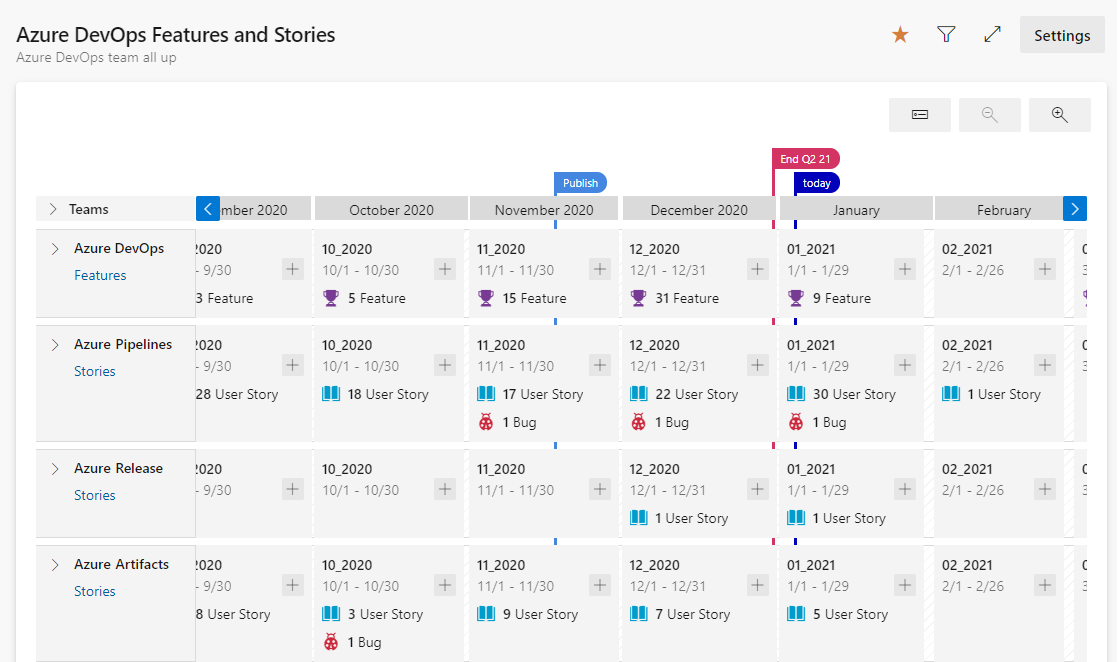
View the rollup of features and epics
A rollup displays a fuller picture of the underlying work directly on the cards in your delivery plan. Rollup views are available for features, epics, or any portfolio backlog you've added to your project. To enable rollups, open your plan settings, select Fields, and then select Show child rollup data.
For example, here's a plan view of four scenarios with a rollup of the child features, user stories, and bugs for a single team.
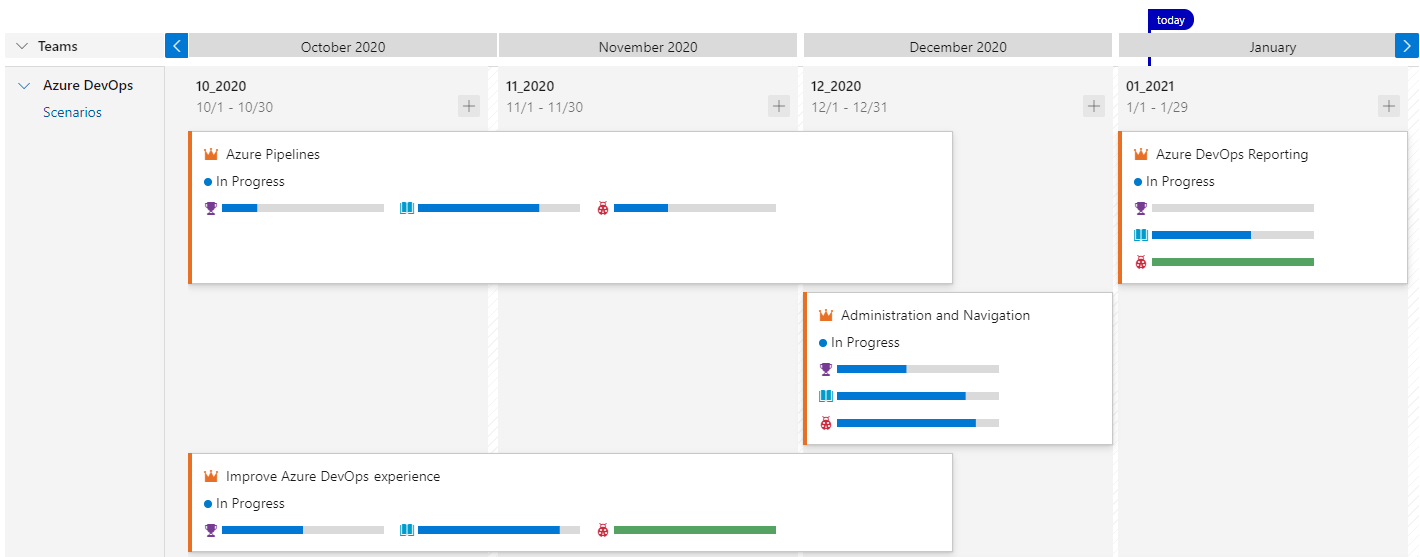
You can also view rollups from a backlog view, as described in Display rollup progress or totals.
Update the iteration for a backlog item
As changes occur to the schedule, you can update the iteration for a backlog item. Move a card to a different iteration. This change helps drive alignment across your organization.
Print a delivery plan
You can print all or a portion of your delivery plan, depending on the view that you want to capture and share. You can print only one page at a time by using your browser's Print feature.
Here are some tips for printing portions of a plan:
- Select Full screen mode
 .
. - Expand or collapse one or more teams and zoom in or out to get the view that you want.
- Take a screenshot of the plan view, or select the Print function of your browser.
Related articles
Feedback
Coming soon: Throughout 2024 we will be phasing out GitHub Issues as the feedback mechanism for content and replacing it with a new feedback system. For more information see: https://aka.ms/ContentUserFeedback.
Submit and view feedback for