Migrate from Travis to Azure Pipelines
Azure DevOps Services
This purpose of this guide is to help you migrate from Travis to Azure Pipelines. This guide describes shows how to translate from a Travis configuration to an Azure Pipelines configuration.
We need your help to make this guide better! Submit comments or contribute your changes directly.
Key differences
There are many differences between Travis and Azure Pipelines, including:
Travis builds have stages, jobs and phases, while Azure Pipelines has steps that can be arranged and executed in an arbitrary order or grouping that you choose.
Azure Pipelines allows job definitions and steps to be stored in separate YAML files in the same or a different repository, enabling steps to be shared across multiple pipelines.
Azure Pipelines provides full support for building and testing on Microsoft-managed Linux, Windows, and macOS images. For more information about hosted agents, see Microsoft-hosted agents.
Prerequisites
- A GitHub account where you can create a repository. Create one for free.
- An Azure DevOps organization. Create one for free. If your team already has one, then make sure you're an administrator of the Azure DevOps project that you want to use.
- An ability to run pipelines on Microsoft-hosted agents. You can either purchase a parallel job or you can request a free tier.
- Basic knowledge of Azure Pipelines. If you're new to Azure Pipelines, see the following to learn more about Azure Pipelines and how it works prior to starting your migration:
Language
Travis uses the language keyword to identify the prerequisite build
environment to set up for your build. For example, to select Node.JS
16.x:
.travis.yml
language: node_js
node_js:
  - 16
Microsoft-hosted agents contain the SDKs for many languages by default. To use a specific language version, you may need to use a language selection task to set up the environment.
For example, to select Node.JS 16.x:
azure-pipelines.yml
steps:
- task: UseNode@1
  inputs:
    version: '16.x'
Language mappings
The language keyword in Travis implies both that version
of language tools be used and that many build steps be implicitly
performed. In Azure Pipelines, you need to specify the commands that you want to run.
Here's a translation guide from the language keyword to the commands
that are executed automatically for the most commonly used languages:
| Language | Commands |
|---|---|
ccpp |
./configuremakemake install |
csharp |
nuget restore [solution.sln]msbuild /p:Configuration=Release [solution.sln] |
clojure |
lein depslein test |
go |
go get -t -v ./...make or go test |
javagroovy |
Gradle:gradle assemblegradle checkMaven: mvn install -DskipTests=true -Dmaven.javadoc.skip=true -B -Vmvn test -BAnt: ant test |
node_js |
npm install or npm ci or yarnnpm test |
objective-cswift |
pod install or bundle exec pod installxcodebuild -scheme [scheme] build test \| xcpretty |
perl |
cpanm --quiet --installdeps --notest .Build.PL: perl ./Build.pl./Build testMakefile.PL: perl Makefile.PLmake testMakefile: make test |
php |
phpunit |
python |
pip install -r requirements.txt |
ruby |
bundle install --jobs=3 --retry=3rake |
In addition, less common languages can be enabled but require another dependency installation step or execution inside a docker container:
| Language | Commands |
|---|---|
crystal |
docker run -v $(pwd):/src -w /src crystallang/crystal shards installdocker run -v $(pwd):/src -w /src crystallang/crystal crystal spec |
d |
sudo wget http://master.dl.sourceforge.net/project/d-apt/files/d-apt.list -O /etc/apt/sources.list.d/d-apt.listsudo apt-get updatesudo apt-get -y --allow-unauthenticated install --reinstall d-apt-keyringsudo apt-get updatesudo apt-get install dmd-compiler dubdub test --compiler=dmd |
dart |
wget https://dl-ssl.google.com/linux/linux_signing_key.pub -O - \| sudo apt-key add -wget https://storage.googleapis.com/download.dartlang.org/linux/debian/dart_stable.list -O /etc/apt/sources.list.d/dart_stable.listsudo apt-get updatesudo apt-get install dart/usr/lib/dart/bin/pub get/usr/lib/dart/bin/pub run test |
erlang |
sudo apt-get install rebarrebar get-depsrebar compilerebar skip_deps=true eunit |
elixir |
sudo apt-get install elixirmix local.rebar --forcemix local.hex --forcemix deps.getmix test |
haskell |
sudo apt-get install cabal-installcabal install --only-dependencies --enable-testscabal configure --enable-testscabal buildcabal test |
haxe |
sudo apt-get install haxeyes \| haxelib install [hxml]haxe [hxml] |
julia |
sudo apt-get install juliajulia -e "using Pkg; Pkg.build(); end"julia --check-bounds=yes -e "Pkg; Pkg.test(coverage=true); end" |
nix |
docker run -v $(pwd):/src -w /src nixos/nix nix-build |
perl6 |
sudo apt-get install rakudoPERL6LIB=lib prove -v -r --exec=perl6 t/ |
rust |
curl -sSf https://sh.rustup.rs | sh -s -- -ycargo build --verbosecargo test --verbose |
scala |
echo "deb https://repo.scala-sbt.org/scalasbt/debian /" | /etc/apt/sources.list.d/sbt.listsudo apt-key adv --keyserver hkp://keyserver.ubuntu.com:80 --recv 2EE0EA64E40A89B84B2DF73499E82A75642AC823sudo apt-get updatesudo apt-get install sbtsbt ++2.11.6 test |
smalltalk |
docker run -v $(pwd):/src -w /src hpiswa/smalltalkci smalltalkci |
Multiple language selections
You can also configure an environment that supports building different applications in multiple languages. For example, to ensure the build environment targets both Node.JS 16.x and Ruby 3.2 or better:
azure-pipelines.yml
steps:
- task: UseNode@1
  inputs:
    version: '8.x'
- task: UseRubyVersion@0
  inputs:
    versionSpec: '>= 3.2'
Phases
In Travis, steps are defined in a fixed set of named phases such as
before_install or before_script. Azure Pipelines doesn't have named phases and steps can be grouped, named, and organized in whatever way makes sense for the pipeline.
For example:
.travis.yml
before_install:
    - npm install -g bower
install:
    - npm install
    - bower install
script:
    - npm run build
    - npm test
azure-pipelines.yml
steps:
- script: npm install -g bower
- script: npm install
- script: bower install
- script: npm run build
- script: npm test
Alternatively, steps can be grouped together and optionally named:
azure-pipelines.yml
steps:
- script: |
    npm install -g bower
    npm install
    bower install
  displayName: 'Install dependencies'
- script: npm run build
- script: npm test
Parallel jobs
Travis provides parallelism by letting you define a stage, which is a group of jobs that are executed in parallel. A Travis build can have multiple stages; once all jobs in a stage have completed, the next stage starts.
With Azure Pipelines, you can make each step or stage dependent on any other step. In this way, you specify which steps run serially, and which can run in parallel. So you can fan out with multiple steps run in parallel after the completion of one step, and then fan back in with a single step that runs afterward. This model gives you options to define complex workflows if necessary. For now, here's a simple example:
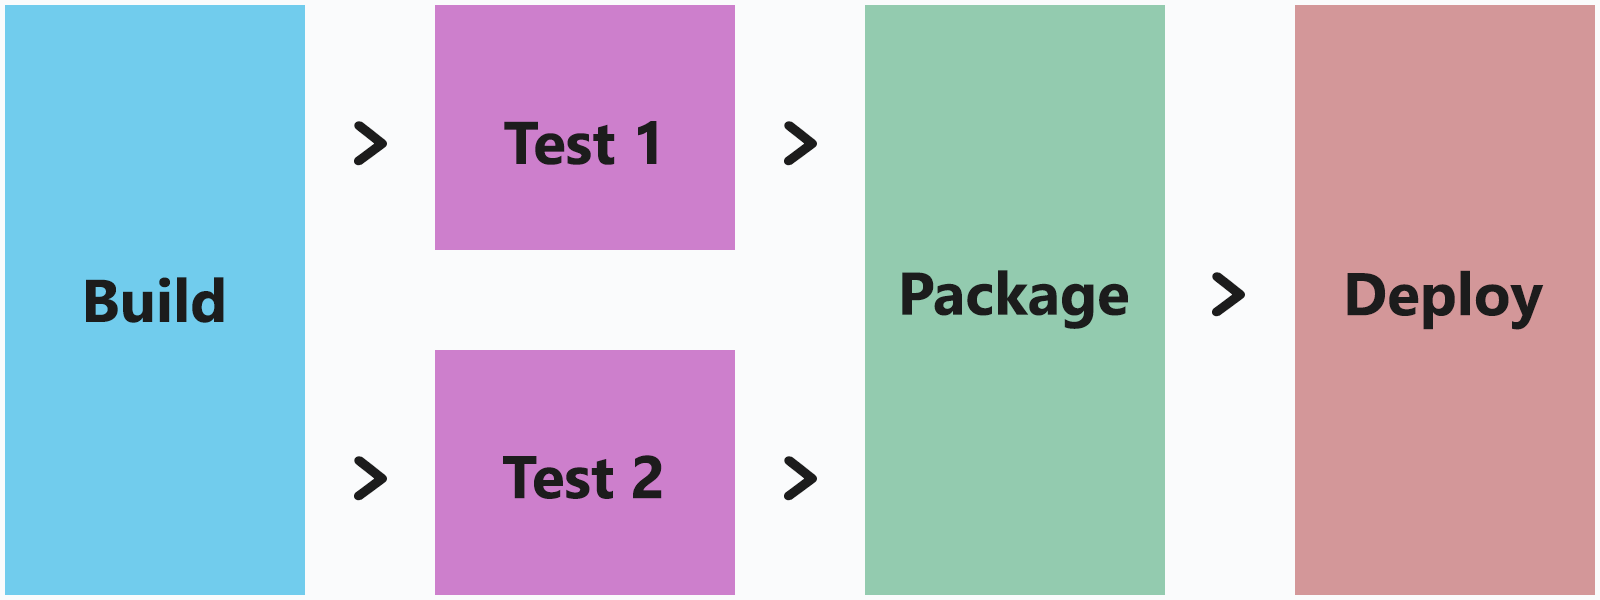
For example, to run a build script, then upon its completion run both the unit tests and the integration tests in parallel, and once all tests have finished, package the artifacts and then run the deploy to pre-production:
.travis.yml
jobs:
  include:
  - stage: build
    script: ./build.sh
  - stage: test
    script: ./test.sh unit_tests
  - script: ./test.sh integration_tests
  - stage: package
    script: ./package.sh
  - stage: deploy
    script: ./deploy.sh pre_prod
azure-pipelines.yml
jobs:
- job: build
  steps:
  - script: ./build.sh
- job: test1
  dependsOn: build
  steps:
  - script: ./test.sh unit_tests
- job: test2
  dependsOn: build
  steps:
  - script: ./test.sh integration_tests
- job: package
  dependsOn:
  - test1
  - test2
  script: ./package.sh
- job: deploy
  dependsOn: package
  steps:
  - script: ./deploy.sh pre_prod
Advanced parallel execution
In Azure Pipelines you have more options and control over how you orchestrate your pipeline.
For example, a team has a set of fast-running unit tests, and another set of and slower integration tests. The team wants to begin creating the .ZIP file for a release as soon as the unit are completed because they provide high confidence that the build provides a good package. But before they deploy to pre-production, they want to wait until all tests have passed:
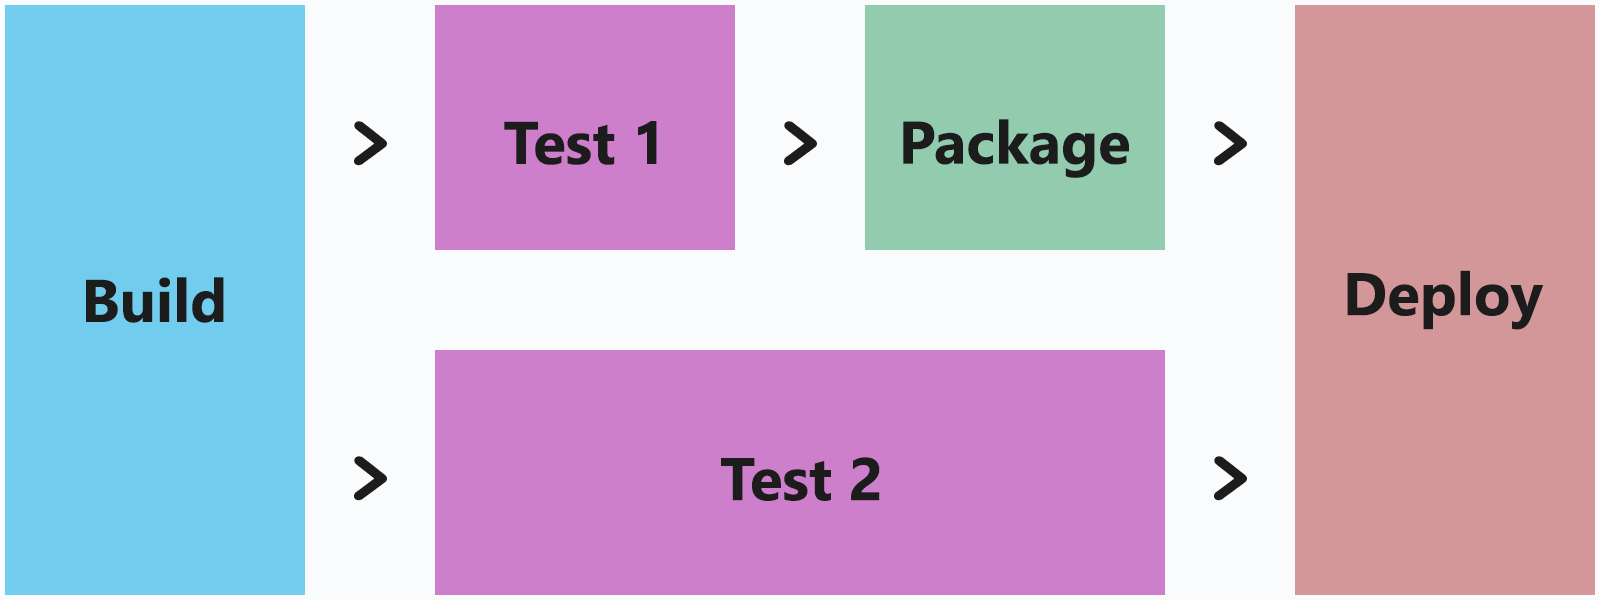
In Azure Pipelines they can do it this way:
azure-pipelines.yml
jobs:
- job: build
  steps:
  - script: ./build.sh
- job: test1
  dependsOn: build
  steps:
  - script: ./test.sh unit_tests
- job: test2
  dependsOn: build
  steps:
  - script: ./test.sh integration_tests
- job: package
  dependsOn: test1
  script: ./package.sh
- job: deploy
  dependsOn:
  - test1
  - test2
  - package
  steps:
  - script: ./deploy.sh pre_prod
Step reuse
In Travis you can use matrices to run multiple executions across a single configuration. In Azure Pipelines you can use matrices in the same way, but you can also implement configuration reuse with templates.
Example: Environment variable in a matrix
One of the most common ways to run several builds with a slight variation is to change the execution using environment variables. For example, your build script can look for the presence of an environment variable and change the way your software is built, or the way it's tested.
You can use a matrix to have run a build configuration several times, once for each value in the environment variable. For example, to run a given script three times, each time with a different setting for an environment variable:
.travis.yml
os: osx
env:
  matrix:
  - MY_ENVIRONMENT_VARIABLE: 'one'
  - MY_ENVIRONMENT_VARIABLE: 'two'
  - MY_ENVIRONMENT_VARIABLE: 'three'
script: echo $MY_ENVIRONMENT_VARIABLE
azure-pipelines.yml
pool:
  vmImage: 'macOS-latest'
strategy:
  matrix:
    set_env_to_one:
      MY_ENVIRONMENT_VARIABLE: 'one'
    set_env_to_two:
      MY_ENVIRONMENT_VARIABLE: 'two'
    set_env_to_three:
      MY_ENVIRONMENT_VARIABLE: 'three'
steps:
- script: echo $(MY_ENVIRONMENT_VARIABLE)
Example: Language versions in a matrix
Another common scenario is to run against several
different language environments. Travis supports an implicit definition
using the language keyword, while Azure Pipelines expects an explicit
task to define how to configure that language version.
You can use the environment variable matrix options in Azure Pipelines to enable a matrix for different language versions. For example, you can set an environment variable in each matrix variable that corresponds to the language version that you want to use, then in the first step, use that environment variable to run the language configuration task:
.travis.yml
os: linux
matrix:
  include:
  - rvm: 2.3.7
  - rvm: 2.4.4
  - rvm: 2.5.1
script: ruby --version
azure-pipelines.yml
vmImage: 'ubuntu-latest'
strategy:
  matrix:
    ruby 2.3:
      ruby_version: '2.3.7'
    ruby 2.4:
      ruby_version: '2.4.4'
    ruby 2.5:
      ruby_version: '2.5.1'
steps:
- task: UseRubyVersion@0
  inputs:
    versionSpec: $(ruby_version)
- script: ruby --version
Example: Operating systems within a matrix
It's also common to run builds in multiple operating systems. Travis
supports this definition using the os keyword, while Azure Pipelines
lets you configure the operating system by selecting the pool to run in
using the vmImage keyword.
For example, you can set an environment variable in each matrix variable that corresponds to the operating system image that you want to use. Then you can set the machine pool to the variable you've set:
.travis.yml
matrix:
  include:
  - os: linux
  - os: windows
  - os: osx
script: echo Hello, world!
azure-pipelines.yml
strategy:
  matrix:
    linux:
      imageName: 'ubuntu-latest'
    mac:
      imageName: 'macOS-latest'
    windows:
      imageName: 'windows-latest'

pool:
  vmImage: $(imageName)

steps:
- script: echo Hello, world!
Success and failure handling
Travis allows you to specify steps that run when the build succeeds,
using the after_success phase, or when the build fails, using the
after_failure phase. With Azure Pipelines you can define success and failure
conditions based on the result of any step, which enables more flexible
and powerful pipelines.
.travis.yml
build: ./build.sh
after_success: echo Success
after_failure: echo Failed
azure-pipelines.yml
steps:
- script: ./build.sh
- script: echo Success
  condition: succeeded()
- script: echo Failed
  condition: failed()
Advanced success and failure handling
In Azure Pipelines you can program a flexible set of dependencies and
conditions for flow control between jobs.
You can configure jobs to run based on the success or
failure of previous jobs or based on environment variables.
You can even configure jobs to always run,
regardless of the success of other jobs.
For example, if you want to run a script when the build fails, but only if it's running as a build on the main branch:
azure-pipelines.yml
jobs:
- job: build
  steps:
  - script: ./build.sh
- job: alert
  dependsOn: build
  condition: and(failed(), eq(variables['Build.SourceBranch'], 'refs/heads/main'))
  steps:
  - script: ./sound_the_alarms.sh
Predefined variables
Both Travis and Azure Pipelines set multiple environment variables to allow you to inspect and interact with the execution environment of the CI system.
In most cases, there's an Azure Pipelines variable to match the environment variable in Travis. Here's a list of commonly used environment variables in Travis and their analog in Azure Pipelines:
| Travis | Azure Pipelines | Description |
|---|---|---|
CI=true or TRAVIS=true |
TF_BUILD=True |
Indicates that your build is running in the CI system; useful for scripts that are also intended to be run locally during development. |
TRAVIS_BRANCH |
CI builds:BUILD_SOURCEBRANCHPull request builds: SYSTEM_PULLREQUEST_TARGETBRANCH |
The name of the branch the build was queued for, or the name of the branch the pull request is targeting. |
TRAVIS_BUILD_DIR |
BUILD_SOURCESDIRECTORY |
The location of your checked out source and the default working directory. |
TRAVIS_BUILD_NUMBER |
BUILD_BUILDID |
A unique numeric identifier for the current build invocation. |
TRAVIS_COMMIT |
CI builds:BUILD_SOURCEVERSION |
The commit ID currently being built. |
TRAVIS_COMMIT |
Pull request builds:git rev-parse HEAD^2 |
For pull request validation builds, Azure Pipelines sets BUILD_SOURCEVERSION to the resulting merge commit of the pull request into main; this command identifies the pull request commit itself. |
TRAVIS_COMMIT_MESSAGE |
BUILD_SOURCEVERSIONMESSAGE |
The log message of the commit being built. |
TRAVIS_EVENT_TYPE |
BUILD_REASON |
The reason the build was queued; a map of values is in the "build reasons" table below. |
TRAVIS_JOB_NAME |
AGENT_JOBNAME |
The name of the current job, if specified. |
TRAVIS_OS_NAME |
AGENT_OS |
The operating system that the job is running on; a map of values is in the "operating systems" table below. |
TRAVIS_PULL_REQUEST |
Azure Repos:SYSTEM_PULLREQUEST_PULLREQUESTIDGitHub: SYSTEM_PULLREQUEST_PULLREQUESTNUMBER |
The pull request number that triggered this build. (For GitHub builds, this is a unique identifier that is not the pull request number.) |
TRAVIS_PULL_REQUEST_BRANCH |
SYSTEM_PULLREQUEST_SOURCEBRANCH |
The name of the branch where the pull request originated. |
TRAVIS_PULL_REQUEST_SHA |
Pull request builds:git rev-parse HEAD^2 |
For pull request validation builds, Azure Pipelines sets BUILD_SOURCEVERSION to the resulting merge commit of the pull request into main; this command identifies the pull request commit itself. |
TRAVIS_PULL_REQUEST_SLUG |
The name of the forked repository, if the pull request originated in a fork. There's no analog to this in Azure Pipelines. | |
TRAVIS_REPO_SLUG |
BUILD_REPOSITORY_NAME |
The name of the repository that this build is configured for. |
TRAVIS_TEST_RESULT |
AGENT_JOBSTATUS |
Travis sets this value to 0 if all previous steps have succeeded (returned 0). For Azure Pipelines, check that AGENT_JOBSTATUS=Succeeded. |
TRAVIS_TAG |
BUILD_SOURCEBRANCH |
If this build was queued by the creation of a tag then this is the name of that tag. For Azure Pipelines, the BUILD_SOURCEBRANCH is set to the full Git reference name, for example, refs/tags/tag_name. |
TRAVIS_BUILD_STAGE_NAME |
The name of the stage in Travis. As we saw earlier, Azure Pipelines handles flow control using jobs. You can reference AGENT_JOBNAME. |
Build Reasons:
The TRAVIS_EVENT_TYPE variable contains values that map to values provided by the Azure Pipelines BUILD_REASON variable:
| Travis | Azure Pipelines | Description |
|---|---|---|
push |
IndividualCI |
The build is a continuous integration build from a push. |
pull_request |
PullRequest |
The build was queued to validate a pull request. |
api |
Manual |
The build was queued by the REST API or a manual request on the web page. |
cron |
Schedule |
The build was scheduled. |
Operating Systems:
The TRAVIS_OS_NAME variable contains values that map to values provided by the Azure Pipelines AGENT_OS variable:
| Travis | Azure Pipelines | Description |
|---|---|---|
linux |
Linux |
The build is running on Linux. |
osx |
Darwin |
The build is running on macOS. |
windows |
Windows_NT |
The build is running on Windows. |
To learn more, see Predefined environment variables.
If there isn't a variable for the data you need, then you can use a shell
command to get it. For example, a good substitute of an environment
variable containing the commit ID of the pull request being built is to
run a git command: git rev-parse HEAD^2.
Building specific branches
By default, both Travis and Azure Pipelines perform CI builds on all
branches. Similarly, both systems allow you to limit these builds to
specific branches. In Azure Pipelines, the list of branches to build
should be listed in the include list and the branches not to build
should be listed in the `exclude list. Wildcards are supported.
For example, to build only the main branch and those that begin with the word "releases":
.travis.yml
branches:
  only:
  - main
  - /^releases.*/
azure-pipelines.yml
trigger:
  branches:
    include:
    - main
    - releases*
Output caching
Travis supports caching dependencies and intermediate build output to improve build times. Azure Pipelines doesn't support caching intermediate build output, but does offer integration with Azure Artifacts for dependency storage.
Git submodules
Travis and Azure Pipelines both clone git repos "recursively" by default. This means that submodules are cloned by the agent, which is useful since submodules usually contain dependencies. However, the extra cloning takes time, so if you don't need the dependencies then you can disable cloning submodules:
.travis.yml
git:
  submodules: false
azure-pipelines.yml
checkout:
  submodules: false
Feedback
Coming soon: Throughout 2024 we will be phasing out GitHub Issues as the feedback mechanism for content and replacing it with a new feedback system. For more information see: https://aka.ms/ContentUserFeedback.
Submit and view feedback for