Events
Mar 17, 11 PM - Mar 21, 11 PM
Join the meetup series to build scalable AI solutions based on real-world use cases with fellow developers and experts.
Register nowThis browser is no longer supported.
Upgrade to Microsoft Edge to take advantage of the latest features, security updates, and technical support.
Azure DevOps Services | Azure DevOps Server 2022 - Azure DevOps Server 2019
Important
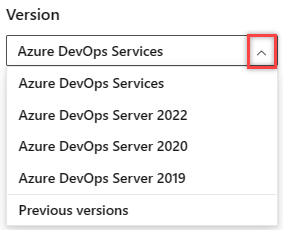
Select the version of this article that corresponds to your platform and version. The version selector is above the table of contents. Look up your Azure DevOps platform and version.
In this article, find basic syntax guidance for using Markdown in Azure DevOps features and wiki Markdown. You can use both common Markdown conventions and GitHub-flavored extensions.
Use Markdown to add formatting, tables, images, and more to your project pages, README files, dashboards, pull requests, wikis, and so on.
Not all Markdown syntax is supported across all features in Azure DevOps. The following table links to each basic syntax section in this article and highlights which features support it.
For more information, see Definition of Done (board), Markdown widget, pull request, README files, and wiki.
Structure your content using headers. Headers segment longer content, making it easier to read.
To set a heading, start a line with a hash character #. Organize your remarks with subheadings by starting a line with more hash characters, for example, ####. You can use up to six levels of headings.
Example:
# This is a H1 header
## This is a H2 header
### This is a H3 header
#### This is a H4 header
##### This is a H5 header
Result:

Make your text easier to read by breaking it into paragraphs or line breaks.
In pull request comments, select Enter to insert a line break, and begin text on a new line.
Example - pull request comment:
Add lines between your text with the **Enter** key.
Your text gets better spaced and makes it easier to read.
Result:
Add lines between your text with the Enter key.
Your text gets better spaced and makes it easier to read.
In a Markdown file or widget, enter two spaces before the line break, and then select Enter to begin a new paragraph.
Example - Markdown file or widget:
Add two spaces before the end of the line, and then select **Enter**.(space, space, Enter)
A space gets added in between paragraphs.
Result:
Add two spaces before the end of the line, and then select Enter.
A space gets added in between paragraphs.
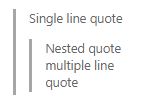
Quote previous comments or text to set the context for your comment or text. Quote single lines of text with > before the text. Use many > characters to nest quoted text. Quote blocks of lines of text by using the same level of > across many lines.
Example:
> Single line quote
>> Nested quote
>> multiple line
>> quote
Result:
To add a horizontal rule, add a line that's a series of dashes ---. The line above the line containing the --- must be blank.
Example:
above

----
below
Result:
above
below
You can emphasize text by applying bold, italics, or strikethrough to characters:
* or underscore _**.~~.Combine these elements to apply emphasis to the text.
Note
There is no Markdown syntax that supports underlining text. Within a wiki page, you can use the HTML <u> tag to generate underlined text. For example, <u>underlined text</u> yields underlined text.
Example:
Use _emphasis_ in comments to express **strong** opinions and point out ~~corrections~~
**_Bold, italicized text_**
**~~Bold, strike-through text~~**
Result:
Use emphasis in comments to express strong opinions and point out corrections
Bold, italicized text
Bold, strike-through text
Highlight suggested code segments using code highlight blocks.
To indicate a span of code, wrap it with three backtick quotes (```) on a new line at both the start and end of the
block. To indicate code inline, wrap it with one backtick quote (`).
Code highlighting entered within the Markdown widget renders code as plain preformatted text.
Example:
```
sudo npm install vsoagent-installer -g
```
Result:
sudo npm install vsoagent-installer -g
Example:
```To install the Microsoft Cross Platform Build & Release Agent, run the following: `$ sudo npm install vsoagent-installer -g`.```
Result:
To install the Microsoft Cross Platform Build & Release Agent, run the following command: `$ sudo npm install vsoagent-installer -g`.
Within a Markdown file, text with four spaces at the beginning of the line automatically converts to a code block.
Set a language identifier for the code block to enable syntax highlighting for any of the supported languages in highlightjs.
``` language
code
```
More examples:
``` js
const count = records.length;
```
const count = records.length;
``` csharp
Console.WriteLine("Hello, World!");
```
Console.WriteLine("Hello, World!");
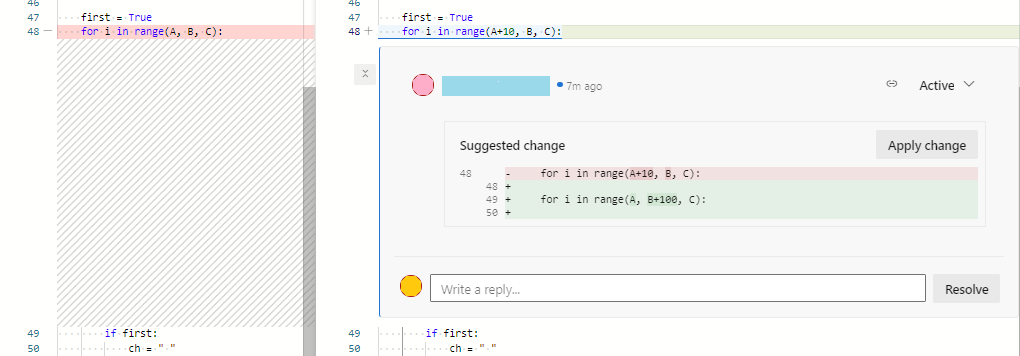
In pull requests, you can use comments to suggest replacement text for one or more lines in a file. Users can easily apply the suggested change by selecting Apply Change. This action results in committing the change to the pull request.
Code highlighting entered within the Markdown widget renders code in diff format with line prefixed by '-' and '+'.
Example:
```suggestion
  for i in range(A, B+100, C):
```
For more information, see Suggest changes in comments.
Organize structured data with tables. Tables are especially useful for describing function parameters, object methods, and other data with a clear name to description mapping.
|.\|.:) when dividing the header and body of tables to specify column alignment (left, center, right).<br/>) (works within a Wiki but not elsewhere).Example:
| Heading 1 | Heading 2 | Heading 3 |
|-----------|:-----------:|-----------:|
| Cell A1 | Cell A2 | Cell A3 |
| Cell B1 | Cell B2 | Cell B3<br/>second line of text |
Result:
| Heading 1 | Heading 2 | Heading 3 |
|---|---|---|
| Cell A1 | Cell A2 | Cell A3 |
| Cell B1 | Cell B2 | Cell B3 second line of text |
Use lists to organize related items. You can add ordered lists with numbers or unordered lists with just bullets. Ordered lists start with a number followed by a period for each list item. Unordered lists start with a -.
Begin each list item on a new line. In a Markdown file or widget, enter two spaces before the line break to begin a new paragraph or enter two line breaks consecutively to begin a new paragraph.
Example:
1. First item.
1. Second item.
1. Third item.
Result:
Example:
- Item 1
- Item 2
- Item 3
Result:
Example:
1. First item.
   - Item 1
   - Item 2
   - Item 3
1. Second item.
   - Nested item 1
      - Further nested item 1
      - Further nested item 2
      - Further nested item 3
   - Nested item 2
   - Nested item 3
Result:
In pull request comments and wikis, HTTP and HTTPS URLs automatically format as links. You can link to work items by entering the # key and a work item ID and then choosing the work item from the list.
Avoid auto suggestions for work items by prefixing # with a backslash (\). This action can be useful if you want to use # for color hex codes.
In Markdown files and widgets, you can set text hyperlinks for your URL using the standard Markdown link syntax:
[Link Text](Link URL)
When you link to another Markdown page in the same Git or Team Foundation Version Control (TFVC) repository, the link target can be a relative path or an absolute path in the repository.
Supported links for Welcome pages:
[text to display](target.md)[text to display](/folder/target.md)[text to display]($/project/folder/target.md)[text to display](http://address.com)Supported links for Markdown widget:
[text to display](http://address.com)Supported links for Wiki:
[text to display](/parent-page/child-page)[text to display](http://address.com)Note
file:// aren't supported for security purposes.Example:
[C# language reference](/dotnet/csharp/language-reference/)
Result:
Links to source control files get interpreted differently depending on whether you specify them in a Welcome page or a Markdown widget. The system interprets relative links as follows:
For example:
| Welcome page | Markdown widget equivalent |
|---|---|
| /BuildTemplates/AzureContinuousDeploy.11.xaml | /DefaultCollection/Fabrikam Fiber/_versionControl#path=$/Tfvc Welcome/BuildTemplates/AzureContinuousDeploy.11.xaml |
| ./page-2.md | /DefaultCollection/Fabrikam Fiber/_versionControl#path=$/Tfvc Welcome/page-2.md |
Within Markdown files, anchor IDs get assigned to all headings when rendered as HTML. Anchor links also support special characters. The ID is the heading text, with the spaces replaced by dashes (-) and all lower case. The following conventions apply to anchor links:
Example:
###Link to a heading in the page
Result:
The syntax for an anchor link to a section...
[Link to a heading in the page](#link-to-a-heading-in-the-page)
You can also reference headings within another Markdown file:
[text to display](./target.md#heading-id)
[text to display](/page-name#section-name)
To highlight issues or make things more interesting, you can add images and animated GIFs to the following aspects of your pull requests.
Use the following syntax to add an image:

Example:

Result:
The path to the image file can be a relative path or the absolute path in Git or TFVC, just like the path to another Markdown file in a link.
IMAGE_URL =WIDTHxHEIGHT
Note
Be sure to include a space before the equal sign.
IMAGE_URL =WIDTHxLightweight task lists are great ways to track progress on your to-dos as a pull request creator or reviewer in the PR description or in a wiki page. Select the Markdown toolbar to get started or apply the format to the selected text.
Use [ ] or [x] to support checklists. Precede the checklist with either -<space> or 1.<space> (any numeral).
Example - Apply the task list Markdown to a highlighted list

To mark items as completed by checking the boxes, you need to manually edit the markdown and modify the syntax after adding a task list.

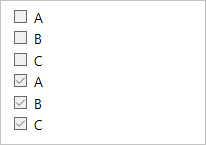
Example - Format a list as a task list
- [ ] A
- [ ] B
- [ ] C
- [x] A
- [x] B
- [x] C
Result:
Note
A checklist within a table cell isn't supported.
In pull request comments and wiki pages, you can use emojis to add character and react to comments in the request. Enter what you're feeling surrounded by : characters to get a matching emoji in your text. We support most emojis.
Example:
:smile:
:angry:
Result:

To escape emojis, enclose them using the ` character.
Example:
`:smile:` `:)` `:angry:`
Result:
:smile: :) :angry:
Syntax
Example/notes
To insert one of the following characters, prefix with a \(backslash).
\, backslash
`, backtick
_, underscore
{}, curly braces
[], square brackets
(), parentheses
#, hash mark
+, plus sign
-, minus sign (hyphen)
., period
!, exclamation mark
*, asterisk
Some examples on inserting special characters:
Enter \\ to get \
Enter \_ to get _
Enter \# to get #
Enter \( to get (
Enter \. to get .
Enter \! to get !
Enter \* to get *
In pull request comments and wiki pages, you can attach files to illustrate your point or to give more detailed reasoning behind your suggestions. To attach a file, drag and drop it into the comment field, or wiki page edit experience. You can also select the paperclip in the upper right of the comment box or from the format pane in your wiki page.
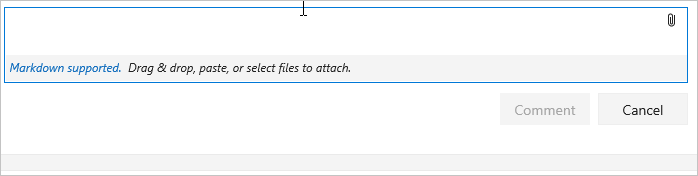
If you have an image on your clipboard, you can paste it into the comment box or wiki page, and it renders directly into your comment or wiki page.
Attaching nonimage files creates a link to the file in your comment. To change the text displayed in the link, update the description text between the brackets. The attached image files render directly into your comment or wiki pages. Save or update your comment or wiki page with an attachment. Then, you can see the attached image and select links to download the attached files.
Attachments support the following file formats:
| Type | File formats |
|---|---|
| Code | CS (.cs), Extensible Markup Language (.xml), JavaScript Object Notation (.json), Hypertext Markup Language(.html, .htm), Layer (.lyr), Windows PowerShell script (.ps1), Roshal Archive (.rar), Remote Desktop Connection (.rdp), Structured Query Language (.sql) - Note: Code attachments aren't permitted in PR comments |
| Compressed files | ZIP (.zip) and GZIP (.gz) |
| Documents | Markdown (.md), Microsoft Office Message (.msg), Microsoft Project (.mpp), Word (.doc and .docx), Excel (.xls, .xlsx and .csv), and Powerpoint (.ppt and .pptx), text files (.txt), and PDFs (.pdf) |
| Images | PNG (.png), GIF (.gif), JPEG (both .jpeg and .jpg), Icons (.ico) |
| Visio | VSD (.vsd and .vsdx) |
| Video | MOV (.mov), MP4 (.mp4) |
Note
Not all file formats are supported within pull requests, such as Microsoft Office Message (.msg) files.
We support both inline and block KaTeX notation in wiki pages and pull requests. See the following supported elements:
To include mathematical notation surround the mathematical notation with a $ sign for inline and $$ for block, as shown in the following examples:
$
\alpha, \beta, \gamma, \delta, \epsilon, \zeta, \eta, \theta, \kappa, \lambda, \mu, \nu, \omicron, \pi, \rho, \sigma, \tau, \upsilon, \phi, ...
$


$\Gamma,  \Delta,  \Theta, \Lambda, \Xi, \Pi, \Sigma, \Upsilon, \Phi, \Psi, \Omega$
Result:

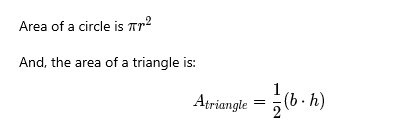
Area of a circle is $\pi r^2$

And, the area of a triangle is:

$$
A_{triangle}=\frac{1}{2}({b}\cdot{h})
$$
Result:
$$
\sum_{i=1}^{10} t_i
$$


$$
\int_0^\infty \mathrm{e}^{-x}\,\mathrm{d}x
$$
Result:

The following guidance shows Markdown syntax for use in Azure DevOps wikis.
Mermaid lets you create diagrams and visualizations using text and code.
Note
flowchart syntax (graph used instead), or LongArrow ---->.Wiki supports the following Mermaid diagram types:
For more information, see the Mermaid release notes and active requests in the Developer Community.
To add a Mermaid diagram to a wiki page, use the following syntax:
::: mermaid
<mermaid diagram syntax>
:::
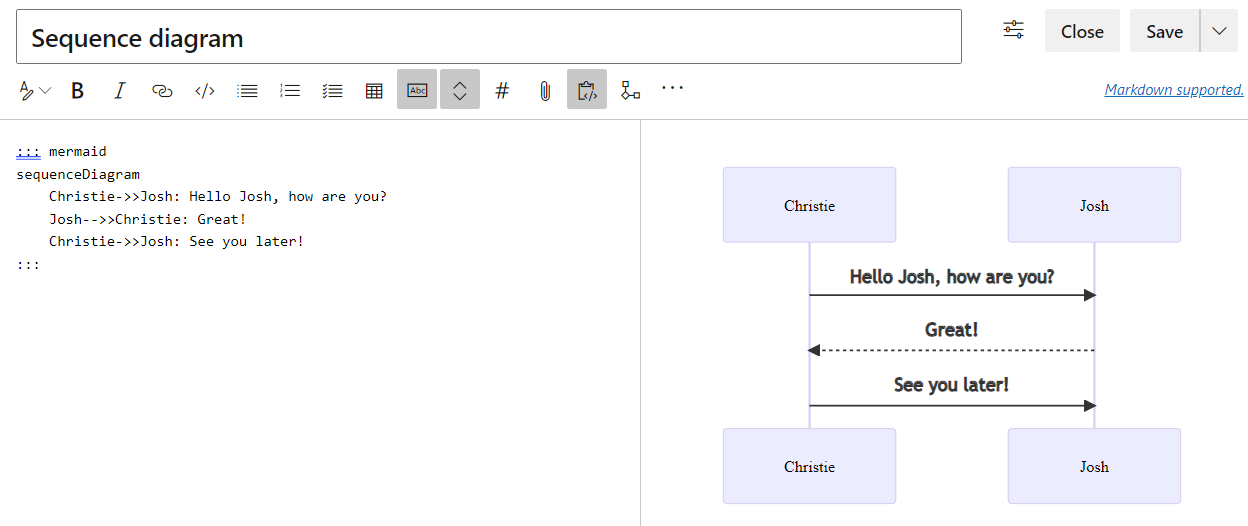
A sequence diagram is an interaction diagram that shows how processes operate with one another and in which order.
::: mermaid
sequenceDiagram
    Christie->>Josh: Hello Josh, how are you?
    Josh-->>Christie: Great!
    Christie->>Josh: See you later!
:::
A Gantt chart records each scheduled task as one continuous bar that extends from the left to the right. The x axis represents time and the y records the different tasks and the order in which they're to be completed.
When you exclude a date, day, or collection of dates specific to a task, the Gantt chart accommodates those changes by extending an equal number of days toward the right, not by creating a gap inside the task.
::: mermaid
gantt
    title A Gantt chart
    dateFormat YYYY-MM-DD
    excludes 2022-03-16,2022-03-18,2022-03-19
    section Section

    A task          :a1, 2022-03-07, 7d
    Another task    :after a1 , 5d
:::

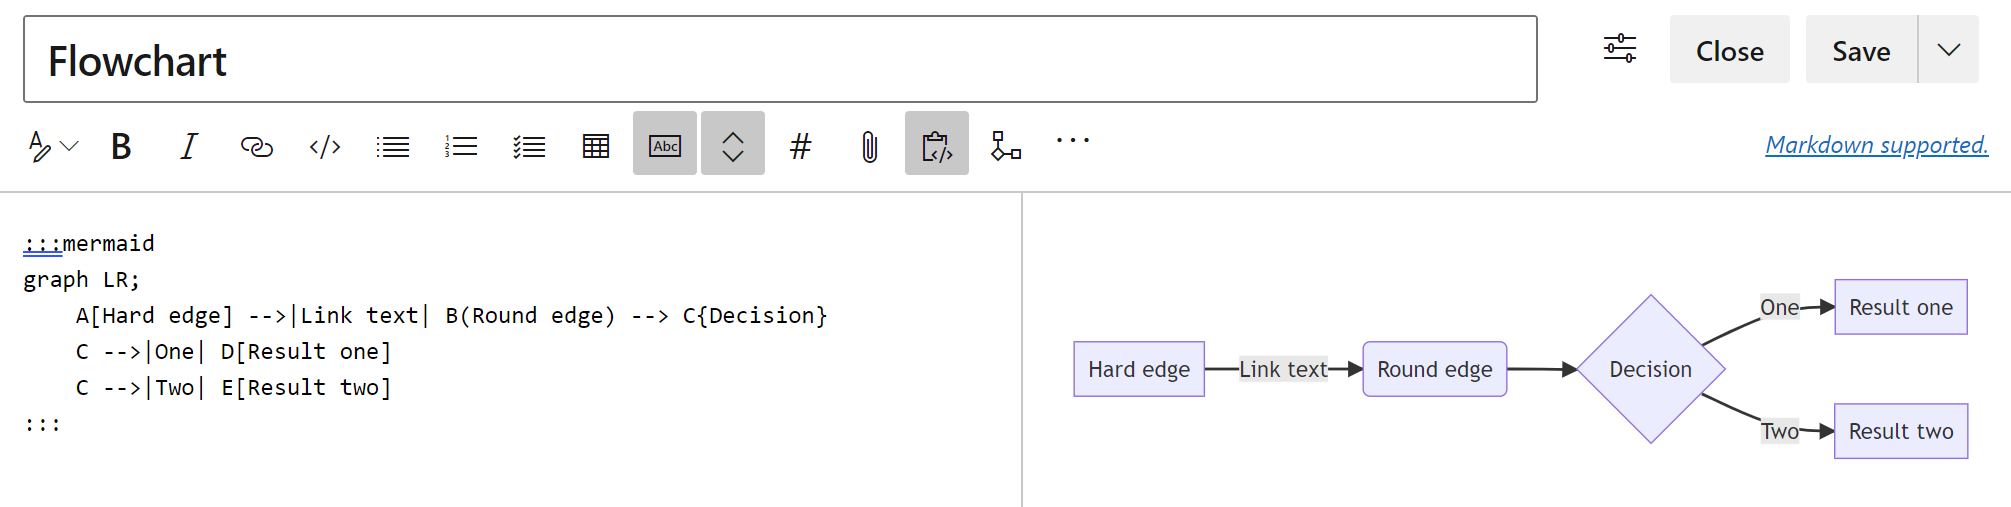
A flowchart is composed of nodes, geometric shapes and edges, and arrows or lines.
The following example shows a flowchart using graph rather than flowchart.
Note
We don't support ----> or flowchart syntax, nor links to and from subgraph.
:::mermaid
graph LR;
    A[Hard edge] -->|Link text| B(Round edge) --> C{Decision}
    C -->|One| D[Result one]
    C -->|Two| E[Result two]
:::
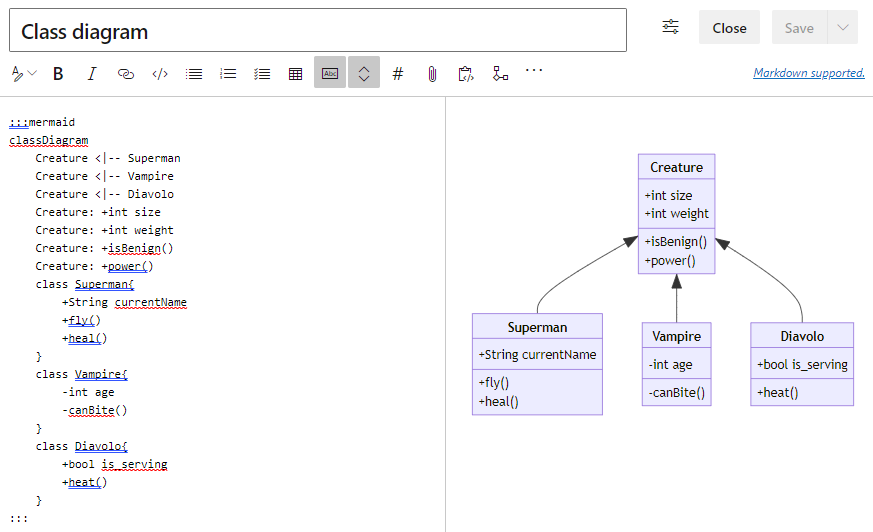
The class diagram is main part of object-oriented modeling. The diagram describes objects, their attributes, methods, and inheritance between them.
:::mermaid
classDiagram
    Creature <|-- Superman
    Creature <|-- Vampire
    Creature <|-- Diavolo
    Creature: +int size
    Creature: +int weight
    Creature: +isBenign()
    Creature: +power()
    class Superman{
        +String currentName
        +fly()
        +heal()
    }
    class Vampire{
        -int age
        -canBite()
    }
    class Diavolo{
        +bool is_serving
        +heat()
    }
:::
The state diagram is used to describe how the system states can change from one to another.
:::mermaid
stateDiagram-v2
    [*] --> Active
    state Active {
        [*] --> NumLockOff
        NumLockOff --> NumLockOn : EvNumLockPressed
        NumLockOn --> NumLockOff : EvNumLockPressed
        --
        [*] --> CapsLockOff
        CapsLockOff --> CapsLockOn : EvCapsLockPressed
        CapsLockOn --> CapsLockOff : EvCapsLockPressed
        --
        [*] --> ScrollLockOff
        ScrollLockOff --> ScrollLockOn : EvScrollLockPressed
        ScrollLockOn --> ScrollLockOff : EvScrollLockPressed
    }
:::

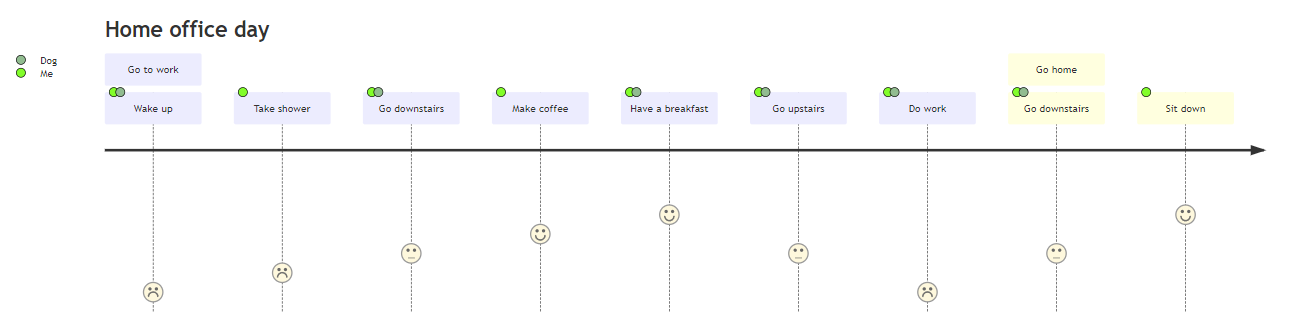
The user journey diagram describes what steps are required to complete certain higher level action or task.
:::mermaid
journey
    title Home office day
    section Go to work
      Wake up: 1: Me, Dog
      Take shower: 2: Me
      Go downstairs: 3: Me, Dog
      Make coffee: 4: Me
      Have a breakfast: 5: Me, Dog
      Go upstairs: 3: Me, Dog
      Do work: 1: Me, Dog
    section Go home
      Go downstairs: 3: Me, Dog
      Sit down: 5: Me
:::
The pie chart diagram is used to visualize the percentages in a circled graph.
:::mermaid
pie title Fishermans in countries
    "Norway" : 684
    "Sweeden" : 234
    "Switzerland" : 10
:::

The requirements diagram visualizes the requirements and their connections.
:::mermaid
requirementDiagram
    requirement development_req {
    id: 1
    text: requirements spec.
    risk: medium
    verifymethod: test
    }
    element test_suite {
    type: manual test
    }
    test_suite - verifies -> development_req
:::

To create a table of contents, add a [[_TOC_]]. The TOC is generated when the tag gets added and there's at least one heading on the page.
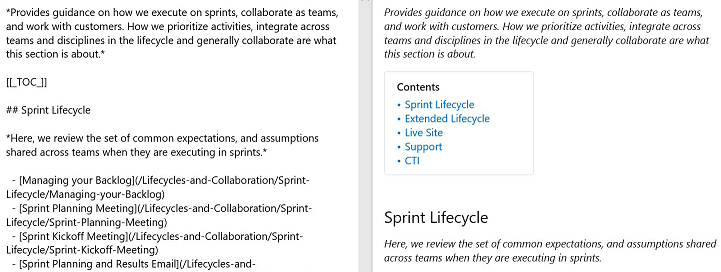
The [[_TOC_]] can be placed anywhere in the page to render the table of contents. Only Markdown headings are considered for TOC (HTML heading tags aren't considered).
All HTML and Markdown tags get stripped from the headings while adding it inside the TOC block. See the following example of how the TOC renders when you add bold and italics to a heading.
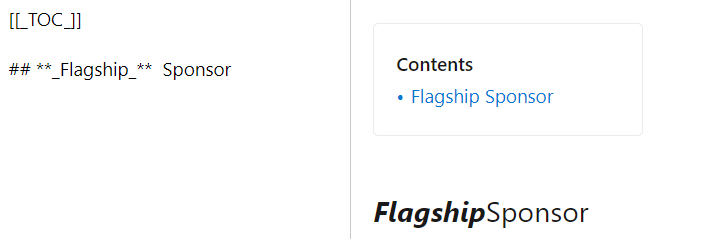
Consistency is maintained in the formatting of the TOC.
Note
The tag [[_TOC_]] is case-sensitive. For example, [[_toc_]] may not render the TOC. Also, only the first instance of [[_TOC_]] is rendered and the rest are ignored.
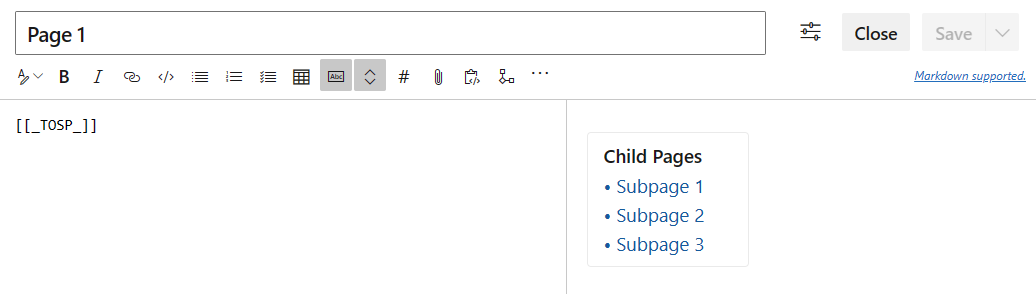
Add a table of content for subpages (TOSP) to your wiki pages. This table has links to all subpages located under the page where the table of subpages is shown.
You can add the table of subpages either by inserting the special tag [[_TOSP_]] manually or by selecting from the More options menu. Only the first [[_TOSP_]] tag is used to create the table of subpages.
To add a collapsible section in a wiki page, use the following syntax:
# A collapsible section with markdown
<details>
  <summary>Click to expand!</summary>

  ## Heading
  1. A numbered
  2. list
     * With some
     * Sub bullets
</details>
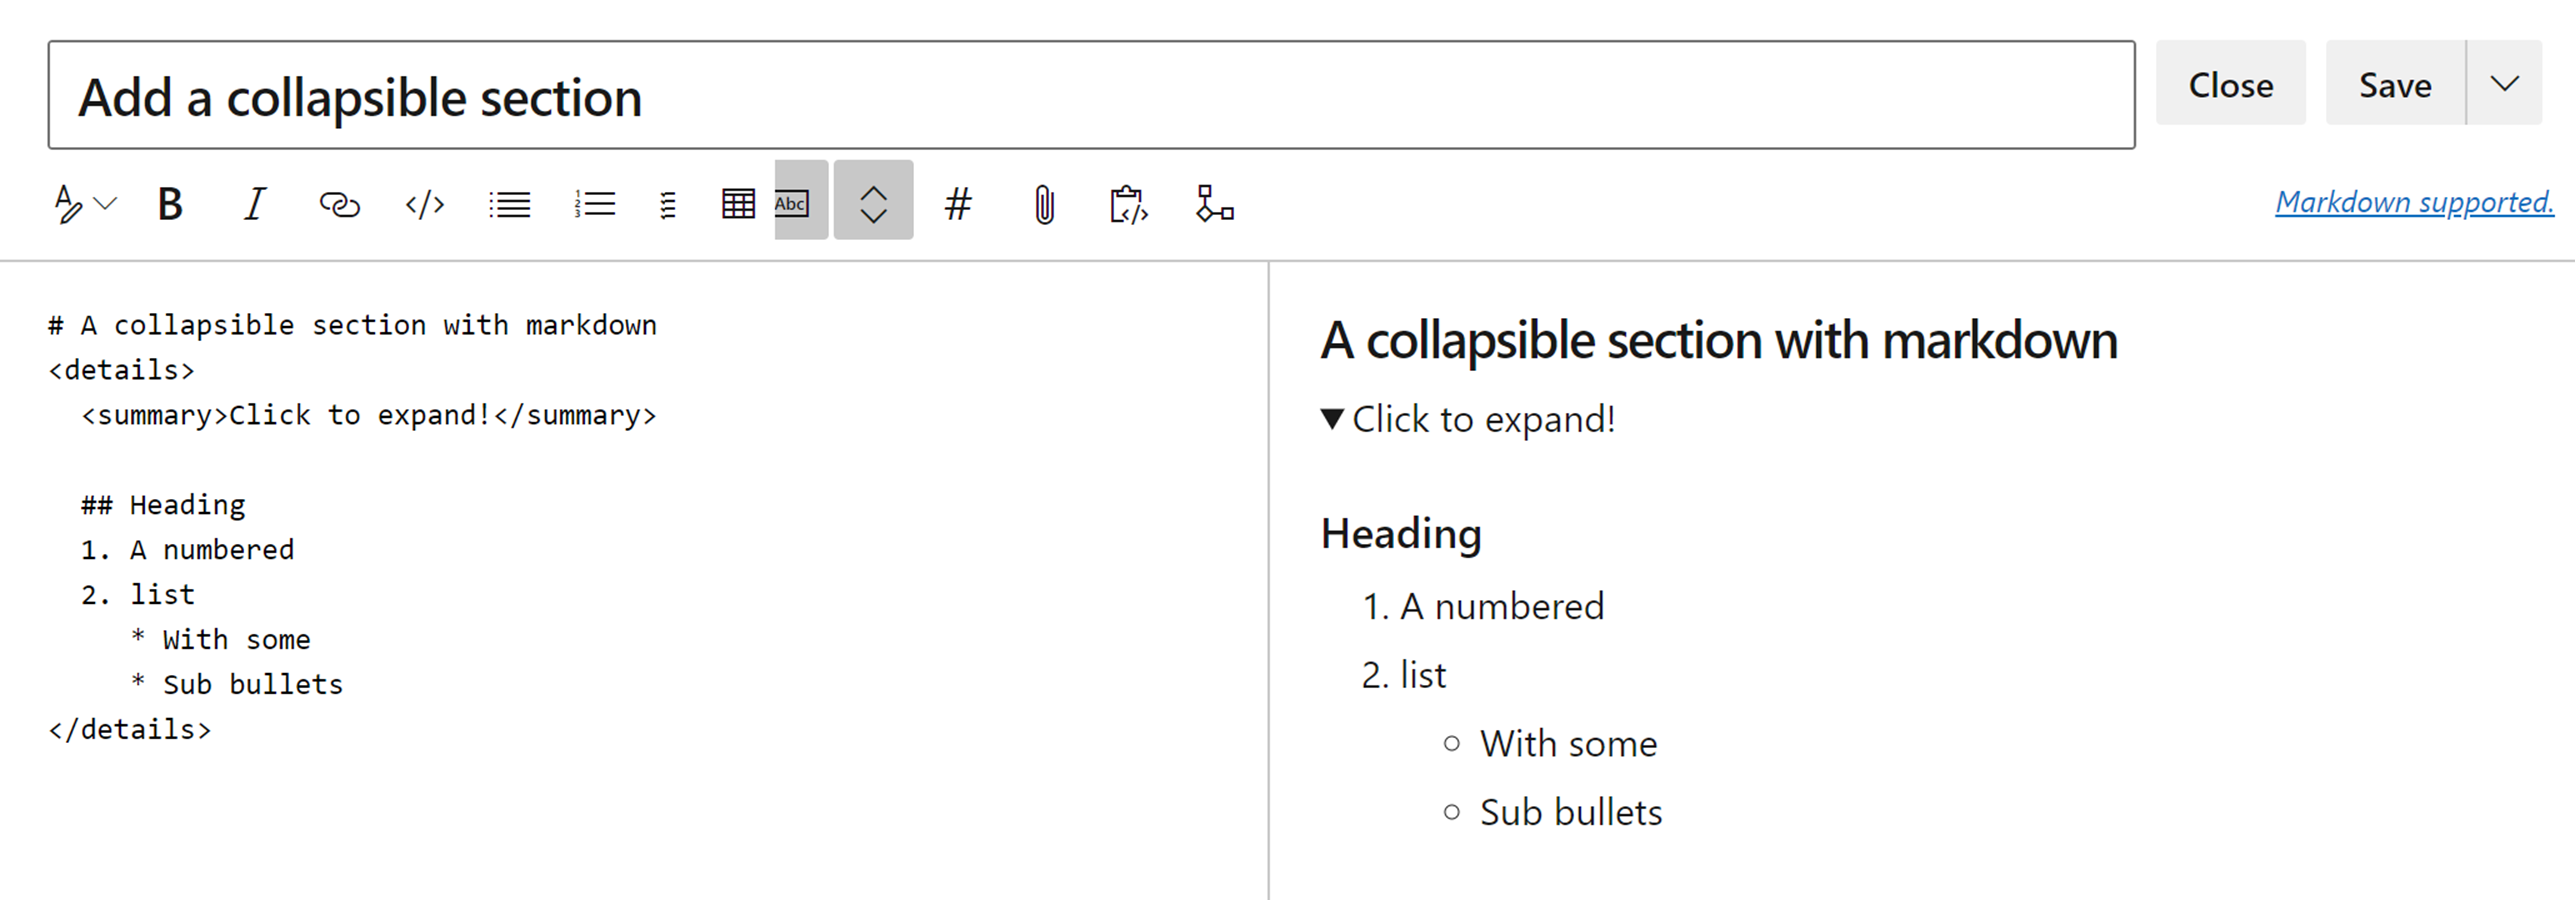
Make sure to add an empty line in the following areas:
</summary> tag, otherwise the markdown/code blocks don't show correctly</details> tag if you have multiple collapsible sectionsTo embed videos from YouTube and Microsoft Streams in a wiki page, use the following syntax:
::: video
<iframe width="640" height="360" src="https://www.youtube.com/embed/OtqFyBA6Dbk" allowfullscreen style="border:none"><iframe>
:::
The iframe corresponds to the embedding iframe block of either a YouTube or Microsoft Streams video.
The ending ":::" is required to prevent a break in the page.
To embed Azure Boards query results in a wiki page as a table, use the following syntax:
::: query-table <queryid>
:::
For example:
::: query-table 6ff7777e-8ca5-4f04-a7f6-9e63737dddf7 :::
You can also use the toolbar and the query selector to embed the query results in a wiki page.
![]()
For more information about how to copy the query URL, which provides a GUID for the query, see Email query items or share query URL.
To @mention users or groups in wiki, key in "@" in the wiki editor. This @mention opens autosuggest from which you can mention users or groups to get notified by email.
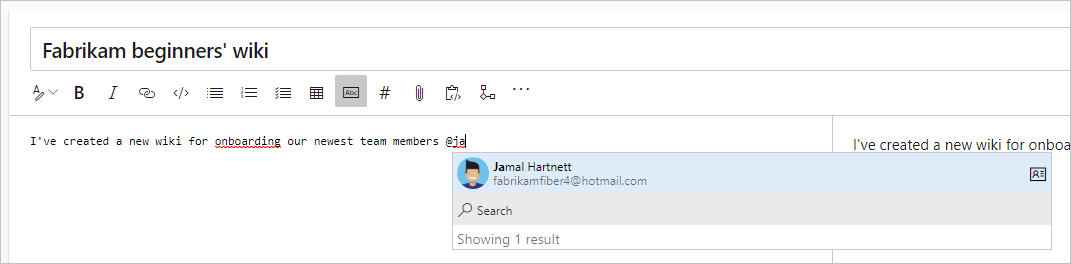
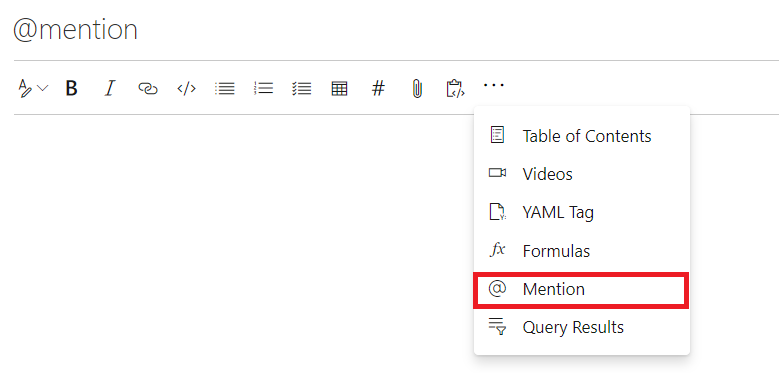
You can also select @mention from the edit toolbar.
When you edit pages directly in code, use the following pattern, @<{identity-guid}>.
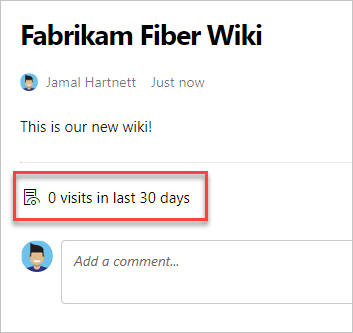
Automatically, you see an aggregated count of page visits for the last 30 days on every page. We define a page visit as a page view by a given user in a 15-minute interval.
Use the batch API pagesBatch to see the daily quantity of visits to all pages in a paginated way. They aren't sorted by number of visits, however. For data over 30 days old, you can get all page visits using the rest API. Sort these pages based on the number of visits to get the top 100. You can store these visits in a dashboard or database.
Enter the pound sign (#), and then enter a work item ID.
In wiki pages, you can also create rich content using HTML tags.
Tip
You can nest Markdown within your HTML, but you must include a blank line between the HTML element and the markdown.
<p>

 [A Markdown link](https://microsoft.com)
</p>
Note
Pasting rich content as HTML is supported in Azure DevOps Server 2019.1 and later versions.
Example - Embedded video
<video src="path of the video file" width=400 controls>
</video>
<video src="https://sec.ch9.ms/ch9/7247/7c8ddc1a-348b-4ba9-ab61-51fded6e7247/vstswiki_high.mp4" width=400 controls>
</video>
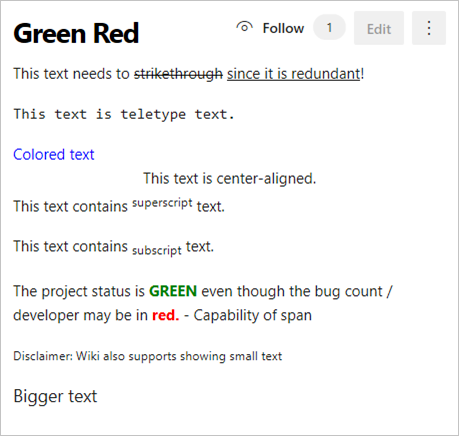
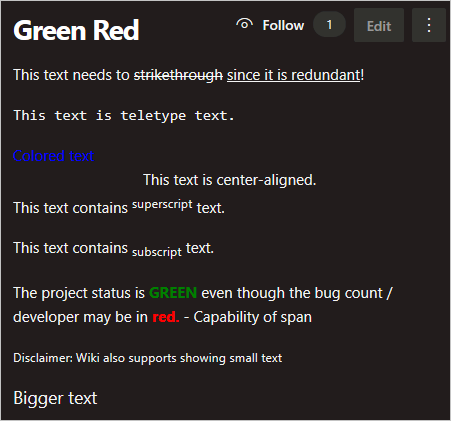
Example - Rich text format
<p>This text needs to <del>strikethrough</del> <ins>since it is redundant</ins>!</p>
<p><tt>This text is teletype text.</tt></p>
<font color="blue">Colored text</font>
<center>This text is center-aligned.</center>
<p>This text contains <sup>superscript</sup> text.</p>
<p>This text contains <sub>subscript</sub> text.</p>
<p>The project status is <span style="color:green;font-weight:bold">GREEN</span> even though the bug count / developer may be in <span style="color:red;font-weight:bold">red.</span> - Capability of span
<p><small>Disclaimer: Wiki also supports showing small text</small></p>
<p><big>Bigger text</big></p>
Result:
Events
Mar 17, 11 PM - Mar 21, 11 PM
Join the meetup series to build scalable AI solutions based on real-world use cases with fellow developers and experts.
Register nowTraining
Module
Communicate effectively on GitHub using Markdown - Training
Learn to use Markdown to communicate with brevity, clarity, and expression.