Tutorial: Secure your hub virtual network using Azure Firewall Manager
When you connect your on-premises network to an Azure virtual network to create a hybrid network, the ability to control access to your Azure network resources is an important part of an overall security plan.
Using Azure Firewall Manager, you can create a hub virtual network to secure your hybrid network traffic destined to private IP addresses, Azure PaaS, and the Internet. You can use Azure Firewall Manager to control network access in a hybrid network using policies that define allowed and denied network traffic.
Firewall Manager also supports a secured virtual hub architecture. For a comparison of the secured virtual hub and hub virtual network architecture types, see What are the Azure Firewall Manager architecture options?
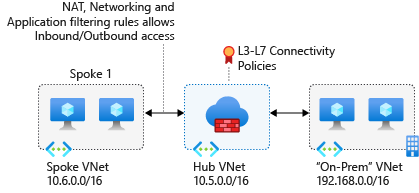
For this tutorial, you create three virtual networks:
- VNet-Hub - the firewall is in this virtual network.
- VNet-Spoke - the spoke virtual network represents the workload located on Azure.
- VNet-Onprem - The on-premises virtual network represents an on-premises network. In an actual deployment, it can be connected using either a VPN or ExpressRoute connection. For simplicity, this tutorial uses a VPN gateway connection, and an Azure-located virtual network is used to represent an on-premises network.
In this tutorial, you learn how to:
- Create a firewall policy
- Create the virtual networks
- Configure and deploy the firewall
- Create and connect the VPN gateways
- Peer the hub and spoke virtual networks
- Create the routes
- Create the virtual machines
- Test the firewall
Prerequisites
A hybrid network uses the hub-and-spoke architecture model to route traffic between Azure VNets and on-premises networks. The hub-and-spoke architecture has the following requirements:
Set AllowGatewayTransit when peering VNet-Hub to VNet-Spoke. In a hub-and-spoke network architecture, a gateway transit allows the spoke virtual networks to share the VPN gateway in the hub, instead of deploying VPN gateways in every spoke virtual network.
Additionally, routes to the gateway-connected virtual networks or on-premises networks are automatically propagated to the routing tables for the peered virtual networks using the gateway transit. For more information, see Configure VPN gateway transit for virtual network peering.
Set UseRemoteGateways when you peer VNet-Spoke to VNet-Hub. If UseRemoteGateways is set and AllowGatewayTransit on remote peering is also set, the spoke virtual network uses gateways of the remote virtual network for transit.
To route the spoke subnet traffic through the hub firewall, you need a User Defined route (UDR) that points to the firewall with the Virtual network gateway route propagation setting disabled. This option prevents route distribution to the spoke subnets. This prevents learned routes from conflicting with your UDR.
Configure a UDR on the hub gateway subnet that points to the firewall IP address as the next hop to the spoke networks. No UDR is required on the Azure Firewall subnet, as it learns routes from BGP.
See the Create Routes section in this tutorial to see how these routes are created.
Note
Azure Firewall must have direct Internet connectivity. If your AzureFirewallSubnet learns a default route to your on-premises network via BGP, you must override this with a 0.0.0.0/0 UDR with the NextHopType value set as Internet to maintain direct Internet connectivity.
Azure Firewall can be configured to support forced tunneling. For more information, see Azure Firewall forced tunneling.
Note
Traffic between directly peered VNets is routed directly even if a UDR points to Azure Firewall as the default gateway. To send subnet to subnet traffic to the firewall in this scenario, a UDR must contain the target subnet network prefix explicitly on both subnets.
If you don't have an Azure subscription, create a free account before you begin.
Create a Firewall Policy
Sign in to the Azure portal.
In the Azure portal search bar, type Firewall Manager and press Enter.
On the Azure Firewall Manager page, under Security, select Azure firewall policies.

Select Create Azure Firewall Policy.
Select your subscription, and for Resource group, select Create new and create a resource group named FW-Hybrid-Test.
For the policy name, type Pol-Net01.
For Region, select East US.
Select Next : DNS Settings.
Select Next : TLS inspection
Select Next:Rules.
Select Add a rule collection.
For Name, type RCNet01.
For Rule collection type, select Network.
For Priority, type 100.
For Action, select Allow.
Under Rules, for Name, type AllowWeb.
For Source, type 192.168.1.0/24.
For Protocol, select TCP.
For Destination Ports, type 80.
For Destination Type, select IP Address.
For Destination, type 10.6.0.0/16.
On the next rule row, enter the following information:
Name: type AllowRDP
Source: type 192.168.1.0/24.
Protocol, select TCP
Destination Ports, type 3389
Destination Type, select IP Address
For Destination, type 10.6.0.0/16Select Add.
Select Review + Create.
Review the details and then select Create.

Create the firewall hub virtual network
Note
The size of the AzureFirewallSubnet subnet is /26. For more information about the subnet size, see Azure Firewall FAQ.
From the Azure portal home page, select Create a resource.
Search for Virtual network and then select Virtual network.
Select Create.
For Subscription, select your subscription.
For Resource group, select FW-Hybrid-Test.
For Name, type VNet-hub.
For Region, select East US.
Select Next.
On the Security, select Next.
For IPv4 address space, type 10.5.0.0/16.
Under Subnets, select default.
For Subnet template, select Azure Firewall.
For Starting address, type 10.5.0.0/26.
Accept the other default settings, and then select Save.
Select Review + create.
Select Create.
Add another subnet named GatewaySubnet with an address space of 10.5.1.0/27. This subnet is used for the VPN gateway.
Create the spoke virtual network
- From the Azure portal home page, select Create a resource.
- Search for Virtual network and then select Virtual network.
- Select Create.
- For Subscription, select your subscription.
- For Resource group, select FW-Hybrid-Test.
- For Name, type VNet-Spoke.
- For Region, select East US.
- Select Next.
- On the Security page, select Next.
- Select Next : IP Addresses.
- For IPv4 address space, type 10.6.0.0/16.
- Under Subnets, select default.
- Change the Name to SN-Workload.
- For Starting address, type 10.6.0.0/24.
- Accept the other default settings, and then select Save.
- Select Review + create.
- Select Create.
Create the on-premises virtual network
From the Azure portal home page, select Create a resource.
Search for Virtual network and then select Virtual network.
Select Create.
For Subscription, select your subscription.
For Resource group, select FW-Hybrid-Test.
For Virtual network name, type VNet-OnPrem.
For Region, select East US.
Select Next.
On the Security page, select Next.
For IPv4 address space, type 192.168.0.0/16.
Under Subnets, select default.
Change the Name to SN-Corp.
For Starting address, type 192.168.1.0/24.
Accept the other default settings, and then select Save.
Select Add a subnet.
For Subnet template, select Virtual Network Gateway.
For Starting address type 192.168.2.0/27.
Select Add.
Select Review + create.
Select Create.
Configure and deploy the firewall
When security policies are associated with a hub, it's referred to as a hub virtual network.
Convert the VNet-Hub virtual network into a hub virtual network and secure it with Azure Firewall.
In the Azure portal search bar, type Firewall Manager and press Enter.
In the right pane, select Overview.
On the Azure Firewall Manager page, under Add security to virtual networks, select View hub virtual networks.
Under Virtual Networks, select the check box for VNet-hub.
Select Manage Security, and then select Deploy a Firewall with Firewall Policy.
On the Convert virtual networks page, under Azure Firewall tier, select Premium. Under Firewall Policy, select the check box for Pol-Net01.
Select Next : Review + confirm
Review the details and then select Confirm.
This takes a few minutes to deploy.
After deployment completes, go to the FW-Hybrid-Test resource group, and select the firewall.
Note the Firewall private IP address on the Overview page. You use it later when you create the default route.
Create and connect the VPN gateways
The hub and on-premises virtual networks are connected via VPN gateways.
Create a VPN gateway for the hub virtual network
Now create the VPN gateway for the hub virtual network. Network-to-network configurations require a RouteBased VpnType. Creating a VPN gateway can often take 45 minutes or more, depending on the selected VPN gateway SKU.
- From the Azure portal home page, select Create a resource.
- In the search text box, type virtual network gateway and press Enter.
- Select Virtual network gateway, and select Create.
- For Name, type GW-hub.
- For Region, select (US) East US.
- For Gateway type, select VPN.
- For VPN type, select Route-based.
- For SKU, select VpnGw2.
- For Generation, select Generation2.
- For Virtual network, select VNet-hub.
- For Public IP address, select Create new, and type VNet-hub-GW-pip for the name.
- For Enable active-active mode, select Disabled.
- Accept the remaining defaults and then select Review + create.
- Review the configuration, then select Create.
Create a VPN gateway for the on-premises virtual network
Now create the VPN gateway for the on-premises virtual network. Network-to-network configurations require a RouteBased VpnType. Creating a VPN gateway can often take 45 minutes or more, depending on the selected VPN gateway SKU.
- From the Azure portal home page, select Create a resource.
- In the search text box, type virtual network gateway and press Enter.
- Select Virtual network gateway, and select Create.
- For Name, type GW-Onprem.
- For Region, select (US) East US.
- For Gateway type, select VPN.
- For VPN type, select Route-based.
- For SKU, select VpnGw2.
- For Generation, select Generation2.
- For Virtual network, select VNet-Onprem.
- For Public IP address, select Create new, and type VNet-Onprem-GW-pip for the name.
- For Enable active-active mode, select Disabled.
- Accept the remaining defaults and then select Review + create.
- Review the configuration, then select Create.
Create the VPN connections
Now you can create the VPN connections between the hub and on-premises gateways.
In this step, you create the connection from the hub virtual network to the on-premises virtual network. A shared key is referenced in the examples. You can use your own values for the shared key. The important thing is that the shared key must match for both connections. It takes some time to create the connection.
- Open the FW-Hybrid-Test resource group and select the GW-hub gateway.
- Select Connections in the left column.
- Select Add.
- For the connection name, type Hub-to-Onprem.
- Select VNet-to-VNet for Connection type.
- Select Next : Settings.
- For the First virtual network gateway, select GW-hub.
- For the Second virtual network gateway, select GW-Onprem.
- For Shared key (PSK), type AzureA1b2C3.
- Select Review + create.
- Select Create.
Create the on-premises to hub virtual network connection. This step is similar to the previous one, except you create the connection from VNet-Onprem to VNet-hub. Make sure the shared keys match. The connection will be established after a few minutes.
- Open the FW-Hybrid-Test resource group and select the GW-Onprem gateway.
- Select Connections in the left column.
- Select Add.
- For the connection name, type Onprem-to-Hub.
- Select VNet-to-VNet for Connection type.
- For the Second virtual network gateway, select GW-hub.
- For Shared key (PSK), type AzureA1b2C3.
- Select OK.
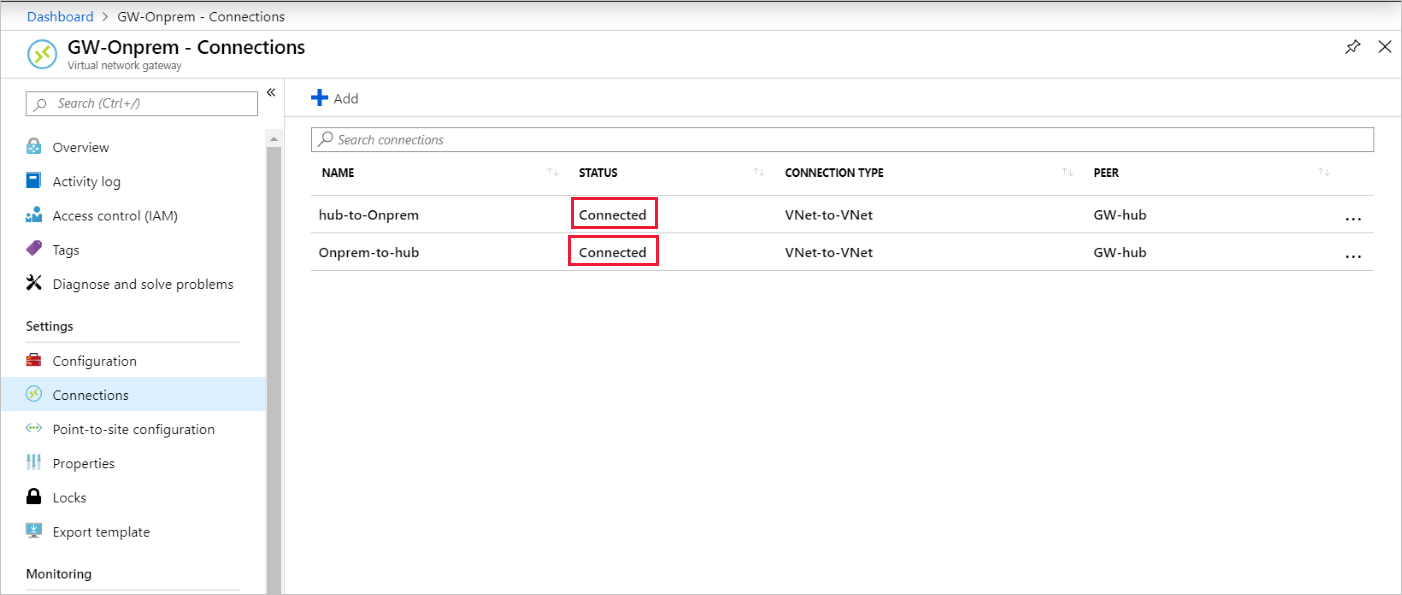
Verify the connection
After about five minutes or so, the status of both connections should be Connected.
Peer the hub and spoke virtual networks
Now peer the hub and spoke virtual networks.
Open the FW-Hybrid-Test resource group and select the VNet-hub virtual network.
In the left column, select Peerings.
Select Add.
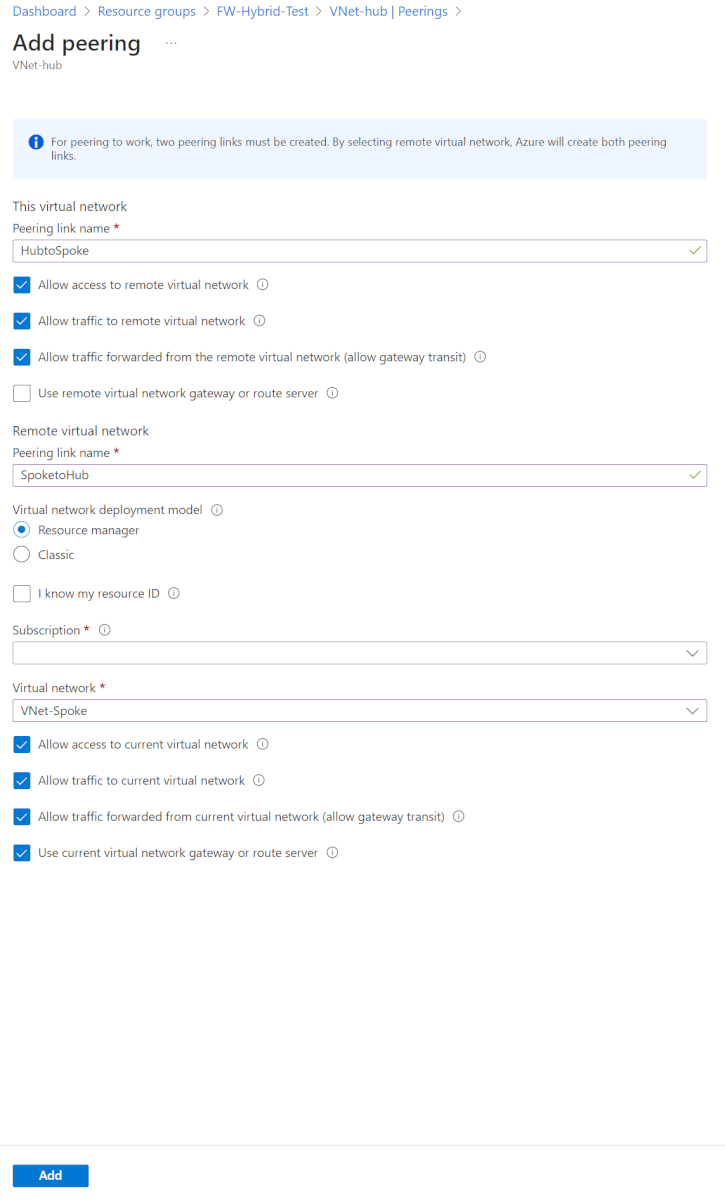
Under This virtual network:
Setting name Value Peering link name HubtoSpoke Allow traffic to remote virtual network selected Allow traffic forwarded from the remote virtual network (allow gateway transit) selected Use remote Virtual network gateway or route server not selected Under Remote virtual network:
Setting name Value Peering link name SpoketoHub Virtual network deployment model Resource Manager Subscription <your subscription> Virtual network VNet-Spoke Allow traffic to current virtual network selected Allow traffic forwarded from current virtual network (allow gateway transit) selected Use current virtual network gateway or route server selected Select Add.
Create the routes
Next, create a couple routes:
- A route from the hub gateway subnet to the spoke subnet through the firewall IP address
- A default route from the spoke subnet through the firewall IP address
- From the Azure portal home page, select Create a resource.
- In the search text box, type route table and press Enter.
- Select Route table.
- Select Create.
- Select the FW-Hybrid-Test for the resource group.
- For Region, select East US.
- For the name, type UDR-Hub-Spoke.
- Select Review + Create.
- Select Create.
- After the route table is created, select it to open the route table page.
- Select Routes in the left column.
- Select Add.
- For the route name, type ToSpoke.
- For Destination type, select IP addresses.
- For Destination IP addresses/CIDR ranges, type 10.6.0.0/16.
- For next hop type, select Virtual appliance.
- For next hop address, type the firewall's private IP address that you noted earlier.
- Select Add.
Now associate the route to the subnet.
- On the UDR-Hub-Spoke - Routes page, select Subnets.
- Select Associate.
- Under Virtual network, select VNet-hub.
- Under Subnet, select GatewaySubnet.
- Select OK.
Now create the default route from the spoke subnet.
- From the Azure portal home page, select Create a resource.
- In the search text box, type route table and press Enter.
- Select Route table.
- Select Create.
- Select the FW-Hybrid-Test for the resource group.
- For Region, select East US.
- For the name, type UDR-DG.
- For Propagate gateway routes, select No.
- Select Review + create.
- Select Create.
- After the route table is created, select it to open the route table page.
- Select Routes in the left column.
- Select Add.
- For the route name, type ToHub.
- For Destination type, select IP addresses
- For Destination IP addresses/CIDR ranges, type 0.0.0.0/0.
- For next hop type, select Virtual appliance.
- For next hop address, type the firewall's private IP address that you noted earlier.
- Select Add.
Now associate the route to the subnet.
- On the UDR-DG - Routes page, select Subnets.
- Select Associate.
- Under Virtual network, select VNet-spoke.
- Under Subnet, select SN-Workload.
- Select OK.
Create virtual machines
Now create the spoke workload and on-premises virtual machines, and place them in the appropriate subnets.
Create the workload virtual machine
Create a virtual machine in the spoke virtual network, running IIS, with no public IP address.
From the Azure portal home page, select Create a resource.
Under Popular Marketplace products, select Windows Server 2019 Datacenter.
Enter these values for the virtual machine:
- Resource group - Select FW-Hybrid-Test
- Virtual machine name: VM-Spoke-01
- Region - (US) East US
- User name: type a user name
- Password: type a password
For Public inbound ports, select Allow selected ports, and then select HTTP (80), and RDP (3389)
Select Next:Disks.
Accept the defaults and select Next: Networking.
Select VNet-Spoke for the virtual network and the subnet is SN-Workload.
Select Next:Management.
Select Next : Monitoring.
For Boot diagnostics, Select Disable.
Select Review + Create, review the settings on the summary page, and then select Create.
Install IIS
From the Azure portal, open the Cloud Shell and make sure that it's set to PowerShell.
Run the following command to install IIS on the virtual machine and change the location if necessary:
Set-AzVMExtension `
        -ResourceGroupName FW-Hybrid-Test `
        -ExtensionName IIS `
        -VMName VM-Spoke-01 `
        -Publisher Microsoft.Compute `
        -ExtensionType CustomScriptExtension `
        -TypeHandlerVersion 1.4 `
        -SettingString '{"commandToExecute":"powershell Add-WindowsFeature Web-Server; powershell      Add-Content -Path \"C:\\inetpub\\wwwroot\\Default.htm\" -Value $($env:computername)"}' `
        -Location EastUS
Create the on-premises virtual machine
This is a virtual machine that you use to connect using Remote Desktop to the public IP address. From there, you then connect to the on-premises server through the firewall.
From the Azure portal home page, select Create a resource.
Under Popular, select Windows Server 2019 Datacenter.
Enter these values for the virtual machine:
- Resource group - Select existing, and then select FW-Hybrid-Test
- Virtual machine name - VM-Onprem
- Region - (US) East US
- User name: type a user name
- Password: type your password
For Public inbound ports, select Allow selected ports, and then select RDP (3389)
Select Next:Disks.
Accept the defaults and select Next:Networking.
Select VNet-Onprem for virtual network and verify the subnet is SN-Corp.
Select Next:Management.
Select Next : Monitoring.
For Boot diagnostics, select Disable.
Select Review + Create, review the settings on the summary page, and then select Create.
Test the firewall
First, note the private IP address for VM-Spoke-01 virtual machine on the VM-Spoke-01 Overview page.
From the Azure portal, connect to the VM-Onprem virtual machine.
Open a web browser on VM-Onprem, and browse to http://<VM-spoke-01 private IP>.
You should see the VM-spoke-01 web page:
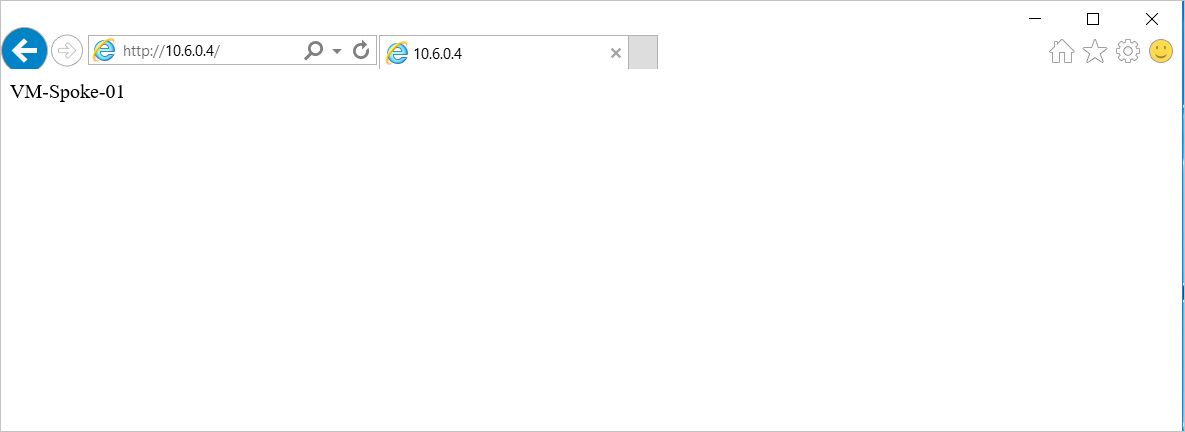
From the VM-Onprem virtual machine, open a remote desktop to VM-spoke-01 at the private IP address.
Your connection should succeed, and you should be able to sign in.
So now you've verified that the firewall rules are working:
- You can browse web server on the spoke virtual network.
- You can connect to the server on the spoke virtual network using RDP.
Next, change the firewall network rule collection action to Deny to verify that the firewall rules work as expected.
- Open the FW-Hybrid-Test resource group and select the Pol-Net01 firewall policy.
- Under Settings, select Rule Collections.
- Select the RCNet01 rule collection.
- For Rule collection action, select Deny.
- Select Save.
Close any existing remote desktops and browsers on VM-Onprem before testing the changed rules. After the rule collection update is complete, run the tests again. They should all fail to connect this time.
Clean up resources
You can keep your firewall resources for further investigation, or if no longer needed, delete the FW-Hybrid-Test resource group to delete all firewall-related resources.
Next steps
Feedback
Coming soon: Throughout 2024 we will be phasing out GitHub Issues as the feedback mechanism for content and replacing it with a new feedback system. For more information see: https://aka.ms/ContentUserFeedback.
Submit and view feedback for