Migrate to Azure Firewall Premium
You can migrate Azure Firewall Standard to Azure Firewall Premium to take advantage of the new Premium capabilities. For more information about Azure Firewall Premium features, see Azure Firewall Premium features.
This article guides you with the required steps to manually migrate your Standard firewall and policy to Premium.
Tip
The easiest way to change your Azure Firewall SKU with no downtime is to use the Change SKU feature. For more information, see Azure Firewall easy upgrade/downgrade.
Before you start the migration, understand the performance considerations and plan ahead for the required maintenance window. Typical down time of 20-30 minutes is expected.
The following general steps are required for a successful migration:
- Create new Premium policy based on your existing Standard policy or classic rules. By the end of this step your new premium policy will include all your existing rules and policy settings.
- Migrate Azure Firewall from Standard to Premium using stop/start.
- Attach the newly created Premium policy to your Premium Firewall.
Important
Upgrading a Standard Firewall deployed in Southeast Asia with Availability Zones is not currently supported.
If you use Terraform to deploy the Azure Firewall, you can use Terraform to migrate to Azure Firewall Premium. For more information, see Migrate Azure Firewall Standard to Premium using Terraform.
Performance considerations
Performance is a consideration when migrating from the standard SKU. IDPS and TLS inspection are compute intensive operations. The premium SKU uses a more powerful VM SKU, which scales to a higher throughput comparable with the standard SKU. For more information about Azure Firewall Performance, see Azure Firewall Performance
Microsoft recommends customers perform full-scale testing in their Azure deployment to ensure the firewall service performance meets your expectations.
Downtime
Migrate your firewall during a planned maintenance time, as there will be some downtime when you Migrate Azure Firewall from Standard to Premium using stop/start.
Migrate Classic rules to Standard policy
During your migration process, you may need to migrate your Classic firewall rules to a Standard policy. You can do this using the Azure portal:
From the Azure portal, select your standard firewall. On the Overview page, select Migrate to firewall policy.
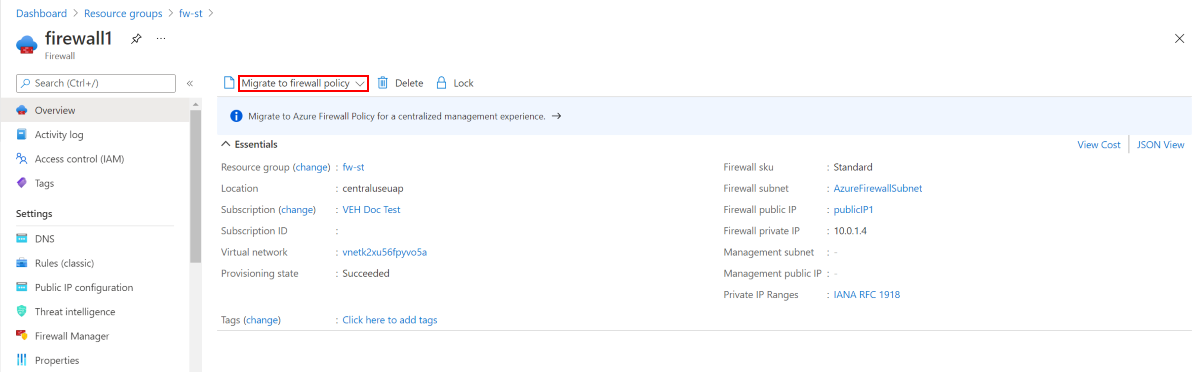
On the Migrate to firewall policy page, select Review + create.
Select Create.
The deployment takes a few minutes to complete.
You can also migrate existing Classic rules from Azure Firewall using Azure PowerShell to create policies. For more information, see Migrate Azure Firewall configurations to Azure Firewall policy using PowerShell
Migrate an existing policy using Azure PowerShell
Transform-Policy.ps1 is an Azure PowerShell script that creates a new Premium policy from an existing Standard policy.
Given a standard firewall policy ID, the script transforms it to a Premium Azure firewall policy. The script first connects to your Azure account, pulls the policy, transforms/adds various parameters, and then uploads a new Premium policy. The new premium policy is named <previous_policy_name>_premium. If it's a child policy transformation, a link to the parent policy will remain.
Usage example:
Transform-Policy -PolicyId /subscriptions/XXXXX-XXXXXX-XXXXX/resourceGroups/some-resource-group/providers/Microsoft.Network/firewallPolicies/policy-name
Important
The script doesn't migrate Threat Intelligence and SNAT private ranges settings. You'll need to note those settings before proceeding and migrate them manually. Otherwise, you might encounter inconsistent traffic filtering with your new upgraded firewall.
This script requires the latest Azure PowerShell. Run Get-Module -ListAvailable Az to see which versions are installed. If you need to install, see Install Azure PowerShell module.
<#
    .SYNOPSIS
        Given an Azure firewall policy id the script will transform it to a Premium Azure firewall policy.
        The script will first pull the policy, transform/add various parameters and then upload a new premium policy.
        The created policy will be named <previous_policy_name>_premium if no new name provided else new policy will be named as the parameter passed.
    .Example
        Transform-Policy -PolicyId /subscriptions/XXXXX-XXXXXX-XXXXX/resourceGroups/some-resource-group/providers/Microsoft.Network/firewallPolicies/policy-name -NewPolicyName <optional param for the new policy name>
#>

param (
    #Resource id of the azure firewall policy.
    [Parameter(Mandatory=$true)]
    [string]
    $PolicyId,

    #new filewallpolicy name, if not specified will be the previous name with the '_premium' suffix
    [Parameter(Mandatory=$false)]
    [string]
    $NewPolicyName = ""
)
$ErrorActionPreference = "Stop"
$script:PolicyId = $PolicyId
$script:PolicyName = $NewPolicyName

function ValidatePolicy {
    [CmdletBinding()]
    param (
        [Parameter(Mandatory=$true)]
        [Object]
        $Policy
    )

    Write-Host "Validating resource is as expected"

    if ($null -eq $Policy) {
        Write-Error "Received null policy"
        exit(1)
    }
    if ($Policy.GetType().Name -ne "PSAzureFirewallPolicy") {
        Write-Error "Resource must be of type Microsoft.Network/firewallPolicies"
        exit(1)
    }

    if ($Policy.Sku.Tier -eq "Premium") {
        Write-Host "Policy is already premium" -ForegroundColor Green
        exit(1)
    }
}

function GetPolicyNewName {
    [CmdletBinding()]
    param (
        [Parameter(Mandatory=$true)]
        [Microsoft.Azure.Commands.Network.Models.PSAzureFirewallPolicy]
        $Policy
    )

    if (-not [string]::IsNullOrEmpty($script:PolicyName)) {
        return $script:PolicyName
    }

    return $Policy.Name + "_premium"
}

function TransformPolicyToPremium {
    [CmdletBinding()]
    param (
        [Parameter(Mandatory=$true)]
        [Microsoft.Azure.Commands.Network.Models.PSAzureFirewallPolicy]
        $Policy
    )
    $NewPolicyParameters = @{
                        Name = (GetPolicyNewName -Policy $Policy)
                        ResourceGroupName = $Policy.ResourceGroupName
                        Location = $Policy.Location
                        BasePolicy = $Policy.BasePolicy.Id
                        ThreatIntelMode = $Policy.ThreatIntelMode
                        ThreatIntelWhitelist = $Policy.ThreatIntelWhitelist
                        PrivateRange = $Policy.PrivateRange
                        DnsSetting = $Policy.DnsSettings
                        SqlSetting = $Policy.SqlSetting
                        ExplicitProxy  = $Policy.ExplicitProxy
                        DefaultProfile  = $Policy.DefaultProfile
                        Tag = $Policy.Tag
                        SkuTier = "Premium"
    }

    Write-Host "Creating new policy"
    $premiumPolicy = New-AzFirewallPolicy @NewPolicyParameters

    Write-Host "Populating rules in new policy"
    foreach ($ruleCollectionGroup in $Policy.RuleCollectionGroups) {
        $ruleResource = Get-AzResource -ResourceId $ruleCollectionGroup.Id
        $ruleToTransfom = Get-AzFirewallPolicyRuleCollectionGroup -AzureFirewallPolicy $Policy -Name $ruleResource.Name
        $ruleCollectionGroup = @{
            FirewallPolicyObject = $premiumPolicy
            Priority = $ruleToTransfom.Properties.Priority
            Name = $ruleToTransfom.Name
        }

        if ($ruleToTransfom.Properties.RuleCollection.Count) {
            $ruleCollectionGroup["RuleCollection"] = $ruleToTransfom.Properties.RuleCollection
        }

        Set-AzFirewallPolicyRuleCollectionGroup @ruleCollectionGroup
    }
}

function ValidateAzNetworkModuleExists {
    Write-Host "Validating needed module exists"
    $networkModule = Get-InstalledModule -Name "Az.Network" -MinimumVersion 4.5 -ErrorAction SilentlyContinue
    if ($null -eq $networkModule) {
        Write-Host "Please install Az.Network module version 4.5.0 or higher, see instructions: https://github.com/Azure/azure-powershell#installation"
        exit(1)
    }
    $resourceModule = Get-InstalledModule -Name "Az.Resources" -MinimumVersion 4.2 -ErrorAction SilentlyContinue
    if ($null -eq $resourceModule) {
        Write-Host "Please install Az.Resources module version 4.2.0 or higher, see instructions: https://github.com/Azure/azure-powershell#installation"
        exit(1)
    }
    Import-Module Az.Network -MinimumVersion 4.5.0
    Import-Module Az.Resources -MinimumVersion 4.2.0
}

ValidateAzNetworkModuleExists
$policy = Get-AzFirewallPolicy -ResourceId $script:PolicyId
ValidatePolicy -Policy $policy
TransformPolicyToPremium -Policy $policy
Migrate Azure Firewall using stop/start
If you use Azure Firewall Standard SKU with firewall policy, you can use the Allocate/Deallocate method to migrate your Firewall SKU to Premium. This migration approach is supported on both VNet Hub and Secure Hub Firewalls. When you migrate a Secure Hub deployment, it will preserve the firewall public IP address.
The minimum Azure PowerShell version requirement is 6.5.0. For more information, see Az 6.5.0.
Migrate a VNET Hub Firewall
Deallocate the Standard Firewall
$azfw = Get-AzFirewall -Name "<firewall-name>" -ResourceGroupName "<resource-group-name>"
$azfw.Deallocate()
Set-AzFirewall -AzureFirewall $azfw
Allocate Firewall Premium (single public IP address)
$azfw = Get-AzFirewall -Name "<firewall-name>" -ResourceGroupName "<resource-group-name>"
$azfw.Sku.Tier="Premium"
$vnet = Get-AzVirtualNetwork -ResourceGroupName "<resource-group-name>" -Name "<Virtual-Network-Name>"
$publicip = Get-AzPublicIpAddress -Name "<Firewall-PublicIP-name>" -ResourceGroupName "<resource-group-name>"
$azfw.Allocate($vnet,$publicip)
Set-AzFirewall -AzureFirewall $azfw
Allocate Firewall Premium (multiple public IP addresses)
$azfw = Get-AzFirewall -Name "FW Name" -ResourceGroupName "RG Name"
$azfw.Sku.Tier="Premium"
$vnet = Get-AzVirtualNetwork -ResourceGroupName "RG Name" -Name "VNet Name"
$publicip1 = Get-AzPublicIpAddress -Name "Public IP1 Name" -ResourceGroupName "RG Name"
$publicip2 = Get-AzPublicIpAddress -Name "Public IP2 Name" -ResourceGroupName "RG Name"
$azfw.Allocate($vnet,@($publicip1,$publicip2))
Set-AzFirewall -AzureFirewall $azfw
Allocate Firewall Premium in Forced Tunnel Mode
$azfw = Get-AzFirewall -Name "<firewall-name>" -ResourceGroupName "<resource-group-name>"
$azfw.Sku.Tier="Premium"
$vnet = Get-AzVirtualNetwork -ResourceGroupName "<resource-group-name>" -Name "<Virtual-Network-Name>"
$publicip = Get-AzPublicIpAddress -Name "<Firewall-PublicIP-name>" -ResourceGroupName "<resource-group-name>"
$mgmtPip = Get-AzPublicIpAddress -ResourceGroupName "<resource-group-name>"-Name "<Management-PublicIP-name>"
$azfw.Allocate($vnet,$publicip,$mgmtPip)
Set-AzFirewall -AzureFirewall $azfw
Migrate a Secure Hub Firewall
Deallocate the Standard Firewall
$azfw = Get-AzFirewall -Name "<firewall-name>" -ResourceGroupName "<resource-group-name>"
$azfw.Deallocate()
Set-AzFirewall -AzureFirewall $azfw
Allocate Firewall Premium
$azfw = Get-AzFirewall -Name "<firewall-name>" -ResourceGroupName "<resource-group-name>"
$hub = get-azvirtualhub -ResourceGroupName "<resource-group-name>" -name "<vWANhub-name>"
$azfw.Sku.Tier="Premium"
$azfw.Allocate($hub.id)
Set-AzFirewall -AzureFirewall $azfw
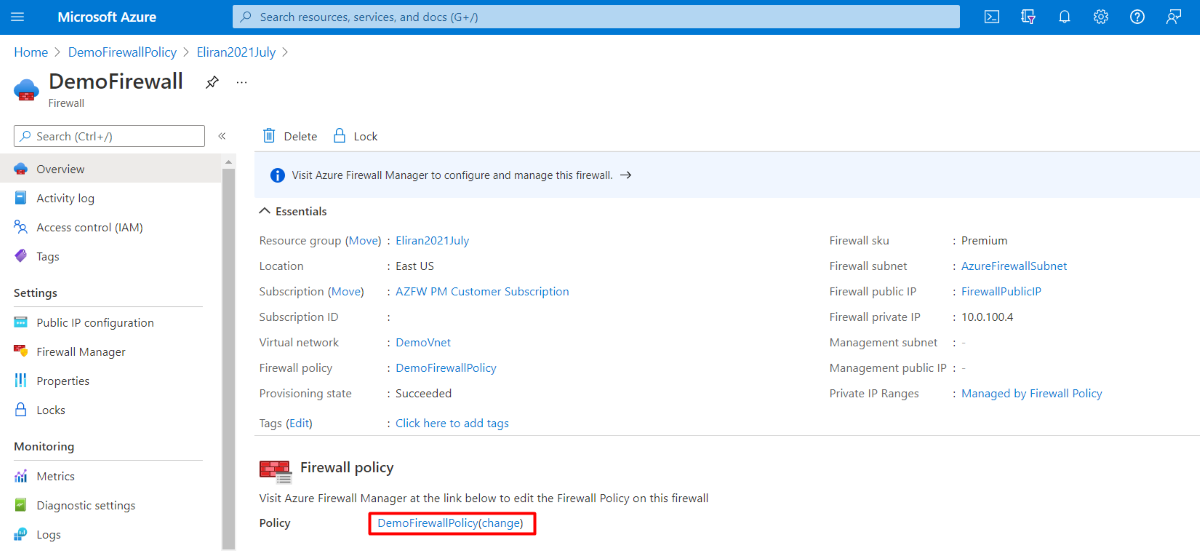
Attach a Premium policy to a Premium Firewall
You can attach a Premium policy to the new Premium Firewall using the Azure portal:
Next steps
Feedback
Coming soon: Throughout 2024 we will be phasing out GitHub Issues as the feedback mechanism for content and replacing it with a new feedback system. For more information see: https://aka.ms/ContentUserFeedback.
Submit and view feedback for