Quickstart: Create a Front Door Standard/Premium using Bicep
This quickstart describes how to use Bicep to create an Azure Front Door Standard/Premium with a Web App as origin.
Note
For web workloads, we highly recommend utilizing Azure DDoS protection and a web application firewall to safeguard against emerging DDoS attacks. Another option is to employ Azure Front Door along with a web application firewall. Azure Front Door offers platform-level protection against network-level DDoS attacks. For more information, see security baseline for Azure services.
Bicep is a domain-specific language (DSL) that uses declarative syntax to deploy Azure resources. It provides concise syntax, reliable type safety, and support for code reuse. Bicep offers the best authoring experience for your infrastructure-as-code solutions in Azure.
Prerequisites
- If you don't have an Azure subscription, create a free account before you begin.
- IP or FQDN of a website or web application.
Review the Bicep file
The Bicep file used in this quickstart is from Azure Quickstart Templates.
In this quickstart, you create a Front Door Standard/Premium, an App Service, and configure the App Service to validate that traffic comes through the Front Door origin.
@description('The location into which regionally scoped resources should be deployed. Note that Front Door is a global resource.')
param location string = resourceGroup().location

@description('The name of the App Service application to create. This must be globally unique.')
param appName string = 'myapp-${uniqueString(resourceGroup().id)}'

@description('The name of the SKU to use when creating the App Service plan.')
param appServicePlanSkuName string = 'S1'

@description('The number of worker instances of your App Service plan that should be provisioned.')
param appServicePlanCapacity int = 1

@description('The name of the Front Door endpoint to create. This must be globally unique.')
param frontDoorEndpointName string = 'afd-${uniqueString(resourceGroup().id)}'

@description('The name of the SKU to use when creating the Front Door profile.')
@allowed([
  'Standard_AzureFrontDoor'
  'Premium_AzureFrontDoor'
])
param frontDoorSkuName string = 'Standard_AzureFrontDoor'

var appServicePlanName = 'AppServicePlan'

var frontDoorProfileName = 'MyFrontDoor'
var frontDoorOriginGroupName = 'MyOriginGroup'
var frontDoorOriginName = 'MyAppServiceOrigin'
var frontDoorRouteName = 'MyRoute'

resource frontDoorProfile 'Microsoft.Cdn/profiles@2021-06-01' = {
  name: frontDoorProfileName
  location: 'global'
  sku: {
    name: frontDoorSkuName
  }
}

resource appServicePlan 'Microsoft.Web/serverFarms@2020-06-01' = {
  name: appServicePlanName
  location: location
  sku: {
    name: appServicePlanSkuName
    capacity: appServicePlanCapacity
  }
  kind: 'app'
}

resource app 'Microsoft.Web/sites@2020-06-01' = {
  name: appName
  location: location
  kind: 'app'
  identity: {
    type: 'SystemAssigned'
  }
  properties: {
    serverFarmId: appServicePlan.id
    httpsOnly: true
    siteConfig: {
      detailedErrorLoggingEnabled: true
      httpLoggingEnabled: true
      requestTracingEnabled: true
      ftpsState: 'Disabled'
      minTlsVersion: '1.2'
      ipSecurityRestrictions: [
        {
          tag: 'ServiceTag'
          ipAddress: 'AzureFrontDoor.Backend'
          action: 'Allow'
          priority: 100
          headers: {
            'x-azure-fdid': [
              frontDoorProfile.properties.frontDoorId
            ]
          }
          name: 'Allow traffic from Front Door'
        }
      ]
    }
  }
}

resource frontDoorEndpoint 'Microsoft.Cdn/profiles/afdEndpoints@2021-06-01' = {
  name: frontDoorEndpointName
  parent: frontDoorProfile
  location: 'global'
  properties: {
    enabledState: 'Enabled'
  }
}

resource frontDoorOriginGroup 'Microsoft.Cdn/profiles/originGroups@2021-06-01' = {
  name: frontDoorOriginGroupName
  parent: frontDoorProfile
  properties: {
    loadBalancingSettings: {
      sampleSize: 4
      successfulSamplesRequired: 3
    }
    healthProbeSettings: {
      probePath: '/'
      probeRequestType: 'HEAD'
      probeProtocol: 'Http'
      probeIntervalInSeconds: 100
    }
  }
}

resource frontDoorOrigin 'Microsoft.Cdn/profiles/originGroups/origins@2021-06-01' = {
  name: frontDoorOriginName
  parent: frontDoorOriginGroup
  properties: {
    hostName: app.properties.defaultHostName
    httpPort: 80
    httpsPort: 443
    originHostHeader: app.properties.defaultHostName
    priority: 1
    weight: 1000
  }
}

resource frontDoorRoute 'Microsoft.Cdn/profiles/afdEndpoints/routes@2021-06-01' = {
  name: frontDoorRouteName
  parent: frontDoorEndpoint
  dependsOn: [
    frontDoorOrigin // This explicit dependency is required to ensure that the origin group is not empty when the route is created.
  ]
  properties: {
    originGroup: {
      id: frontDoorOriginGroup.id
    }
    supportedProtocols: [
      'Http'
      'Https'
    ]
    patternsToMatch: [
      '/*'
    ]
    forwardingProtocol: 'HttpsOnly'
    linkToDefaultDomain: 'Enabled'
    httpsRedirect: 'Enabled'
  }
}

output appServiceHostName string = app.properties.defaultHostName
output frontDoorEndpointHostName string = frontDoorEndpoint.properties.hostName
Multiple Azure resources are defined in the Bicep file:
- Microsoft.Cdn/profiles (Azure Front Door Standard/Premium profile)
- Microsoft.Web/serverfarms (App service plan to host web apps)
- Microsoft.Web/sites (Web app origin servicing request for Front Door)
Deploy the Bicep file
Save the Bicep file as main.bicep to your local computer.
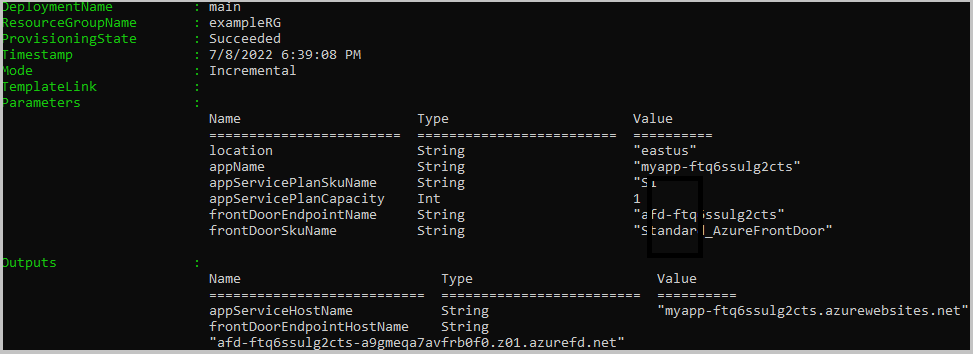
Deploy the Bicep file using either Azure CLI or Azure PowerShell.
az group create --name exampleRG --location eastus az deployment group create --resource-group exampleRG --template-file main.bicepWhen the deployment finishes, the output is similar to:
Validate the deployment
Use Azure CLI or Azure PowerShell to list the deployed resources in the resource group.
az resource list --resource-group exampleRG
You can also use the Azure portal to validate the deployment.
Sign in to the Azure portal.
Select Resource groups from the left pane.
Select the resource group that you created in the previous section.
Select the Front Door you created and you're able to see the endpoint hostname. Copy the hostname and paste it on to the address bar of a browser. Press enter and your requests automatically get routed to the web app.

Clean up resources
When no longer needed, use the Azure portal, Azure CLI, or Azure PowerShell to delete the Front Door service and the resource group. The Front Door and all the related resources are removed.
az group delete --name exampleRG
Next steps
In this quickstart, you created a:
- Front Door
- App Service plan
- Web App
To learn how to add a custom domain to your Front Door, continue to the Front Door tutorials.
Feedback
Coming soon: Throughout 2024 we will be phasing out GitHub Issues as the feedback mechanism for content and replacing it with a new feedback system. For more information see: https://aka.ms/ContentUserFeedback.
Submit and view feedback for