Tutorial: Add and customize delivery rules for Azure Front Door Standard/Premium (Preview) with Azure CLI
Azure Front Door Standard/Premium (Preview) is a fast and secure modern cloud CDN. Azure Front Door uses the Microsoft global edge network and integrates with intelligent threat protection. Azure Front Door Standard focuses on content delivery. Azure Front Door Premium adds extensive security capabilities and customization. This tutorial focuses on creating an Azure Front Door profile, then adding delivery rules for more granular control over your web app behaviors.
Note
This documentation is for Azure Front Door Standard/Premium (Preview). Looking for information on Azure Front Door? View Azure Front Door Docs.
In this tutorial, you'll learn how to:
- Create an Azure Front Door profile.
- Create two instances of a web app.
- Create a new security policy.
- Verify connectivity to your web apps.
- Create a rule set.
- Create a rule and add it to the rule set.
- Add actions or conditions to your rules.
If you don't have an Azure subscription, create an Azure free account before you begin.
Prerequisites
Use the Bash environment in Azure Cloud Shell. For more information, see Quickstart for Bash in Azure Cloud Shell.

If you prefer to run CLI reference commands locally, install the Azure CLI. If you're running on Windows or macOS, consider running Azure CLI in a Docker container. For more information, see How to run the Azure CLI in a Docker container.
If you're using a local installation, sign in to the Azure CLI by using the az login command. To finish the authentication process, follow the steps displayed in your terminal. For other sign-in options, see Sign in with the Azure CLI.
When you're prompted, install the Azure CLI extension on first use. For more information about extensions, see Use extensions with the Azure CLI.
Run az version to find the version and dependent libraries that are installed. To upgrade to the latest version, run az upgrade.
Create an Azure Front Door
Create a resource group
For this quickstart, you'll need two resource groups. One in Central US and the second in East US.
Run az group create to create resource groups.
az group create \
    --name myRGFDCentral \
    --location centralus

az group create \
    --name myRGFDEast \
    --location eastus
Create an Azure Front Door profile
Run az afd profile create to create an Azure Front Door profile.
az afd profile create \
    --profile-name contosoafd \
    --resource-group myRGFDCentral \
    --sku Premium_AzureFrontDoor \
    --subscription mysubscription
Create two instances of a web app
You need two instances of a web application that run in different Azure regions for this tutorial. Both the web application instances run in Active/Active mode, so either one can service traffic.
If you don't already have a web app, use the following script to set up two example web apps.
Create app service plans
Before you can create the web apps you'll need two app service plans, one in Central US and the second in East US.
Run az appservice plan create to create your app service plans.
az appservice plan create \
    --name myAppServicePlanCentralUS \
    --resource-group myRGFDCentral

az appservice plan create \
    --name myAppServicePlanEastUS \
    --resource-group myRGFDEast
Create web apps
Run az webapp create to create a web app in each of the app service plans in the previous step. Web app names have to be globally unique.
Run az webapp list-runtimes to see a list of built-in stacks for web apps.
az webapp create \
    --name WebAppContoso-001 \
    --resource-group myRGFDCentral \
    --plan myAppServicePlanCentralUS \
    --runtime "DOTNETCORE|2.1"

az webapp create \
    --name WebAppContoso-002 \
    --resource-group myRGFDEast \
    --plan myAppServicePlanEastUS \
    --runtime "DOTNETCORE|2.1"
Make note of the default host name of each web app so you can define the backend addresses when you deploy the Front Door in the next step.
Add an endpoint
Run az afd endpoint create to create an endpoint in your profile. You can create multiple endpoints in your profile after finishing the create experience.
az afd endpoint create \
    --resource-group myRGFDCentral \
    --endpoint-name contoso-frontend \
    --profile-name contosoafd \
    --origin-response-timeout-seconds 60 \
    --enabled-state Enabled
Create an origin group
Run az afd origin-group create to create an origin group that contains your two web apps.
az afd origin-group create \
    --resource-group myRGFDCentral \
    --origin-group-name og1 \
    --profile-name contosoafd \
    --probe-request-type GET \
    --probe-protocol Http \
    --probe-interval-in-seconds 120 \
    --probe-path /test1/azure.txt \
    --sample-size 4 \
    --successful-samples-required 3 \
    --additional-latency-in-milliseconds 50
Add origins to the group
Run az afd origin create to add an origin to your origin group.
az afd origin create \
    --resource-group myRGFDCentral \
    --host-name webappcontoso-1.azurewebsites.net
    --profile-name contosoafd \
    --origin-group-name og1 \
    --origin-name contoso1 \
    --origin-host-header webappcontoso-1.azurewebsites.net \
    --priority 1 \
    --weight 1000 \
    --enabled-state Enabled \
    --http-port 80 \
    --https-port 443
Repeat this step and add your second origin.
az afd origin create \
    --resource-group myRGFDCentral \
    --host-name webappcontoso-2.azurewebsites.net
    --profile-name contosoafd \
    --origin-group-name og1 \
    --origin-name contoso2 \
    --origin-host-header webappcontoso-2.azurewebsites.net \
    --priority 1 \
    --weight 1000 \
    --enabled-state Enabled \
    --http-port 80 \
    --https-port 443
Add a route
Run az afd route create to map your frontend endpoint to the origin group. This route forwards requests from the endpoint to og1.
az afd route create \
    --resource-group myRGFDCentral \
    --endpoint-name contoso-frontend \
    --profile-name contosoafd \
    --route-name route1 \
    --https-redirect Enabled \
    --origin-group og1 \
    --supported-protocols Https \
    --link-to-default-domain Enabled \
    --forwarding-protocol MatchRequest
Create a new security policy
Create a WAF policy
Run az network front-door waf-policy create to create a WAF policy for one of your resource groups.
Create a new WAF policy for your Front Door. This example creates a policy that's enabled and in prevention mode.
az network front-door waf-policy create
    --name contosoWAF /
    --resource-group myRGFDCentral /
    --sku Premium_AzureFrontDoor
    --disabled false /
    --mode Prevention
Note
If you select Detection mode, your WAF doesn't block any requests.
Create the security policy
Run az afd security-policy create to apply your WAF policy to the endpoint's default domain.
az afd security-policy create \
    --resource-group myRGFDCentral \
    --profile-name contosoafd \
    --security-policy-name contososecurity \
    --domains /subscriptions/mysubscription/resourcegroups/myRGFDCentral/providers/Microsoft.Cdn/profiles/contosoafd/afdEndpoints/contoso-frontend.z01.azurefd.net \
    --waf-policy /subscriptions/mysubscription/resourcegroups/myRGFDCentral/providers/Microsoft.Network/frontdoorwebapplicationfirewallpolicies/contosoWAF
Verify Azure Front Door
When you create the Azure Front Door Standard/Premium profile, it takes a few minutes for the configuration to be deployed globally. Once completed, you can access the frontend host you created. In a browser, go to contoso-frontend.z01.azurefd.net. Your request will automatically get routed to the nearest server from the specified servers in the origin group.
To test instant global failover, we'll use the following steps:
Open a browser, as described above, and go to the frontend address:
contoso-frontend.azurefd.net.In the Azure portal, search for and select App services. Scroll down to find one of your web apps, WebAppContoso-1 in this example.
Select your web app, and then select Stop, and Yes to verify.
Refresh your browser. You should see the same information page.
Tip
There is a little bit of delay for these actions. You might need to refresh again.
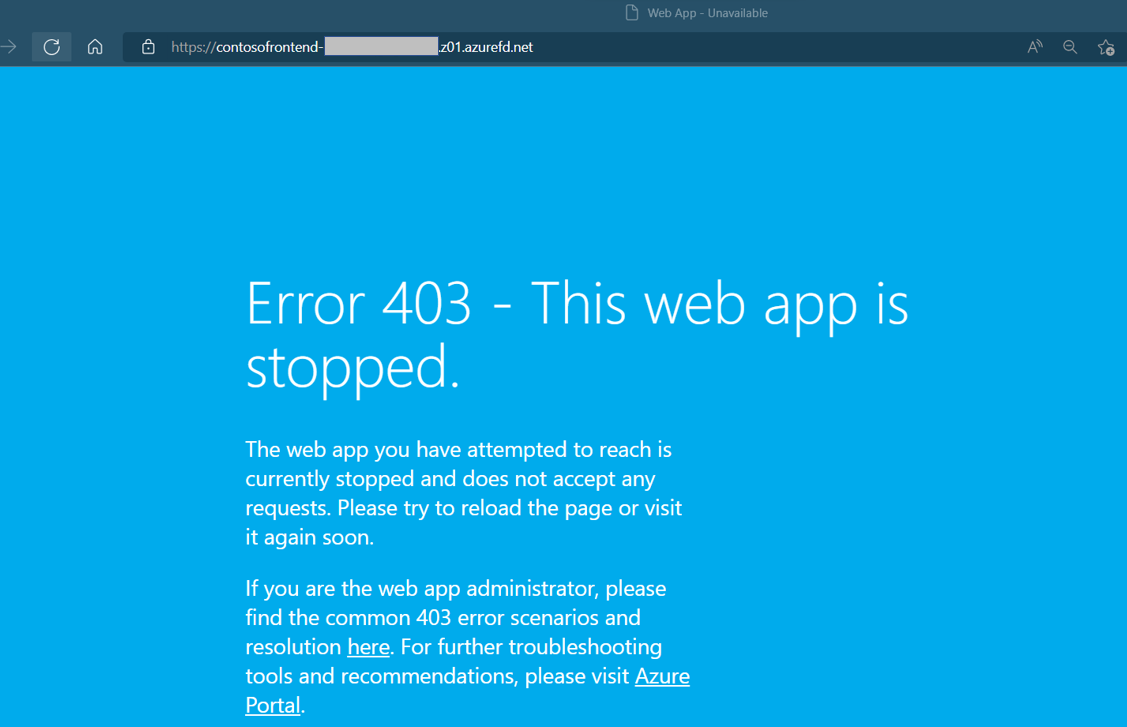
Find the other web app, and stop it as well.
Refresh your browser. This time, you should see an error message.
Create a rule set
Create a rule set to customize how HTTP requests are handled at the edge. Delivery rules added to the rule set provide more control over your web application behaviors. Run az afd rule-set create to create a rule set in your Azure Front Door profile.
az afd rule-set create \
    --profile-name contosoafd \
    --resource-group myRGFDCentral \
    --rule-set-name contosorules
Create a delivery rule and add it to your rule set
Create a new delivery rule within your rule set. Run az afd rule create to create a delivery rule in your rule set. For this example, we'll create a rule for an http to https redirect.
az afd rule create \
    --resource-group myRGFDCentral \
    --rule-set-name contosorules \
    --profile-name contosoafd \
    --order 1 \
    --match-variable RequestScheme \
    --operator Equal \
    --match-values HTTP \
    --rule-name "redirect" \
    --action-name "UrlRedirect" \
    --redirect-protocol Https \
    --redirect-type Moved
Add an action or condition to your delivery rule
You might find that you need to further customize your new delivery rule. You can add actions or conditions as needed after creation. Run az afd rule action add or az afd rule condition add to update your rule.
Add an action
az afd rule action add \
    --resource-group myRGFDCentral \
    --rule-set-name contosorules \
    --profile-name contosoafd \
    --rule-name redirect \
    --action-name "CacheExpiration" \
    --cache-behavior BypassCache
Add a condition
az afd rule condition add \
    --resource-group myRGFDCentral \
    --rule-set-name contosorules \
    --profile-name contosoafd \
    --rule-name redirect \
    --match-variable RemoteAddress \
    --operator GeoMatch \
    --match-values "TH"
Clean up resources
When you don't need the resources for the Front Door, delete both resource groups. Deleting the resource groups also deletes the Front Door and all its related resources.
Run az group delete:
az group delete \
    --name myRGFDCentral

az group delete \
    --name myRGFDEast
Feedback
Coming soon: Throughout 2024 we will be phasing out GitHub Issues as the feedback mechanism for content and replacing it with a new feedback system. For more information see: https://aka.ms/ContentUserFeedback.
Submit and view feedback for