Use Azure Policy extension for Visual Studio Code
Applies to Azure Policy extension version 0.1.2 and newer
Learn how to use the Azure Policy extension for Visual Studio Code (VS Code) to look up aliases, review resources and policy definitions, export objects, and evaluate policy definitions. First, we'll describe how to install the Azure Policy extension in Visual Studio Code. Then we'll walk through how to look up aliases.
The Azure Policy extension for Visual Studio Code can be installed on Linux, macOS, and Windows.
Prerequisites
The following items are required for completing the steps in this article:
- An Azure subscription. If you don't have an Azure subscription, create a free account before you begin.
- Visual Studio Code.
Install and configure the Azure Policy extension
After you meet the prerequisites, you can install the Azure Policy extension for Visual Studio Code by following these steps:
- Open Visual Studio Code.
- From the menu bar, go to View > Extensions.
- In the search box, enter Azure Policy.
- Select Azure Policy from the search results, and then select Install.
- Select Reload when necessary.
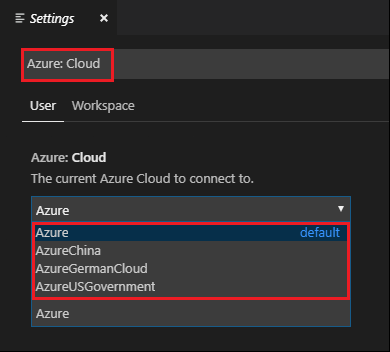
For a national cloud user, follow these steps to set the Azure environment first:
Select File > Preferences > Settings.
Search on the following string: Azure: Cloud
Select the nation cloud from the list:
Using the Policy extension
Note
Changes made locally to policy definitions viewed in the Azure Policy extension for Visual Studio Code aren't synced to Azure.
Connect to an Azure account
To evaluate resources and lookup aliases, you must connect to your Azure account. Follow these steps to connect to Azure from Visual Studio Code:
Sign in to Azure from the Azure Policy extension or the Command Palette.
Azure Policy extension
From the Azure Policy extension, select Sign in to Azure.

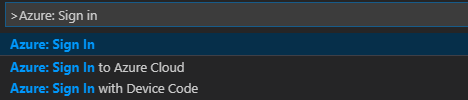
Command Palette
From the menu bar, go to View > Command Palette, and enter Azure: Sign In.
Follow the sign in instructions to sign in to Azure. After you're connected, your Azure account name is shown on the status bar at the bottom of the Visual Studio Code window.
Select subscriptions
When you first sign in, only the default subscription resources and policy definitions are loaded by the Azure Policy extension. To add or remove subscriptions from displaying resources and policy definitions, follow these steps:
Start the subscription command from the Command Palette or the window footer.
Command Palette
From the menu bar, go to View > Command Palette, and enter Azure: Select Subscriptions.
Window footer
In the window footer at the bottom of the screen, select the segment that matches Azure: <your account>.
Use the filter box to quickly find subscriptions by name. Then, check or remove the check from each subscription to set the subscriptions shown by the Azure Policy extension. When done adding or removing subscriptions to display, select OK.
Search for and view resources
The Azure Policy extension lists resources in the selected subscriptions by Resource Provider and by resource group in the Resources pane. The tree view includes the following groupings of resources within the selected subscription or at the subscription level:
- Resource Providers
- Each registered Resource Provider with resources and related child resources that have policy aliases
- Resource Groups
- All resources by the resource group they're in
By default, the extension filters the 'Resource Provider' portion by existing resources and resources that have policy aliases. Change this behavior in Settings > Extensions > Azure Policy to see all Resource Providers without filtering.
Customers with hundreds or thousands of resources in a single subscription may prefer a searchable way to locate their resources. The Azure Policy extension makes it possible to search for a specific resource with the following steps:
Start the search interface from the Azure Policy extension or the Command Palette.
Azure Policy extension
From the Azure Policy extension, hover over the Resources panel and select the ellipsis, then select Search Resources.
Command Palette
From the menu bar, go to View > Command Palette, and enter Azure Policy: Search Resources.
If more than one subscription is selected for display, use the filter to select which subscription to search.
Use the filter to select which resource group to search that is part of the previously chosen subscription.
Use the filter to select which resource to display. The filter works for both the resource name and the resource type.
Discover aliases for resource properties
When a resource is selected, whether through the search interface or by selecting it in the tree view, the Azure Policy extension opens the JavaScript Object Notation (JSON) file representing that resource and all its Azure Resource Manager property values.
Once a resource is open, hovering over the Resource Manager property name or value displays the
Azure Policy alias if one exists. In this example, the resource is a
Microsoft.Compute/virtualMachines resource type and the
properties.storageProfile.imageReference.offer property is hovered over. Hovering shows the
matching aliases.

Note
The VS Code extension only supports evaluation of Resource Manager mode properties. For more information about the modes, see the mode definitions.
Search for and view policy definitions and assignments
The Azure Policy extension lists policy types and policy assignments as a tree view for the subscriptions selected to be displayed in the Policies pane. Customers with hundreds or thousands of policy definitions or assignments in a single subscription may prefer a searchable way to locate their policy definitions or assignments. The Azure Policy extension makes it possible to search for a specific policy or assignment with the following steps:
Start the search interface from the Azure Policy extension or the Command Palette.
Azure Policy extension
From the Azure Policy extension, hover over the Policies panel and select the ellipsis, then select Search Policies.
Command Palette
From the menu bar, go to View > Command Palette, and enter Azure Policy: Search Policies.
If more than one subscription is selected for display, use the filter to select which subscription to search.
Use the filter to select which policy type or assignment to search that is part of the previously chosen subscription.
Use the filter to select which policy or to display. The filter works for displayName for the policy definition or policy assignment.
When selecting a policy or assignment, whether through the search interface or by selecting it in the tree view, the Azure Policy extension opens the JSON that represents the policy or assignment and all its Resource Manager property values. The extension can validate the opened Azure Policy JSON schema.
Export objects
Objects from your subscriptions can be exported to a local JSON file. In either the Resources or Policies pane, hover over or select an exportable object. At the end of the highlighted row, select the save icon and select a folder to save that resources JSON.
The following objects can be exported locally:
- Resources pane
- Resource groups
- Individual resources (either in a resource group or under a Resource Provider)
- Policies pane
- Policy assignments
- Built-in policy definitions
- Custom policy definitions
- Initiatives
On-demand evaluation scan
An evaluation scan can be started with the Azure Policy extension for Visual Studio Code. To start an evaluation, select and pin each of the following objects: a resource, a policy definition, and a policy assignment.
- To pin each object, find it in either the Resources pane or the Policies pane and select the pin to an edit tab icon. Pinning an object adds it to the Evaluation pane of the extension.
- In the Evaluation pane, select one of each object and use the select for evaluation icon to mark it as included in the evaluation.
- At the top of the Evaluation pane, select the run evaluation icon. A new pane in Visual Studio Code opens with the resulting evaluation details in JSON form.
Note
For AuditIfNotExists or DeployIfNotExists policy definitions, use the plus icon in the Evaluation pane or Azure Policy: Select a resource for existence check (only used for if-not-exists policies) from the Command Palette to select a related resource for the existence check.
The evaluation results provide information about the policy definition and policy assignment along with the policyEvaluations.evaluationResult property. The output looks similar to the following example:
{
    "policyEvaluations": [
        {
            "policyInfo": {
                ...
            },
            "evaluationResult": "Compliant",
            "effectDetails": {
                "policyEffect": "Audit",
                "existenceScope": "None"
            }
        }
    ]
}
Note
The VS Code extension only supports evaluation of Resource Manager mode properties. For more information about the modes, see the mode definitions.
The evaluation feature does not work on macOS and Linux installations of the extension.
Create policy definition from a constraint template or mutation template
The VS Code extension can create a policy definition from an existing Open Policy Agent (OPA) GateKeeper v3 constraint template or an existing mutation template. The YAML Ain't Markup Language (YAML) file must be open in VS Code for the Command Palette to be an option.
Open a valid OPA GateKeeper v3 constraint template YAML file.
From the menu bar, go to View > Command Palette, and enter Azure Policy for Kubernetes: Create Policy Definition from Constraint Template Or Mutation.
Select the appropriate sourceType value.
Fill in the
/* EDIT HERE */portions of the policy definition JSON.
While the extension generates the JSON of a policy definition, it doesn't create the definition in Azure. Once you've filled in the appropriate "edit here" fields, use the completed policy definition JSON and the Azure portal or supported SDK to create the policy definition within your Azure environment.
Sign out
From the menu bar, go to View > Command Palette, and then enter Azure: Sign Out.
Next steps
- Review examples at Azure Policy samples.
- Study the Azure Policy definition structure.
- Read Understanding policy effects.
- Understand how to programmatically create policy definitions.
- Learn how to remediate non-compliant resources.
- Grasp what a management group is with Organize your resources with Azure management groups.
Feedback
Coming soon: Throughout 2024 we will be phasing out GitHub Issues as the feedback mechanism for content and replacing it with a new feedback system. For more information see: https://aka.ms/ContentUserFeedback.
Submit and view feedback for