Connect HDInsight Kafka cluster with client VM in different VNet
This article describes the steps to set up the connectivity between a virtual machine (VM) and HDInsight Kafka cluster residing in two different virtual networks (VNet).
Connect HDInsight Kafka cluster with client VM in different VNet
Create two different virtual networks where HDInsight Kafka cluster and VM are hosted respectively. For more information, see Create a virtual network using Azure portal.
Peer these two virtual networks, so that IP addresses of their subnets must not overlap with each other. For more information, see Connect virtual networks with virtual network peering using the Azure portal.
Ensure that the peering status shows as connected.

Create HDInsight Kafka cluster in first VNet
hdi-primary-vnet. For more information, see Create an HDInsight Kafka cluster.Create a virtual machine (VM) in the second VNet
hilo-secondary-vnet. While creating the VM, specify the second VNet name where this virtual machine must be deployed. For more information, see Create a Linux virtual machine in the Azure portal.Note
IPs of Kafka VMs never change if VM is present in cluster. Only when you manually replace VM from the cluster then, that IP changes. You can check the latest IPs from Ambari portal.

Methods to connect to HDInsight Kafka cluster from client VM
- Configure Kafka for IP advertising: Use
Kafka IP advertisingto populate Kafka worker node private IPs in different vnet. Once IP advertising is done, use private DNS setup for DNS resolution of worker nodes FQDN. - Update /etc/hosts file in client machine: Update
/etc/hostsfile in client machine with/etc/hostsfile of Kafka Head/Worker node.
Note
- Private DNS setup is optional after IP advertising. This is required only when you want to use FQDN of Kafka worker nodes with private DNS domain name instead of private IPs.
- IPs of Kafka VMs never change if VM is present in cluster. Only when you manually replace VM from the cluster then, that IP changes. You can check the latest IPs from Ambari portal.
Configure Kafka for IP advertising
This configuration allows the client to connect using broker IP addresses instead of domain names. By default, Apache Zookeeper returns the domain name of the Kafka brokers to clients.
This configuration doesn't work with the VPN software client, as it can't use name resolution for entities in the virtual network.
Use the following steps to configure HDInsight Kafka to advertise IP addresses instead of domain names:
Using a web browser, go to
https://CLUSTERNAME.azurehdinsight.net. ReplaceCLUSTERNAMEwith the HDInsight Kafka cluster name.When prompted, use the HTTPS
usernameandpasswordfor the cluster. The Ambari Web UI for the cluster is displayed.To view information on Kafka, select
Kafkafrom the left panel and then select configs.
To access
kafka-envconfiguration on the Ambari dashboard, just typekafka-envin the top right filter field in Ambari UI.
To configure Kafka to advertise IP addresses, add the following text to the bottom of the
kafka-env-templatefield:# Configure Kafka to advertise IP addresses instead of FQDN IP_ADDRESS=$(hostname -i) echo advertised.listeners=$IP_ADDRESS sed -i.bak -e '/advertised/{/advertised@/!d;}' /usr/hdp/current/kafka-broker/conf/server.properties echo "advertised.listeners=PLAINTEXT://$IP_ADDRESS:9092" >> /usr/hdp/current/kafka-broker/conf/server.propertiesTo configure the interface that Kafka listens on, enter
listenersin the filter field on the top right.To configure Kafka to listen on all network interfaces, change the value in the
listenersfield toPLAINTEXT://0.0.0.0:9092.To save the configuration changes, use the
Savebutton. Enter a text message describing the changes. SelectOKonce the changes have been saved.
To prevent errors when restarting Kafka, use the
Actionsbutton and selectTurn On Maintenance Mode. SelectOKto complete this operation.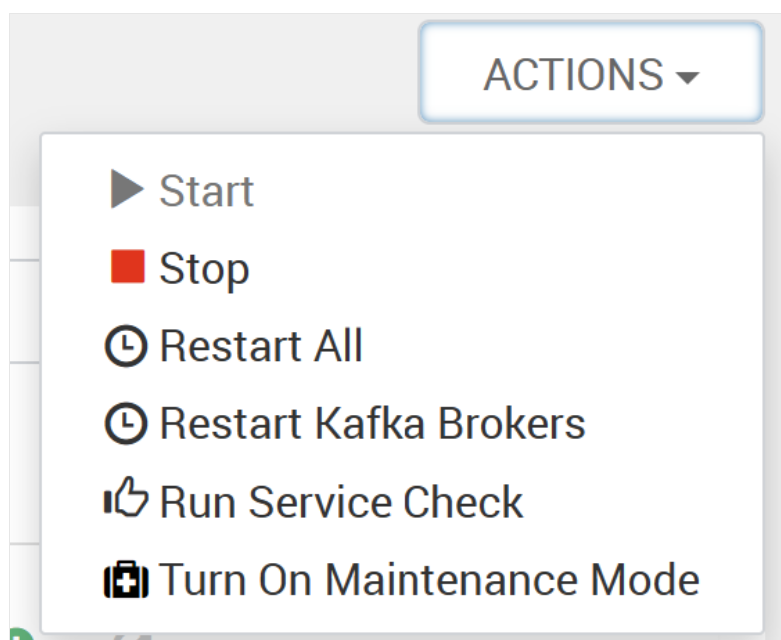
To restart Kafka, use the
Restartbutton and selectRestart All Affected. Confirm the restart, and then use theOKbutton after the operation has completed.
To disable maintenance mode, use the
Actionsbutton and selectTurn Off Maintenance Mode. SelectOKto complete this operation.Now you can execute your jobs from client VM with Kafka IP address. To check IP address of worker nodes from Ambari Portal click on
Hostson left panel.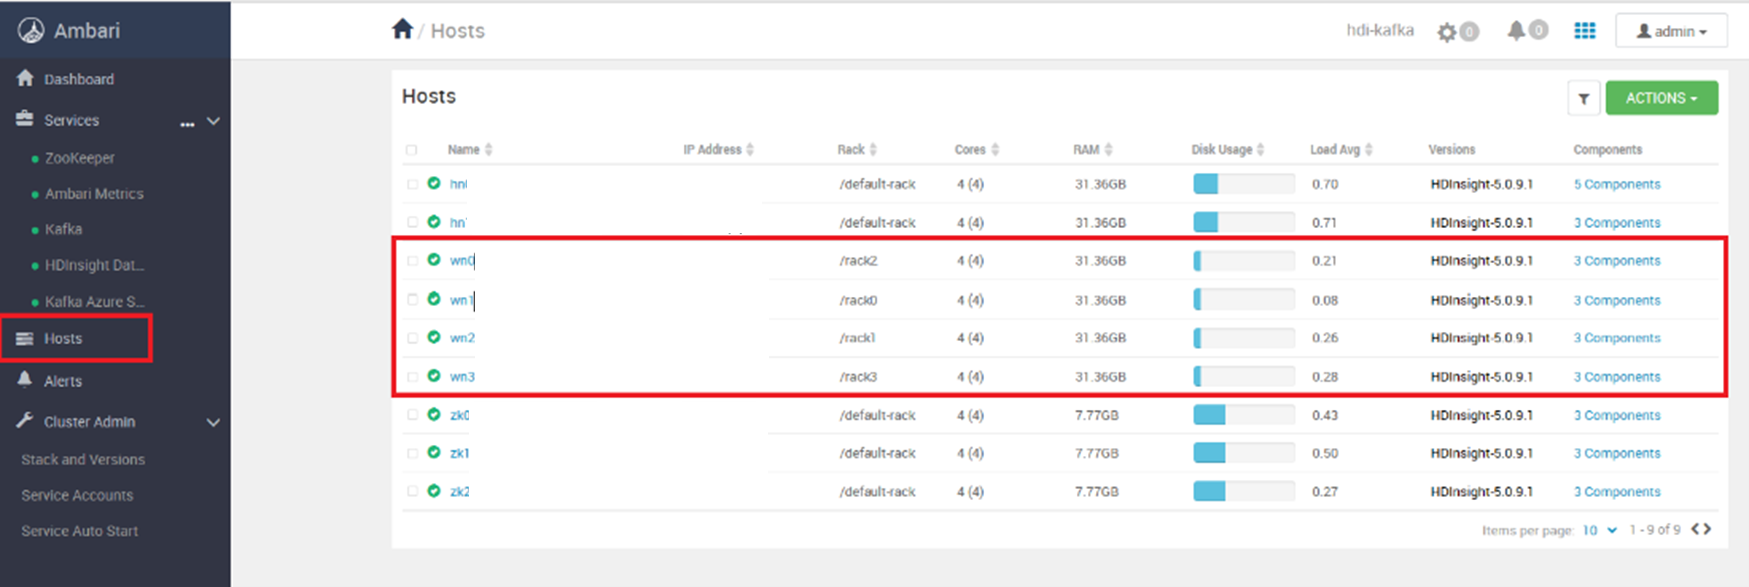
Use Sample git repository to create Kafka topics](https://github.com/Azure-Samples/hdinsight-kafka-java-get-started), to produce and consume data from that topic.
# In previous example IP of worker node 0 is `broker1-ip` and worker node 1 is `broker2-ip`
# Create Kafka Topic
java -jar kafka-producer-consumer.jar create <topic_name> $KAFKABROKERS
java -jar kafka-producer-consumer.jar create test broker1-ip:9092,broker1-ip:9092
# Produce Data in Topic
java -jar kafka-producer-consumer.jar producer <topic_name> $KAFKABROKERS
java -jar kafka-producer-consumer.jar producer test broker1-ip:9092, broker2-ip:9092
# Consume Data from Topic
java -jar kafka-producer-consumer.jar consumer <topic_name> $KAFKABROKERS
java -jar kafka-producer-consumer.jar consumer test broker1-ip:9092,broker2-ip:9092
Note
It is recommended to add all the brokers IP in $KAFKABROKERS for fault tolerance.


Update /etc/hosts file in client machine
Copy the highlighted worker nodes entries of the file
/etc/hostfrom Kafka headnode to Client VM.After these entries are made, try to reach the Kafka Ambari dashboard using the web browser or curl command using the hn0 or hn1 FQDN as:
If Client VM is using Linux OS
# Execute curl command
curl hn0-hdi-ka.mvml5coqo4xuzc1nckq1sltcxf.bx.internal.cloudapp.net:8080

# Output
<!--
* Licensed to the Apache Software Foundation (ASF) under one
* or more contributor license agreements.  See the NOTICE file
* distributed with this work for additional information
* regarding copyright ownership.  The ASF licenses this file
* to you under the Apache License, Version 2.0 (the
* "License"); you may not use this file except in compliance
* with the License.  You may obtain a copy of the License at
*
*     http://www.apache.org/licenses/LICENSE-2.0
*
* Unless required by applicable law or agreed to in writing, software
* distributed under the License is distributed on an "AS IS" BASIS,
* WITHOUT WARRANTIES OR CONDITIONS OF ANY KIND, either express or implied.
* See the License for the specific language governing permissions and
* limitations under the License.
-->
<!DOCTYPE html>
<html lang="en">
<head>
  <meta charset="utf-8">
  <meta http-equiv="X-UA-Compatible" content="IE=edge">
  <meta name="viewport" content="width=device-width, initial-scale=1.0">
  <link rel="stylesheet" href="stylesheets/vendor.css">
  <link rel="stylesheet" href="stylesheets/app.css">
  <script src="javascripts/vendor.js"></script>
  <script src="javascripts/app.js"></script>
  <script>
      $(document).ready(function() {
          require('initialize');
          // make favicon work in firefox
          $('link[type*=icon]').detach().appendTo('head');
          $('#loading').remove();
      });
  </script>
  <title>Ambari</title>
  <link rel="shortcut icon" href="/img/logo.png" type="image/x-icon">
</head>
<body>
    <div id="loading">...Loading...</div>
    <div id="wrapper">
    <!-- ApplicationView -->
    </div>
    <footer>
        <div class="container footer-links">
            <a data-qa="license-link" href="http://www.apache.org/licenses/LICENSE-2.0" target="_blank">Licensed under the Apache License, Version 2.0</a>.
            <a data-qa="third-party-link" href="/licenses/NOTICE.txt" target="_blank">See third-party tools/resources that Ambari uses and their respective authors</a>
         </div>
    </footer>
</body>
</html>
If Client VM is using Windows OS
Go to overview page of
hdi-kafkaand click on Ambari view to get the URL.Put the login credential as username
adminand passwordYOUR_PASSWORD, which you have set while creating cluster.Note
- In Windows VM, static hostnames need to be added in the host file which present in the path
C:\Windows\System32\drivers\etc\. - This article assumes that the Ambari server is active on
Head Node 0. If the Ambari server is active onHead Node 1use the FQDN of hn1 to access the Ambari UI.

- In Windows VM, static hostnames need to be added in the host file which present in the path
You can also send messages to kafka topic and read the topics from the VM. For that you can try to use this sample java application.
Use sample git repository to create Kafka topics, produce and consume data from that topic. For more information, see hdinsight-kafka-java-getting-started.
You can use FQDN, IP or short name(first six letters of cluster name) of brokers to pass as
KAFKABROKERSin the following commands.# In the previous example # IP of worker node 0 is `broker1-ip` and worker node 1 is `broker2-ip` # Short Name of worker node 0 is `wn0-hdi-ka` and worker node 1 is `wn1-hdi-ka` # FQDN of worker node 0 is `wn0-hdi-ka.mvml5coqo4xuzc1nckq1sltcxf.bx.internal.cloudapp.net` and worker node 1 is `wn1-hdi-ka.mvml5coqo4xuzc1nckq1sltcxf.bx.internal.cloudapp.net` # Create Kafka Topic java -jar kafka-producer-consumer.jar create <topic_name> $KAFKABROKERS java -jar kafka-producer-consumer.jar create test broker1-ip:9092,broker2-ip:9092 # Produce Data in Topic java -jar kafka-producer-consumer.jar producer <topic_name> $KAFKABROKERS java -jar kafka-producer-consumer.jar producer test wn0-hdi-ka:9092,wn1-hdi-ka:9092 # Consume Data from Topic java -jar kafka-producer-consumer.jar consumer <topic_name> $KAFKABROKERS java -jar kafka-producer-consumer.jar consumer test wn0-hdi-ka.mvml5coqo4xuzc1nckq1sltcxf.bx.internal.cloudapp.net:9092,wn1-hdi-ka.mvml5coqo4xuzc1nckq1sltcxf.bx.internal.cloudapp.net:9092

Note
It is recommended to add all the brokers IP, FQDN or short name in $KAFKABROKERS for fault tolerance.
Feedback
Coming soon: Throughout 2024 we will be phasing out GitHub Issues as the feedback mechanism for content and replacing it with a new feedback system. For more information see: https://aka.ms/ContentUserFeedback.
Submit and view feedback for