Tutorial: Create and deploy custom IoT Edge modules
Applies to: ![]() IoT Edge 1.1
IoT Edge 1.1
Important
IoT Edge 1.1 end of support date was December 13, 2022. Check the Microsoft Product Lifecycle for information about how this product, service, technology, or API is supported. For more information about updating to the latest version of IoT Edge, see Update IoT Edge.
In this article, we create three IoT Edge modules that receive messages from downstream IoT devices, run the data through your machine learning model, and then forward insights to IoT Hub.
IoT Edge hub facilitates module to module communication. Using the IoT Edge hub as a message broker keeps modules independent from each other. Modules only need to specify the inputs on which they accept messages and the outputs to which they write messages.
We want the IoT Edge device to accomplish four things for us:
- Receive data from the downstream devices.
- Predict the remaining useful life (RUL) for the device that sent the data.
- Send a message with the RUL for the device to IoT Hub. This function could be modified to send data only if the RUL drops below a specified level.
- Save the downstream device data to a local file on the IoT Edge device. This data file is periodically uploaded to IoT Hub to refine the training of the machine learning model. Using file upload instead of constant message streaming is more cost effective.
To accomplish these tasks, we use three custom modules:
RUL Classifier: The turboFanRulClassifier module we created in Train and deploy an Azure Machine Learning model is a standard machine learning module, which exposes an input called "amlInput" and an output called "amlOutput". The "amlInput" expects its input to look exactly like the input that we sent to the ACI-based web service. Likewise, "amlOutput" returns the same data as the web service.
Avro writer: This module receives messages on the "avroModuleInput" input and persists the message in Avro format to disk for later upload to IoT Hub.
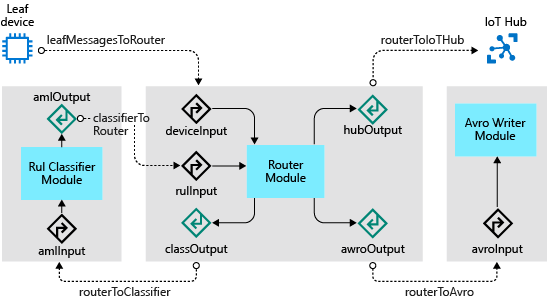
Router Module: The router module receives messages from downstream devices, then formats and sends the messages to the classifier. The module then receives the messages from the classifier and forwards the message onto the Avro writer module. Finally, the module sends just the RUL prediction to the IoT Hub.
Inputs:
- deviceInput: receives messages from downstream devices
- rulInput: receives messages from the "amlOutput"
Outputs:
- classify: sends messages to "amlInput"
- writeAvro: sends messages to "avroModuleInput"
- toIotHub: sends messages to $upstream, which passes the messages to the connected IoT Hub
The following diagram shows the modules, inputs, outputs, and the IoT Edge Hub routes for the full solution:
The steps in this article are typically performed by a cloud developer.
In this section of the tutorial, you learn how to:
- Create an IoT Edge module from custom code.
- Generate a Docker image from your custom module.
- Reconfigure IoT Hub routing to support your custom modules.
- Build, publish, and deploy your custom modules.
Prerequisites
This article is part of a series for a tutorial about using Azure Machine Learning on IoT Edge. Each article in the series builds on the work in the previous article. If you have arrived at this article directly, visit the first article in the series.
Create a new IoT Edge solution
During execution of the second of our two Azure Notebooks, we created and published a container image containing our RUL model. Azure Machine Learning, as part of the image creation process, packaged that model so that the image is deployable as an Azure IoT Edge module.
In this step, we are going to create an Azure IoT Edge solution using the "Azure Machine Learning" module and point the module to the image we published using Azure Notebooks.
Open a remote desktop session to your development VM.
Open folder C:\source\IoTEdgeAndMlSample in Visual Studio Code.
Right click on the explorer panel (in the blank space) and select New IoT Edge Solution.

Accept the default solution name EdgeSolution.
Choose Azure Machine Learning as the module template.
Name the module turbofanRulClassifier.
Choose your machine learning workspace. This workspace is the turboFanDemo workspace that you created in Tutorial: Train and deploy an Azure Machine Learning model
Select the image you created while running the Azure Notebook.
Look at the solution and notice the files that have been created:
deployment.template.json: This file contains the definition of each of the modules in the solution. There are three sections to pay attention to in this file:
Registry credentials: Defines the set of custom container registries you are using in your solution. Right now, it should contain the registry from your machine learning workspace, which is where your Azure Machine Learning image was stored. You can have any number of container registries, but for simplicity we will use this one registry for all modules.
"registryCredentials": {
  "<your registry>": {
    "username": "$CONTAINER_REGISTRY_USERNAME_<your registry>",
    "password": "$CONTAINER_REGISTRY_PASSWORD_<your registry>",
    "address": "<your registry>.azurecr.io"
  }
}
Modules: This section contains the set of user-defined modules that go with this solution. The turbofanRulClassifier module definition points to the image in your container registry. As we add more modules to the solution, they will show up in this section.
"modules": {
   "turbofanRulClassifier": {
     "version": "1.0",
     "type": "docker",
     "status": "running",
     "restartPolicy": "always",
     "settings": {
       "image": "turbofandemo2cd74296.azurecr.io/edgemlsample:1",
       "createOptions": {}
     }
   }
}
Routes: we will be working with routes quite a bit in this tutorial. Routes define how modules communicate with each other. The existing route defined by the template does not match with the routing we need. Delete the
turbofanRulClassifierToIoTHubroute."$edgeHub": { "properties.desired": { "schemaVersion": "1.0", "routes": { "turbofanRulClassifierToIoTHub": "FROM /messages/modules/turbofanRulClassifier/outputs/* INTO $upstream" }, "storeAndForwardConfiguration": { "timeToLiveSecs": 7200 } } }
deployment.debug.template.json: this file is the debug version of deployment.template.json. Typically, we should keep this file synchronized with the content of the deployment.template.json file but doing so is not required for this tutorial.
.env: this file is where you should supply the username and password for accessing your registry.
CONTAINER_REGISTRY_USERNAME_<your registry name>=<ACR username>
CONTAINER_REGISTRY_PASSWORD_<your registry name>=<ACR password>
Note
This tutorial uses admin login credentials for Azure Container Registry, which are convenient for development and test scenarios. When you're ready for production scenarios, we recommend a least-privilege authentication option like service principals. For more information, see Manage access to your container registry.
Right click on the deployment.template.json file in Visual Studio Code explorer and select Build IoT Edge Solution.
Notice that this command creates a config folder with a deployment.amd64.json file. This file is the concrete deployment template for the solution.
Add Router module
Next, we add the Router module to our solution. The Router module handles several responsibilities for our solution:
- Receive messages from downstream devices: as messages arrive to the IoT Edge device from downstream devices, the Router module receives the message and begins orchestrating the routing of the message.
- Send messages to the RUL Classifier module: when a new message is received from a downstream device, the Router module transforms the message to the format that the RUL Classifier expects. The Router sends the message to the RUL Classifier for a RUL prediction. Once the classifier has made a prediction, it sends the message back to the Router module.
- Send RUL messages to IoT Hub: when the Router receives messages from the classifier, it transforms the message to contain only the essential information, device ID and RUL, and sends the abbreviated message to the IoT hub. A further refinement, which we have not done here, would send messages to the IoT Hub only when the RUL prediction falls below a threshold (for example, when the RUL is fewer than 100 cycles). Filtering in this way would reduce volume of messages and reduce cost of the IoT hub.
- Send message to the Avro Writer module: to preserve all the data sent by the downstream device, the Router module sends the entire message received from the classifier to the Avro Writer module, which will persist and upload the data using IoT Hub file upload.
The Router module is an important piece of the solution that ensures messages are processed in the correct order.
Create the module and copy files
Right click on the modules folder in Visual Studio Code and choose Add IoT Edge Module.
Choose C# module for the module template.
Name the module turbofanRouter.
When prompted for your Docker Image Repository, use the registry from the machine learning workspace (you can find the registry in the registryCredentials node of your deployment.template.json file). This value is the fully qualified address to the registry, like <your registry>.azurecr.io/turbofanrouter.
Note
In this article, we use the Azure Container Registry that was created by the Azure Machine Learning workspace. This is purely for convenience. We could have created a new container registry and published our modules there.
In the Terminal using a command prompt shell, copy the files from the sample module into the solution.
copy c:\source\IoTEdgeAndMlSample\EdgeModules\modules\turbofanRouter\*.cs c:\source\IoTEdgeAndMlSample\EdgeSolution\modules\turbofanRouter\Accept the prompt to overwrite the program.cs file.
Build router module
In Visual Studio Code, select Terminal > Configure Default Build Task.
Select Create tasks.json file from template.
Select .NET Core.
Replace the contents of tasks.json with the following code.
{
  "version": "2.0.0",
  "tasks": [
    {
      "label": "build",
      "command": "dotnet",
      "type": "shell",
      "group": {
        "kind": "build",
        "isDefault": true
      },
      "args": [
        "build",
        "${workspaceFolder}/modules/turbofanRouter"
      ],
      "presentation": {
        "reveal": "always"
      },
      "problemMatcher": "$msCompile"
    }
  ]
}
Save and close tasks.json.
Run build with
Ctrl + Shift + Bor Terminal > Run Build Task.
Set up module routes
As mentioned above, the IoT Edge runtime uses routes configured in the deployment.template.json file to manage communication between loosely coupled modules. In this section, we drill into how to set up the routes for the turbofanRouter module. We will cover the input routes first and then move on the outputs.
Inputs
In the Init() method of Program.cs we register two callbacks for the module:
await ioTHubModuleClient.SetInputMessageHandlerAsync(EndpointNames.FromLeafDevice, LeafDeviceInputMessageHandler, ioTHubModuleClient);
await ioTHubModuleClient.SetInputMessageHandlerAsync(EndpointNames.FromClassifier, ClassifierCallbackMessageHandler, ioTHubModuleClient);
The first callback listens for messages sent to the deviceInput sink. From the diagram above, we see that we want to route messages from any downstream device to this input. In the deployment.template.json file, add a route that tells the edge hub to route any message received by the IoT Edge device that was not sent by an IoT Edge module into the input called "deviceInput" on the turbofanRouter module:
"leafMessagesToRouter": "FROM /messages/* WHERE NOT IS_DEFINED($connectionModuleId) INTO BrokeredEndpoint(\"/modules/turbofanRouter/inputs/deviceInput\")"Next add a route for messages from the rulClassifier module into the turbofanRouter module:
"classifierToRouter": "FROM /messages/modules/turbofanRulClassifier/outputs/amloutput INTO BrokeredEndpoint(\"/modules/turbofanRouter/inputs/rulInput\")"
Outputs
Add four additional routes to the $edgeHub route parameter, to handle outputs from the Router module.
Program.cs defines the method SendMessageToClassifier(), which uses the module client to send a message to the RUL classifier using the route:
"routerToClassifier": "FROM /messages/modules/turbofanRouter/outputs/classOutput INTO BrokeredEndpoint(\"/modules/turbofanRulClassifier/inputs/amlInput\")"SendRulMessageToIotHub() uses the module client to send just the RUL data for the device to the IoT Hub via the route:
"routerToIoTHub": "FROM /messages/modules/turboFanRouter/outputs/hubOutput INTO $upstream"SendMessageToAvroWriter() uses the module client to send the message with the RUL data added to the avroFileWriter module.
"routerToAvro": "FROM /messages/modules/turbofanRouter/outputs/avroOutput INTO BrokeredEndpoint(\"/modules/avroFileWriter/inputs/avroModuleInput\")"HandleBadMessage() sends failed messages upstream the IoT Hub where they can be routed for later.
"deadLetter": "FROM /messages/modules/turboFanRouter/outputs/deadMessages INTO $upstream"
With all the routes taken together your "$edgeHub" node should look like the following JSON:
"$edgeHub": {
  "properties.desired": {
    "schemaVersion": "1.0",
    "routes": {
      "leafMessagesToRouter": "FROM /messages/* WHERE NOT IS_DEFINED($connectionModuleId) INTO BrokeredEndpoint(\"/modules/turbofanRouter/inputs/deviceInput\")",
      "classifierToRouter": "FROM /messages/modules/turbofanRulClassifier/outputs/amlOutput INTO BrokeredEndpoint(\"/modules/turbofanRouter/inputs/rulInput\")",
      "routerToClassifier": "FROM /messages/modules/turbofanRouter/outputs/classOutput INTO BrokeredEndpoint(\"/modules/turbofanRulClassifier/inputs/amlInput\")",
      "routerToIoTHub": "FROM /messages/modules/turboFanRouter/outputs/hubOutput INTO $upstream",
      "routerToAvro": "FROM /messages/modules/turbofanRouter/outputs/avroOutput INTO BrokeredEndpoint(\"/modules/avroFileWriter/inputs/avroModuleInput\")",
      "deadLetter": "FROM /messages/modules/turboFanRouter/outputs/deadMessages INTO $upstream"
    },
    "storeAndForwardConfiguration": {
      "timeToLiveSecs": 7200
    }
  }
}
Note
Adding the turbofanRouter module created the following additional route: turbofanRouterToIoTHub": "FROM /messages/modules/turbofanRouter/outputs/* INTO $upstream. Remove this route, leaving only the routes listed above in your deployment.template.json file.
Add Avro Writer module
The Avro Writer module has two responsibilities in our solution, to store messages and upload files.
Store messages: when the Avro Writer module receives a message, it writes the message to the local file system in Avro format. We use a bind mount, which mounts a directory (in this case /data/avrofiles) into a path in the module's container. This mount allows the module to write to a local path (/avrofiles) and have those files accessible directly from the IoT Edge device.
Upload files: the Avro Writer module uses the Azure IoT Hub file upload feature to upload files to an Azure storage account. Once a file is successfully uploaded, the module deletes the file from disk
Create module and copy files
In Visual Studio Code, select View > Command Palette, and then search for and select Python: Select Interpreter.
Select your installed Python version 3.7 or later.
Right click on the modules folder in Visual Studio Code and choose Add IoT Edge Module.
Choose Python Module.
Name the module
avroFileWriter.When prompted for your Docker Image Repository, use the same registry as you used when adding the Router module.
Copy files from the sample module into the solution.
copy C:\source\IoTEdgeAndMlSample\EdgeModules\modules\avroFileWriter\*.py C:\source\IoTEdgeAndMlSample\EdgeSolution\modules\avroFileWriter\Accept the overwrite of main.py.
Notice that filemanager.py and schema.py have been added to the solution and main.py has been updated.
Note
When you open a Python file you may be prompted to install pylint. You do not need to install the linter to complete this tutorial.
Bind mount for data files
As mentioned previously, the writer module relies on the presence of a bind mount to write Avro files to the device's file system.
Add directory to device
In the Azure portal, start your IoT Edge device VM if it is not running. Connect to it using SSH. The connection requires the DNS name that you can copy from the overview page for the VM in the Azure portal.
ssh -l <user>@<vm name>.<region>.cloudapp.azure.comAfter logging in, create the directory that will hold the saved downstream device messages.
sudo mkdir -p /data/avrofilesUpdate directory permissions to make it writable by the container.
sudo chmod ugo+rw /data/avrofilesValidate the directory now has write (w) permission for user, group, and owner.
ls -la /data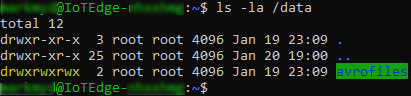
Add directory to the module
To add the directory to the module's container, we will modify the Dockerfiles associated with the avroFileWriter module. There are three Dockerfiles associated with the module: Dockerfile.amd64, Dockerfile.amd64.debug, and Dockerfile.arm32v7. These files should be kept in sync in case we wish to debug or deploy to an arm32 device. For this article, focus only on Dockerfile.amd64.
On your development VM, open the C:\source\IoTEdgeAndMlSample\EdgeSolution\modules\avoFileWriter\Dockerfile.amd64 file.
Modify the file so that is looks like the following example:
FROM ubuntu:xenial

WORKDIR /app

RUN apt-get update && apt-get install -y --no-install-recommends libcurl4-openssl-dev
python3-pip libboost-python1.58-dev libpython3-dev && rm -rf /var/lib/apt/lists/*

RUN pip3 install --upgrade pip
COPY requirements.txt ./
RUN pip install -r requirements.txt

COPY . .

RUN useradd -ms /bin/bash moduleuser
RUN mkdir /avrofiles && chown moduleuser /avrofiles
USER moduleuser

CMD [ "python3", "-u", "./main.py" ]
The
mkdirandchowncommands instruct the Docker build process to create a top-level directory called /avrofiles in the image and then to make the moduleuser the owner of that directory. It is important that these commands are inserted after the module user is added to the image with theuseraddcommand and before the context switches to the moduleuser (USER moduleuser).If needed, make corresponding changes to Dockerfile.amd64.debug and Dockerfile.arm32v7.
Add bind configuration to the avroFileWriter
The final step of creating the bind is to update the deployment.template.json (and deployment.debug.template.json) files with the bind information.
Open deployment.template.json.
Modify the module definition for avroFileWriter by adding the
Bindsparameter that points the container directory /avrofiles to the local directory on the edge device. Your module definition should match this example:"avroFileWriter": { "version": "1.0", "type": "docker", "status": "running", "restartPolicy": "always", "settings": { "image": "${MODULES.avroFileWriter}", "createOptions": { "HostConfig": { "Binds": [ "/data/avrofiles:/avrofiles" ] } } } }
Bind mount for access to config.yaml
We need to add one more bind for the writer module. This bind gives the module access to read the connection string from the /etc/iotedge/config.yaml file on the IoT Edge device. We need the connection string to create an IoTHubClient so that we can call the upload_blob_async method to upload files to the IoT hub. The steps for adding this bind are similar to the ones in the previous section.
Update directory permission
Connect to your IoT Edge device using SSH.
ssh -l <user>@IoTEdge-<extension>.<region>.cloudapp.azure.comAdd read permission to the config.yaml file.
sudo chmod +r /etc/iotedge/config.yamlValidate the permissions are set correctly.
ls -la /etc/iotedge/Ensure that the permissions for config.yaml are -r--r--r--.
Add directory to module
On your development machine, open the Dockerfile.amd64 file.
Add an additional set of
mkdirandchowncommands to the file so that is looks like:FROM ubuntu:xenial WORKDIR /app RUN apt-get update && apt-get install -y --no-install-recommends libcurl4-openssl-dev python3-pip libboost-python1.58-dev libpython3-dev && rm -rf /var/lib/apt/lists/\* RUN pip3 install --upgrade pip COPY requirements.txt ./ RUN pip install -r requirements.txt COPY . . RUN useradd -ms /bin/bash moduleuser RUN mkdir /avrofiles && chown moduleuser /avrofiles RUN mkdir -p /app/iotconfig && chown moduleuser /app/iotconfig USER moduleuser CMD "python3", "-u", "./main.py"]Make the corresponding changes to Dockerfile.amd64.debug and Dockerfile.arm32v7.
Update the module configuration
Open the deployment.template.json file.
Modify the module definition for avroFileWriter by adding a second line to the
Bindsparameter that points the container directory (/app/iotconfig) to the local directory on the device (/etc/iotedge)."avroFileWriter": { "version": "1.0", "type": "docker", "status": "running", "restartPolicy": "always", "settings": { "image": "${MODULES.avroFileWriter}", "createOptions": { "HostConfig": { "Binds": [ "/data/avrofiles:/avrofiles", "/etc/iotedge:/app/iotconfig" ] } } } }Make the corresponding changes to deployment.debug.template.json.
Install dependencies
The writer module takes a dependency on two Python libraries, fastavro and PyYAML. We need to install the dependencies on our development machine and instruct the Docker build process to install them in our module's image.
PyYAML
On your development machine, open the
C:\source\IoTEdgeAndMlSample\EdgeSolution\modules\avoFileWriter\requirements.txtfile and add "pyyaml" on a new line in the file.azure-iothub-device-client~=1.4.3 pyyamlOpen the Dockerfile.amd64 file and add a
pip installcommand to upgrade setuptools.FROM ubuntu:xenial WORKDIR /app RUN apt-get update && \ apt-get install -y --no-install-recommends libcurl4-openssl-dev python3-pip libboost-python1.58-dev libpython3-dev && \ rm -rf /var/lib/apt/lists/\* RUN pip3 install --upgrade pip RUN pip install -U pip setuptools COPY requirements.txt ./ RUN pip install -r requirements.txt COPY . . RUN useradd -ms /bin/bash moduleuser RUN mkdir /avrofiles && chown moduleuser /avrofiles RUN mkdir -p /app/iotconfig && chown moduleuser /app/iotconfig USER moduleuser CMD [ "python3", "-u", "./main.py" ]At a command prompt, install pyyaml to your development machine.
pip install pyyaml
Fastavro
In requirements.txt, add fastavro after pyyaml.
azure-iothub-device-client~=1.4.3 pyyaml fastavroInstall fastavro to your development machine.
pip install fastavro
Reconfigure IoT Hub
By introducing the IoT Edge device and modules to the system, we have changed our expectations about what data will be sent to the hub and for what purpose. We need to reconfigure the routing in the hub to deal with our new reality.
Note
We reconfigure the hub before deploying modules because some of the hub settings, specifically file upload, needs to be correctly set up for the avroFileWriter module to run correctly
Set up route for RUL messages in IoT Hub
With the router and classifier in place, we expect to receive regular messages containing only the device ID and the RUL prediction for the device. We want to route the RUL data to its own storage location where we can monitor the status of the devices, build reports and fire alerts as needed. At the same time, we want any device data that is still being sent directly by a downstream device that has not yet been attached to our IoT Edge device to continue to route to the current storage location.
Create a RUL message route
In the Azure portal, navigate to your IoT Hub.
From the menu on the left pane, under Hub settings, select Message routing.
On the Routes tab, select Add.
Name the route RulMessageRoute.
Select Add endpoint to the right of the Endpoint selector and choose Storage.
On the Add a storage endpoint page, name the endpoint ruldata.
Select Pick a container.
On the Storage accounts page, find the storage account you're using throughout this tutorial, which is named like iotedgeandml<unique suffix>.
Select the ruldata container and click Select.
Back at the Add a storage endpoint page, select Create to create the storage endpoint.
Back at the Add a route page, for the Routing query, replace
truewith the following query:IS_DEFINED($body.PredictedRul) AND NOT IS_DEFINED($body.OperationalSetting1)Expand the Test section and then the Message body section. Replace the message body with this example of our expected messages:
{
  "ConnectionDeviceId": "aaLeafDevice_1",
  "CorrelationId": "b27e97bb-06c5-4553-a064-e9ad59c0fdd3",
  "PredictedRul": 132.62721409309165,
  "CycleTime": 64.0
}
Select Test route. If the test is successful, you see "The message matched the query."
Click Save.
Update turbofanDeviceDataToStorage route
We don't want to route the new prediction data to our old storage location, so update the route to prevent it.
In the IoT Hub Message routing page, select the Routes tab.
Select turbofanDeviceDataToStorage, or whatever name you gave to your initial device data route.
Update the routing query to
IS_DEFINED($body.OperationalSetting1)Expand the Test section and then the Message body section. Replace the message with this example of our expected messages:
{
  "Sensor13": 2387.96,
  "OperationalSetting1": -0.0008,
  "Sensor6": 21.61,
  "Sensor11": 47.2,
  "Sensor9": 9061.45,
  "Sensor4": 1397.86,
  "Sensor14": 8140.39,
  "Sensor18": 2388.0,
  "Sensor12": 522.87,
  "Sensor2": 642.42,
  "Sensor17": 391.0,
  "OperationalSetting3": 100.0,
  "Sensor1": 518.67,
  "OperationalSetting2": 0.0002,
  "Sensor20": 39.03,
  "DeviceId": 19.0,
  "Sensor5": 14.62,
  "PredictedRul": 212.00132402791962,
  "Sensor8": 2388.01,
  "Sensor16": 0.03,
  "CycleTime": 42.0,
  "Sensor21": 23.3188,
  "Sensor15": 8.3773,
  "Sensor3": 1580.09,
  "Sensor10": 1.3,
  "Sensor7": 554.57,
  "Sensor19": 100.0
}
Select Test route. If the test is successful, you see "The message matched the query."
Select Save.
Configure file upload
Configure the IoT Hub file upload feature to enable the file writer module to upload files to storage.
From the left pane menu in your IoT Hub, under Hub settings, choose File upload.
Select Azure Storage Container.
Select your storage account from the list.
Select the container that starts with azureml-blobstore appended with a guid and click Select.
Select Save. The portal notifies you when the save is complete.
Note
We aren't turning on upload notification for this tutorial, but see Receive a file upload notification for details on how to handle file upload notification.
Build, publish, and deploy modules
Now that we have made the configuration changes, we are ready to build the images and publish them to our Azure container registry. The build process uses the deployment.template.json file to determine which modules need to be built. The settings for each module, including version, are found in the module.json file in the module folder. The build process first runs a Docker build on the Dockerfiles matching the current configuration found in the module.json file to create an image. Then it publishes the image to the registry from the module.json file with a version tag matching the one in the module.json file. Finally, it produces a configuration-specific deployment manifest (for example, deployment.amd64.json), which we will deploy to the IoT Edge device. The IoT Edge device reads the information from the deployment manifest, and based on the instructions will download the modules, configure the routes, and set any desired properties. This deployment method has two side effects that you should be aware of:
Deployment lag: since the IoT Edge runtime must recognize the change to its desired properties before it starts to reconfigure, it can take some amount of time after you deploy your modules until the runtime picks them up and starts to update the IoT Edge device.
Module versions matter: if you publish a new version of a module's container to your container registry using the same version tags as the previous module, the runtime will not download the new version of the module. It does a comparison of the version tag of the local image and the desired image from the deployment manifest. If those versions match, the runtime takes no action. Therefore, it is important to increment the version of your module each time you wish to deploy new changes. Increment the version by changing the version property under the tag property in the module.json file for the module you are changing. Then build and publish the module.
{
  "$schema-version": "0.0.1",
  "description": "",
  "image": {
    "repository": "<your registry>.azurecr.io/avrofilewriter",
    "tag": {
      "version": "0.0.1",
      "platforms": {
        "amd64": "./Dockerfile.amd64",
        "amd64.debug": "./Dockerfile.amd64.debug",
        "arm32v7": "./Dockerfile.arm32v7"
      }
    },
    "buildOptions": []
  },
  "language": "python"
}
Build and publish
On your development VM, start Docker if it is not running.
In Visual Studio Code, start a new terminal with a command prompt and log in to your Azure container registry (ACR).
You can find the required username, password, and login server values in the Azure portal. The container registry name has the format "turbofandemo<unique id>". From the left pane menu, under Settings, select Access keys to view them.
docker login -u <ACR username> -p <ACR password> <ACR login server>
- In Visual Studio Code, right-click on deployment.template.json and choose Build and Push IoT Edge Solution.
View modules in the registry
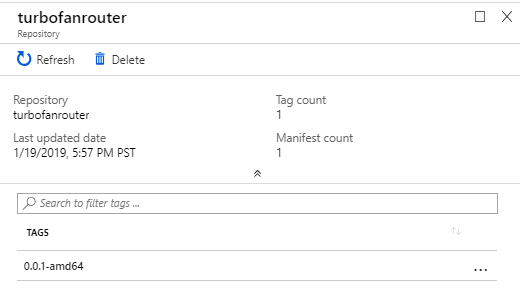
Once the build successfully completes, we will be able to use the Azure portal to review our published modules.
Open the Azure Container Registry for this tutorial. The container registry name has the format "turbofandemo<unique id>".
From the left pane menu, under Services, select Repositories.
Note that both modules you created, avrofilewriter and turbofanrouter, appear as repositories.
Select turbofanrouter and note that you have published one image tagged as 0.0.1-amd64.
Deploy modules to IoT Edge device
We have built and configured the modules in our solution, now we will deploy the modules to the IoT Edge device.
In Visual Studio Code, right click on the deployment.amd64.json file in the config folder.
Choose Create Deployment for Single Device.
Choose your IoT Edge device, aaTurboFanEdgeDevice.
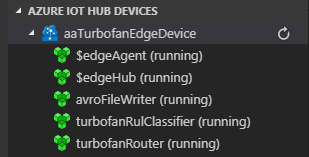
Refresh the Azure IoT Hub devices panel in Visual Studio Code explorer. You should see that the three new modules are deployed but not yet running.
Refresh again after a few minutes and you will see the modules running.
Note
It can take several minutes for the modules to start and settle into a steady running state. During that time, you may see modules start and stop as they try to establish a connection with the IoT Edge hub module.
Diagnosing failures
In this section, we share a few techniques for understanding what has gone wrong with a module or modules. Often a failure can first be spotted from the status in the Visual Studio Code.
Identify failed modules
Visual Studio Code: Look at the Azure IoT Hub devices panel. If most modules are in a running state but one is stopped, you need to investigate that stopped module further. If all modules are in a stopped state for a long period of time, it may indicate failure as well.
Azure portal: By navigating to your IoT hub in the portal and then finding the device details page (under IoT Edge, drill into your device) you may find that a module has reported an error or has never reported anything to the IoT hub.
Diagnosing from the device
By logging into the IoT Edge device (the Linux VM in our case), you can gain access to a good deal of information about the status of your modules. The main mechanism we use are the Docker commands that let us examine the containers and images on the device.
Log in to your IoT Edge device:
ssh -l <user>@IoTEdge-<extension>.<region>.cloudapp.azure.comList all running containers. We expect to see a container for each module with a name that corresponds to the module. Also, this command lists the exact image for the container including version so you can match with your expectation. You can also list images by substituting "image" for "container" in the command.
sudo docker container lsGet the logs for a container. This command outputs whatever has been written to StdErr and StdOut in the container. This command works for containers that have started and then died for some reason. It is also useful for understanding what has been happening with the edgeAgent or edgeHub containers.
sudo docker container logs <container id>Inspect a container. This command gives a ton of information about the image. The data can be filtered depending on what you are looking for. As an example, if you want to see if the binds on the avroFileWriter are correct you can use the command:
sudo docker container inspect -f "{{ json .Mounts }}" avroFileWriter | python -m json.toolConnect to a running container. This command can be helpful if you want to examine the container while it is running:
sudo docker exec -it avroFileWriter bash
Clean up resources
This tutorial is part of a set where each article builds on the work done in the previous ones. Please wait to clean up any resources until you complete the final tutorial.
Next steps
In this article, we created an IoT Edge Solution in Visual Studio Code with three modules: a classifier, a router, and a file writer/uploader. We set up the routes to allow the modules to communicate with each other on the edge device. We modified the configuration of the edge device, and updated the Dockerfiles to install dependencies and add bind mounts to the modules' containers.
Next, we updated the configuration of the IoT Hub to route our messages based on type and to handle file uploads. With everything in place, we deployed the modules to the IoT Edge device and ensured the modules were running correctly.
Continue to the next article to start sending data and see your solution in action.