Tutorial: Send telemetry from an IoT Plug and Play device to Azure IoT Hub

In this quickstart, you learn a basic Azure IoT application development workflow. You use the Azure CLI and IoT Explorer to create an Azure IoT hub and a device. Then you use an Azure IoT device SDK sample to run a temperature controller, connect it securely to the hub, and send telemetry. The temperature controller sample application runs on your local machine and generates simulated sensor data to send to IoT Hub.
Prerequisites
This quickstart runs on Windows, Linux, and Raspberry Pi. It's been tested on the following OS and device versions:
- Windows 10
- Ubuntu 20.04 LTS
- Raspberry Pi OS (Raspbian) version 10, running on a Raspberry Pi 3 Model B+
Install the following prerequisites on your development machine except where noted for Raspberry Pi:
- If you don't have an Azure subscription, create one for free before you begin.
- Git.
- Azure IoT Explorer: Cross-platform, GUI-based utility to monitor and manage Azure IoT. If you're using Raspberry Pi as your development platform, we recommend that you install IoT Explorer on another computer. If you don't want to install IoT Explorer, you can use Azure CLI to perform the same steps.
- Azure CLI. You have two options for running Azure CLI commands in this quickstart:
- Use the Azure Cloud Shell, an interactive shell that runs CLI commands in your browser. This option is recommended because you don't need to install anything. If you're using Cloud Shell for the first time, sign in to the Azure portal. Follow the steps in Get started with Azure Cloud Shell to Start Cloud Shell and Select the Bash environment.
- Optionally, run Azure CLI on your local machine. If Azure CLI is already installed, run
az upgradeto upgrade the CLI and extensions to the current version. To install Azure CLI, see Install Azure CLI. If you're using Raspberry Pi as your development platform, we recommend that you use Azure Cloud Shell or install Azure CLI on another computer.
Install the remaining prerequisites for your operating system.
Linux or Raspberry Pi OS
To complete this quickstart on Linux or Raspberry Pi OS, install the following software:
Install GCC, Git, CMake, and the required dependencies using the apt-get command:
sudo apt-get update
sudo apt-get install -y git cmake build-essential curl libcurl4-openssl-dev libssl-dev uuid-dev
Verify the version of CMake is 3.13 or greater, and the version of GCC is 4.4.7 or greater.
cmake --version
gcc --version
Windows
To complete this quickstart on Windows, install Visual Studio 2022 and add the required components for C and C++ development.
- For new users, install Visual Studio (Community, Professional, or Enterprise) 2022. Download the edition you want to install, and start the installer.
Note
For existing Visual Studio 2022 users, select Windows Start, type Visual Studio Installer, run the installer, and then select Modify.
- In the installer Workloads tab, select the Desktop Development with C++ workload.
- Run the installation.
Create an IoT hub
In this section, you use Azure CLI to create an IoT hub and a resource group. An Azure resource group is a logical container into which Azure resources are deployed and managed. An IoT hub acts as a central message hub for bi-directional communication between your IoT application and devices.
To create an IoT hub and a resource group:
Launch Azure CLI:
- If you're using Cloud Shell, select the Try It button on the CLI commands to launch Cloud Shell in a split browser window. Or you can open the Cloud Shell in a separate browser tab.
- If you're using Azure CLI locally, open a console such as Windows CMD, PowerShell, or Bash and sign in to Azure CLI.
To run the CLI commands in the rest of this quickstart: copy the command syntax, paste it into your Cloud Shell window or CLI console, edit variable values, and press Enter.
Run az extension add to install or upgrade the azure-iot extension to the current version.
az extension add --upgrade --name azure-iotRun the az group create command to create a resource group. The following command creates a resource group named MyResourceGroup in the eastus location.
Note
You can optionally set an alternate location. To see available locations, run
az account list-locations. This tutorial uses eastus as shown in the example command.az group create --name MyResourceGroup --location eastusRun the az iot hub create command to create an IoT hub. It might take a few minutes to create an IoT hub.
YourIotHubName. Replace this placeholder and the surrounding braces in the following command, using the name you chose for your IoT hub. An IoT hub name must be globally unique in Azure. Use your IoT hub name in the rest of this quickstart wherever you see the placeholder.
az iot hub create --resource-group MyResourceGroup --name {YourIoTHubName}Tip
After creating an IoT hub, you'll use Azure IoT Explorer to interact with your IoT hub in the rest of this quickstart. IoT Explorer is a GUI application that lets you connect to an existing IoT Hub and add, manage, and monitor devices. To learn more, see Install and use Azure IoT explorer. Optionally, you can continue to use CLI commands.
Configure IoT Explorer
In the rest of this quickstart, you'll use IoT Explorer to register a device to your IoT hub and to view the device telemetry. In this section, you configure IoT Explorer to connect to the IoT hub you just created and to read plug and play models from the public model repository.
Note
You can also use the Azure CLI to register a device. Use the az iot hub device-identity create --device-id mydevice --hub-name {YourIoTHubName} command to register a new device and the az iot hub device-identity connection-string show --device-id mydevice --hub-name {YourIoTHubName} command to get the primary connection string for the device. Once you note down the device connection string, you can skip ahead to Run the device sample.
To add a connection to your IoT hub:
Run the az iot hub connection-string show command to get the connection string for your IoT hub.
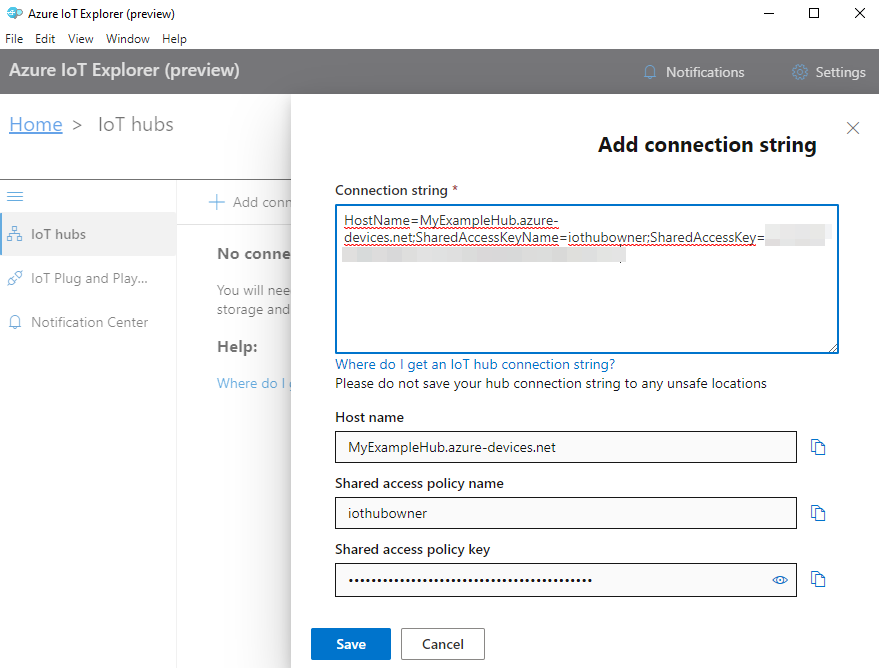
az iot hub connection-string show --hub-name {YourIoTHubName}Copy the connection string without the surrounding quotation characters.
In Azure IoT Explorer, select IoT hubs on the left menu, then select + Add connection.
Paste the connection string into the Connection string box.
Select Save.
If the connection succeeds, IoT Explorer switches to the Devices view.
To add the public model repository:
In IoT Explorer, select Home to return to the home view.
On the left menu, select IoT Plug and Play Settings, then select +Add and select Public repository from the drop-down menu.
An entry appears for the public model repository at
https://devicemodels.azure.com.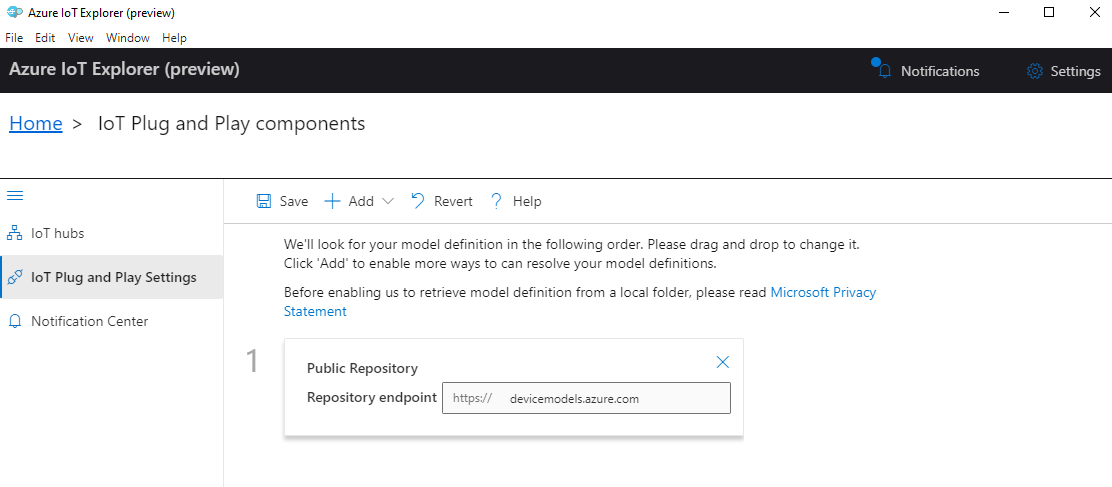
Select Save.
Register a device
In this section, you create a new device instance and register it with the IoT hub you created. You'll use the connection information for the newly registered device to securely connect your device in a later section.
To register a device:
From the home view in IoT Explorer, select IoT hubs.
The connection you previously added should appear. Select View devices in this hub below the connection properties.
Select + New and enter a device ID for your device; for example, mydevice. Leave all other properties the same.
Select Create.
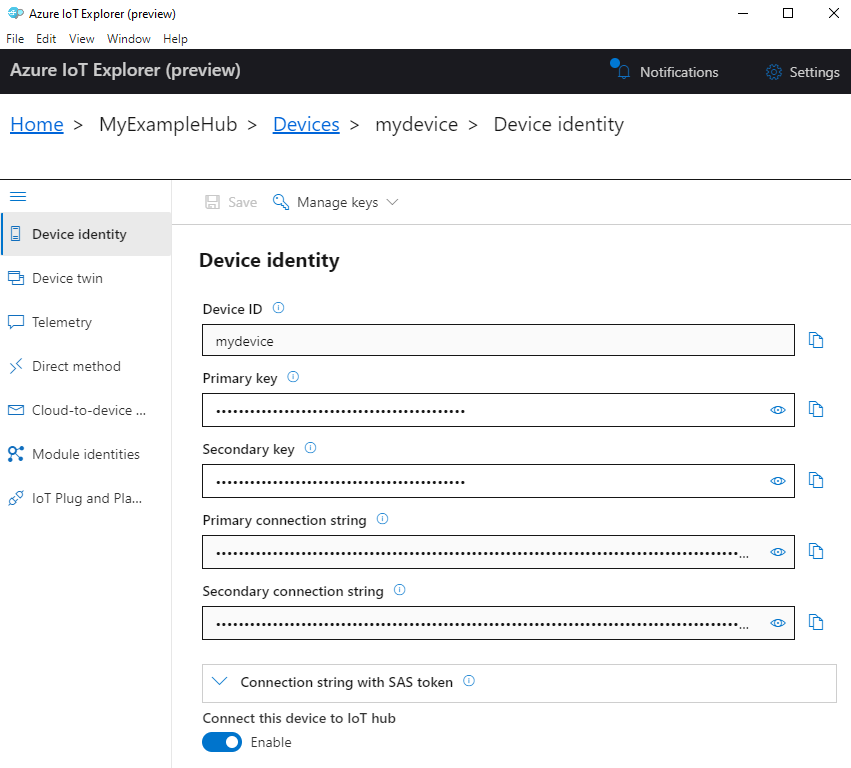
Use the copy buttons to copy and note down the Primary connection string field. You'll need this connection string later.
Run the device sample
In this section, you use the C SDK to send messages from a device to your IoT hub. You run a sample that implements a temperature controller with two thermostat sensors.
Build the sample
Open a new console to install the Azure IoT C device SDK and run the code sample. For Windows, select Start, type Developer Command Prompt for VS 2019, and open the console. For Linux and Raspberry Pi OS, open a terminal for Bash commands.
Note
If you're using a local installation of Azure CLI, you might now have two console windows open. Be sure to enter the commands in this section in the console you just opened, not the one that you've been using for the CLI.
Navigate to a local folder where you want to clone the sample repo.
Clone the Azure IoT C device SDK to your local machine:
git clone https://github.com/Azure/azure-iot-sdk-c.gitNavigate to the root folder of the SDK, and run the following command to update dependencies:
cd azure-iot-sdk-c
git submodule update --init
This operation takes a few minutes.
To build the SDK and samples, run the following commands:
cmake -Bcmake -Duse_prov_client=ON -Dhsm_type_symm_key=ON -Drun_e2e_tests=OFF
cmake --build cmake
Set the following environment variables, to enable your device to connect to Azure IoT.
- Set an environment variable called
IOTHUB_DEVICE_CONNECTION_STRING. For the variable value, use the device connection string that you saved in the previous section. - Set an environment variable called
IOTHUB_DEVICE_SECURITY_TYPE. For the variable, use the literal string valueconnectionString.
CMD
set IOTHUB_DEVICE_CONNECTION_STRING=<your connection string here>
set IOTHUB_DEVICE_SECURITY_TYPE=connectionString
Note
For Windows CMD there are no quotation marks surrounding the string values for each variable.
Bash
export IOTHUB_DEVICE_CONNECTION_STRING="<your connection string here>" export IOTHUB_DEVICE_SECURITY_TYPE="connectionString"- Set an environment variable called
Run the code
Run the sample code, using the appropriate command for your console.
CMD
cmake\iothub_client\samples\pnp\pnp_temperature_controller\Debug\pnp_temperature_controller.exeBash
cmake/iothub_client/samples/pnp/pnp_temperature_controller/pnp_temperature_controllerNote
This code sample uses Azure IoT Plug and Play, which lets you integrate smart devices into your solutions without any manual configuration. By default, most samples in this documentation use IoT Plug and Play. To learn more about the advantages of IoT PnP, and cases for using or not using it, see What is IoT Plug and Play?.
The sample securely connects to your IoT hub as the device you registered and begins sending telemetry messages. The sample output appears in your console.
View telemetry
You can view the device telemetry with IoT Explorer. Optionally, you can view telemetry using Azure CLI.
To view telemetry in Azure IoT Explorer:
From your Iot hub in IoT Explorer, select View devices in this hub, then select your device from the list.
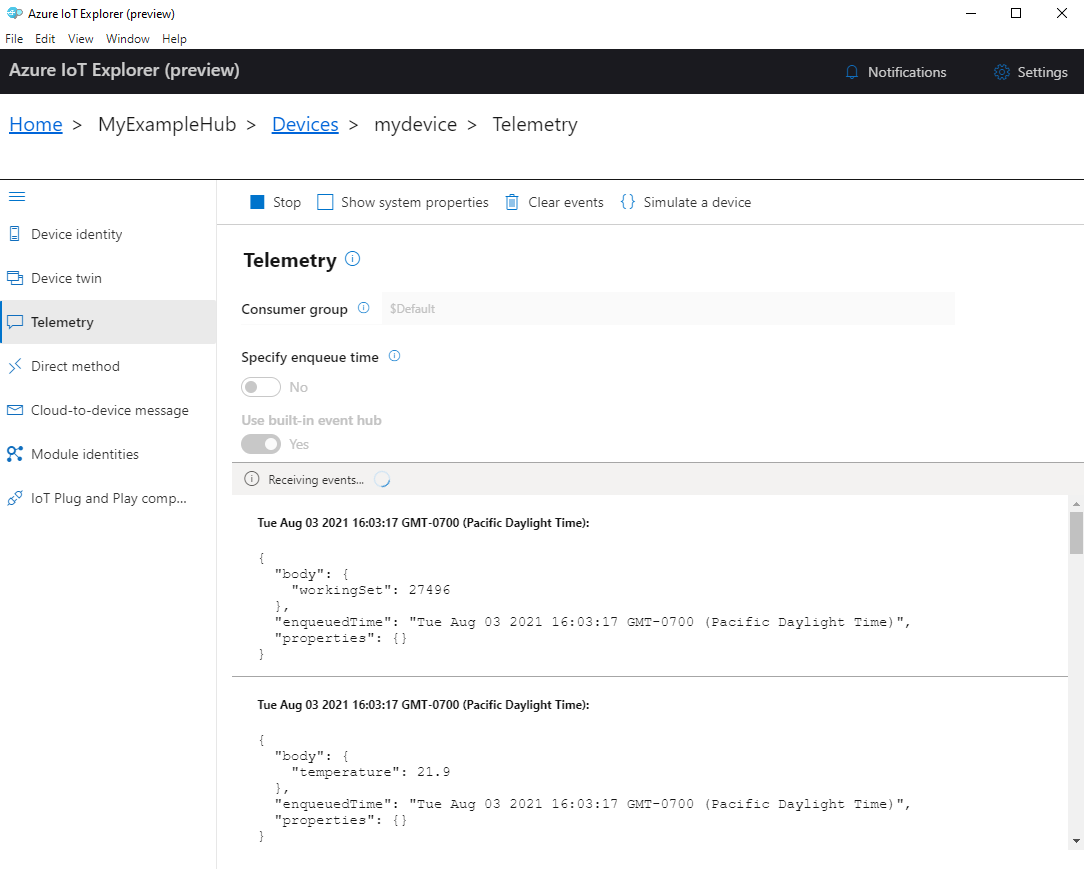
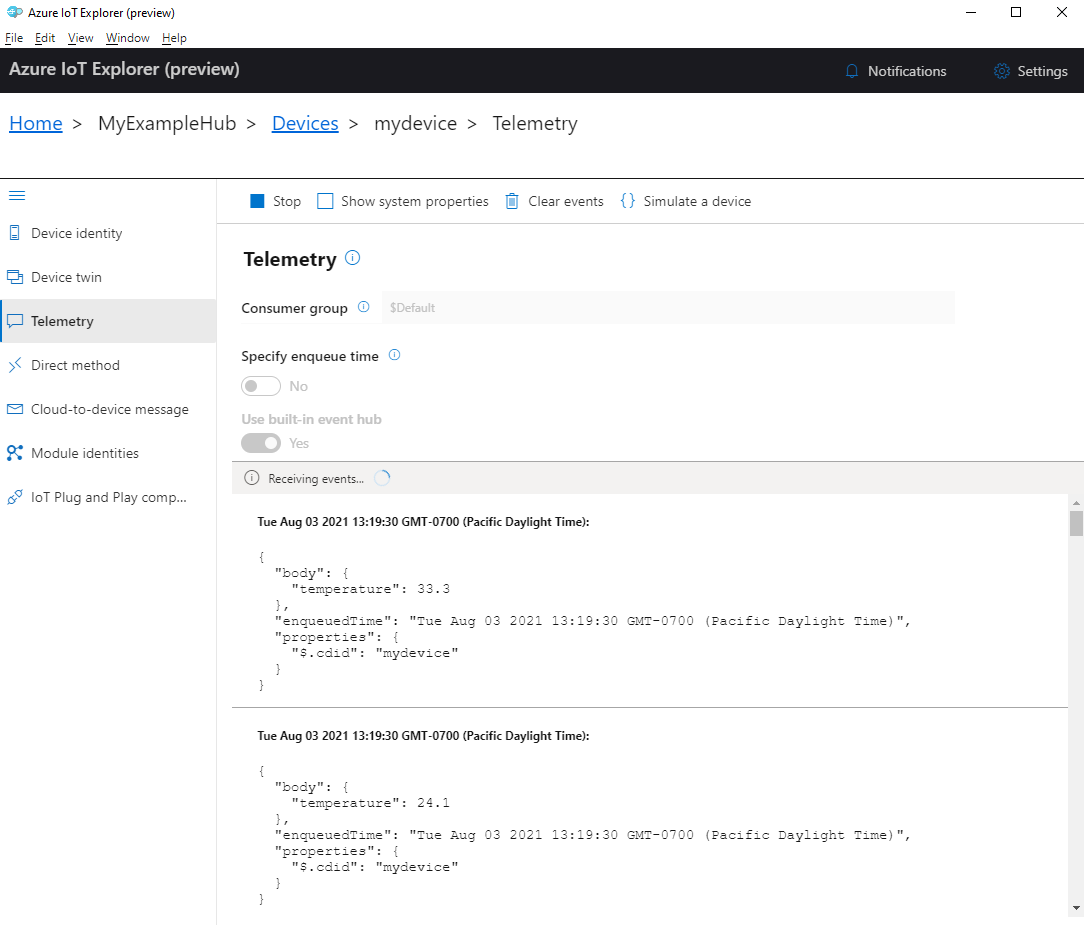
On the left menu for your device, select Telemetry.
Confirm that Use built-in event hub is set to Yes and then select Start.
View the telemetry as the device sends messages to the cloud.

Select Stop to end receiving events.
To read telemetry sent by individual device components, you can use the plug and play features in IoT Explorer. For example, the temperature controller in this quickstart has two thermostats: thermostat1 and thermostat2. To see the temperature reported by thermostat1:
On your device in IoT Explorer, select IoT Plug and Play components from the left menu. Then select thermostat1 from the list of components.
On the thermostat1 component pane, select Telemetry from the top menu.
On the Telemetry pane, follow the same steps that you did previously. Make sure that Use built-in event hub is set to Yes and then select Start.
To view device telemetry with Azure CLI:
Run the az iot hub monitor-events command to monitor events sent from the device to your IoT hub. Use the names that you created previously in Azure IoT for your device and IoT hub.
az iot hub monitor-events --output table --device-id mydevice --hub-name {YourIoTHubName}View the connection details and telemetry output in the console.
Starting event monitor, filtering on device: mydevice, use ctrl-c to stop...
event:
  component: ''
  interface: dtmi:com:example:TemperatureController;1
  module: ''
  origin: mydevice
  payload: '{"workingSet":1251}'

event:
  component: thermostat1
  interface: dtmi:com:example:TemperatureController;1
  module: ''
  origin: mydevice
  payload: '{"temperature":22.00}'
In this quickstart, you learn a basic Azure IoT application development workflow. You use the Azure CLI and IoT Explorer to create an Azure IoT hub and a device. Then you use an Azure IoT device SDK sample to run a temperature controller, connect it securely to the hub, and send telemetry. The temperature controller sample application runs on your local machine and generates simulated sensor data to send to IoT Hub.
Prerequisites
This quickstart runs on Windows, Linux, and Raspberry Pi. It's been tested on the following OS and device versions:
- Windows 10
- Ubuntu 20.04 LTS
- Raspberry Pi OS (Raspbian) version 10, running on a Raspberry Pi 3 Model B+
Install the following prerequisites on your development machine except where noted for Raspberry Pi:
If you don't have an Azure subscription, create one for free before you begin.
Git.
.NET Core SDK 3.1. Be sure to install the .NET SDK, not just the runtime. To check the version of the .NET SDK and runtime installed on your machine, run
dotnet --info.- For Windows and Linux (except Raspberry Pi), follow the instructions to install the .NET Core SDK 3.1 on your platform.
- For Raspberry Pi, you'll need to follow the instructions to manually install the SDK. This is because on Debian, package manager installs of the .NET SDK are only supported for the x64 architecture.
Azure IoT Explorer: Cross-platform, GUI-based utility to monitor and manage Azure IoT. If you're using Raspberry Pi as your development platform, we recommend that you install IoT Explorer on another computer. If you don't want to install IoT Explorer, you can use Azure CLI to perform the same steps.
Azure CLI. You have two options for running Azure CLI commands in this quickstart:
- Use the Azure Cloud Shell, an interactive shell that runs CLI commands in your browser. This option is recommended because you don't need to install anything. If you're using Cloud Shell for the first time, sign in to the Azure portal. Follow the steps in Get started with Azure Cloud Shell to Start Cloud Shell and Select the Bash environment.
- Optionally, run Azure CLI on your local machine. If Azure CLI is already installed, run
az upgradeto upgrade the CLI and extensions to the current version. To install Azure CLI, see Install Azure CLI. If you're using Raspberry Pi as your development platform, we recommend that you use Azure Cloud Shell or install Azure CLI on another computer.
Create an IoT hub
In this section, you use Azure CLI to create an IoT hub and a resource group. An Azure resource group is a logical container into which Azure resources are deployed and managed. An IoT hub acts as a central message hub for bi-directional communication between your IoT application and devices.
To create an IoT hub and a resource group:
Launch Azure CLI:
- If you're using Cloud Shell, select the Try It button on the CLI commands to launch Cloud Shell in a split browser window. Or you can open the Cloud Shell in a separate browser tab.
- If you're using Azure CLI locally, open a console such as Windows CMD, PowerShell, or Bash and sign in to Azure CLI.
To run the CLI commands in the rest of this quickstart: copy the command syntax, paste it into your Cloud Shell window or CLI console, edit variable values, and press Enter.
Run az extension add to install or upgrade the azure-iot extension to the current version.
az extension add --upgrade --name azure-iotRun the az group create command to create a resource group. The following command creates a resource group named MyResourceGroup in the eastus location.
Note
You can optionally set an alternate location. To see available locations, run
az account list-locations. This tutorial uses eastus as shown in the example command.az group create --name MyResourceGroup --location eastusRun the az iot hub create command to create an IoT hub. It might take a few minutes to create an IoT hub.
YourIotHubName. Replace this placeholder and the surrounding braces in the following command, using the name you chose for your IoT hub. An IoT hub name must be globally unique in Azure. Use your IoT hub name in the rest of this quickstart wherever you see the placeholder.
az iot hub create --resource-group MyResourceGroup --name {YourIoTHubName}Tip
After creating an IoT hub, you'll use Azure IoT Explorer to interact with your IoT hub in the rest of this quickstart. IoT Explorer is a GUI application that lets you connect to an existing IoT Hub and add, manage, and monitor devices. To learn more, see Install and use Azure IoT explorer. Optionally, you can continue to use CLI commands.
Configure IoT Explorer
In the rest of this quickstart, you'll use IoT Explorer to register a device to your IoT hub and to view the device telemetry. In this section, you configure IoT Explorer to connect to the IoT hub you just created and to read plug and play models from the public model repository.
Note
You can also use the Azure CLI to register a device. Use the az iot hub device-identity create --device-id mydevice --hub-name {YourIoTHubName} command to register a new device and the az iot hub device-identity connection-string show --device-id mydevice --hub-name {YourIoTHubName} command to get the primary connection string for the device. Once you note down the device connection string, you can skip ahead to Run the device sample.
To add a connection to your IoT hub:
Run the az iot hub connection-string show command to get the connection string for your IoT hub.
az iot hub connection-string show --hub-name {YourIoTHubName}Copy the connection string without the surrounding quotation characters.
In Azure IoT Explorer, select IoT hubs on the left menu, then select + Add connection.
Paste the connection string into the Connection string box.
Select Save.
If the connection succeeds, IoT Explorer switches to the Devices view.
To add the public model repository:
In IoT Explorer, select Home to return to the home view.
On the left menu, select IoT Plug and Play Settings, then select +Add and select Public repository from the drop-down menu.
An entry appears for the public model repository at
https://devicemodels.azure.com.
Select Save.
Register a device
In this section, you create a new device instance and register it with the IoT hub you created. You'll use the connection information for the newly registered device to securely connect your device in a later section.
To register a device:
From the home view in IoT Explorer, select IoT hubs.
The connection you previously added should appear. Select View devices in this hub below the connection properties.
Select + New and enter a device ID for your device; for example, mydevice. Leave all other properties the same.
Select Create.
Use the copy buttons to copy and note down the Primary connection string field. You'll need this connection string later.
Run the device sample
In this section, you'll use the C# SDK to send messages from a device to your IoT hub. You'll run a sample that implements a temperature controller with two thermostat sensors.
Open a new console such as Windows CMD, PowerShell, or Bash. In the following steps, you'll use this console to install the Node.js SDK and work with Node.js sample code.
Note
If you're using a local installation of Azure CLI, you might now have two console windows open. Be sure to enter the commands in this section in the console you just opened, not the one that you've been using for the CLI.
Clone the Microsoft Azure IoT SDK for C# (.NET) to your local machine:
git clone https://github.com/Azure/azure-iot-sdk-csharp.gitNavigate to the sample directory:
Windows
cd azure-iot-sdk-csharp\iothub\device\samples\solutions\PnpDeviceSamples\TemperatureControllerLinux or Raspberry Pi OS
cd azure-iot-sdk-csharp/iothub/device/samples/solutions/PnpDeviceSamples/TemperatureControllerInstall the Azure IoT C# SDK and necessary dependencies:
dotnet restoreThis command installs the proper dependencies as specified in the TemperatureController.csproj file.
Set both of the following environment variables, to enable your device to connect to Azure IoT.
- Set an environment variable called
IOTHUB_DEVICE_CONNECTION_STRING. For the variable value, use the device connection string that you saved in the previous section. - Set an environment variable called
IOTHUB_DEVICE_SECURITY_TYPE. For the variable, use the literal string valueconnectionString.
CMD (Windows)
set IOTHUB_DEVICE_CONNECTION_STRING=<your connection string here>
set IOTHUB_DEVICE_SECURITY_TYPE=connectionString
Note
For Windows CMD there are no quotation marks surrounding the string values for each variable.
PowerShell
$env:IOTHUB_DEVICE_CONNECTION_STRING='<your connection string here>'
$env:IOTHUB_DEVICE_SECURITY_TYPE='connectionString'
Bash
export IOTHUB_DEVICE_CONNECTION_STRING="<your connection string here>" export IOTHUB_DEVICE_SECURITY_TYPE="connectionString"- Set an environment variable called
Run the code sample:
dotnet runNote
This code sample uses Azure IoT Plug and Play, which lets you integrate smart devices into your solutions without any manual configuration. By default, most samples in this documentation use IoT Plug and Play. To learn more about the advantages of IoT PnP, and cases for using or not using it, see What is IoT Plug and Play?.
The sample securely connects to your IoT hub as the device you registered and begins sending telemetry messages. The sample output appears in your console.
View telemetry
You can view the device telemetry with IoT Explorer. Optionally, you can view telemetry using Azure CLI.
To view telemetry in Azure IoT Explorer:
From your Iot hub in IoT Explorer, select View devices in this hub, then select your device from the list.
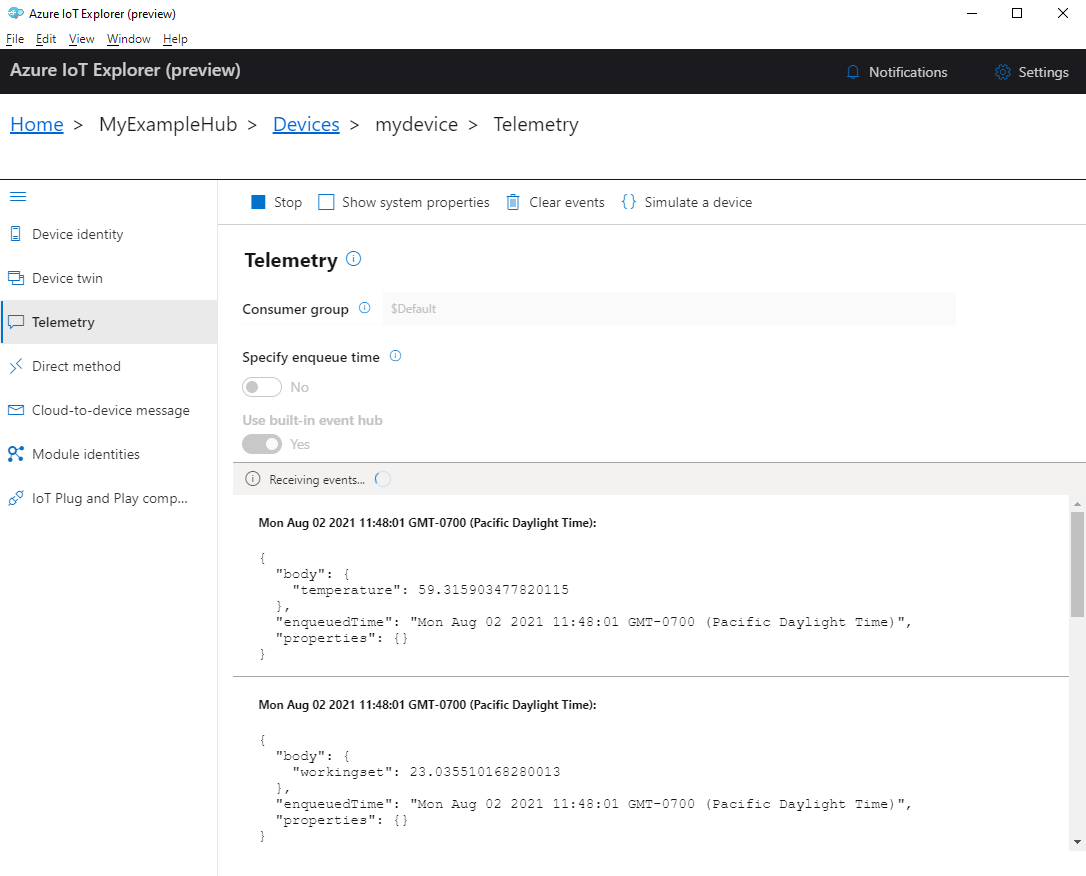
On the left menu for your device, select Telemetry.
Confirm that Use built-in event hub is set to Yes and then select Start.
View the telemetry as the device sends messages to the cloud.
Select Stop to end receiving events.
To read telemetry sent by individual device components, you can use the plug and play features in IoT Explorer. For example, the temperature controller in this quickstart has two thermostats: thermostat1 and thermostat2. To see the temperature reported by thermostat1:
On your device in IoT Explorer, select IoT Plug and Play components from the left menu. Then select thermostat1 from the list of components.
On the thermostat1 component pane, select Telemetry from the top menu.
On the Telemetry pane, follow the same steps that you did previously. Make sure that Use built-in event hub is set to Yes and then select Start.
To view device telemetry with Azure CLI:
Run the az iot hub monitor-events command to monitor events sent from the device to your IoT hub. Use the names that you created previously in Azure IoT for your device and IoT hub.
az iot hub monitor-events --output table --device-id mydevice --hub-name {YourIoTHubName}View the connection details and telemetry output in the console.
Starting event monitor, filtering on device: mydevice, use ctrl-c to stop...
event:
  component: thermostat1
  interface: dtmi:com:example:TemperatureController;2
  module: ''
  origin: mydevice
  payload:
    temperature: 39.8

event:
  component: thermostat2
  interface: dtmi:com:example:TemperatureController;2
  module: ''
  origin: mydevice
  payload:
    temperature: 36.7
Select CTRL+C to end monitoring.
In this quickstart, you learn a basic Azure IoT application development workflow. You use the Azure CLI and IoT Explorer to create an Azure IoT hub and a device. Then you use an Azure IoT device SDK sample to run a temperature controller, connect it securely to the hub, and send telemetry. The temperature controller sample application runs on your local machine and generates simulated sensor data to send to IoT Hub.
Prerequisites
This quickstart runs on Windows, Linux, and Raspberry Pi. It's been tested on the following OS and device versions:
- Windows 10
- Ubuntu 20.04 LTS
- Raspberry Pi OS (Raspbian) version 10, running on a Raspberry Pi 3 Model B+
Install the following prerequisites on your development machine except where noted for Raspberry Pi:
- If you don't have an Azure subscription, create one for free before you begin.
- Git.
- Azure IoT Explorer: Cross-platform, GUI-based utility to monitor and manage Azure IoT. If you're using Raspberry Pi as your development platform, we recommend that you install IoT Explorer on another computer. If you don't want to install IoT Explorer, you can use Azure CLI to perform the same steps.
- Azure CLI. You have two options for running Azure CLI commands in this quickstart:
- Use the Azure Cloud Shell, an interactive shell that runs CLI commands in your browser. This option is recommended because you don't need to install anything. If you're using Cloud Shell for the first time, sign in to the Azure portal. Follow the steps in Get started with Azure Cloud Shell to Start Cloud Shell and Select the Bash environment.
- Optionally, run Azure CLI on your local machine. If Azure CLI is already installed, run
az upgradeto upgrade the CLI and extensions to the current version. To install Azure CLI, see Install Azure CLI. If you're using Raspberry Pi as your development platform, we recommend that you use Azure Cloud Shell or install Azure CLI on another computer.
Install the remaining prerequisites for your operating system.
Windows
To complete this quickstart on Windows, install the following software:
Java SE Development Kit 8 or later. You can download the Java 8 (LTS) JDK for multiple platforms from Download Zulu Builds of OpenJDK. In the installer, select the Add to Path option.
Apache Maven 3. After you extract the download to a local folder, add the full path to the Maven /bin folder to the Windows
PATHenvironment variable.
Linux or Raspberry Pi OS
To complete this quickstart on Linux or Raspberry Pi OS, install the following software:
Note
Steps in this section are based on Linux Ubuntu/Debian distributions. (Raspberry Pi OS is based on Debian.) If you're using a different Linux distribution, you'll need to modify the steps accordingly.
OpenJDK (Open Java Development Kit) 8 or later. You can use the
java -versioncommand to verify the version of Java installed on your system. Make sure that the JDK is installed, not just the Java runtime (JRE).To install the OpenJDK for your system, enter the following commands:
To install the default version of OpenJDK for your system (OpenJDK 11 for Ubuntu 20.04 and Raspberry Pi OS 10 at the time of writing):
sudo apt update
sudo apt install default-jdk
Alternatively, you can specify a version of the JDK to install. For example:
sudo apt update
sudo apt install openjdk-8-jdk
If your system has multiple versions of Java installed, you can use the following commands to configure the default (auto) versions of Java and the Java compiler.
update-java-alternatives --list          #list the Java versions installed
sudo update-alternatives --config java   #set the default Java version
sudo  update-alternatives --config javac #set the default Java compiler version
Set the
JAVA_HOMEenvironment variable to the path of your JDK installation. (This is generally a versioned subdirectory in the /usr/lib/jvm directory.)export JAVA_HOME=$(readlink -f /usr/bin/java | sed "s:bin/java::")Important
This command sets the
JAVA_HOMEvariable in your current shell environment. We recommend adding the command to your~/.bashrcor/etc/profilefile to make it available whenever you open a new shell.Verify the version of the Java JDK (and JRE) installed, that your Java compiler version matches the JDK version, and that the
JAVA_HOMEenvironment variable is properly set.java -version javac -version echo $JAVA_HOME
Apache Maven 3. You can use the
mvn --versioncommand to verify the version of Maven installed on your system.To install Maven, enter the following commands:
sudo apt-get update
sudo apt-get install maven
Enter the following command to verify your installation.
mvn --version
Create an IoT hub
In this section, you use Azure CLI to create an IoT hub and a resource group. An Azure resource group is a logical container into which Azure resources are deployed and managed. An IoT hub acts as a central message hub for bi-directional communication between your IoT application and devices.
To create an IoT hub and a resource group:
Launch Azure CLI:
- If you're using Cloud Shell, select the Try It button on the CLI commands to launch Cloud Shell in a split browser window. Or you can open the Cloud Shell in a separate browser tab.
- If you're using Azure CLI locally, open a console such as Windows CMD, PowerShell, or Bash and sign in to Azure CLI.
To run the CLI commands in the rest of this quickstart: copy the command syntax, paste it into your Cloud Shell window or CLI console, edit variable values, and press Enter.
Run az extension add to install or upgrade the azure-iot extension to the current version.
az extension add --upgrade --name azure-iotRun the az group create command to create a resource group. The following command creates a resource group named MyResourceGroup in the eastus location.
Note
You can optionally set an alternate location. To see available locations, run
az account list-locations. This tutorial uses eastus as shown in the example command.az group create --name MyResourceGroup --location eastusRun the az iot hub create command to create an IoT hub. It might take a few minutes to create an IoT hub.
YourIotHubName. Replace this placeholder and the surrounding braces in the following command, using the name you chose for your IoT hub. An IoT hub name must be globally unique in Azure. Use your IoT hub name in the rest of this quickstart wherever you see the placeholder.
az iot hub create --resource-group MyResourceGroup --name {YourIoTHubName}Tip
After creating an IoT hub, you'll use Azure IoT Explorer to interact with your IoT hub in the rest of this quickstart. IoT Explorer is a GUI application that lets you connect to an existing IoT Hub and add, manage, and monitor devices. To learn more, see Install and use Azure IoT explorer. Optionally, you can continue to use CLI commands.
Configure IoT Explorer
In the rest of this quickstart, you'll use IoT Explorer to register a device to your IoT hub and to view the device telemetry. In this section, you configure IoT Explorer to connect to the IoT hub you just created and to read plug and play models from the public model repository.
Note
You can also use the Azure CLI to register a device. Use the az iot hub device-identity create --device-id mydevice --hub-name {YourIoTHubName} command to register a new device and the az iot hub device-identity connection-string show --device-id mydevice --hub-name {YourIoTHubName} command to get the primary connection string for the device. Once you note down the device connection string, you can skip ahead to Run the device sample.
To add a connection to your IoT hub:
Run the az iot hub connection-string show command to get the connection string for your IoT hub.
az iot hub connection-string show --hub-name {YourIoTHubName}Copy the connection string without the surrounding quotation characters.
In Azure IoT Explorer, select IoT hubs on the left menu, then select + Add connection.
Paste the connection string into the Connection string box.
Select Save.
If the connection succeeds, IoT Explorer switches to the Devices view.
To add the public model repository:
In IoT Explorer, select Home to return to the home view.
On the left menu, select IoT Plug and Play Settings, then select +Add and select Public repository from the drop-down menu.
An entry appears for the public model repository at
https://devicemodels.azure.com.
Select Save.
Register a device
In this section, you create a new device instance and register it with the IoT hub you created. You'll use the connection information for the newly registered device to securely connect your device in a later section.
To register a device:
From the home view in IoT Explorer, select IoT hubs.
The connection you previously added should appear. Select View devices in this hub below the connection properties.
Select + New and enter a device ID for your device; for example, mydevice. Leave all other properties the same.
Select Create.
Use the copy buttons to copy and note down the Primary connection string field. You'll need this connection string later.
Run the device sample
In this section, you use the Java SDK to send messages from a device to your IoT hub. You'll run a sample that implements a temperature controller with two thermostat sensors.
Open a console to install the Azure IoT Java device SDK, build, and run the code sample. You'll use this console in the following steps.
Note
If you're using a local installation of Azure CLI, you might now have two console windows open. Be sure to enter the commands in this section in the console you just opened, not the one that you've been using for the CLI.
Linux and Raspberry Pi OS
Confirm that the JAVA_HOME (
echo $JAVA_HOME) environment variable is set. For information about setting JAVA_HOME, see Linux/Raspberry Pi Prerequisites.Clone the Azure IoT Java device SDK to your local machine:
git clone https://github.com/Azure/azure-iot-sdk-java.gitNavigate to the root folder of the SDK and run the following command to build the SDK and update the samples.
cd azure-iot-sdk-java
mvn install -T 2C -DskipTests
This operation takes several minutes.
Set the following environment variables, to enable your device to connect to Azure IoT.
- Set an environment variable called
IOTHUB_DEVICE_CONNECTION_STRING. For the variable value, use the device connection string that you saved in the previous section. - Set an environment variable called
IOTHUB_DEVICE_SECURITY_TYPE. For the variable, use the literal string valueconnectionString.
CMD
set IOTHUB_DEVICE_CONNECTION_STRING=<your connection string here>
set IOTHUB_DEVICE_SECURITY_TYPE=connectionString
Note
For Windows CMD there are no quotation marks surrounding the string values for each variable.
Bash
export IOTHUB_DEVICE_CONNECTION_STRING="<your connection string here>" export IOTHUB_DEVICE_SECURITY_TYPE="connectionString"- Set an environment variable called
Navigate to the sample directory.
CMD
cd device\iot-device-samples\pnp-device-sample\temperature-controller-device-sampleBash
cd device/iot-device-samples/pnp-device-sample/temperature-controller-device-sampleRun the code sample.
java -jar -Dexec.mainClass="samples.com.microsoft.azure.sdk.iot.device.TemperatureController"Note
This code sample uses Azure IoT Plug and Play, which lets you integrate smart devices into your solutions without any manual configuration. By default, most samples in this documentation use IoT Plug and Play. To learn more about the advantages of IoT PnP, and cases for using or not using it, see What is IoT Plug and Play?.
The sample securely connects to your IoT hub as the device you registered and begins sending telemetry messages. The sample output appears in your console.
View telemetry
You can view the device telemetry with IoT Explorer. Optionally, you can view telemetry using Azure CLI.
To view telemetry in Azure IoT Explorer:
From your Iot hub in IoT Explorer, select View devices in this hub, then select your device from the list.
On the left menu for your device, select Telemetry.
Confirm that Use built-in event hub is set to Yes and then select Start.
View the telemetry as the device sends messages to the cloud.
Select Stop to end receiving events.
To read telemetry sent by individual device components, you can use the plug and play features in IoT Explorer. For example, the temperature controller in this quickstart has two thermostats: thermostat1 and thermostat2. To see the temperature reported by thermostat1:
On your device in IoT Explorer, select IoT Plug and Play components from the left menu. Then select thermostat1 from the list of components.
On the thermostat1 component pane, select Telemetry from the top menu.
On the Telemetry pane, follow the same steps that you did previously. Make sure that Use built-in event hub is set to Yes and then select Start.
To view device telemetry with Azure CLI:
Run the az iot hub monitor-events command to monitor events sent from the device to your IoT hub. Use the names that you created previously in Azure IoT for your device and IoT hub.
az iot hub monitor-events --output table --device-id mydevice --hub-name {YourIoTHubName}View the connection details and telemetry output in the console.
Starting event monitor, filtering on device: mydevice, use ctrl-c to stop...
event:
  component: thermostat1
  interface: dtmi:com:example:TemperatureController;2
  module: ''
  origin: mydevice
  payload:
    temperature: 24.1

event:
  component: thermostat2
  interface: dtmi:com:example:TemperatureController;2
  module: ''
  origin: mydevice
  payload:
    temperature: 33.3
In this quickstart, you learn a basic Azure IoT application development workflow. You use the Azure CLI and IoT Explorer to create an Azure IoT hub and a device. Then you use an Azure IoT device SDK sample to run a temperature controller, connect it securely to the hub, and send telemetry. The temperature controller sample application runs on your local machine and generates simulated sensor data to send to IoT Hub.
Prerequisites
This quickstart runs on Windows, Linux, and Raspberry Pi. It's been tested on the following OS and device versions:
- Windows 10
- Ubuntu 20.04 LTS
- Raspberry Pi OS (Raspbian) version 10, running on a Raspberry Pi 3 Model B+
Install the following prerequisites on your development machine except where noted for Raspberry Pi:
- If you don't have an Azure subscription, create one for free before you begin.
- Git.
- Node.js version 12 or later. To check your node version run
node --version. - Azure IoT Explorer: Cross-platform, GUI-based utility to monitor and manage Azure IoT. If you're using Raspberry Pi as your development platform, we recommend that you install IoT Explorer on another computer. If you don't want to install IoT Explorer, you can use Azure CLI to perform the same steps.
- Azure CLI. You have two options for running Azure CLI commands in this quickstart:
- Use the Azure Cloud Shell, an interactive shell that runs CLI commands in your browser. This option is recommended because you don't need to install anything. If you're using Cloud Shell for the first time, sign in to the Azure portal. Follow the steps in Get started with Azure Cloud Shell to Start Cloud Shell and Select the Bash environment.
- Optionally, run Azure CLI on your local machine. If Azure CLI is already installed, run
az upgradeto upgrade the CLI and extensions to the current version. To install Azure CLI, see Install Azure CLI. If you're using Raspberry Pi as your development platform, we recommend that you use Azure Cloud Shell or install Azure CLI on another computer.
Create an IoT hub
In this section, you use Azure CLI to create an IoT hub and a resource group. An Azure resource group is a logical container into which Azure resources are deployed and managed. An IoT hub acts as a central message hub for bi-directional communication between your IoT application and devices.
To create an IoT hub and a resource group:
Launch Azure CLI:
- If you're using Cloud Shell, select the Try It button on the CLI commands to launch Cloud Shell in a split browser window. Or you can open the Cloud Shell in a separate browser tab.
- If you're using Azure CLI locally, open a console such as Windows CMD, PowerShell, or Bash and sign in to Azure CLI.
To run the CLI commands in the rest of this quickstart: copy the command syntax, paste it into your Cloud Shell window or CLI console, edit variable values, and press Enter.
Run az extension add to install or upgrade the azure-iot extension to the current version.
az extension add --upgrade --name azure-iotRun the az group create command to create a resource group. The following command creates a resource group named MyResourceGroup in the eastus location.
Note
You can optionally set an alternate location. To see available locations, run
az account list-locations. This tutorial uses eastus as shown in the example command.az group create --name MyResourceGroup --location eastusRun the az iot hub create command to create an IoT hub. It might take a few minutes to create an IoT hub.
YourIotHubName. Replace this placeholder and the surrounding braces in the following command, using the name you chose for your IoT hub. An IoT hub name must be globally unique in Azure. Use your IoT hub name in the rest of this quickstart wherever you see the placeholder.
az iot hub create --resource-group MyResourceGroup --name {YourIoTHubName}Tip
After creating an IoT hub, you'll use Azure IoT Explorer to interact with your IoT hub in the rest of this quickstart. IoT Explorer is a GUI application that lets you connect to an existing IoT Hub and add, manage, and monitor devices. To learn more, see Install and use Azure IoT explorer. Optionally, you can continue to use CLI commands.
Configure IoT Explorer
In the rest of this quickstart, you'll use IoT Explorer to register a device to your IoT hub and to view the device telemetry. In this section, you configure IoT Explorer to connect to the IoT hub you just created and to read plug and play models from the public model repository.
Note
You can also use the Azure CLI to register a device. Use the az iot hub device-identity create --device-id mydevice --hub-name {YourIoTHubName} command to register a new device and the az iot hub device-identity connection-string show --device-id mydevice --hub-name {YourIoTHubName} command to get the primary connection string for the device. Once you note down the device connection string, you can skip ahead to Run the device sample.
To add a connection to your IoT hub:
Run the az iot hub connection-string show command to get the connection string for your IoT hub.
az iot hub connection-string show --hub-name {YourIoTHubName}Copy the connection string without the surrounding quotation characters.
In Azure IoT Explorer, select IoT hubs on the left menu, then select + Add connection.
Paste the connection string into the Connection string box.
Select Save.
If the connection succeeds, IoT Explorer switches to the Devices view.
To add the public model repository:
In IoT Explorer, select Home to return to the home view.
On the left menu, select IoT Plug and Play Settings, then select +Add and select Public repository from the drop-down menu.
An entry appears for the public model repository at
https://devicemodels.azure.com.
Select Save.
Register a device
In this section, you create a new device instance and register it with the IoT hub you created. You'll use the connection information for the newly registered device to securely connect your device in a later section.
To register a device:
From the home view in IoT Explorer, select IoT hubs.
The connection you previously added should appear. Select View devices in this hub below the connection properties.
Select + New and enter a device ID for your device; for example, mydevice. Leave all other properties the same.
Select Create.
Use the copy buttons to copy and note down the Primary connection string field. You'll need this connection string later.
Run the device sample
In this section, you'll use the Node.js SDK to send messages from a device to your IoT hub. You'll run a sample that implements a temperature controller with two thermostat sensors.
Open a new console such as Windows CMD, PowerShell, or Bash. In the following steps, you'll use this console to install the Node.js SDK and work with Node.js sample code.
Note
If you're using a local installation of Azure CLI, you might now have two console windows open. Be sure to enter the commands in this section in the console you just opened, not the one that you've been using for the CLI.
Clone the Azure IoT Node.js SDK device samples to your local machine:
git clone https://github.com/Azure/azure-iot-sdk-nodeNavigate to the sample directory:
Windows
cd azure-iot-sdk-node\device\samples\javascriptLinux or Raspberry Pi OS
cd azure-iot-sdk-node/device/samples/javascriptInstall the Azure IoT Node.js SDK and necessary dependencies:
npm installThis command installs the proper dependencies as specified in the package.json file in the device samples directory.
Set both of the following environment variables, to enable your device to connect to Azure IoT.
- Set an environment variable called
IOTHUB_DEVICE_CONNECTION_STRING. For the variable value, use the device connection string that you saved in the previous section. - Set an environment variable called
IOTHUB_DEVICE_SECURITY_TYPE. For the variable, use the literal string valueconnectionString.
CMD (Windows)
set IOTHUB_DEVICE_CONNECTION_STRING=<your connection string here>
set IOTHUB_DEVICE_SECURITY_TYPE=connectionString
Note
For Windows CMD there are no quotation marks surrounding the string values for each variable.
PowerShell
$env:IOTHUB_DEVICE_CONNECTION_STRING='<your connection string here>'
$env:IOTHUB_DEVICE_SECURITY_TYPE='connectionString'
Bash
export IOTHUB_DEVICE_CONNECTION_STRING="<your connection string here>" export IOTHUB_DEVICE_SECURITY_TYPE="connectionString"- Set an environment variable called
Run the following code sample:
node pnp_temperature_controller.jsNote
This code sample uses Azure IoT Plug and Play, which lets you integrate smart devices into your solutions without any manual configuration. By default, most samples in this documentation use IoT Plug and Play. To learn more about the advantages of IoT PnP, and cases for using or not using it, see What is IoT Plug and Play?.
The sample securely connects to your IoT hub as the device you registered and begins sending telemetry messages. The sample output appears in your console.
View telemetry
You can view the device telemetry with IoT Explorer. Optionally, you can view telemetry using Azure CLI.
To view telemetry in Azure IoT Explorer:
From your Iot hub in IoT Explorer, select View devices in this hub, then select your device from the list.
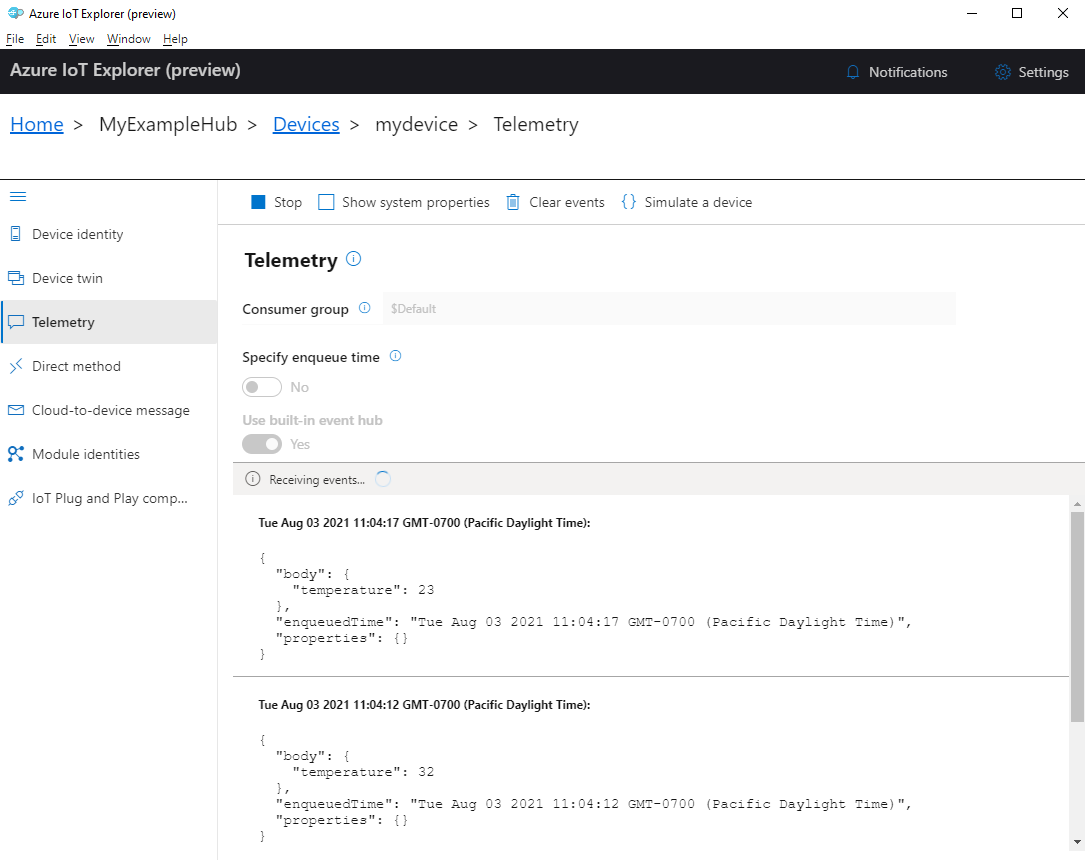
On the left menu for your device, select Telemetry.
Confirm that Use built-in event hub is set to Yes and then select Start.
View the telemetry as the device sends messages to the cloud.
Select Stop to end receiving events.
To read telemetry sent by individual device components, you can use the plug and play features in IoT Explorer. For example, the temperature controller in this quickstart has two thermostats: thermostat1 and thermostat2. To see the temperature reported by thermostat1:
On your device in IoT Explorer, select IoT Plug and Play components from the left menu. Then select thermostat1 from the list of components.
On the thermostat1 component pane, select Telemetry from the top menu.
On the Telemetry pane, follow the same steps that you did previously. Make sure that Use built-in event hub is set to Yes and then select Start.
To view device telemetry with Azure CLI:
Run the az iot hub monitor-events command to monitor events sent from the device to your IoT hub. Use the names that you created previously in Azure IoT for your device and IoT hub.
az iot hub monitor-events --output table --device-id mydevice --hub-name {YourIoTHubName}View the connection details and telemetry output in the console.
Starting event monitor, filtering on device: mydevice, use ctrl-c to stop...
event:
  component: thermostat1
  interface: dtmi:com:example:TemperatureController;2
  module: ''
  origin: mydevice
  payload:
    temperature: 70.5897683228018

event:
  component: thermostat2
  interface: dtmi:com:example:TemperatureController;2
  module: ''
  origin: mydevice
  payload:
    temperature: 52.87582619316418
In this quickstart, you learn a basic Azure IoT application development workflow. You use the Azure CLI and IoT Explorer to create an Azure IoT hub and a device. Then you use an Azure IoT device SDK sample to run a temperature controller, connect it securely to the hub, and send telemetry. The temperature controller sample application runs on your local machine and generates simulated sensor data to send to IoT Hub.
Prerequisites
This quickstart runs on Windows, Linux, and Raspberry Pi. It's been tested on the following OS and device versions:
- Windows 10 or Windows 11
- Ubuntu 20.04 LTS
- Raspberry Pi OS (Raspbian) version 10, running on a Raspberry Pi 3 Model B+
Install the following prerequisites on your development machine except where noted for Raspberry Pi:
- If you don't have an Azure subscription, create one for free before you begin.
- Git.
- Python. Check the Azure IoT Python SDK for current Python version requirements. To check your Python version, run
python3 --version. - Azure IoT Explorer: Cross-platform, GUI-based utility to monitor and manage Azure IoT. If you're using Raspberry Pi as your development platform, we recommend that you install IoT Explorer on another computer. If you don't want to install IoT Explorer, you can use Azure CLI to perform the same steps.
- Azure CLI. You have two options for running Azure CLI commands in this quickstart:
- Use the Azure Cloud Shell, an interactive shell that runs CLI commands in your browser. This option is recommended because you don't need to install anything. If you're using Cloud Shell for the first time, sign in to the Azure portal. Follow the steps in Get started with Azure Cloud Shell to Start Cloud Shell and Select the Bash environment.
- Optionally, run Azure CLI on your local machine. If Azure CLI is already installed, run
az upgradeto upgrade the CLI and extensions to the current version. To install Azure CLI, see Install Azure CLI. If you're using Raspberry Pi as your development platform, we recommend that you use Azure Cloud Shell or install Azure CLI on another computer.
Create an IoT hub
In this section, you use Azure CLI to create an IoT hub and a resource group. An Azure resource group is a logical container into which Azure resources are deployed and managed. An IoT hub acts as a central message hub for bi-directional communication between your IoT application and devices.
To create an IoT hub and a resource group:
Launch Azure CLI:
- If you're using Cloud Shell, select the Try It button on the CLI commands to launch Cloud Shell in a split browser window. Or you can open the Cloud Shell in a separate browser tab.
- If you're using Azure CLI locally, open a console such as Windows CMD, PowerShell, or Bash and sign in to Azure CLI.
To run the CLI commands in the rest of this quickstart: copy the command syntax, paste it into your Cloud Shell window or CLI console, edit variable values, and press Enter.
Run az extension add to install or upgrade the azure-iot extension to the current version.
az extension add --upgrade --name azure-iotRun the az group create command to create a resource group. The following command creates a resource group named MyResourceGroup in the eastus location.
Note
You can optionally set an alternate location. To see available locations, run
az account list-locations. This tutorial uses eastus as shown in the example command.az group create --name MyResourceGroup --location eastusRun the az iot hub create command to create an IoT hub. It might take a few minutes to create an IoT hub.
YourIotHubName. Replace this placeholder and the surrounding braces in the following command, using the name you chose for your IoT hub. An IoT hub name must be globally unique in Azure. Use your IoT hub name in the rest of this quickstart wherever you see the placeholder.
az iot hub create --resource-group MyResourceGroup --name {YourIoTHubName}Tip
After creating an IoT hub, you'll use Azure IoT Explorer to interact with your IoT hub in the rest of this quickstart. IoT Explorer is a GUI application that lets you connect to an existing IoT Hub and add, manage, and monitor devices. To learn more, see Install and use Azure IoT explorer. Optionally, you can continue to use CLI commands.
Configure IoT Explorer
In the rest of this quickstart, you'll use IoT Explorer to register a device to your IoT hub and to view the device telemetry. In this section, you configure IoT Explorer to connect to the IoT hub you just created and to read plug and play models from the public model repository.
Note
You can also use the Azure CLI to register a device. Use the az iot hub device-identity create --device-id mydevice --hub-name {YourIoTHubName} command to register a new device and the az iot hub device-identity connection-string show --device-id mydevice --hub-name {YourIoTHubName} command to get the primary connection string for the device. Once you note down the device connection string, you can skip ahead to Run the device sample.
To add a connection to your IoT hub:
Run the az iot hub connection-string show command to get the connection string for your IoT hub.
az iot hub connection-string show --hub-name {YourIoTHubName}Copy the connection string without the surrounding quotation characters.
In Azure IoT Explorer, select IoT hubs on the left menu, then select + Add connection.
Paste the connection string into the Connection string box.
Select Save.
If the connection succeeds, IoT Explorer switches to the Devices view.
To add the public model repository:
In IoT Explorer, select Home to return to the home view.
On the left menu, select IoT Plug and Play Settings, then select +Add and select Public repository from the drop-down menu.
An entry appears for the public model repository at
https://devicemodels.azure.com.
Select Save.
Register a device
In this section, you create a new device instance and register it with the IoT hub you created. You'll use the connection information for the newly registered device to securely connect your device in a later section.
To register a device:
From the home view in IoT Explorer, select IoT hubs.
The connection you previously added should appear. Select View devices in this hub below the connection properties.
Select + New and enter a device ID for your device; for example, mydevice. Leave all other properties the same.
Select Create.
Use the copy buttons to copy and note down the Primary connection string field. You'll need this connection string later.
Run the device sample
In this section, you use the Python SDK to send messages from a device to your IoT hub. You'll run a sample that implements a temperature controller with two thermostat sensors.
Open a new console such as Windows CMD, PowerShell, or Bash. In the following steps, you'll use this console to install the Python SDK and work with the Python sample code.
Note
If you're using a local installation of Azure CLI, you might now have two console windows open. Be sure to enter the commands in this section in the console you just opened, not the one that you've been using for the CLI.
Clone the Azure IoT Python SDK device samples to your local machine:
git clone --branch v2 https://github.com/Azure/azure-iot-sdk-pythonNavigate to the sample directory:
Windows
cd azure-iot-sdk-python\samples\pnpLinux or Raspberry Pi OS
cd azure-iot-sdk-python/samples/pnpInstall the Azure IoT Python SDK:
pip3 install azure-iot-deviceSet the following environment variables, to enable your device to connect to Azure IoT.
- Set an environment variable called
IOTHUB_DEVICE_CONNECTION_STRING. For the variable value, use the device connection string that you saved in the previous section. - Set an environment variable called
IOTHUB_DEVICE_SECURITY_TYPE. For the variable, use the literal string valueconnectionString.
CMD (Windows)
set IOTHUB_DEVICE_CONNECTION_STRING=<your connection string here>
set IOTHUB_DEVICE_SECURITY_TYPE=connectionString
Note
For Windows CMD there are no quotation marks surrounding the string values for each variable.
PowerShell
$env:IOTHUB_DEVICE_CONNECTION_STRING='<your connection string here>'
$env:IOTHUB_DEVICE_SECURITY_TYPE='connectionString'
Bash
export IOTHUB_DEVICE_CONNECTION_STRING="<your connection string here>" export IOTHUB_DEVICE_SECURITY_TYPE="connectionString"- Set an environment variable called
Run the code for the following sample file.
python temp_controller_with_thermostats.pyNote
This code sample uses Azure IoT Plug and Play, which lets you integrate smart devices into your solutions without any manual configuration. By default, most samples in this documentation use IoT Plug and Play. To learn more about the advantages of IoT Plug and Play, and cases for using or not using it, see What is IoT Plug and Play?.
The sample securely connects to your IoT hub as the device you registered and begins sending telemetry messages. The sample output appears in your console.
View telemetry
You can view the device telemetry with IoT Explorer. Optionally, you can view telemetry using Azure CLI.
To view telemetry in Azure IoT Explorer:
From your Iot hub in IoT Explorer, select View devices in this hub, then select your device from the list.
On the left menu for your device, select Telemetry.
Confirm that Use built-in event hub is set to Yes and then select Start.
View the telemetry as the device sends messages to the cloud.
Select Stop to end receiving events.
To read telemetry sent by individual device components, you can use the plug and play features in IoT Explorer. For example, the temperature controller in this quickstart has two thermostats: thermostat1 and thermostat2. To see the temperature reported by thermostat1:
On your device in IoT Explorer, select IoT Plug and Play components from the left menu. Then select thermostat1 from the list of components.
On the thermostat1 component pane, select Telemetry from the top menu.
On the Telemetry pane, follow the same steps that you did previously. Make sure that Use built-in event hub is set to Yes and then select Start.
To view device telemetry with Azure CLI:
Run the az iot hub monitor-events command to monitor events sent from the device to your IoT hub. Use the names that you created previously in Azure IoT for your device and IoT hub.
az iot hub monitor-events --output table --device-id mydevice --hub-name {YourIoTHubName}View the connection details and telemetry output in the console.
Starting event monitor, filtering on device: mydevice, use ctrl-c to stop...
event:
  component: thermostat1
  interface: dtmi:com:example:TemperatureController;2
  module: ''
  origin: mydevice
  payload:
    temperature: 28

event:
  component: thermostat2
  interface: dtmi:com:example:TemperatureController;2
  module: ''
  origin: mydevice
  payload:
    temperature: 10
Clean up resources
If you no longer need the Azure resources created in this tutorial, you can use the Azure CLI to delete them.
Important
Deleting a resource group is irreversible. The resource group and all the resources contained in it are permanently deleted. Make sure that you do not accidentally delete the wrong resource group or resources.
To delete a resource group by name:
Run the az group delete command. This command removes the resource group, the IoT Hub, and the device registration you created.
az group delete --name MyResourceGroupRun the az group list command to confirm the resource group is deleted.
az group list
Next steps
In this tutorial, you learned a basic Azure IoT application workflow for securely connecting a device to the cloud and sending device-to-cloud telemetry. You used Azure CLI to create an Azure IoT hub and a device instance. Then you used an Azure IoT device SDK to create a temperature controller, connect it to the hub, and send telemetry. You also used Azure CLI to monitor telemetry.
As a next step, explore the following articles to learn more about building device solutions with Azure IoT.
Feedback
Coming soon: Throughout 2024 we will be phasing out GitHub Issues as the feedback mechanism for content and replacing it with a new feedback system. For more information see: https://aka.ms/ContentUserFeedback.
Submit and view feedback for