Tutorial: Configure MQTT bridge between Azure IoT MQ Preview and Azure Event Grid
Important
Azure IoT Operations Preview – enabled by Azure Arc is currently in PREVIEW. You shouldn't use this preview software in production environments.
See the Supplemental Terms of Use for Microsoft Azure Previews for legal terms that apply to Azure features that are in beta, preview, or otherwise not yet released into general availability.
In this tutorial, you learn how to configure IoT MQ for bi-directional MQTT bridge with Azure Event Grid MQTT broker PaaS. You can use this feature to process your IoT data at the edge and in the cloud. For example, you can use IoT MQ to process telemetry data at the edge, and then bridge the data to Azure Event Grid for further processing in the cloud.
Prerequisites
Set environment variables
Sign in with Azure CLI:
az login
Set environment variables for the rest of the setup. Replace values in <> with valid values or names of your choice. A new Azure Event Grid namespace and topic space are created in your Azure subscription based on the names you provide:
# For this tutorial, the steps assume the IoT Operations cluster and the Event Grid
# are in the same subscription, resource group, and location.

# Name of the resource group of Azure Event Grid and IoT Operations cluster
export RESOURCE_GROUP=<RESOURCE_GROUP_NAME>

# Azure region of Azure Event Grid and IoT Operations cluster
export LOCATION=<LOCATION>

# Name of the Azure Event Grid namespace
export EVENT_GRID_NAMESPACE=<EVENT_GRID_NAMESPACE>

# Name of the Arc-enabled IoT Operations cluster
export CLUSTER_NAME=<CLUSTER_NAME>

# Subscription ID of Azure Event Grid and IoT Operations cluster
export SUBSCRIPTION_ID=<SUBSCRIPTION_ID>
Create Event Grid namespace with MQTT broker enabled
Create Event Grid namespace with Azure CLI. The location should be the same as the one you used to deploy Azure IoT Operations.
az eventgrid namespace create \
  --namespace-name $EVENT_GRID_NAMESPACE \
  --resource-group $RESOURCE_GROUP \
  --location $LOCATION \
  --topic-spaces-configuration "{state:Enabled,maximumClientSessionsPerAuthenticationName:3}"
By setting the topic-spaces-configuration, this command creates a namespace with:
- MQTT broker enabled
- Maximum client sessions per authentication name as 3.
The max client sessions option allows IoT MQ to spawn multiple instances and still connect. To learn more, see multi-session support.
Create a topic space
In the Event Grid namespace, create a topic space named tutorial with a topic template telemetry/#.
az eventgrid namespace topic-space create \
  --resource-group $RESOURCE_GROUP \
  --namespace-name $EVENT_GRID_NAMESPACE \
  --name tutorial \
  --topic-templates "telemetry/#"
By using the # wildcard in the topic template, you can publish to any topic under the telemetry topic space. For example, telemetry/temperature or telemetry/humidity.
Give Azure IoT MQ Preview access to the Event Grid topic space
Using az k8s-extension show, find the principal ID for the Azure IoT MQ Arc extension. The command stores the principal ID in a variable for later use.
export PRINCIPAL_ID=$(az k8s-extension show \
  --resource-group $RESOURCE_GROUP \
  --cluster-name $CLUSTER_NAME \
  --name mq \
  --cluster-type connectedClusters \
  --query identity.principalId -o tsv)
echo $PRINCIPAL_ID
Take note of the output value for identity.principalId, which is a GUID value with the following format:
d84481ae-9181-xxxx-xxxx-xxxxxxxxxxxx
Then, use Azure CLI to assign publisher and subscriber roles to IoT MQ for the topic space you created.
Assign the publisher role:
az role assignment create \
  --assignee $PRINCIPAL_ID \
  --role "EventGrid TopicSpaces Publisher" \
  --scope /subscriptions/$SUBSCRIPTION_ID/resourceGroups/$RESOURCE_GROUP/providers/Microsoft.EventGrid/namespaces/$EVENT_GRID_NAMESPACE/topicSpaces/tutorial
Assign the subscriber role:
az role assignment create \
  --assignee $PRINCIPAL_ID \
  --role "EventGrid TopicSpaces Subscriber" \
  --scope /subscriptions/$SUBSCRIPTION_ID/resourceGroups/$RESOURCE_GROUP/providers/Microsoft.EventGrid/namespaces/$EVENT_GRID_NAMESPACE/topicSpaces/tutorial
Tip
The scope matches the id of the topic space you created with az eventgrid namespace topic-space create in the previous step, and you can find it in the output of the command.
Event Grid MQTT broker hostname
Use Azure CLI to get the Event Grid MQTT broker hostname.
az eventgrid namespace show \
  --resource-group $RESOURCE_GROUP \
  --namespace-name $EVENT_GRID_NAMESPACE \
  --query topicSpacesConfiguration.hostname \
  -o tsv
Take note of the output value for topicSpacesConfiguration.hostname that is a hostname value that looks like:
example.region-1.ts.eventgrid.azure.net
Create an MQTT bridge connector and topic map resources
In a new file named bridge.yaml, specify the MQTT bridge connector and topic map configuration. Replace the example placeholder value in remoteBrokerConnection endpoint with the Event Grid MQTT hostname from the previous step. Include the port number 8883.
apiVersion: mq.iotoperations.azure.com/v1beta1
kind: MqttBridgeConnector
metadata:
  name: tutorial-bridge
  namespace: azure-iot-operations
spec:
  image:
    repository: mcr.microsoft.com/azureiotoperations/mqttbridge
    tag: 0.4.0-preview
    pullPolicy: IfNotPresent
  protocol: v5
  bridgeInstances: 2
  logLevel: debug
  remoteBrokerConnection:
    endpoint: example.region-1.ts.eventgrid.azure.net:8883
    tls:
      tlsEnabled: true
    authentication:
      systemAssignedManagedIdentity:
        audience: https://eventgrid.azure.net
  localBrokerConnection:
    endpoint: aio-mq-dmqtt-frontend:8883
    tls:
      tlsEnabled: true
      trustedCaCertificateConfigMap: aio-ca-trust-bundle-test-only
    authentication:
      kubernetes: {}
---
apiVersion: mq.iotoperations.azure.com/v1beta1
kind: MqttBridgeTopicMap
metadata:
  name: tutorial-topic-map
  namespace: azure-iot-operations
spec:
  mqttBridgeConnectorRef: tutorial-bridge
  routes:
    - direction: local-to-remote
      name: publish
      source: tutorial/local
      target: telemetry/iot-mq
      qos: 1
    - direction: remote-to-local
      name: subscribe
      source: telemetry/#
      target: tutorial/cloud
      qos: 1
You configure the MQTT bridge connector to:
- Use the Event Grid MQTT broker as the remote broker
- Use the local IoT MQ broker as the local broker
- Use TLS for both remote and local brokers
- Use system-assigned managed identity for authentication to the remote broker
- Use Kubernetes service account for authentication to the local broker
- Use the topic map to map the
tutorial/localtopic to thetelemetry/iot-mqtopic on the remote broker - Use the topic map to map the
telemetry/#topic on the remote broker to thetutorial/cloudtopic on the local broker
When you publish to the tutorial/local topic on the local IoT MQ broker, the message is bridged to the telemetry/iot-mq topic on the remote Event Grid MQTT broker. Then, the message is bridged back to the tutorial/cloud topic on the local IoT MQ broker. Similarly, when you publish to the telemetry/iot-mq topic on the remote Event Grid MQTT broker, the message is bridged to the tutorial/cloud topic on the local IoT MQ broker.
Apply the deployment file with kubectl.
kubectl apply -f bridge.yaml
mqttbridgeconnector.mq.iotoperations.azure.com/tutorial-bridge created
mqttbridgetopicmap.mq.iotoperations.azure.com/tutorial-topic-map created
Verify MQTT bridge deployment
Use kubectl to check the two bridge instances are ready and running.
kubectl get pods -n azure-iot-operations -l app=aio-mq-mqttbridge
NAME                       READY   STATUS    RESTARTS   AGE
aio-mq-tutorial-bridge-0   1/1     Running   0          45s
aio-mq-tutorial-bridge-1   1/1     Running   0          45s
You can now publish on the local broker and subscribe to the Event Grid MQTT Broker and verify messages flow as expected.
Deploy MQTT client
To verify the MQTT bridge is working, deploy an MQTT client to the same namespace as IoT MQ. In a new file named client.yaml, specify the client deployment:
apiVersion: v1
kind: Pod
metadata:
  name: mqtt-client
  namespace: azure-iot-operations
spec:
  serviceAccountName: mqtt-client
  containers:
  - image: alpine
    name: mqtt-client
    command: ["sh", "-c"]
    args: ["apk add mosquitto-clients mqttui && sleep infinity"]
    volumeMounts:
    - name: mq-sat
      mountPath: /var/run/secrets/tokens
    - name: trust-bundle
      mountPath: /var/run/certs
  volumes:
  - name: mq-sat
    projected:
      sources:
      - serviceAccountToken:
          path: mq-sat
          audience: aio-mq
          expirationSeconds: 86400
  - name: trust-bundle
    configMap:
      name: aio-ca-trust-bundle-test-only
Apply the deployment file with kubectl.
kubectl apply -f client.yaml
pod/mqtt-client created
Start a subscriber
Use kubectl exec to start a shell in the mosquitto client pod.
kubectl exec --stdin --tty mqtt-client -n azure-iot-operations -- sh
Inside the shell, start a subscriber to the IoT MQ broker on the tutorial/# topic space with mqttui.
mqttui log "tutorial/#" \
-b mqtts://aio-mq-dmqtt-frontend:8883 \
-u '$sat' \
--password $(cat /var/run/secrets/tokens/mq-sat) \
--insecure
Leave the command running and open a new terminal window.
Publish MQTT messages to the cloud via the bridge
In a new terminal window, start another shell in the mosquitto client pod.
kubectl exec --stdin --tty mqtt-client -n azure-iot-operations -- sh
Inside the shell, use mosquitto to publish five messages to the tutorial/local topic.
mosquitto_pub -h aio-mq-dmqtt-frontend -p 8883 \
-m "This message goes all the way to the cloud and back!" \
-t "tutorial/local" -u '$sat' -P $(cat /var/run/secrets/tokens/mq-sat) \
--cafile /var/run/certs/ca.crt \
--repeat 5 --repeat-delay 1 -d
View the messages in the subscriber
In the subscriber shell, you see the messages you published.
23:17:50.802 QoS:AtMostOnce  tutorial/local     Payload( 52): This message goes all the way to the cloud and back!
23:17:51.086 QoS:AtMostOnce  tutorial/cloud     Payload( 52): This message goes all the way to the cloud and back!
23:17:51.803 QoS:AtMostOnce  tutorial/local     Payload( 52): This message goes all the way to the cloud and back!
23:17:51.888 QoS:AtMostOnce  tutorial/cloud     Payload( 52): This message goes all the way to the cloud and back!
23:17:52.804 QoS:AtMostOnce  tutorial/local     Payload( 52): This message goes all the way to the cloud and back!
23:17:52.888 QoS:AtMostOnce  tutorial/cloud     Payload( 52): This message goes all the way to the cloud and back!
23:17:53.805 QoS:AtMostOnce  tutorial/local     Payload( 52): This message goes all the way to the cloud and back!
23:17:53.895 QoS:AtMostOnce  tutorial/cloud     Payload( 52): This message goes all the way to the cloud and back!
23:17:54.807 QoS:AtMostOnce  tutorial/local     Payload( 52): This message goes all the way to the cloud and back!
23:17:54.881 QoS:AtMostOnce  tutorial/cloud     Payload( 52): This message goes all the way to the cloud and back!
Here, you see the messages are published to the local IoT MQ broker to the tutorial/local topic, bridged to Event Grid MQTT broker, and then bridged back to the local IoT MQ broker again on the tutorial/cloud topic. The messages are then delivered to the subscriber. In this example, the round trip time is about 80 ms.
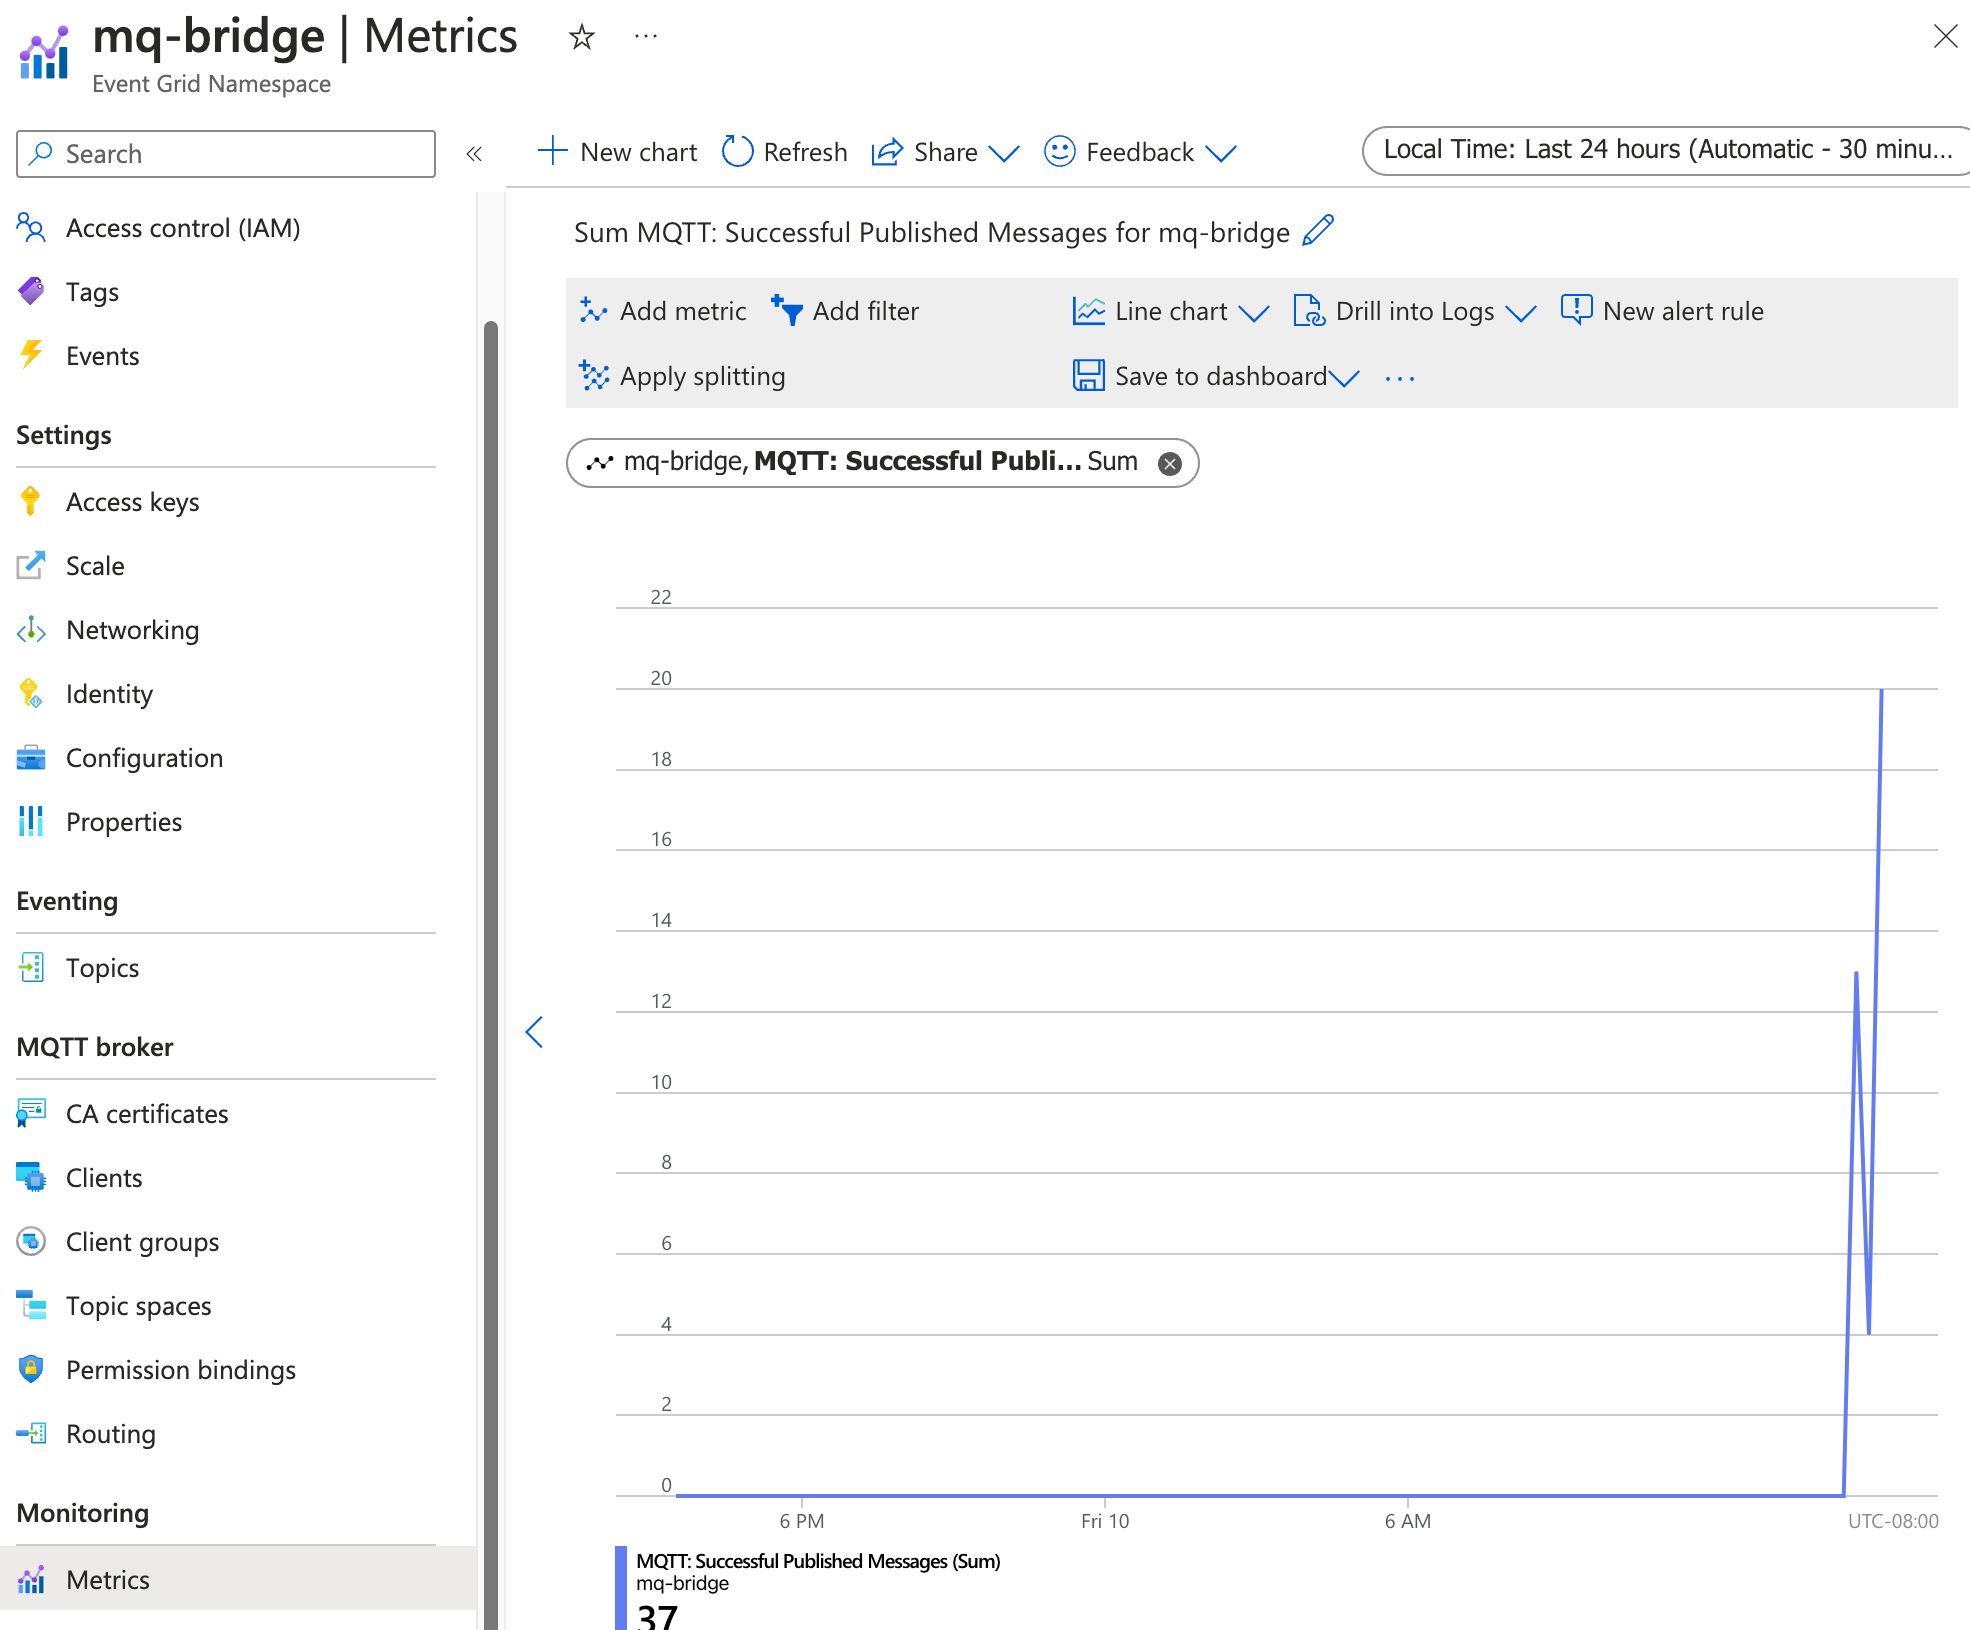
Check Event Grid metrics to verify message delivery
You can also check the Event Grid metrics to verify the messages are delivered to the Event Grid MQTT broker. In the Azure portal, navigate to the Event Grid namespace you created. Under Metrics > MQTT: Successful Published Messages. You should see the number of messages published and delivered increase as you publish messages to the local IoT MQ broker.
Tip
You can check the configurations of topic maps, QoS, and message routes with the CLI extension az iot ops check --detail-level 2.
Next steps
In this tutorial, you learned how to configure IoT MQ for bi-directional MQTT bridge with Azure Event Grid MQTT broker. As next steps, explore the following scenarios:
- To use an MQTT client to publish messages directly to the Event Grid MQTT broker, see Publish MQTT messages to Event Grid MQTT broker. Give the client a publisher permission binding to the topic space you created, and you can publish messages to any topic under the
telemetry, liketelemetry/temperatureortelemetry/humidity. All of these messages are bridged to thetutorial/cloudtopic on the local IoT MQ broker. - To set up routing rules for the Event Grid MQTT broker, see Configure routing rules for Event Grid MQTT broker. You can use routing rules to route messages to different topics based on the topic name, or to filter messages based on the message content.
Related content
Feedback
Coming soon: Throughout 2024 we will be phasing out GitHub Issues as the feedback mechanism for content and replacing it with a new feedback system. For more information see: https://aka.ms/ContentUserFeedback.
Submit and view feedback for