Manage asset configurations remotely
Important
Azure IoT Operations Preview – enabled by Azure Arc is currently in PREVIEW. You shouldn't use this preview software in production environments.
See the Supplemental Terms of Use for Microsoft Azure Previews for legal terms that apply to Azure features that are in beta, preview, or otherwise not yet released into general availability.
An asset in Azure IoT Operations Preview is a logical entity that you create to represent a real asset. An Azure IoT Operations asset can have properties, tags, and events that describe its behavior and characteristics.
OPC UA servers are software applications that communicate with assets. OPC UA servers expose OPC UA tags that represent data points. OPC UA tags provide real-time or historical data about the status, performance, quality, or condition of assets.
An asset endpoint is a custom resource in your Kubernetes cluster that connects OPC UA servers to OPC UA connector modules. This connection enables an OPC UA connector to access an asset's data points. Without an asset endpoint, data can't flow from an OPC UA server to the Azure IoT OPC UA Broker Preview instance and Azure IoT MQ Preview instance. After you configure the custom resources in your cluster, a connection is established to the downstream OPC UA server and the server forwards telemetry to the OPC UA Broker instance.
A site is a collection of Azure IoT Operations instances. Sites help you organize your instances and manage access control. Your IT administrator creates sites, assigns instances to them, and grants access to OT users in your organization.
In the Azure IoT Operations (preview) portal, an instance represents an Azure IoT Operations cluster. An instance can have one or more asset endpoints.
This article describes how to use the Azure IoT Operations (preview) portal and the Azure CLI to:
- Define asset endpoints
- Add assets, and define tags and events
These assets, tags, and events map inbound data from OPC UA servers to friendly names that you can use in the MQ broker and Azure IoT Data Processor Preview pipelines.
Prerequisites
To configure an assets endpoint, you need a running instance of Azure IoT Operations.
Sign in
To sign in to the Azure IoT Operations (preview) portal, navigate to the Azure IoT Operations (preview) portal in your browser and sign in by using your Microsoft Entra ID credentials.
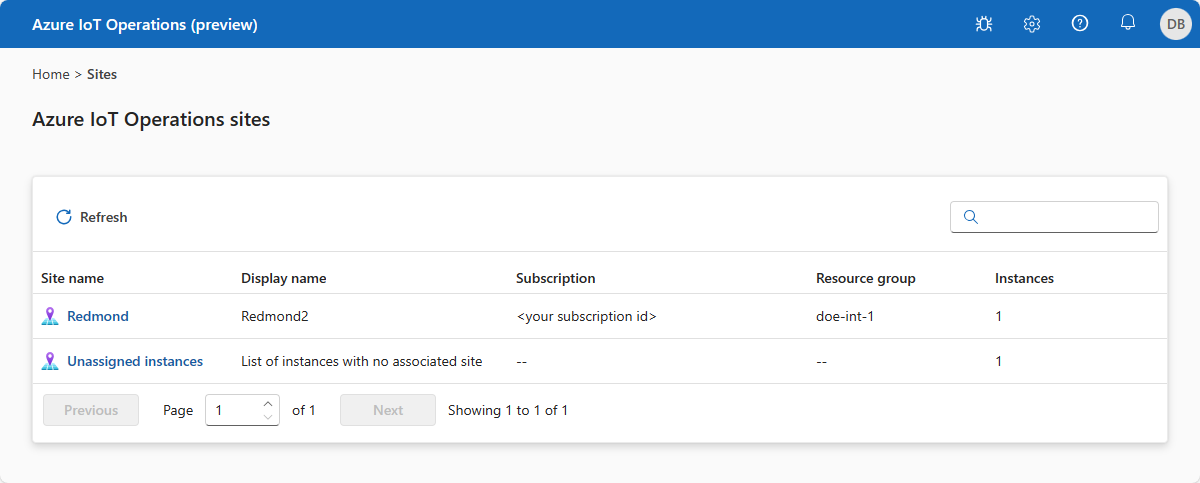
Select your site
After you sign in, the portal displays a list of sites that you have access to. Each site is a collection of Azure IoT Operations instances where you can configure your assets. Your IT administrator is responsible for organizing instances in to sites and granting access to OT users in your organization. Instances that aren't part of a site appear in the Unassigned instances node. Select the site that you want to use:
Tip
You can use the filter box to search for sites.
If you don't see any sites, you might not be in the right Azure Active Directory tenant. You can change the tenant from the top right menu in the portal. If you still don't see any sites that means you aren't added to any yet. Reach out to your IT administrator to request access.
Select your instance
After you select a site, the portal displays a list of the Azure IoT Operations instances that are part of the site. Select the instance that you want to use:

Tip
You can use the filter box to search for instances.
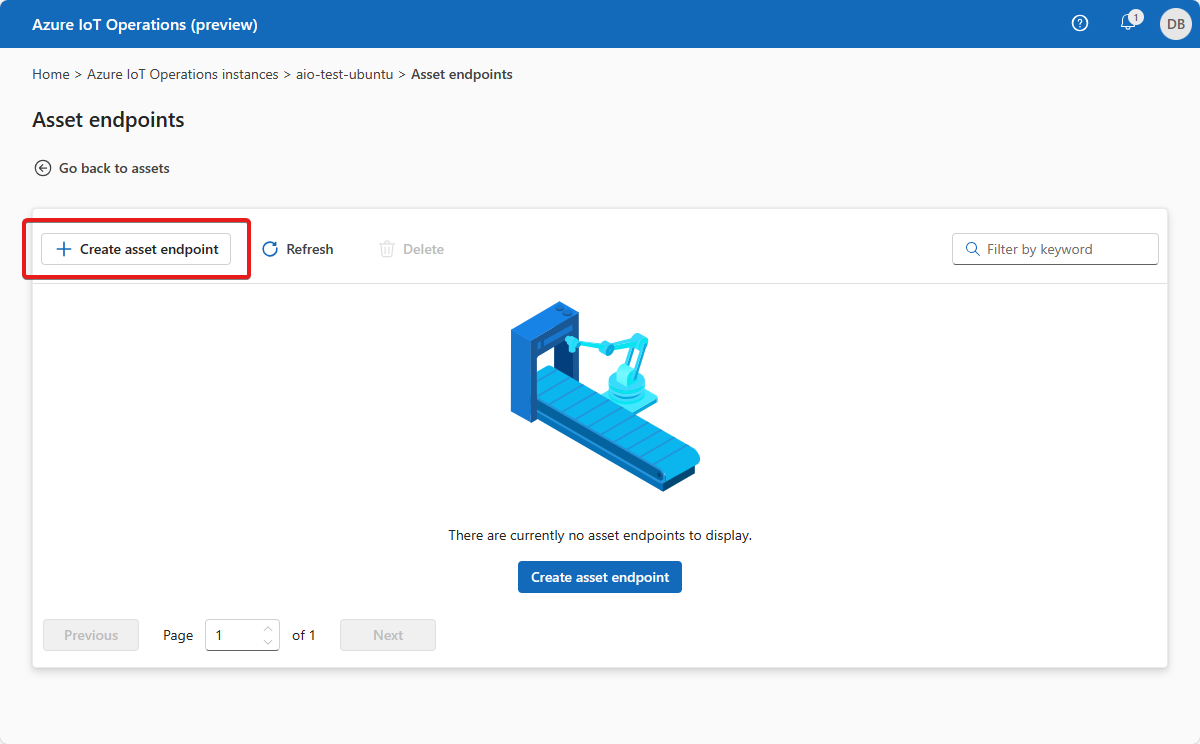
Create an asset endpoint
By default, an Azure IoT Operations deployment includes a built-in OPC PLC simulator. To create an asset endpoint that uses the built-in OPC PLC simulator:
Select Asset endpoints and then Create asset endpoint:
Tip
You can use the filter box to search for asset endpoints.
Enter the following endpoint information:
Field Value Name opc-ua-connector-0OPC UA Broker URL opc.tcp://opcplc-000000:50000User authentication AnonymousTransport authentication Do not use transport authentication certificateTo save the definition, select Create.
This configuration deploys a new assetendpointprofile resource called opc-ua-connector-0 to the cluster. After you define an asset, an OPC UA connector pod discovers it. The pod uses the asset endpoint that you specify in the asset definition to connect to an OPC UA server.
When the OPC PLC simulator is running, data flows from the simulator, to the connector, to the OPC UA broker, and finally to the MQ broker.
Configure an asset endpoint to use a username and password
The previous example uses the Anonymous authentication mode. This mode doesn't require a username or password.
To use the UsernamePassword authentication mode, complete the following steps:
- Follow the steps in Configure OPC UA user authentication with username and password to add secrets for username and password in Azure Key Vault, and project them into Kubernetes cluster.
- In the Azure IoT Operations (preview) portal, select Username & password for the User authentication field to configure the asset endpoint to use these secrets. Then enter the following values for the Username reference and Password reference fields:
| Field | Value |
|---|---|
| Username reference | aio-opc-ua-broker-user-authentication/username |
| Password reference | aio-opc-ua-broker-user-authentication/password |
Configure an asset endpoint to use a transport authentication certificate
To configure the asset endpoint to use a transport authentication certificate, complete the following steps:
- Follow the steps in configure mutual trust to add a transport certificate and private key to Azure Key Vault, and project them into Kubernetes cluster.
- In the Azure IoT Operations (preview) portal, select Use transport authentication certificate for the Transport authentication field and enter the certificate thumbprint.
Add an asset, tags, and events
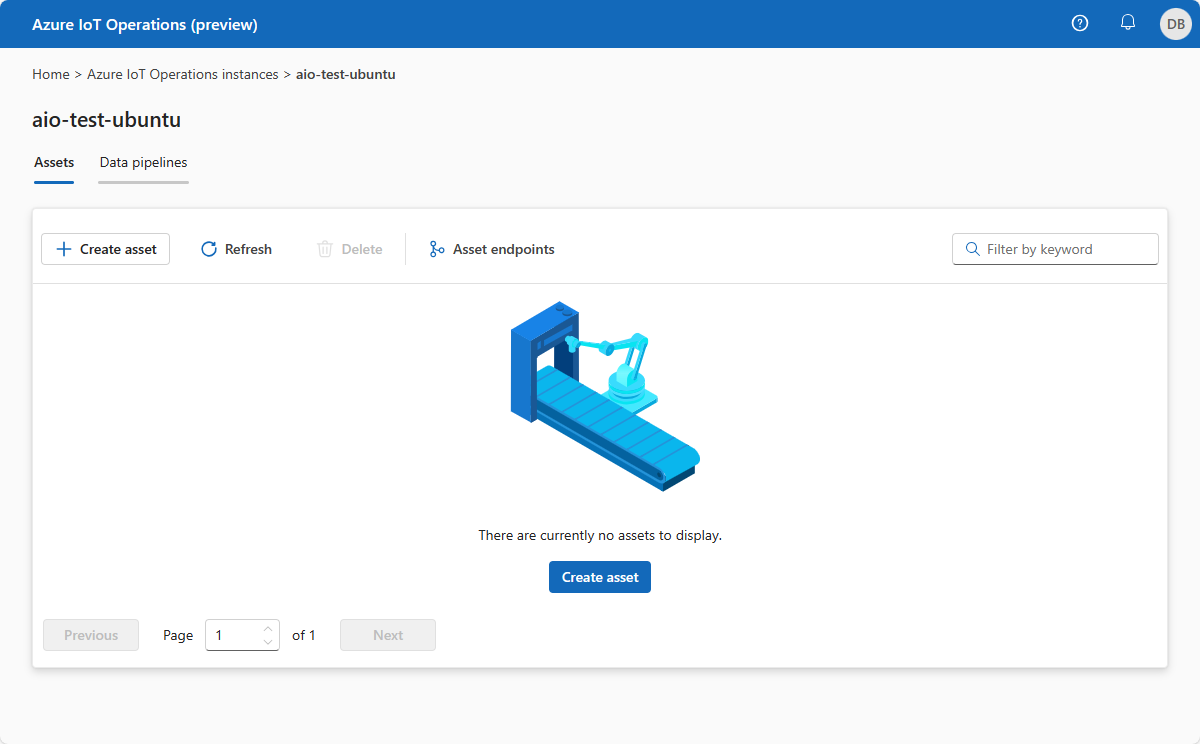
To add an asset in the Azure IoT Operations (preview) portal:
Select the Assets tab. Before you create any assets, you see the following screen:
Tip
You can use the filter box to search for assets.
Select Create asset.
On the asset details screen, enter the following asset information:
- Asset name
- Asset endpoint. Select your asset endpoint from the list.
- Description
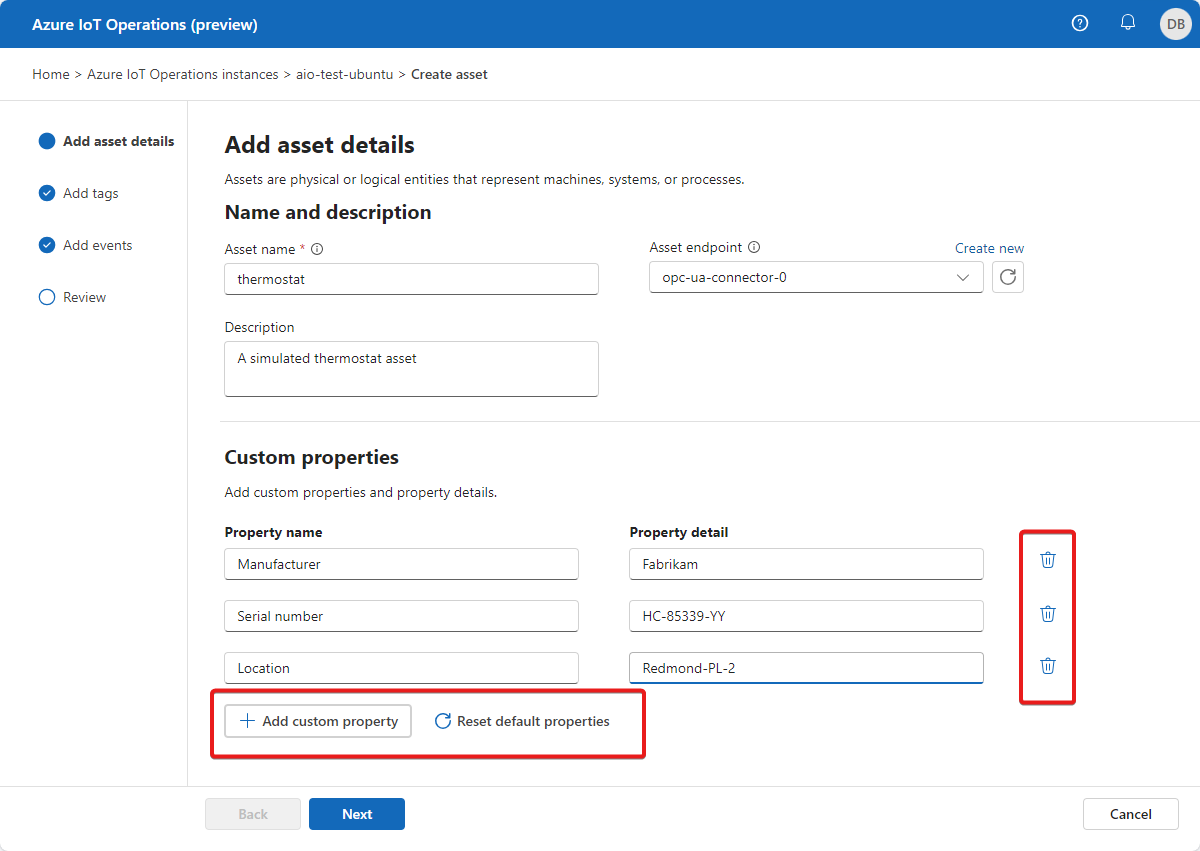
Configure the set of properties that you want to associate with the asset. You can accept the default list of properties or add your own. The following properties are available by default:
- Manufacturer
- Manufacturer URI
- Model
- Product code
- Hardware version
- Software version
- Serial number
- Documentation URI
Select Next to go to the Add tags page.
Add individual tags to an asset
Now you can define the tags associated with the asset. To add OPC UA tags:
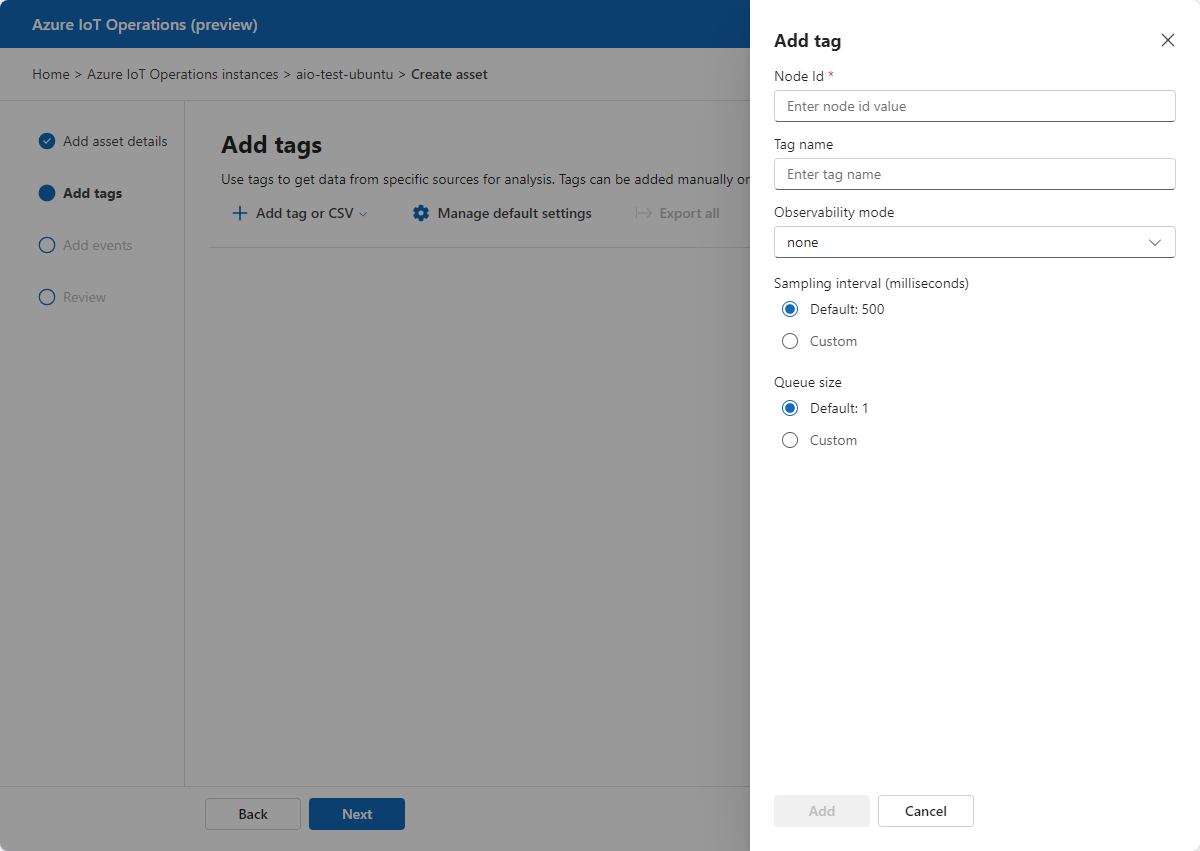
Select Add tag or CSV > Add tag.
Enter your tag details:
- Node ID. This value is the node ID from the OPC UA server.
- Tag name (Optional). This value is the friendly name that you want to use for the tag. If you don't specify a tag name, the node ID is used as the tag name.
- Observability mode (Optional) with following choices:
- None
- Gauge
- Counter
- Histogram
- Log
- Sampling Interval (milliseconds). You can override the default value for this tag.
- Queue size. You can override the default value for this tag.
The following table shows some example tag values that you can use with the built-in OPC PLC simulator:
Node ID Tag name Observability mode ns=3;s=FastUInt10 temperature none ns=3;s=FastUInt100 Tag 10 none Select Manage default settings to configure default telemetry settings for the asset. These settings apply to all the OPC UA tags that belong to the asset. You can override these settings for each tag that you add. Default telemetry settings include:
- Sampling interval (milliseconds): The sampling interval indicates the fastest rate at which the OPC UA Server should sample its underlying source for data changes.
- Publishing interval (milliseconds): The rate at which OPC UA Server should publish data.
- Queue size: The depth of the queue to hold the sampling data before publishing it.
Add tags in bulk to an asset
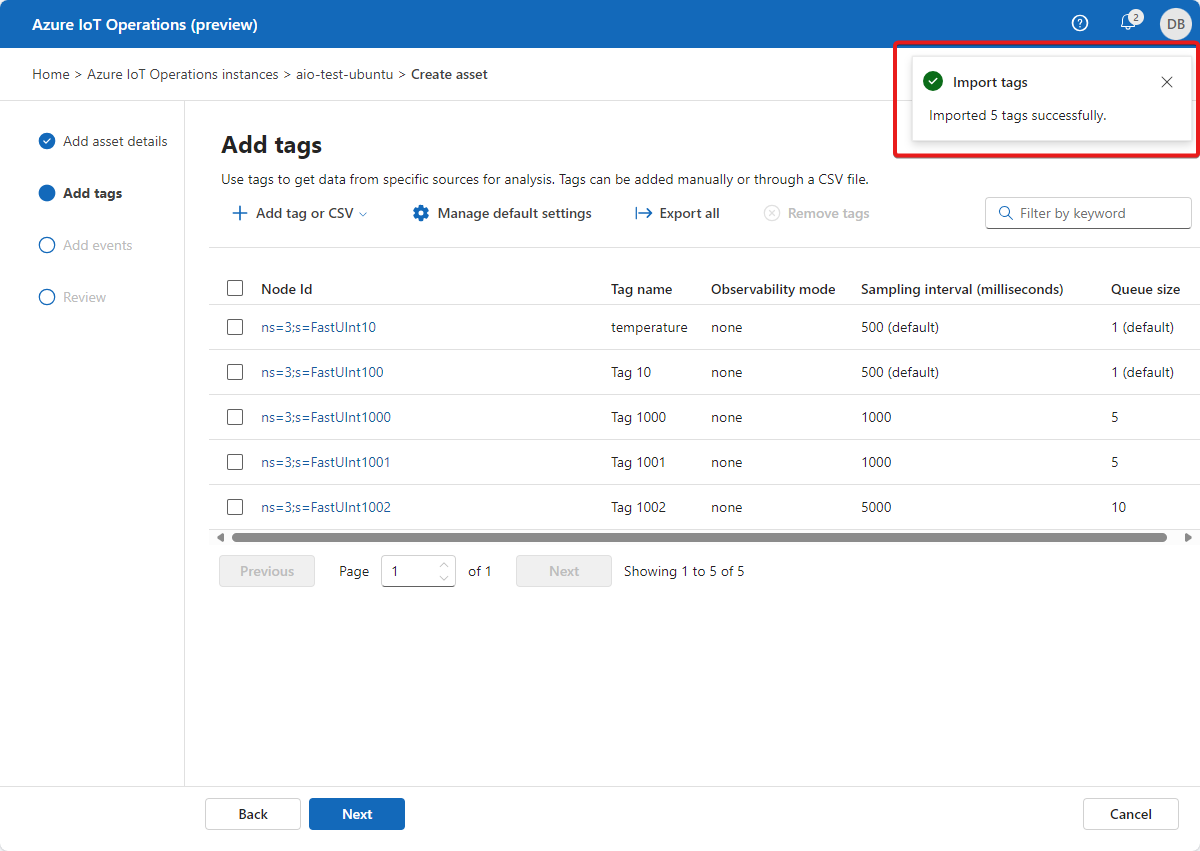
You can import up to 1000 OPC UA tags at a time from a CSV file:
Create a CSV file that looks like the following example:
NodeID TagName Sampling Interval Milliseconds QueueSize ObservabilityMode ns=3;s=FastUInt1000 Tag 1000 1000 5 none ns=3;s=FastUInt1001 Tag 1001 1000 5 none ns=3;s=FastUInt1002 Tag 1002 5000 10 none Select Add tag or CSV > Import CSV (.csv) file. Select the CSV file you created and select Open. The tags defined in the CSV file are imported:
If you import a CSV file that contains tags that are duplicates of existing tags, the Azure IoT Operations (preview) portal displays the following message:
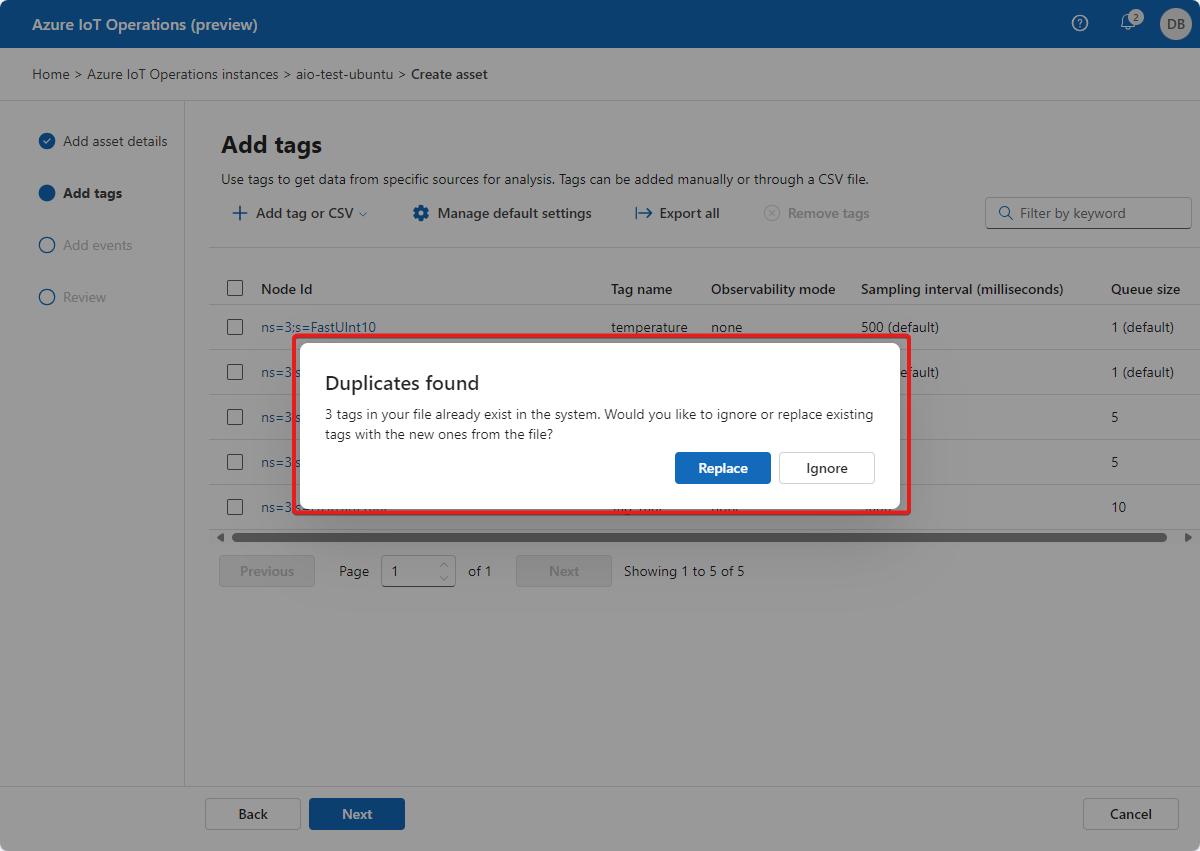
You can either replace the duplicate tags and add new tags from the import file, or you can cancel the import.
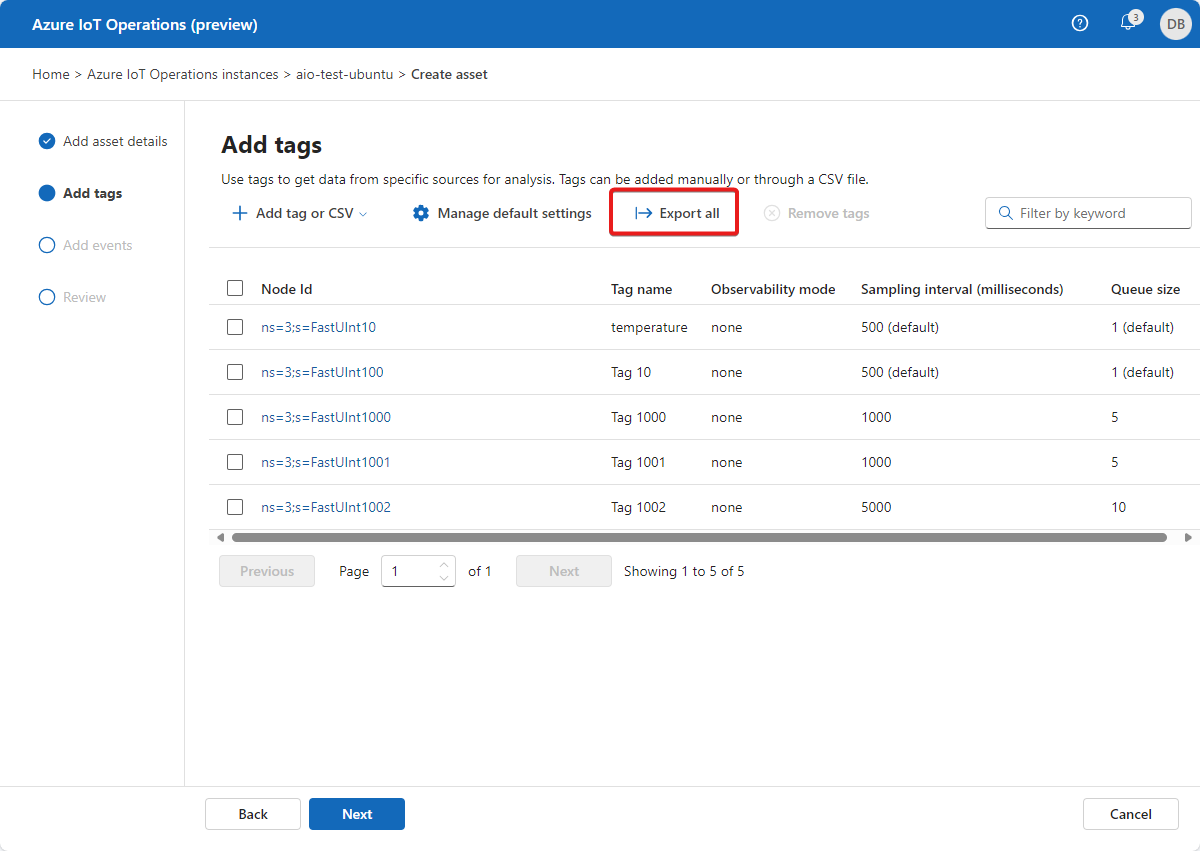
To export all the tags from an asset to a CSV file, select Export all and choose a location for the file:
On the Tags page, select Next to go to the Add events page.
Tip
You can use the filter box to search for tags.
Add individual events to an asset
Now you can define the events associated with the asset. To add OPC UA events:
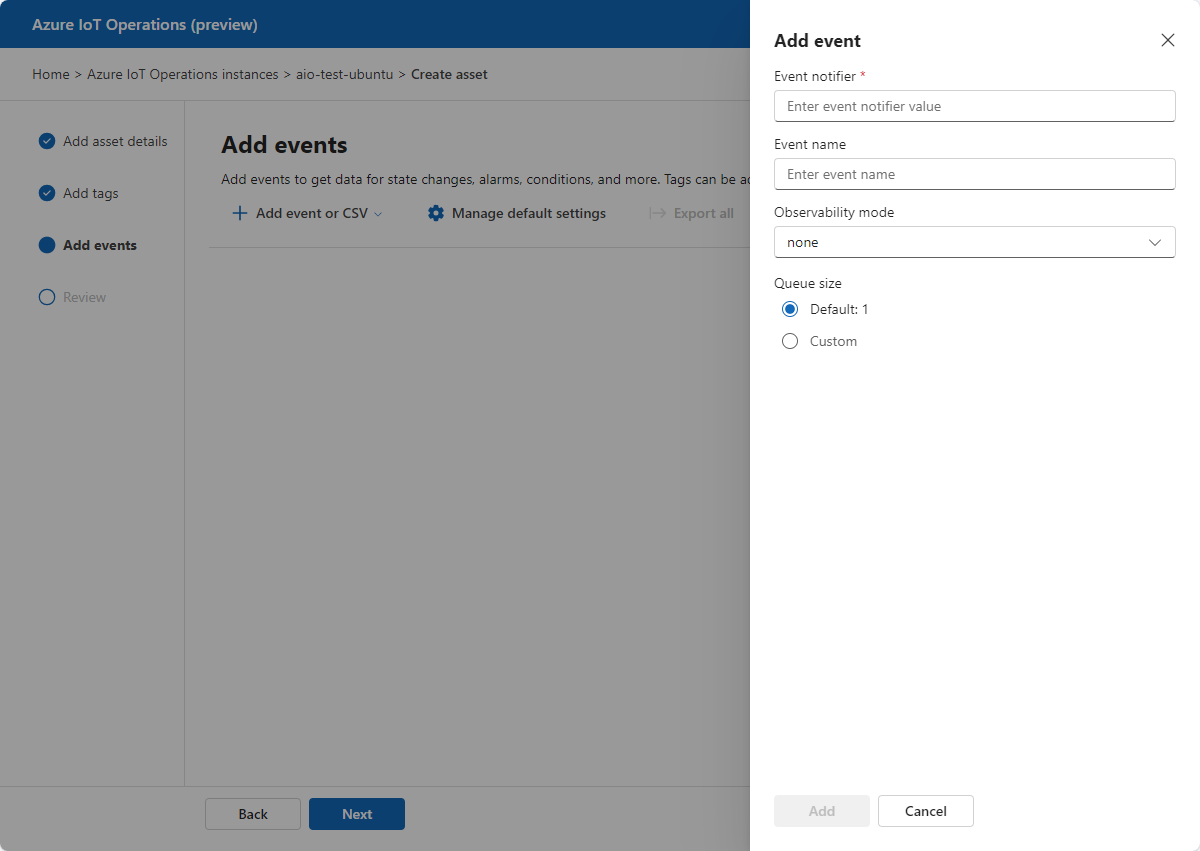
Select Add event or CSV > Add event.
Enter your event details:
- Event notifier. This value is the event notifier from the OPC UA server.
- Event name (Optional). This value is the friendly name that you want to use for the event. If you don't specify an event name, the event notifier is used as the event name.
- Observability mode (Optional) with following choices:
- None
- Gauge
- Counter
- Histogram
- Log
- Queue size. You can override the default value for this tag.
Select Manage default settings to configure default event settings for the asset. These settings apply to all the OPC UA events that belong to the asset. You can override these settings for each event that you add. Default event settings include:
- Publishing interval (milliseconds): The rate at which OPC UA Server should publish data.
- Queue size: The depth of the queue to hold the sampling data before publishing it.
Add events in bulk to an asset
You can import up to 1000 OPC UA events at a time from a CSV file.
To export all the events from an asset to a CSV file, select Export all and choose a location for the file.
On the Events page, select Next to go to the Review page.
Tip
You can use the filter box to search for events.
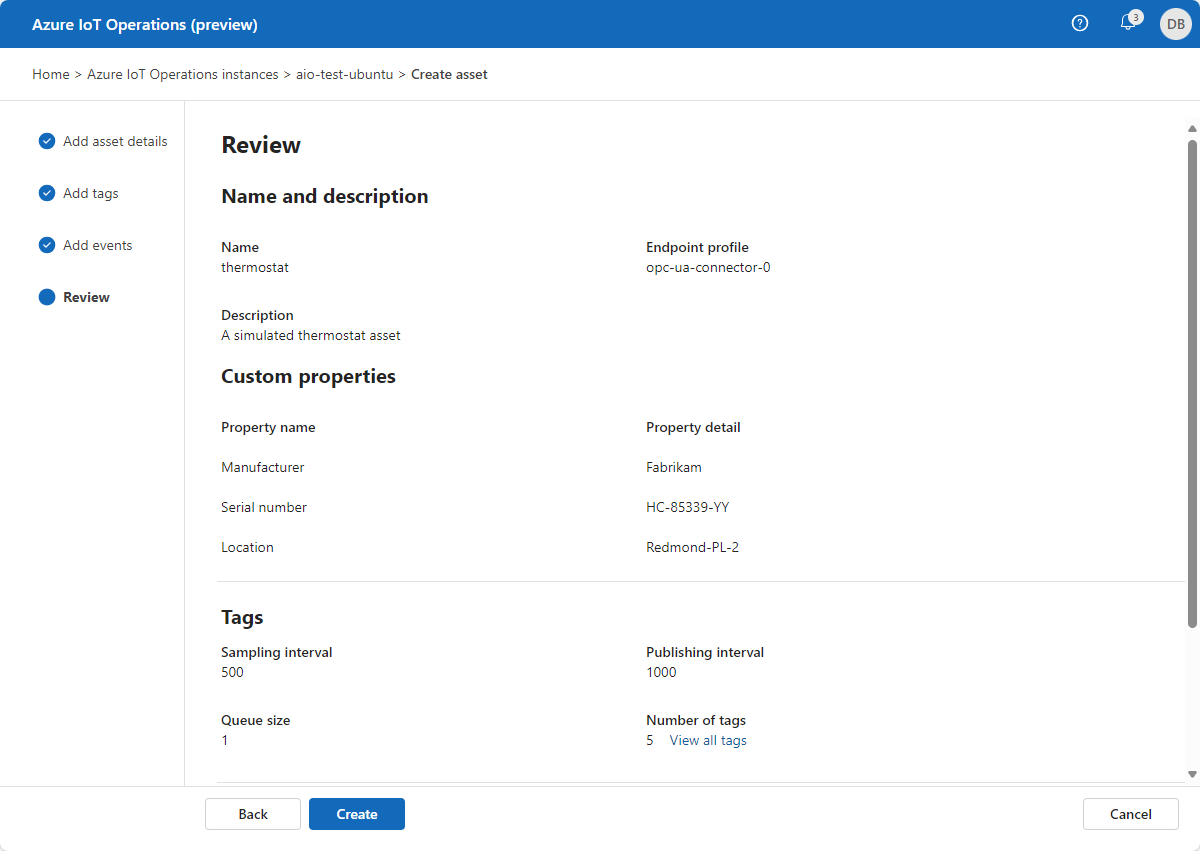
Review your changes
Review your asset and OPC UA tag and event details and make any adjustments you need:
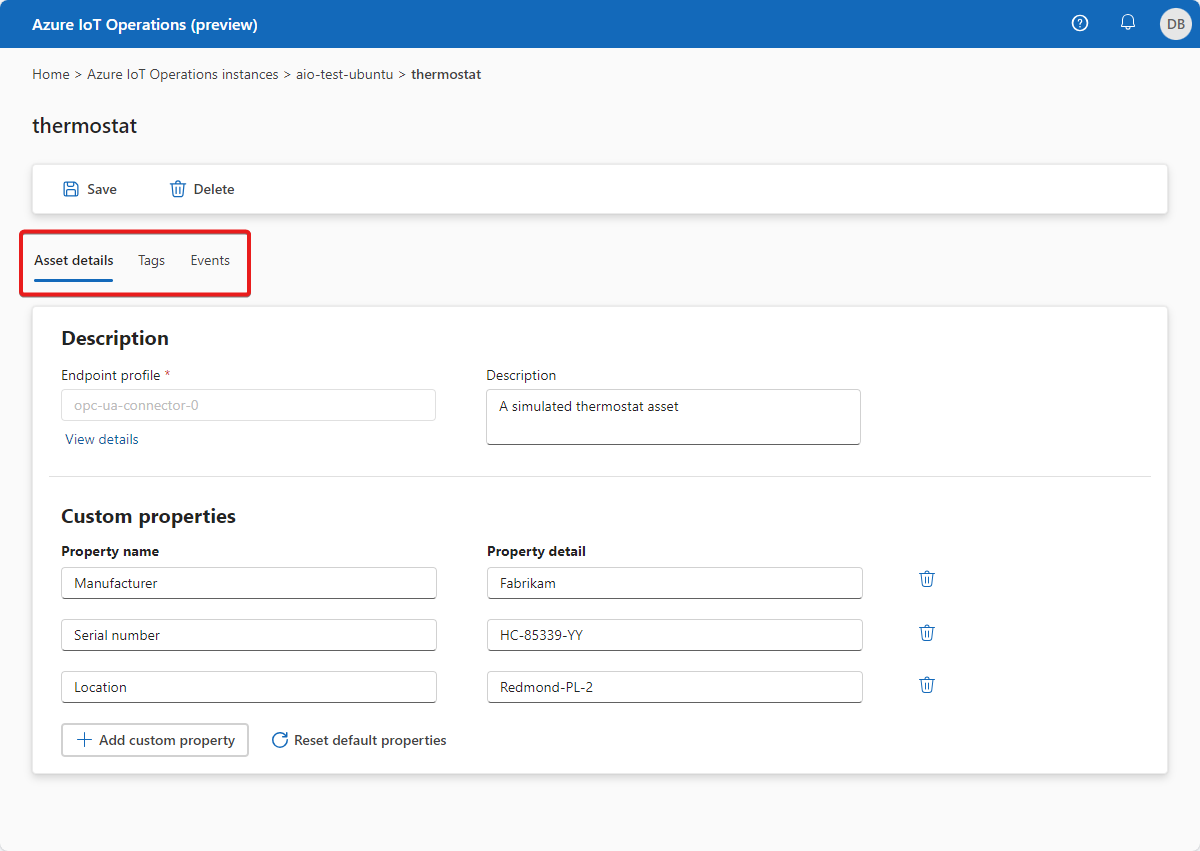
Update an asset
Find and select the asset you created previously. Use the Asset details, Tags, and Events tabs to make any changes:
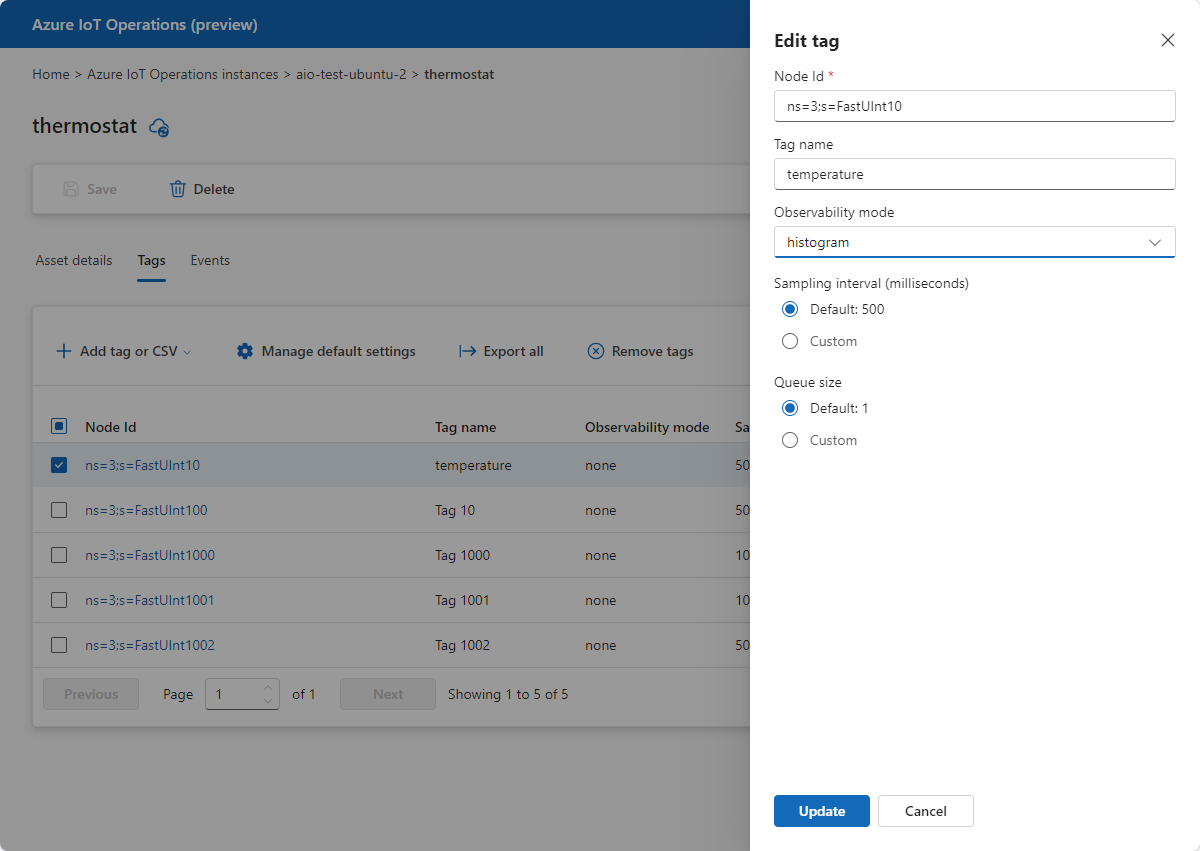
On the Tags tab, you can add tags, update existing tags, or remove tags.
To update a tag, select an existing tag and update the tag information. Then select Update:
To remove tags, select one or more tags and then select Remove tags:
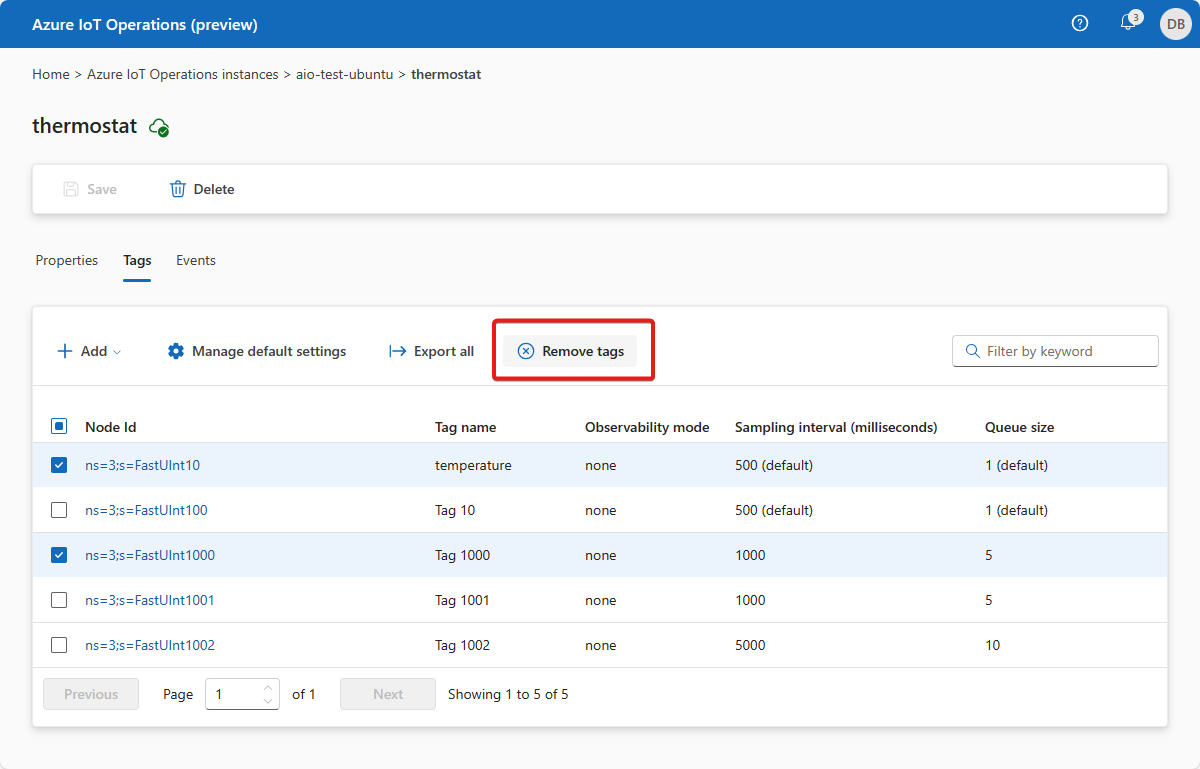
You can also add, update, and delete events and properties in the same way.
When you're finished making changes, select Save to save your changes.
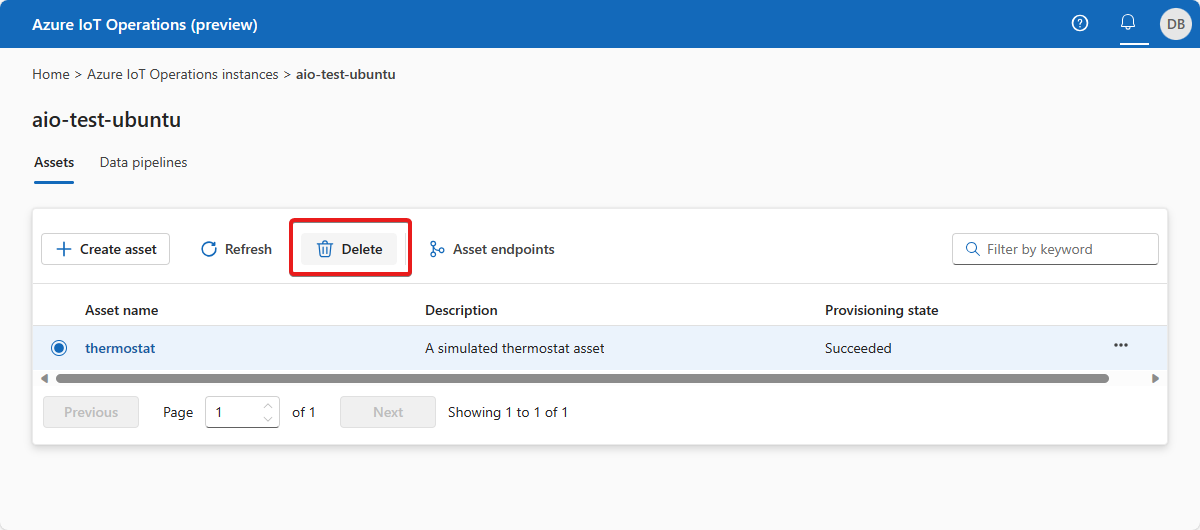
Delete an asset
To delete an asset, select the asset you want to delete. On the Asset details page, select Delete. Confirm your changes to delete the asset:
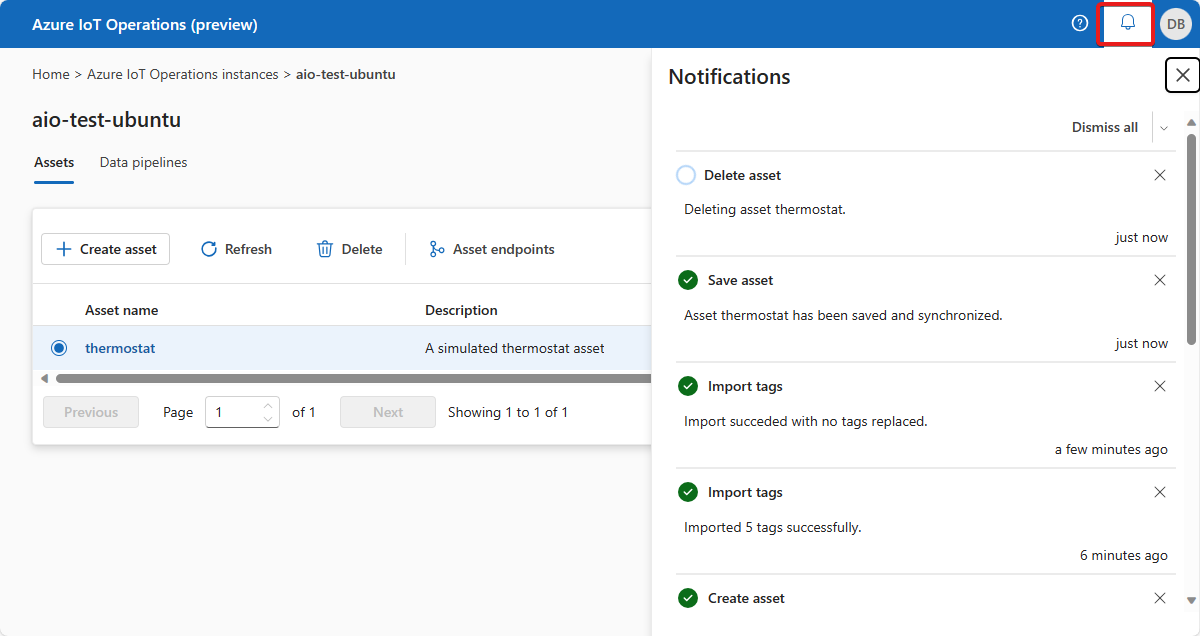
Notifications
Whenever you make a change to asset in the Azure IoT Operations (preview) portal, you see a notification that reports the status of the operation:
Related content
Feedback
Coming soon: Throughout 2024 we will be phasing out GitHub Issues as the feedback mechanism for content and replacing it with a new feedback system. For more information see: https://aka.ms/ContentUserFeedback.
Submit and view feedback for