An inbound NAT rule is used to forward traffic from a load balancer frontend to one or more instances in the backend pool.
There are two types of inbound NAT rule:
Single virtual machine - An inbound NAT rule that targets a single machine in the backend pool of the load balancer
Multiple virtual machines - An inbound NAT rule that targets multiple virtual machines in the backend pool of the load balancer
In this article, you learn how to add and remove an inbound NAT rule for both types. You learn how to change the frontend port allocation in a multiple instance inbound NAT rule. You can choose from the Azure portal, PowerShell, or CLI examples.
If you choose to install and use PowerShell locally, this article requires the Azure PowerShell module version 5.4.1 or later. Run Get-Module -ListAvailable Az to find the installed version. If you need to upgrade, see Install Azure PowerShell module. If you're running PowerShell locally, you also need to run Connect-AzAccount to create a connection with Azure.
If you prefer to run CLI reference commands locally, install the Azure CLI. If you're running on Windows or macOS, consider running Azure CLI in a Docker container. For more information, see How to run the Azure CLI in a Docker container.
If you're using a local installation, sign in to the Azure CLI by using the az login command. To finish the authentication process, follow the steps displayed in your terminal. For other sign-in options, see Sign in with the Azure CLI.
When you're prompted, install the Azure CLI extension on first use. For more information about extensions, see Use extensions with the Azure CLI.
Run az version to find the version and dependent libraries that are installed. To upgrade to the latest version, run az upgrade.
Add a single VM inbound NAT rule
Choose this option to configure a rule for a single VM. Select Azure portal, PowerShell, or CLI for instructions.
If you prefer to run CLI reference commands locally, install the Azure CLI. If you're running on Windows or macOS, consider running Azure CLI in a Docker container. For more information, see How to run the Azure CLI in a Docker container.
If you're using a local installation, sign in to the Azure CLI by using the az login command. To finish the authentication process, follow the steps displayed in your terminal. For other sign-in options, see Sign in with the Azure CLI.
When you're prompted, install the Azure CLI extension on first use. For more information about extensions, see Use extensions with the Azure CLI.
Run az version to find the version and dependent libraries that are installed. To upgrade to the latest version, run az upgrade.
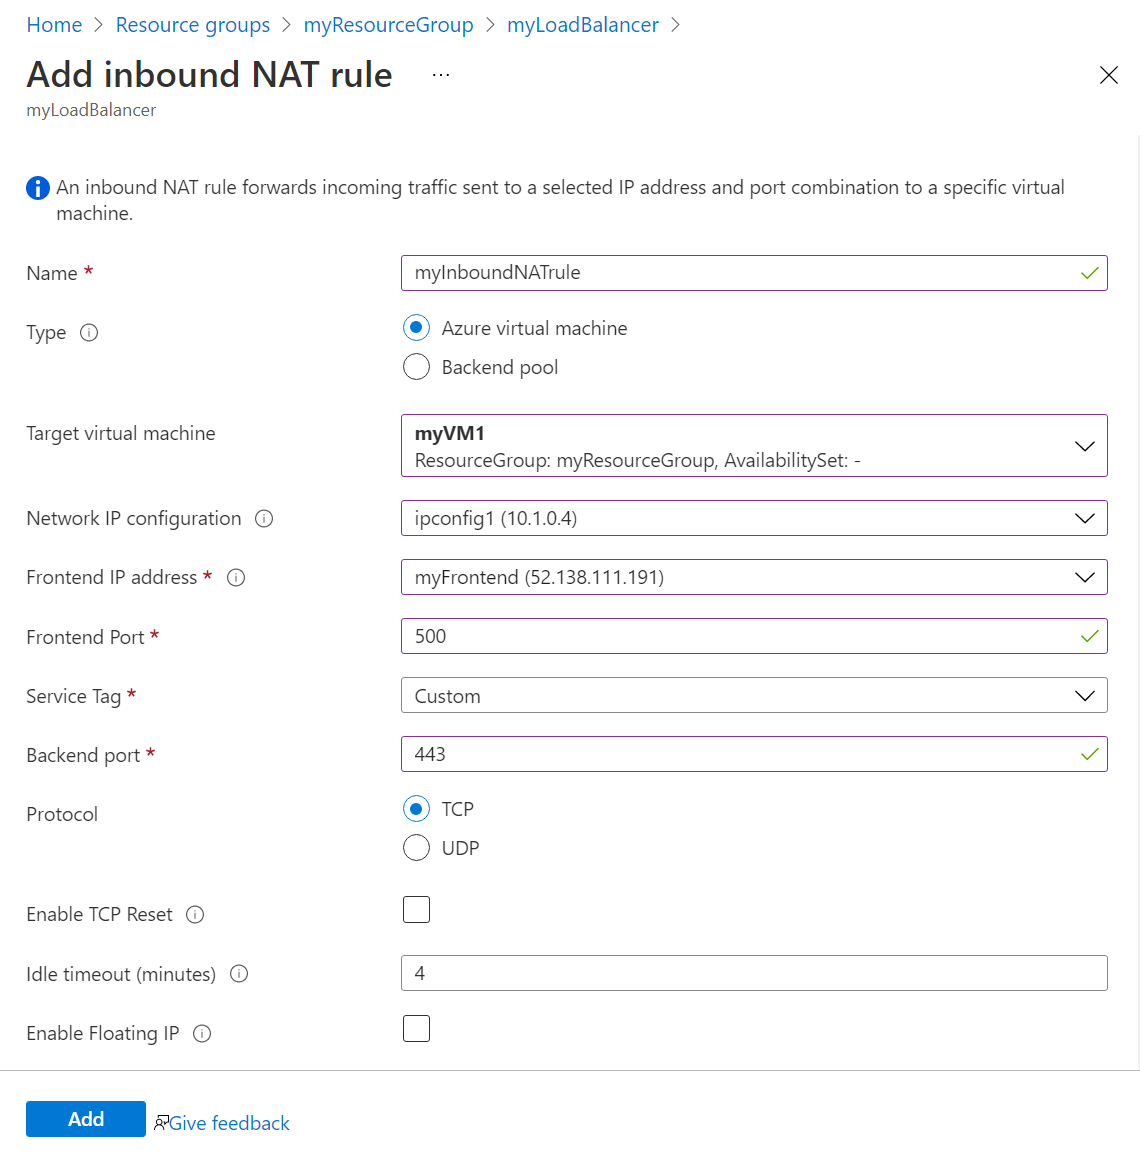
In this example, you will create an inbound NAT rule to forward port 500 to backend port 443. You will then attach the inbound NAT rule to a VM's NIC
Choose this option to configure a rule with a range of ports to a backend pool of virtual machines. Select Azure portal, PowerShell, or CLI for instructions.
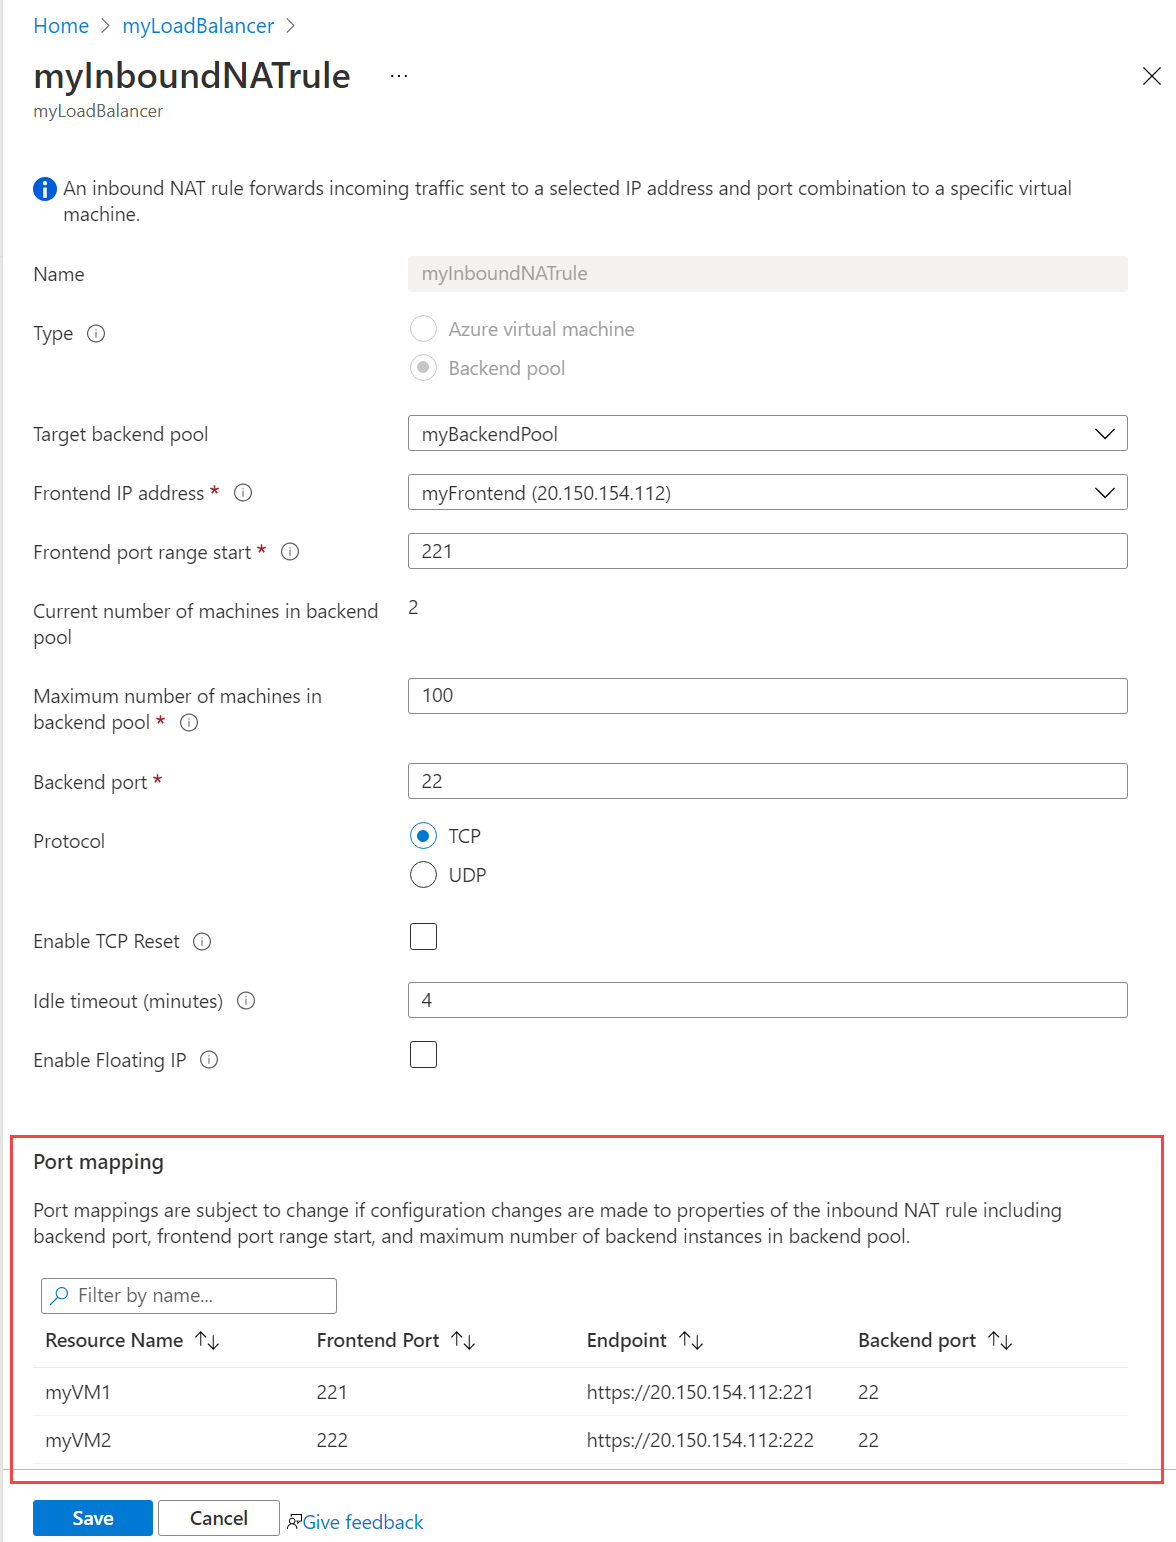
In this example, you create an inbound NAT rule to forward a range of ports starting at port 500 to backend port 443. The maximum number of machines in the backend pool is set by the parameter Maximum number of machines in backend pool with a value of 500. This setting limits the backend pool to 500 virtual machines.
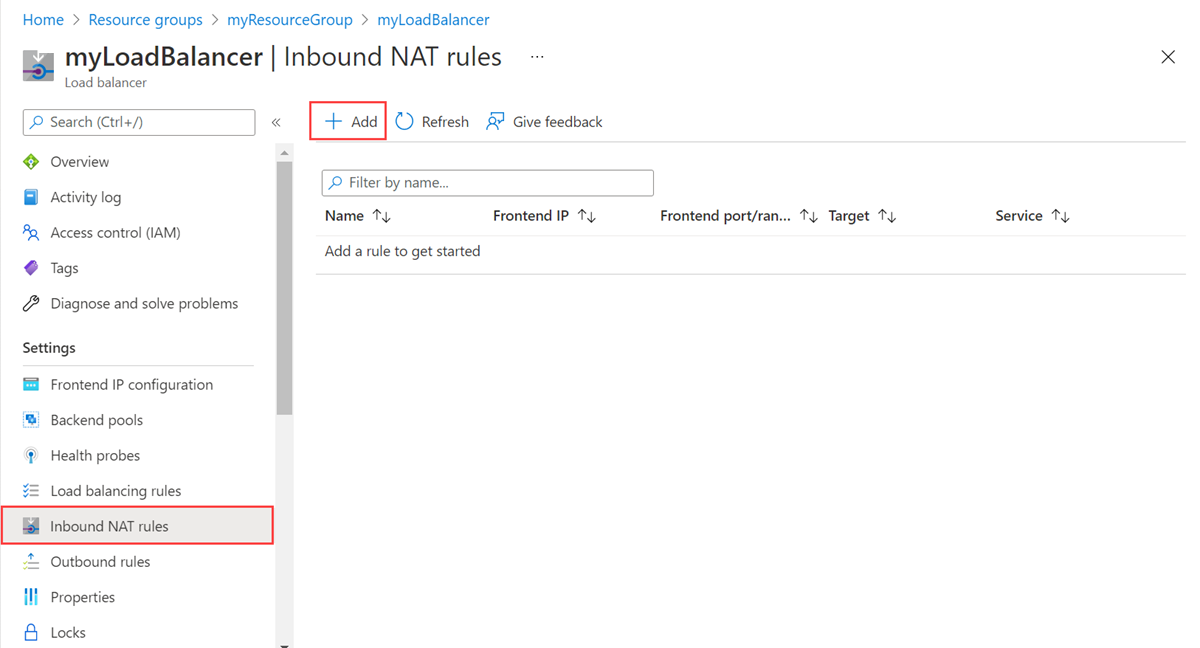
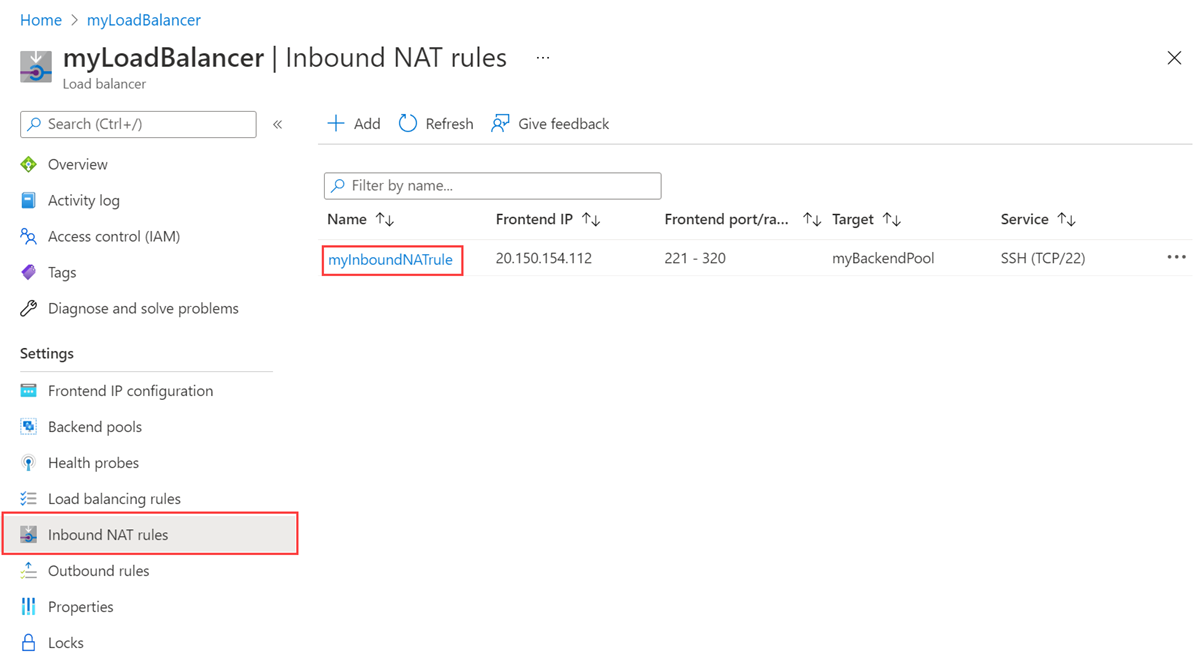
In the search box at the top of the portal, enter Load balancer. Select Load balancers in the search results.
Select myLoadBalancer or your load balancer.
In the load balancer page, select Inbound NAT rules in Settings.
Select + Add in Inbound NAT rules to add the rule.
Enter or select the following information in Add inbound NAT rule.
Setting
Value
Name
Enter myInboundNATrule.
Type
Select Backend pool.
Target backend pool
Select your backend pool. In this example, it's myBackendPool.
Frontend IP address
Select your frontend IP address. In this example, it's myFrontend.
Frontend port range start
Enter 500.
Maximum number of machines in backend pool
Enter 500.
Backend port
Enter 443.
Protocol
Select TCP.
Leave the rest at the defaults and select Add.
In this example, you create an inbound NAT rule to forward a range of ports starting at port 500 to backend port 443. The maximum number of machines in the backend pool is set by the parameter -FrontendPortRangeEnd with a value of 1000. This setting limits the backend pool to 500 virtual machines.
Use Get-AzLoadBalancer to place the load balancer information into a variable.
## Place the load balancer information into a variable for later use. ##
$slb = @{
    ResourceGroupName = 'myResourceGroup'
    Name = 'myLoadBalancer'
}
$lb = Get-AzLoadBalancer @slb

## Create the multiple virtual machines inbound NAT rule. ##
$rule = @{
    Name = 'myInboundNATrule'
    Protocol = 'Tcp'
    BackendPort = '443'
    FrontendIpConfiguration = $lb.FrontendIpConfigurations[0]
    FrontendPortRangeStart = '500'
    FrontendPortRangeEnd = '1000'
    BackendAddressPool = $lb.BackendAddressPools[0]
}
$lb | Add-AzLoadBalancerInboundNatRuleConfig @rule

$lb | Set-AzLoadBalancer
In this example, you create an inbound NAT rule to forward a range of ports starting at port 500 to backend port 443. The maximum number of machines in the backend pool is set by the parameter --frontend-port-range-end with a value of 1000. This setting limits the backend pool to 500 virtual machines.
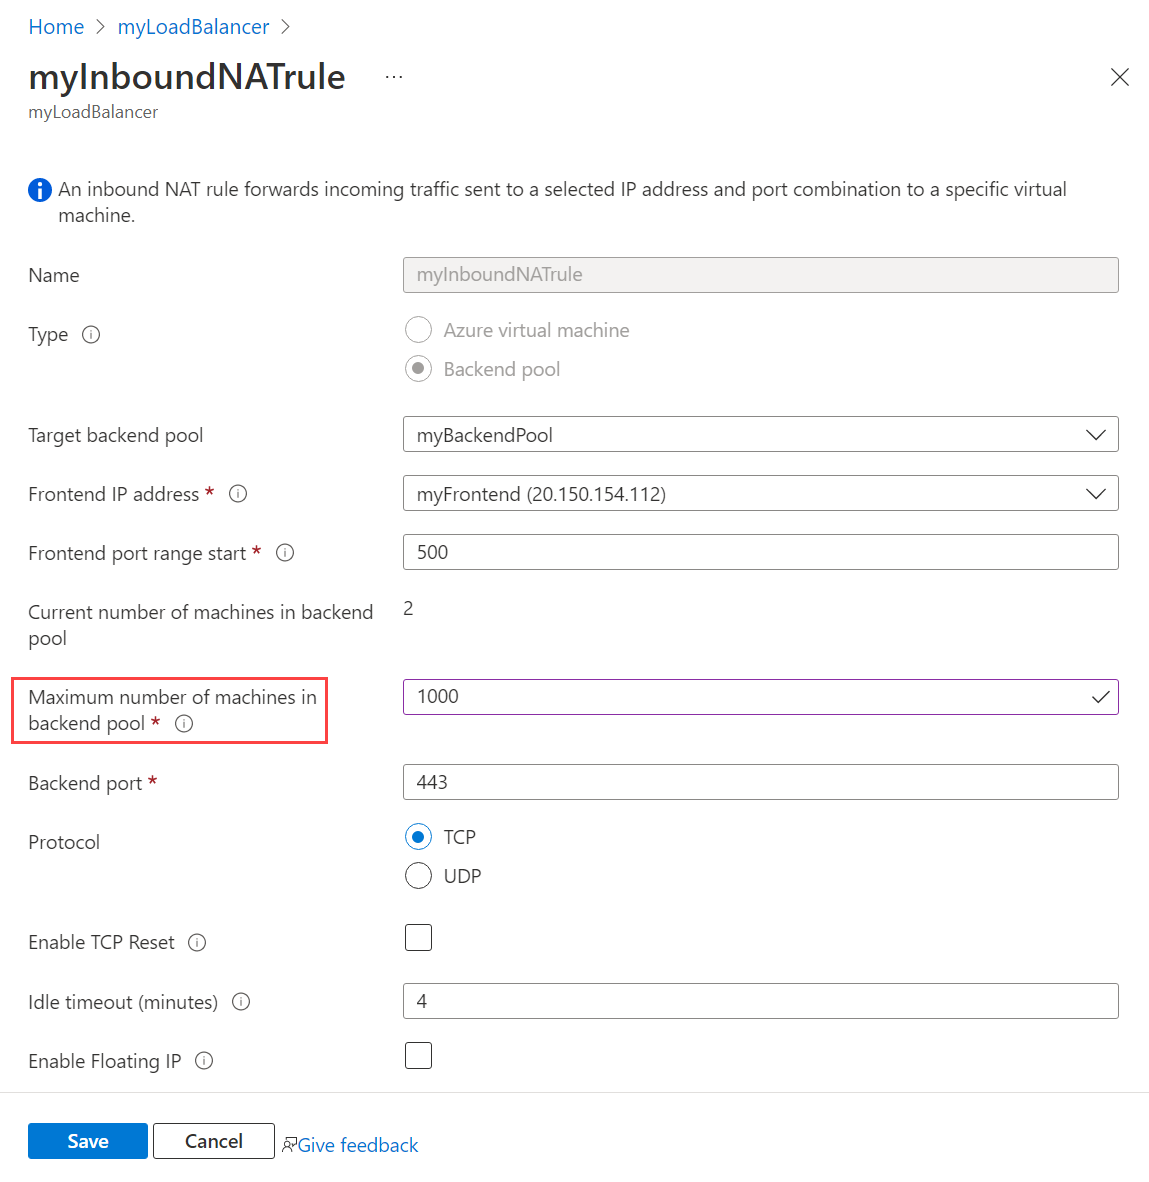
To accommodate more virtual machines in the backend pool in a multiple instance rule, change the frontend port allocation in the inbound NAT rule. In this example, you change the Maximum number of machines in backend pool from 500 to 1000. This setting increases the maximum number of machines in the backend pool to 1000.
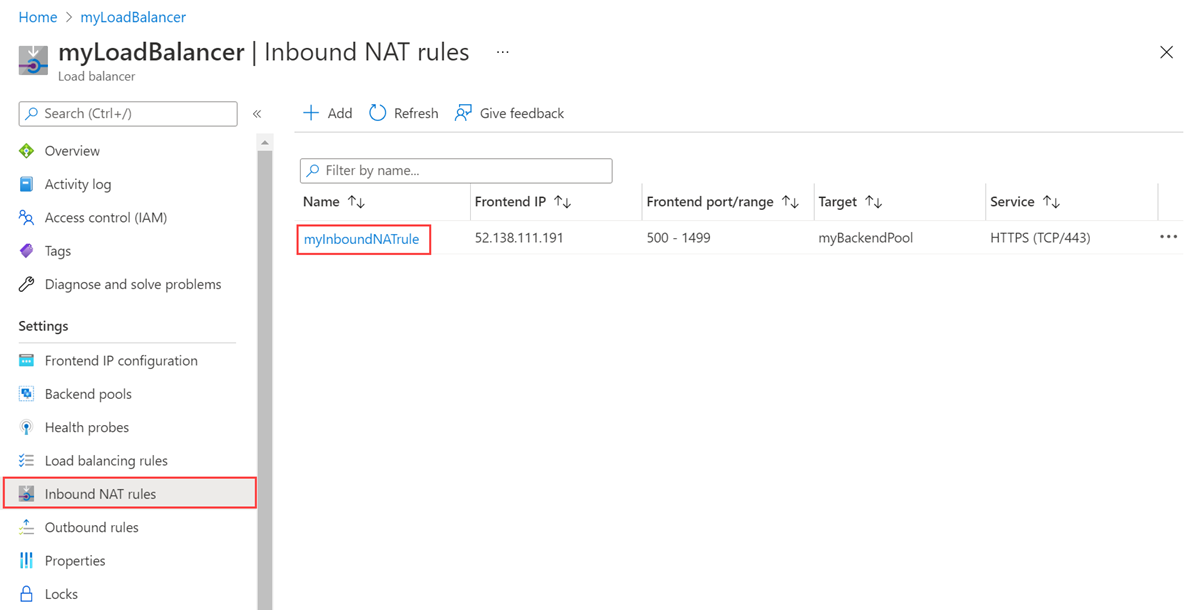
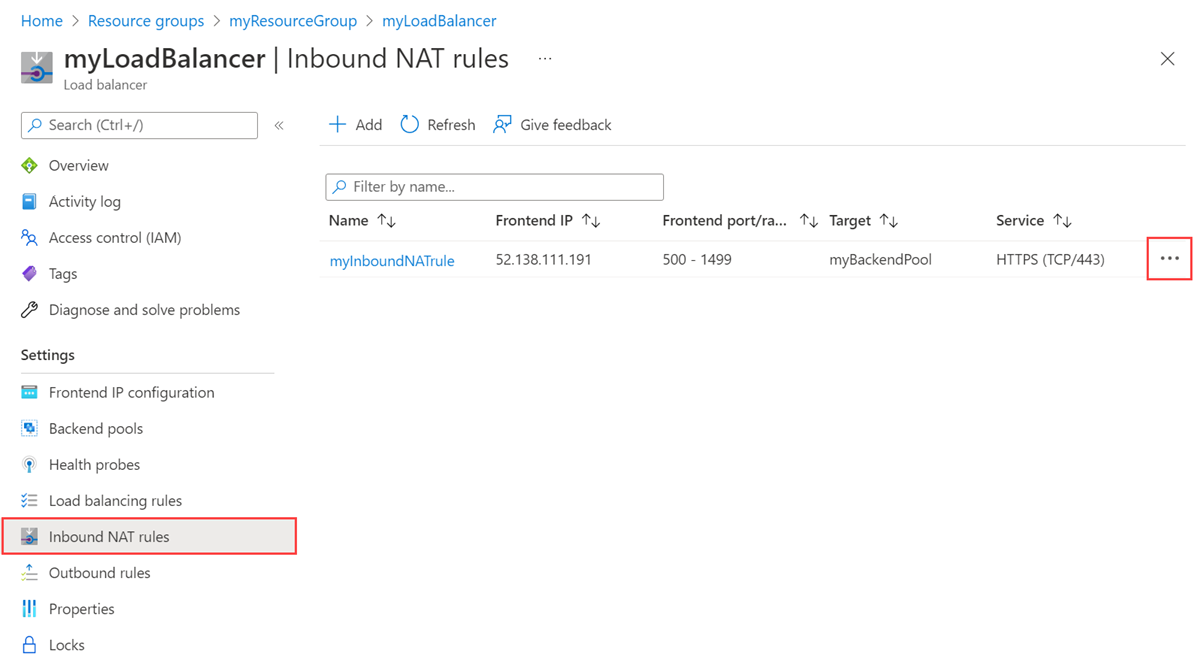
In the search box at the top of the portal, enter Load balancer. Select Load balancers in the search results.
Select myLoadBalancer or your load balancer.
In the load balancer page, select Inbound NAT rules in Settings.
Select the inbound NAT rule you wish to change. In this example, it's myInboundNATrule.
In the properties of the inbound NAT rule, change the value in Maximum number of machines in backend pool to 1000.
Select Save.
To accommodate more virtual machines in the backend pool in a multiple instance rule, change the frontend port allocation in the inbound NAT rule. In this example, you change the parameter -FrontendPortRangeEnd to 1500. This setting increases the maximum number of machines in the backend pool to 1000.
Use Get-AzLoadBalancer to place the load balancer information into a variable.
## Place the load balancer information into a variable for later use. ##
$slb = @{
    ResourceGroupName = 'myResourceGroup'
    Name = 'myLoadBalancer'
}
$lb = Get-AzLoadBalancer @slb

## Set the new port allocation
$rule = @{
    Name = 'myInboundNATrule'
    Protocol = 'Tcp'
    BackendPort = '443'
    FrontendIpConfiguration = $lb.FrontendIpConfigurations[0]
    FrontendPortRangeStart = '500'
    FrontendPortRangeEnd = '1500'
    BackendAddressPool = $lb.BackendAddressPools[0]
}
$lb | Set-AzLoadBalancerInboundNatRuleConfig @rule
To accommodate more virtual machines in the backend pool, change the frontend port allocation in the inbound NAT rule. In this example, you change the parameter --frontend-port-range-end to 1500. This setting increases the maximum number of machines in the backend pool to 1000
## Place the load balancer information into a variable for later use. ##
$slb = @{
    ResourceGroupName = 'myResourceGroup'
    Name = 'myLoadBalancer'
}
$lb = Get-AzLoadBalancer @slb

## Remove the inbound NAT rule
$lb | Remove-AzLoadBalancerInboundNatRuleConfig -Name 'myInboundNATrule'

$lb | Set-AzLoadBalancer
Coming soon: Throughout 2024 we will be phasing out GitHub Issues as the feedback mechanism for content and replacing it with a new feedback system. For more information see: https://aka.ms/ContentUserFeedback.